Monday, May 13th, 2013

Word 2010 and 2013 Tip – Misssing Page Numbers

Finding and Fixing Page Numbers that Can’t be Seen and/or Won’t Print

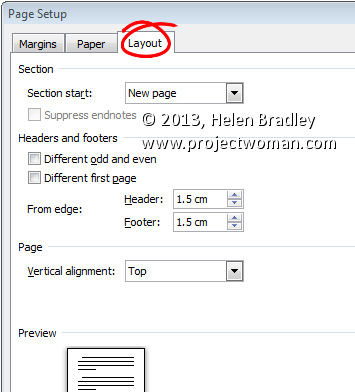
If you have included page numbers at the foot of a page and find that they’re missing from your printouts the problem lies with your page settings. The footer text is being forced to print so far down the paper that your printer is ejecting the paper before this point is reached.

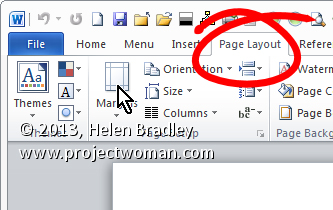
Solve the problem by selecting the Page Layout tab, click the Margins dropdown list, and click Custom Margins. Now, in this dialog select the Layout tab. Finally, increase the From edge: Footer measurement slightly. Experiment to find the smallest increase which will allow your page numbers to print.


Helen Bradley

Wednesday, February 2nd, 2011

Section Breaks in Word 2007 & 2010

I love working with Microsoft apps and finding cool things to do with them. I hate it when Microsoft messes with my head.

While I love Microsoft Word 2010, Word 2007 was never my favorite application so I didn’t use it as my day to day tool preferring to stick with Word 2003 which really was a great program.

Now that Word 2010 is here, I have bitten the bullet and I’m turning all my production work over to Word 2010 – it is just such a wonderful program and a fitting successor to Word 2003.

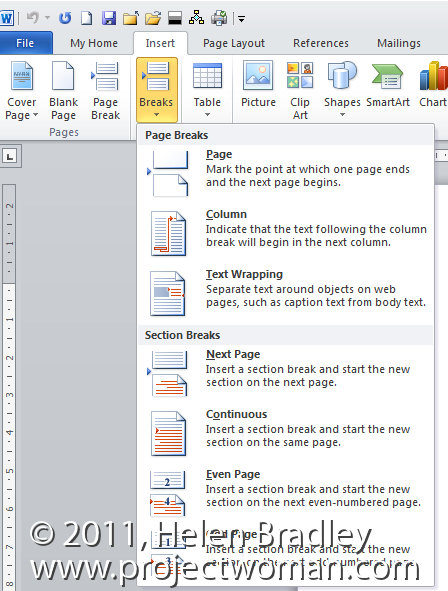
But, wonderful as it is, it has some annoyances. One is when you come to insert a section break into a document. For years I’ve used the Insert menu in Word 2003 to add Breaks of all types to my documents. In Word 2007, 2010 – no go! You can insert a cover page, a blank page or a page break and any other number of smart document objects from the Insert tab – but you can’t insert a section break.

Instead the Breaks feature has been moved to the Page Layout tab – select it and then choose Breaks. Why it wasn’t placed on the Insert tab along with page breaks or why page breaks was added to the Insert tab and also duplicated in the Page Layout tab, I don’t know, but there it is.

So, when you need to add a section break to a Microsoft Word 2007 or 2010 document use the Page Layout tab, select Breaks and then, for example, Next page to create a section break that immediately opens a new page in the document.

You may not like it, but if you’re using Word 2007 you have to accept it’s Microsoft’s world and we just get to live in it.

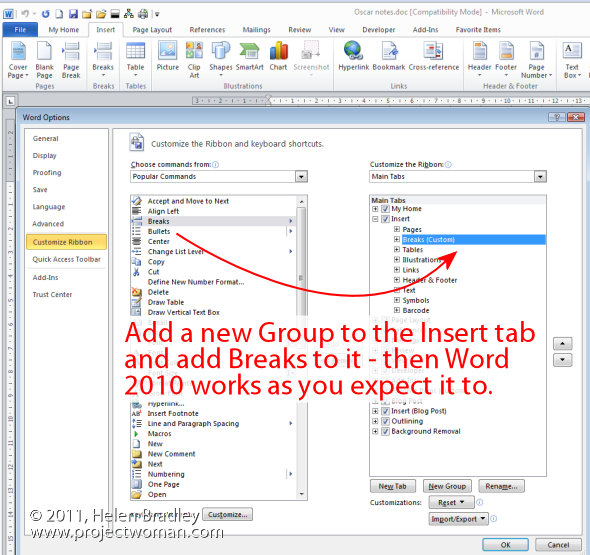
If you’re using Word 2010 – Yeah! life is good. Thanks to the new customizable ribbon you can add your own Group to the Insert tab, move it up so it’s alongside the built-in Pages group then add the Breaks command to it – it’s a great solution and quick and easy to do and it makes such good sense.
Helen Bradley
Saturday, January 15th, 2011

Create and Undo Columns in Word

Create two columns in Word and remove columns

Continuing the short series on working with columns in Word, here’s how to create a column layout in Word.

Create two columns

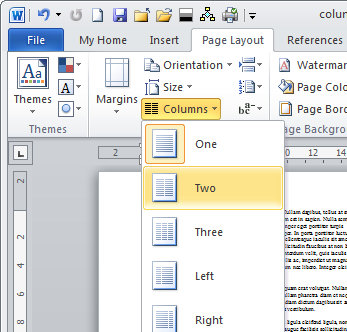
To turn an entire document into columns in Word 2007 and 2010 click the Page Layout tab and select Columns > Two. This immediately formats all the text in your document into two columns.

In Word 2003 you’ll choose Format > Columns, select Two (or Three etc.,) and click Ok.

Remove two columns

To undo the change and set your document back to one column in effectively undoing the two columns, repeat the process. In Word 2007 or Word 2010, choose Page Layout > Columns > One. The default for any document is one column so all you’re doing is going back to the default. In Word 2003 choose Format > Columns > One.

Make only part of the document into columns

If you want only part of a document to be in columns then select that part of the document first. For example, you may select all the content after the heading, leaving the heading unselected so it will be full width of the page. With that content selected, choose Page Layout > Columns and then select the number of columns.

This will make just the selected text into columns, leaving everything else full width of the page.

Again, if that piece of text ever needs to be returned to a single column just click inside it, choose Page Layout > Columns > One and it will be restore to the way it used to look.

So, that’s how to make text in columns in Word, how to delete columns and how to make only part of a document into columns.

Helen Bradley