Continuing the short series on working with columns in Word, here’s how to create a column layout in Word.
Create two columns
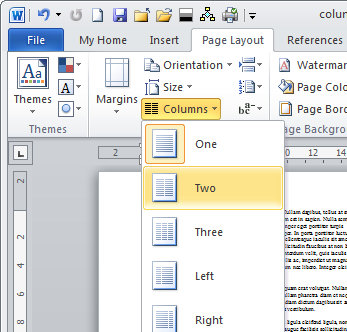
To turn an entire document into columns in Word 2007 and 2010 click the Page Layout tab and select Columns > Two. This immediately formats all the text in your document into two columns.
In Word 2003 you’ll choose Format > Columns, select Two (or Three etc.,) and click Ok.
Remove two columns
To undo the change and set your document back to one column in effectively undoing the two columns, repeat the process. In Word 2007 or Word 2010, choose Page Layout > Columns > One. The default for any document is one column so all you’re doing is going back to the default. In Word 2003 choose Format > Columns > One.
Make only part of the document into columns
If you want only part of a document to be in columns then select that part of the document first. For example, you may select all the content after the heading, leaving the heading unselected so it will be full width of the page. With that content selected, choose Page Layout > Columns and then select the number of columns.
This will make just the selected text into columns, leaving everything else full width of the page.
Again, if that piece of text ever needs to be returned to a single column just click inside it, choose Page Layout > Columns > One and it will be restore to the way it used to look.
So, that’s how to make text in columns in Word, how to delete columns and how to make only part of a document into columns.


Dear Wonderful Woman –
Thank you for your very helpful information on columns. The trouble I’m having at this point is that I want the columns to continue on the next page. Right now when I reach the end of a column it opens a new column on the same page and pushes all the other columns further. The result is that, instead of my 1st column information going into a second page, my 4th column information goes to the second page. Any help would be greatly appreciated. thanks, Tia
Wow, this was not only easy, but it made sense with my lack of computer knowledge. Now I can make columns where I need them, not the entire page.