Learn to insert a table in a Word document with a single click
When you need to repeatedly create the same type of table in a Word document you can do so using the new Word Quick Part feature.
This technique works well when you use the same table layout repeatedly. Your inserted table will be the same size, have the same number of columns and rows and contain any preset formatting that it had when you created it as a Quick Part entry. Once created, you can insert it quickly whenever you need it.
To do this:
Create a new table with the number of rows and columns you want all your tables to have.
Include any text in the table that needs to always be in this type of table – if there is none, leave the cells blank.
Format the cells in the way you wan them to be formatted every time – including text formats and cell background colors and borders.
When you are done, select the table by clicking in it and choose Table Tools > Layout > Select > Select Table.
Choose Insert > Quick Parts > AutoText > Save Selection to AutoText Gallery.
In the Create New Building block dialog set the Gallery to Tables and type a description of the table and click Ok.
In future, to create a table to these exact specifications choose Insert > Tables > Quick Tables, locate the table in the list and click it to insert it into the document.
This feature is the successor to the AutoText feature in earlier versions of Word. It looks a little more cumbersome but it is more easily discovered so you don’t have to remember where the table was saved as it appears automatically on the Insert Table menu.
Learn to quickly add extra spacing above and below the contents of a Word table cell
When you enter text in a Word 2013 table you may want more space above and below your text than appears by default.
While you can make the table cells larger and vertically centre the text in the cells this is a cumbersome solution and there is better and faster way.
To add extra spacing you can change the table’s cell spacing values.
To do this, first select the table, right click choose Table Properties.
Click the Table tab and click Options.
Here you can set the Top, Bottom, Left and Right cell margins for all cells in the table. Set the Top and Bottom values to 0.25″ to add a little extra space above and below the text in the cells.
In the pre-ribbon versions of Word you would use the Table commands to sort data in a Word document.
In Word 2007, 2010 & 2013 you can’t use the table sort options any longer for plain old text simply because you can’t select the table options if you don’t have a table – it’s a Catch 22 situation.
Luckily, Word now includes a proper sort option for any text – not just table text. To use it, first select the text to sort and then click the Sort button on the Home tab of the Ribbon.
When the Sort Text dialog opens you can choose what to sort such as Paragraph or Field and the type of sort. If you want a case sensitive sort so A is treated differently to a then click Options and check the Case Sensitive checkbox.
Once you are done select the sorting options, click Ok to perform the sort.
Use a text box in Word to control text wrap around a table
In a previous tip I showed you how to place a table inside a text box so you could put two tables side by side. You can use the same process to make the text on your page wrap around a table.
To control the way text wraps around a table, first create a text box and place a table inside it.
Then click to select the text box and, from the Ribbon, select the Format tab > Text Box Tools. Click the Wrap Text dropdown menu and choose the desired wrapping option from those in the list – typically you will use Square to wrap text round the text box with its inserted table.
Place tables side by side in a document using text boxes to keep them in place
If you add a table to a text box in Microsoft Word, you can position the text box wherever you want it to be on the screen.
If you need two tables to be placed side by side in your document you can do so by placing each of them inside a text box and then arranging the text boxes side by side.
To do this, create a text box by selecting the Insert tab on the Ribbon, click Text Box and click Draw Text Box. Click and drag to create a text box and then click inside it and create a table by choosing Insert > Table. Repeat the process to create the second table in its text box then drag to position the text boxes side by side.
To automatically number rows in your table, select the column you wish to number (or the specific cells in the column you wish to number). Now, click the Numbering button on the Home tab on the Ribbon. After the rows are numbered, you can move the rows anywhere and the numbering will readjust automatically.
To quickly move a whole paragraph up or down a Word document, click in the paragraph and press Shift + Alt + Up Arrow (or Down Arrow).
The same key combination will move an entire table row up or down a table and, when the top or bottom of the table is reached, it detaches the table row from the table to create another table which will continue moving through the page. This is a quicker and simpler way to split a table.
Learn what is new in Word 2013 and how you can put it to work in your day. Features include new Design tab, start screen, Layout Options, PDF editing, Table border painting, styles and sampler, Read Mode options, Present Online, Save to skydrive, insert images and video from the web.
Transcript:
Hello, I’m Helen Bradley. Welcome to this video tutorial. Today we’re going to look at what’s new in the new Word 2013. This is the new start screen that you’ll see when you start Word 2013. And it’s similar to that in Excel and PowerPoint and Publisher. You’ll see the recent documents that you’ve had open down the side of the screen here, and you’ll be given the option to open other documents for example from SkyDrive or your local computer. There are templates here and these are current so at the moment it’s sort of October so we’re seeing Thanksgiving and Halloween templates. They will change with the seasons. If there is a template that you like you can click on it and you can pin it to your start screen. You can also click to have a look at it in more detail. If there are multiple images you can look through it here. If you want to use it click Create, otherwise just close it down, and you can go and have a look at another template. You can search online for templates and there are some suggested searches here. If you have your own templates you can click Personal and view the templates that you’ve created for yourself. Up here in the top corner are details of the account that you’re currently logged into. So this tells me I’m logged in to this particular SkyDrive account. Let’s open a document and we’ll start working inside the new 2013.
Here I have a document open inside the new Word 2013. You’ll see that the screen is very clean. It’s got that sort of metro style interface that is typical of the new Office 2013 suite. Everything is very flat and your documents sort of take center stage. So let’s have a look at a couple of the new features. The first one is the new read mode. I’m going to View and then Read mode because a lot of people actually use Word as a reader. So I’m just going to set this back to the layout that you will see by default. This is this sort of two column layout which allows you to work through the document and read it and particularly appropriate for using on a tablet. You can change this to the regular page layout if you want to by choosing Paper Layout. There are paper colors that you can choose. We’re obviously using sepia at the moment. And you can set it to the default which is two columns, narrow or wide as you choose.
There are some other features here. If you right click a word you can click Define and it will be defined on the screen for you. I don’t have a word that’s actually going to be definable to show you that, but it works just fine. The other thing in this read mode is that you can look at things more closely. For example we might look at this chart and double click it. And it will now open over the top of the document so that we can look at it in more detail. And that happens as well with smart art. Now this read mode is not looking at the document the way it would be presented so things may overlap if they’re complex. The important thing about this read mode is that it’s for reading the document and not sort of previewing it the way it’s actually going to appear when it’s printed.
I’m just going to escape out of here to go back to the regular Word. Now one of the other changes to Word is in the review area so I’m going to open a different document. I have one here that has track changes in it. The track changes feature has been overhauled a little bit. Let’s go into review and I’m just going to show the new mode which is simple markup. In simple markup we’re going to see the document as it would be if all the changes were incorporated. So that’s text that is inserted is inserted and text that has been marked for deletion is deleted. And we can switch between these two modes either by choosing simple markup or all markup here on the tab, or we can click these lines. These are lines indicating that there are changes here, but we’re seeing it in simple mode at the moment. So we’re not seeing the changes. We’re just being warned that there are changes. Click again and now we can see what the changes are.
There are some changes too to comment. So for example if somebody adds a comment to a document, if you want to reply to that comment you can click this Reply button that allows you to now reply to that comment. The changes here are quite significant because in the past if you wanted to reply to a comment all you could do was add another comment. So conversations could become quite long and complex as they sort of scrolled down the page. Here now all the comments or all the conversation about a particular point can be isolated inside a single comment. And I’m just going to delete that comment. Let’s just get rid of it in its entirety and let’s go back to viewing this document in the new simple markup.
Now I’m going to get rid of all the changes in this document. I’m going to accept everything because I want to show you some of the new design features in the new Design tab. The new Design tab has put together some of the features that were really difficult to find in earlier versions of Word, in particular the sort of document formatting styles. Now you can see what the document formatting styles are. And if you like one you can click on it to apply it to your document. And there are lots of different styles here to choose from. This is the one that we were using previously, but they’re easy to find and to use. If you see one that you like, for example we might like this sort of gray look, we could change the color scheme that’s applied to it. So we could make it blue for example. There’s also the ability to choose different font combinations for our document if we like the look of it but prefer a different combination of fonts for example.
Now if we create a look that we like and we want to use it every time we open Word then we can set this as default. This is a new option on the Design tab. If we click this, this is now going to be the default look for all our documents in future. So this new Design tab has lots of features on it that make things more accessible than they were. Of course if we want to format individual elements on this page we’d back to the Home tab and selecting styles. But these styles are linked to the design or the document format that we’re using here from the Design tab.
Still in this document I’m just going to change its rotation back to normal and we’re going to have a look at the new layout options that we have for this. One of them is this layout options icon here which makes it more accessible to find the text wrapping options. In the past these were really quite difficult for people to find. And now they’ve been attached to the image itself. You can also opt to move the image with the text or fix its position on the page. If you click See More you’ll get the more traditional layout dialog. There are also alignment guides so watch as I move this image around the page. It becomes aligned or we can see when it is aligned to various objects on the page because we get this green alignment guide appearing. So we can see when it’s aligned with paragraphs, with margins of the page, perhaps the edge of the page itself. So this allows you to align things up more easily than you’ve been able to do in the past. Now still in this document we’re going to have a look at the new navigation pane. I’m choosing View and then Navigation Pane. This document has been set up using styles. So because it’s been set up using styles I can navigate the document by selecting the headings in this navigation pane. It just makes it easier to move around and particularly a long document. In addition, there are these new collapse icons. Again, because this document has been formatted using heading styles these collapse and expand icons appear and I can click on them to collapse the document down to just the heading. So imagine this in a really long document. If you had really large headings that had lots of text underneath then you could collapse your document so that you only work on the headings that you’re interested in working on at the time and then you can expand the other headings as you go through it. Now this is a feature that used to be available in outline mode but it’s been brought into print layout. So it’s accessible to any document that you create using heading styles, not only the ability to collapse and expand paragraphs but also this slightly smarter and more useful navigation pane.
Now as well as collapsing parts of the document you can now collapse the ribbon. So you can click here to collapse the Ribbon and it collapses to just the headings. And then you can click to open it. You can pin it or unpin it depending on what you want it to appear like. I’m going to pin it because I like to see the ribbon particularly on large screens.
Before we start looking at tables let’s just go to headers and footers. I’m going to choose Insert and then I’m going to just insert a plain old header into this document. One of the changes here to the header option is that there is access to document info. You can get access to the author, file name, pathname and document title from the Header tab and that’s new in this version of Word. So let’s just close out of there and let’s switch to a document that has a table in it. Here we have a document that has a table in it, and with the table selected we now have options for formatting that table. From the Design tab you’ll see that there are additional table styles here. And these are theme aware so they’re going to look like the theme itself. So I’ve just applied one of them here. Now I can go ahead and format this table a little bit better if I want to. I’m thinking that the text would be better white. So let’s just go and get some white text, and let’s make it a bit bolder.
Now there is a new feature with the design of this table in the border. So we’re going to the table, let’s just grab the table. I’m going to the Design tab and here are our new border styles. This allows us to bypass the old border option that was available inside Word and to paint borders on. Now I can click here for border styles, and I’ll get borders that are theme aware. So these are borders that look like the theme. So I’ll just select one, but I might make a slight change to it. I think I’ll add a slightly wider border. So I’m choosing the color I want from the styles, but I’m making it a bit wider. Now I’m going to click on the border painter and I’m going to start Painting this border onto my table. And wherever I click and paint it’s going to be painted on. So this allows me to paint borders on where I want them to appear and to remove them where I don’t want them. For example, I could just set a border to none and they would be removed. Now let’s say that I make a mistake down here and I paint this border on by mistake. I want to go back to the regular border. Then all I need to do is from the border styles option here is choose my border sampler. I can sample a border. It’s now attached to the border painter. So having sampled it, I can now paint it back onto the table. So this gives me a lot more flexibility in working with tables than I’ve ever had particularly with borders and tables because that’s really been a nightmare issue for a lot of users.
Now the other thing that I can do in tables that I haven’t been able to do easily in the past is to add a row or a column. All I need do is to position my cursor just where I want the row or column to be inserted and I get this new indicator. And I can click to insert a row. I’m just going to undo that. But let’s go and see that the same thing appears between columns so we could add an extra column to the document. Let’s just undo that. We could also add one at this edge if we want to. So there are some new features inside Word not only new table styles but the ability to paint on borders, to sample borders and to access border styles.
The new features in Word 2013 extend to images and video. If you click the Insert tab you get access to online pictures. So you can view images that are in the office.com clipart collection. You can search Bing or you can go and search your own SkyDrive account. So let’s just type cupcake here. You can see that our cupcake image came from there, but you can add additional images by just clicking on them to insert them into your document. The same thing happens with video content. You can click Online Video and access online video. The benefit of these insert video and online picture options is that you can insert content direct from the web without needing to download it and save it to your computer first.
Let’s have a look at some of the screens that are available here. The open screen gives you access to recent documents, and if you click Computer you’ll see access to your recently open folders. And you can pin folders here as well as pin documents here. You can also get access to your SkyDrive account. One of the new features is in this share Option because you can now present online. If you click this you can go into a present online feature that is presented through the Office presentation service which is a new service. And this is similar to presenting a PowerPoint presentation online. Your presentation or your Word document is uploaded and you’re given a link that you can then share with others and they can watch as you present the document to them. You also have the ability to publish blog posts and invite people also to share your document. This would be done via a SkyDrive location. Here are the account options. Here you can see what account you’re currently logged into. You can also add services. For example we could add a LinkedIn or Twitter service here. We’re already connected to Facebook and SkyDrive, and you can see your update options.
The other feature that I want to talk about is the ability to open and edit PDFs. So I have the open screen available here, and there is a PDF that I just downloaded. So I’m just going to click it to open it. Now you’ve never been able to do this before inside Word and that is to open a PDF for editing. Now the application is not perfect. In fact it’s far from perfect, particularly with complex documents like this one that actually has images and pieces in it. But if we go to the select pane here we’re able to actually locate the picture and the elements that are part of this document so I can actually find these shapes. And I’m just deleting them. So I’m getting rid of these shapes that made the image and now I have something more attune to the original PDF and I could make changes to it. I would probably need to reformat this table as tables aren’t particularly friendly. But you do get access to the internal contents of a PDF file which you couldn’t in the past.
So there’s a roundup of the features that are new in Word 2013. I’m Helen Bradley. Thank you for joining me for this video. Please subscribe to my YouTube channel so that you’re advised of new videos. You can also find more blog posts and information on my website at projectwoman.com.
Confession time. I had a picture in a table cell in Word and try as I might I couldn’t get the little black angled cursor to appear so I could select the cell’s contents. Frustrating – yep, I’d say so.
Nope – wrong arrow, the image is so close to the table cell it’s almost impossible to get the cell select arrow to appear.
This is what it should look like.
Then I remembered the new feature in Word 2007 – it’s on the Table Tools >Layout tab (so you have to have a table and click in it to see this option). On the far left is the Select button – new to Word 2007. Click it and you can select what to select. Oh! let’s back up a bit here – it would be a good idea to click in the cell you want to select before you begin – forgot that bit.
Using this you can select a cell then right click and, as I did, choose Copy to copy its contents. Don’t be fooled by the fact that not everything in the cell looks like it is selected – just trust that it is.
There are other options there that include Select Row, Select Column, Select Table – much easier than trying to juggle those little arrows when they just won’t appear.
The new Excel 2007 has far superior tools for finding and removing duplicate entries in a list. Thankfully – because this has been a nightmare in earlier versions.
To find and remove duplicates from a list of data in Excel 2007 first format the area as a table by selecting it and, from the Home tab, choose Format as Table.
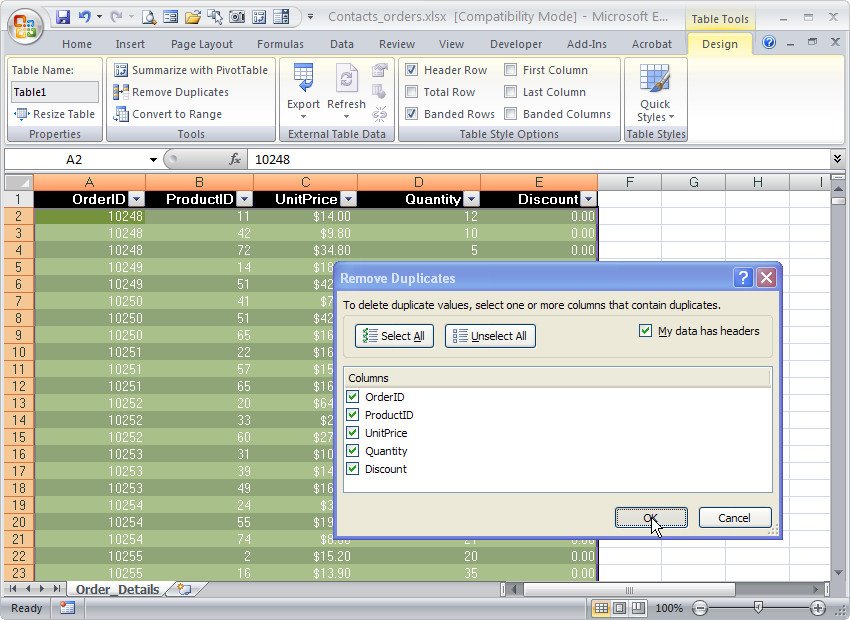
Click on any cell in the table and choose Table Tools > Design tab on the Ribbon.
Select Remove Duplicates to display the Remove Duplicates dialog. In this dialog are the Column headings for your data and all are selected by default. To remove the duplicate data from your worksheet leave all the column headings selected and click Ok.
If you want to remove rows where only certain data matches, leave the column headings for those particular rows selected and deselect the column headings for those columns which may have data that differs from one row to another. Now click Ok.
It is sensible to save your worksheet before running this Remove Duplicates option just in case you delete data by accident. If this happens and if you haven’t closed the file, you can recover it using the Undo button.