Learn how to use a spin button (also called a spinner) form of control in Excel to aid in data entry. Using a spin button, a user can click the button to increase or decrease a value in a worksheet cell.
This video explains how to access the Developer tab, then, how to add the spin button form control and, finally, how to set up the control. It also explains how to scale the value that the control provides so it can provide percentages and very large or very small values. This feature is in Excel 97, 2000, 2002, Excel 2007, Excel 2010 and Excel 2013.
Transcript:
Hello, I’m Helen Bradley. Welcome to this video tutorial. In this tutorial we’re going to have a look at creating spin buttons in Excel to make data entry just about as much fun as data entry can be. Before we get started with spinner controls let’s have a look and see what we’re talking about.
Here is a copy of the worksheet that we’re going to be working on and this is the spin button control. It’s been set to work between 20 and 30 so it will take a value between 20 and 30 years and every time I click the down arrow it decrements this cell by one so that the overall payment per month on the mortgage is increased because the term is much shorter. When we increase the term on the mortgage by clicking on the up arrow the overall payment is reduced. And it stops at 30.
So let’s see how we would add the spinner control to this particular worksheet.
Well first of all you have to have the Developer tab available. It it’s not choose File and then Options and in Excel 2013 and 2010 you’ll go to the Customize Ribbon button here and you’ll check this Developer tab here so that turns it on. In Excel 2007 you’ll go here because there will be an option here for Show the Developer Toolbar in the Ribbon.
So once you’ve got the Developer toolbar available click it and then take this Insert option and you want the form controls. Now the Active X controls look pretty much the same thing but they work very, very differently. And what we want are the simple form controls because they’re the easiest to use. I’m going to click here on the spin button control and then I’m going to click and drag to create the control on my worksheet. Now I can resize it later on but I’m going to start by drawing this size.
I’m now going to right click it and choose Format Control. And this gives me my options for formatting the control. To start off with I can set its current value. So I can start it at for example 25 and then I can set its minimum value which I had previously set to 20 so all our mortgages are going to tested between 20 and 30 years in length. And then I’m going to make the maximum value the 30. So we’re going to move between 20 and 30. And the incremental changes how big a change do I want to happen with each click of the button. Now these have to be integers so one is the smallest value. And cell link is a pointer to the cell that I want the value to be inserted in so I’m going to click in here and then click in this cell because this is going to be my link cell and click Ok.
You can see that the cell value changed to 25. That’s because that was the starting value. Now if I click on the spin button right now nothing is going to happen because it’s still active. So I’m just going to click outside it and now I can test it. You can see I can click up but when I get to 30 I can’t click it any more and then it will click down. And when I get to 20 it won’t go any lower.
So that’s a spin button control that you can use to control this sort of value. But there are some limits to spin buttons that we’re going to have to get around. One of them is that they only return integer values and the maximum value is 30,000. So right now that would cause us some problems in trying to add the mortgage amount which is in the region of 200,000 or more when the maximum value is 30,000. And here the interest rate is 5 percent. That’s .05. That’s not even an integer. It’s not even a one. So we’re going to have problems controlling that. And we’re going to have to find a way around it which of course can be done easily.
To see how we would deal with the situation where the amount borrowed is a much larger figure than we can use in the spin button control let’s have a look at this worksheet. In this worksheet we’re looking at how we could possibly scale a range of 0 to 30,000 to actually work for us. Let’s say that the minimum amount that we want this mortgage calculator to work for is 100,000 and the maximum is one million. Well let’s look and see what 100,000 is. Well 100,000 is 10 times 10,000 and a million is 100 times 10,000. So we could have our spinner work between 10 and 100 if we could scale it up by 10,000 each time. I’m going to replace the formula with a value and it’s going to multiply the contents of cell D2 by 10,000. Now there’s nothing in cell D2 right now but we know that we can put a value in there using a spin button.
So again Developer, I’m going to Insert and I’m going to select the Spin Button Form Control. I’m going to drag to create it on the worksheet, right click it and choose Format Control. This time I want my minimum value to be 10 because I’m going to use a 10 to 100 scale here. The maximum value is going to be 100 and I’ll have it increment by one digit at a time which is going to be 10,000. I’m going to set my current value to, for argument sake, 20 so that we’ll get back our 200,000 in this cell. And the cell link cell is going to be the cell that has the value in it that this formula is using. When I click Ok let’s see how it’s working.
As you can see the spin button here is giving us this value here of 20 and in this cell we’re just taking the value of 20 and scaling it up. So now if I click on this button it’s going up by 10,000 every click of the button and it’s going to max out at one million. And if I were to come down then it would max out in the bottom direction at 100,000. And each time as I click on the button, well I’m sitting on the button right now, but as I click on the button the amount that we’re paying each month is being recalculated accordingly. So scaling up like this is a way of getting larger values than the 30,000 that we’re allowed in the spin button control. Of course that’s preempting the solution for this value here. All we need to do now is to scale this downwards. So let’s see how we do that.
To reduce a value using a spinner we’ll work the opposite direction. Let’s say that we want an interest value between 2 and 10 percent. That’s between .02 and .1.
.02 can be represented by 2 times .01 and 10 by 10 by .01. Now that’s only going to give us whole interest values so I don’t think it’s going to be quite big enough. Let’s go down a scale and let’s say it’s 20 multiplied by .001 and 100 multiplied by .001. That’s going to give us additional percentages in the range so instead of going 2 percent, 3 percent, 4 percent we can go 2.1, 2.2, 2.3 and so on. So let’s take this scaling back to our worksheet. Again we’re going to add a spin button here so from the Developer toolbar Insert make sure that you’re using this form control and drag a spinner into position. We’ll right click it and choose Format Control and we’re going to use cell D3 as our intermediate cell. The minimum value is going to be 20. The maximum value from our previous calculations on the other worksheet is 100. We’ll use an incremental change of one for now and the cell link will be this cell here D3 and press Ok.
Now nothing is actually happening because we haven’t put our formula in here yet. The formula multiplies this value here by .001. And here is our smallest value 2 percent. We’ll need to reformat this cell so I’m going to the Home tab of the Ribbon and I’m going to increase the decimal places here so that we can see exactly what values we’re getting and not rounded values. Here everything is now going up in .1 of a percent. And it will max out at 10 percent because that’s where we set it to max out at. It won’t be able to go any larger than that.
Now all we need to do to make this worksheet a little bit neater is just to hide the column that contains those intermediary values. And now somebody can use this calculator to calculate a loan and instead of having to put value in here manually they can just click on the spin button controls to do it automatically.
I’m Helen Bradley. Thank you for joining me for this video tutorial. Look out for more of my video tutorials on this YouTube channel and visit my website at projectwoman.com for more tips, tricks and tutorials on a range of Office programs including Excel, Word, Outlook, PowerPoint and Publisher.
Use a text box in Word to control text wrap around a table
In a previous tip I showed you how to place a table inside a text box so you could put two tables side by side. You can use the same process to make the text on your page wrap around a table.
To control the way text wraps around a table, first create a text box and place a table inside it.
Then click to select the text box and, from the Ribbon, select the Format tab > Text Box Tools. Click the Wrap Text dropdown menu and choose the desired wrapping option from those in the list – typically you will use Square to wrap text round the text box with its inserted table.
Modify a Style’s Font Color to help find missed formatting
Quickly determine which paragraphs in a document have been formatted using one style, rather than another, by changing the colour of the formatted text.
To do this, click the Home tab on the Ribbon, hover over the style’s name you want to edit in the Styles gallery. Now, right click it and select Modify. In the Modify Style dialog, change the Font Color to something that will stand out on the page (such as purple) and click OK.
Now scroll through your document to see if the style has been applied everywhere you wanted it applied. Remember, if you don’t make any changes at this point, you can quickly undo the colour change by selecting Undo.
Otherwise, when you are done formatting the document, set the colour back to the original Font Color by repeating the above steps.
Learn to use ‘Save as type’ to format your document so users of older versions of Word can access them
You can easily exchange files with users of older versions of Word. This is because Word 2007, 2010, and 2013 essentially share the same file format. So it is pretty easy to open any Word document created using version 2007, 2010 or 2013 in any other of these three versions of Word. In addition, Word 2007, 2010, and 2013 will open files from any previous version of Word.
However, when you need to share a Word 2007, 2010, or 2013 file with someone using a much earlier version such as Word 2003 or a Mac version of Word, you must save the file using their particular Word file format. This is because the file formats are not the same and the older versions of Word cannot read the newer file formats.
To save using the appropriate format, select the File tab on the Ribbon, and click Save As. In the Save As dialog, click the Save as type: dropdown list and select the word processing format that matches the software that your other user is using such as Word 97-2003 Document (*.doc). Then click Save to save it in that format.
Learn more about the formatting applied to text in your document with this handy Keyboard Shortcut
If you want to quickly find out what formatting has been applied to any piece of text, click in the text and press Shift + F1. A task pane will open in the right of Word window. This Reveal Formatting task pane displays details about the text format being used for the word that your insertion point is closest to.
With this task pane open you can click on any piece if text to learn more about its formatting.
One easy and fun way to add visual interest to a text heavy page is to use a Drop Cap. A Drop Cap is when the first letter of a paragraph is increased in size and, more often than not, put in a more ornate font.
To create a Drop Cap, place your insertion point in the paragraph you wish to start with a Drop Cap. Then, choose Insert on the Ribbon, click Drop Cap > Drop Cap Options. The ‘Drop Cap Options’ allows you to either insert the Drop Cap into the paragraph, with ‘Dropped’, or place it separate from the text, with ‘In margin’. If you’re unsure what to use, I would suggest ‘Dropped’ and increase the ‘Distance from text’ setting to .3cm and the ‘Lines to drop’ setting (which affects the Font size of the actual Drop Cap) to 5 and click OK.
To change the font of the Drop Cap, you can either select the font you want directly in the ‘Drop Cap Options’ window or highlight the letter (which appears in a Frame) afterwards and changing it. You could even use Format, Borders and Shading, Shading tab to fill the frame with colour.
Here are five cool tips, tricks and keystrokes to help your day go faster in Excel:
Display cell formulas and not results
If you want to see the cell in your worksheet display formulas rather than the results of those formulas then you can do it one of two ways.
Use the keyboard shortcut Ctrl + ~ to toggle formula display on and off
You can also use Formulas > Show Formulas
Start a new line
When you need to add a line break to a cell to start a new line of text press Alt + Enter in the cell. If you just want to wrap a long piece of text in a cell right click the cell and choose Format > Alignment tab > Wrap Text.
Copy the contents of the cell above
To copy the contents of the cell above into the current cell press Control + ‘.
Moving around super fast and super smart
To move from one sheet in a workbook to the next (or in reverse), press Control + PgDn and Control + PgUp. To move to the next open workbook press Control + Tab or Control + Shift + Tab.
Super quick mouse free SUM formula
Skip taking the mouse to your Ribbon to add a SUM function and do it with a simple keystroke instead. Type Alt + = and Excel adds the SUM function automatically to the current cell. Doesn’t get much easier than that!
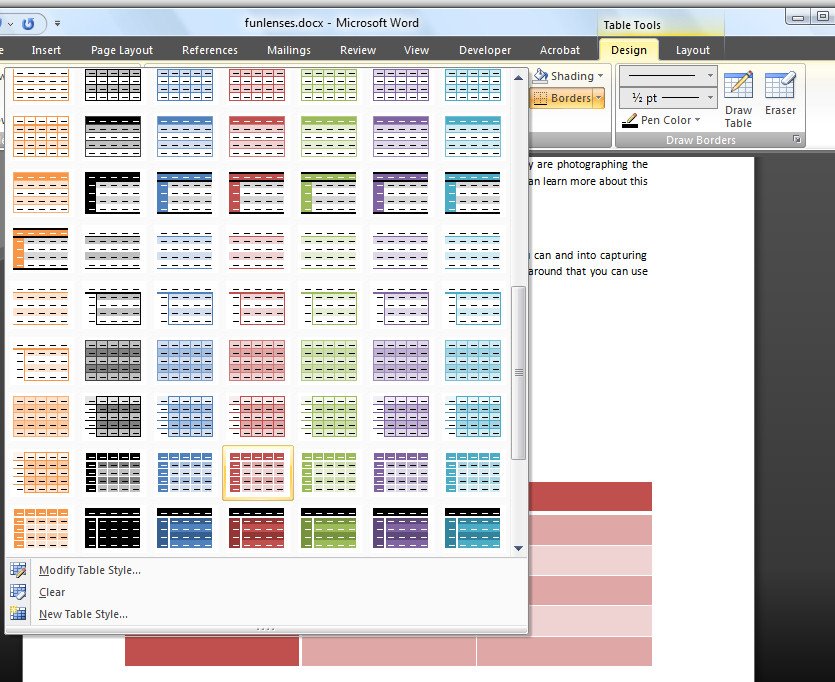
The table options in Word 2007 allow you to create quite sophisticated tables more easily than you’ve been able to in the past.
Click the Insert tab and click the Table button and drag over the number of cells you want for your table.
With the table selected, choose Table Tools > Design tab and choose a Table Style from the dropdown list.
Many of the styles are linked to theme colors so you can create a table with an attractive style which like other Word objects changes color to match the theme when it changes.
When you have a table style selected you can configure other options for it by, for example, selecting the Banded Rows checkbox in the Table Style Options group and adjusting the look of the first and last columns and header row using the checkboxes.