In the pre-ribbon versions of Word you would use the Table commands to sort data in a Word document.
In Word 2007, 2010 & 2013 you can’t use the table sort options any longer for plain old text simply because you can’t select the table options if you don’t have a table – it’s a Catch 22 situation.
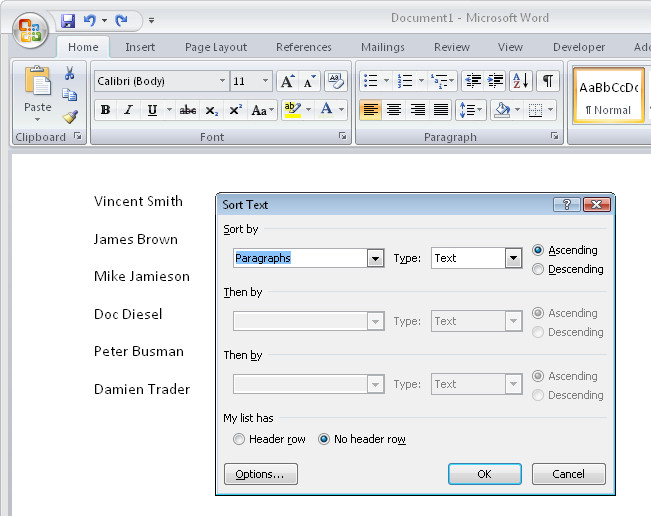
Luckily, Word now includes a proper sort option for any text – not just table text. To use it, first select the text to sort and then click the Sort button on the Home tab of the Ribbon.
When the Sort Text dialog opens you can choose what to sort such as Paragraph or Field and the type of sort. If you want a case sensitive sort so A is treated differently to a then click Options and check the Case Sensitive checkbox.
Once you are done select the sorting options, click Ok to perform the sort.
Lightroom has two types of collections: regular Collections and Smart Collections. Smart Collections are live and they are created as a result of filtering your photos according to rules that you write. You cannot add an image to a Smart Collection by dragging and dropping it into the collection. You can’t remove an image from a Smart Collection just because you don’t want it in there – it can only be removed if it fails to meet the criteria you set up for the collection.
Smart collections are a handy way to create collections and to manage your photos and here I’ll show you how to make use of them.
Shipped Smart Collections
There are a few Smart Collections which ship with Lightroom. To find these, click the Collections panel in Lightroom and click on the Smart Collection Set. Click the Smart collection called Without Keywords. As its name suggests, this collection shows you all the images in your Lightroom catalog that do not have keywords associated with them.
If you’re like me you’ll want to close this one pretty quickly – it can be scary to see just how many images aren’t keyworded!
You can learn more about this collection by right clicking its name and choose Edit Smart Collection. You’ll see that the Smart Collection is configured to contain all those images for which the Keywords property is empty.
There are other collections which are shipped with Lightroom including Recently Modified which is a collection of images that have been edited recently.
You can, if desired, change the Recently Modified Smart Collection to span a different number of days. Click this collection , right click and choose Edit Smart Collection. You can see that the collection criteria is set to be Edit Date > Is in the last
When you do so, Lightroom checks the images in your catalog to determine which images meet this criteria and it displays these in this Smart Collection.
Make your own Smart Collections
In addition to those shipped with Lightroom you can create your own Smart Collections. For example, if you color your images red meaning a certain thing you can create a Smart Collection that contains all the images which are colored red.
To do this, click to open the Collections panel, click the plus symbol and choose Create Smart Collection. Type a name for it such as Red Images, click Inside a Collection Set and choose to add it to the Smart Collections set. From the options below select Label color is red.
Click Create to create the collection – it will contain all images in your collection which have the red label color associated with them.
Remove an Image from a Smart Collection
The only way you can remove an image from a Smart Collection is to configure it so it no longer meets the criteria for the Smart Collection. For example an image will no longer appear in the Without Keywords collection if you add a keyword to it.
You can remove an image from the Red Images collection if you remove or change its color label. When it no longer has the red color label associated with it, it will no longer appear in the collection.
Similarly, if you apply the red color label to an image in Lightroom it will be automatically added to the Red Images Smart Collection.
One of the benefits of Smart Collections is that they’re continually updated by Lightroom. So Lightroom ensures that all the images which match the criteria you use to define the Smart Collection are in that collection.
How Smart Collections differ from Regular Collections
Smart Collections behave differently to Regular Collections in a few key ways. One difference is that you cannot arrange images in a Smart Collection into your own custom order.
The collection order can only be set to one of the Lightroom default Sort Order options; Capture Time, Edit Order, Edit Time, Edit Count, Rating, Pick, Label Text, Label Color, File Name, File Extension, File Type and Aspect Ratio. Regular collections, on the other hand, can be sorted into User Order which is useful for slideshows and web pages for example.
You also cannot set a Smart Collection as the Target Collection because you cannot add images to a Smart Collection manually. It can only be added if it matches the criteria which describes that collection.
Over to you .. Do you use Smart Collections in Lightroom and, if so, how do you use them? Do you use the shipped collections or make your own?
Sometimes the data in your worksheet doesn’t appear in the order you want it to. You can reorder the data by sorting it.
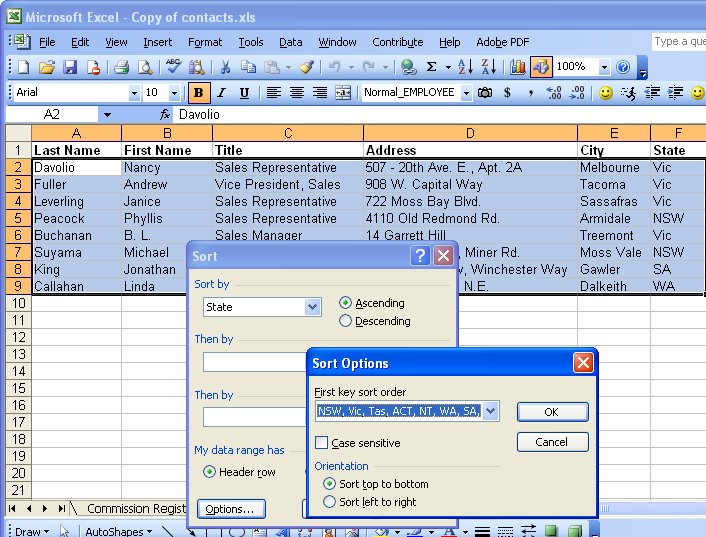
To sort data in a worksheet, select it using your mouse, or click inside the data area and press Control + Shift + * to select all the cells in the current block. In Excel 2003, choose Data, Sort and then choose the column which contains the data to sort from the Sort by: dropdown list. To sort on more than one column choose the second column from the dialog’s Then by: dropdown list. For example to produce a ‘phonebook’ type of sort, first Sort by the column containing the last name and Then by: the column containing the first name. If you do this, two people with the same last name will be grouped together but appear in alphabetical order by first name.
You can also sort in order of a custom list. So, for example, if you wanted all the people who live in Victoria to appear at the top of a list then those who live in NSW, etc.. create a custom list with the state names (or abbreviations) in the order you want to use for sorting. Then choose the State column in your data list as the Sort by: column and click Options. From the First key sort order dropdown list choose the custom list containing the state details and click Ok, and Ok again. The list will be sorted in order of the entries in your custom list and any entries which don’t match an item in the list will appear at the end, in alphabetical order.
While it looks like Word has no tool for sorting a list – only for sorting data in a table, this is not the case and the Table sort tool works just fine for sorting data in a list.
To sort a list, such as a list of names, where each name appears on a new line and the last name is separated from the first by a comma and a space, choose Table, Sort. From the Sort by list, choose Field 1 and then, from the Then by list choose Field 2 and click Ok. This sorts the data into order by last name and then by first name where there are two or more people with the same last name.
If the names appear with the first name then a space and then last name you’ll have to tell Word to differentiate between the two names. To do this, select your list and choose Table, Sort, Options and click the Other option and press the Space bar and click Ok. From the Sort by list, choose Word 2 and then, from the Then by list choose Word 1 and click Ok. This sorts the data into order by last name and then by first name where there are two or more people with the same last name.
If you find that Word 2 doesn’t appear as an option in the Sort by list, click Ok to exit the Table Sort dialog and select the option again.