Tuesday, August 6th, 2013

Photoshop Tip – Create an Image Watermark

Make a Watermark Reminiscent of a Post Office Stamp Cancellation

In a older post I talked about using an image watermark in Lightroom to apply to your images.

Lightroom Tip – Using Image Watermarks

Finally, in this post, I’ll show you how to create the watermark image to use.

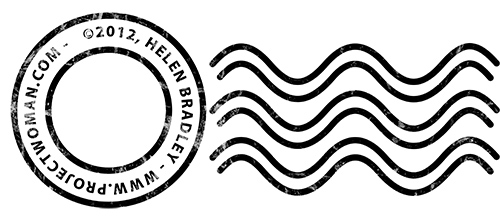
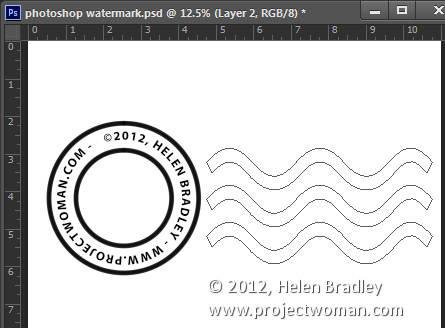
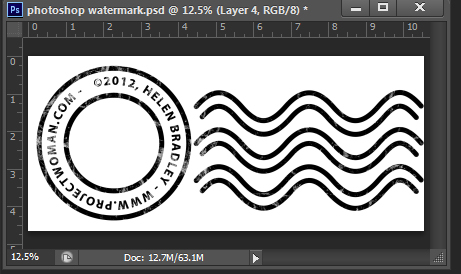
This watermark has two concentric circles with text between them and a set of wavy lines making it look like a post office stamp cancellation. The watermark also has a slightly grunge look.

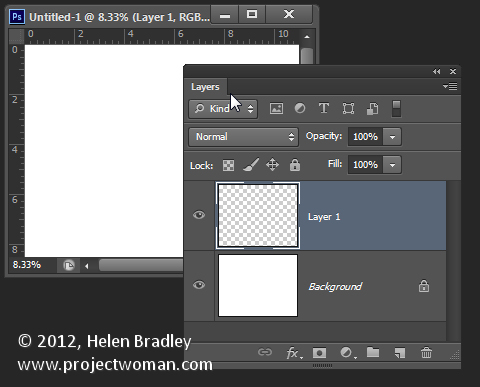
To make it, start in Photoshop with a letter size image. I set mine to landscape orientation with a white background. This will make it easy to create a black watermark and I will be able to see it as I work.

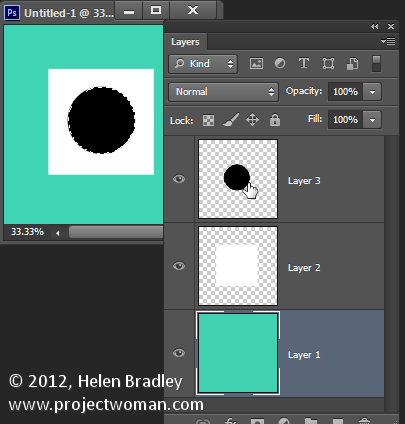
Add a new layer by choosing Layer > New > Layer. This is a transparent layer on which you’ll place the circles.

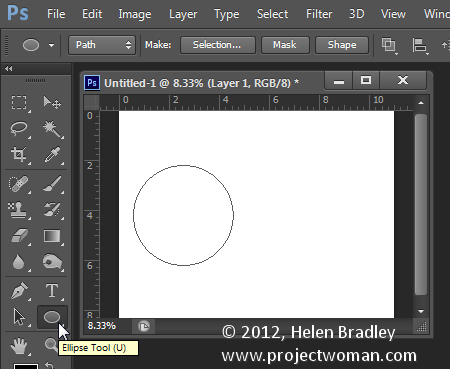
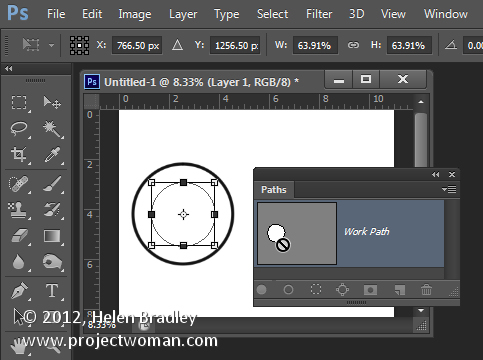
Start with the Ellipsis Tool which shares a position in the Tools with the Rectangle tool – it is a shape tool – don’t use the Elliptical Marquee Tool.

Make sure that the option on the Tool Option bar is set to Path and hold Shift as you drag a circle on the screen.

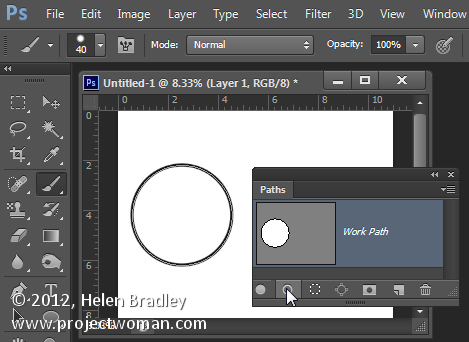
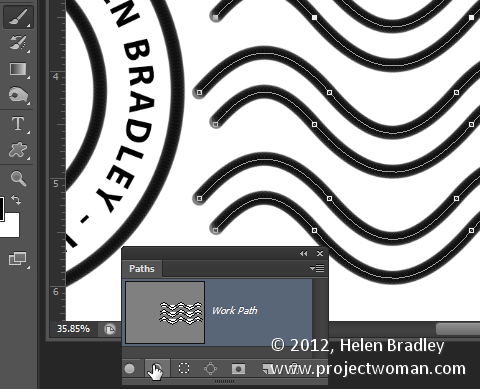
When the circle is in position choose Window > Paths to view the Paths palette.

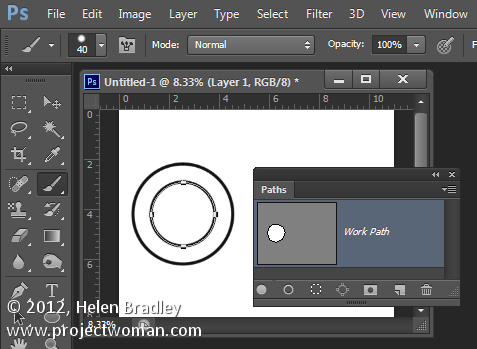
Select the Brush tool and select a brush. I used a Hard Round brush sized down to around 40 pixels.

Set the foreground color to black, click the Work Path in the Paths palette to select it and then click the Stroke Path with Brush icon at the foot of the Paths palette. This strokes the path with the current brush.

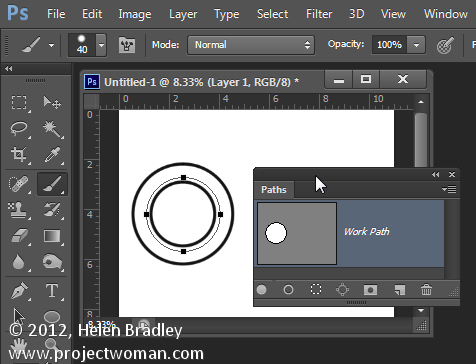
Click the Path Selection Tool which shares a position in the Tools palette with the Direct Selection Tool. Click on the path and it will select the entire path.

If the transformation handles do not appear press Ctrl + T (Command + T on the Mac). Hold Shift and Alt (Shift and Option on the Mac) and drag inwards to create a circle which is concentric with the previous circle.

Repeat the process of selecting the Brush, click on the path so it is selected and click to Stroke Path with Brush.

Click the Path Selection Tool and, with this smaller circle selected, press Ctrl + T (Command + T on the Mac). Hold Shift and Alt (Shift and Option on the Mac) and drag a little outwards to create a circle path for typing the text along.

Select the Text tool and hold the mouse over this third path.

Look for the text tool to show as an I-beam pointer with a bent line through it – this tells you Photoshop will align the text along the path.

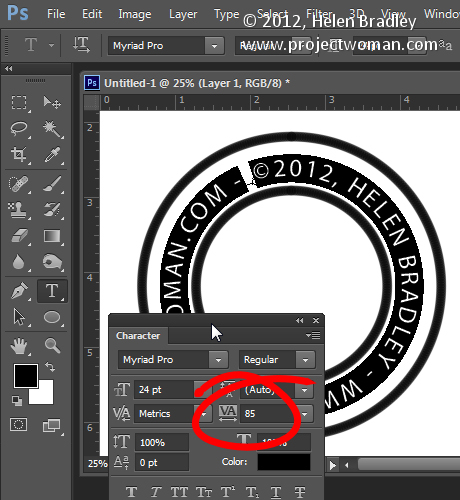
Click once to anchor the Text tool to the path. Select the text color – in my case I chose black – and select the font and font size – I used Myriad Pro – 24 points. Type the text to use – I typed:

© 2012, Helen Bradley – projectwoman.com –

To enter © hold Alt and type 0169.

With the text selected display the Character palette by choosing Window > Character and adjust the tracking to expand the text so it wraps all the way around the shape.

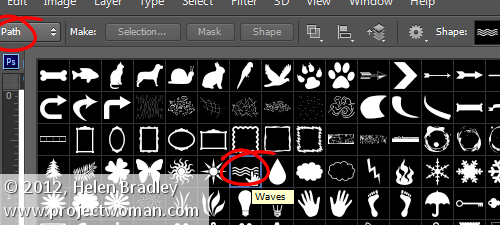
You can draw your own lines for the cancellation lines using the Custom Shape Tool. First create a new layer then select the Wave shape and on the Tool Options bar make sure that it is set to Path.

Drag to make your curved lines.

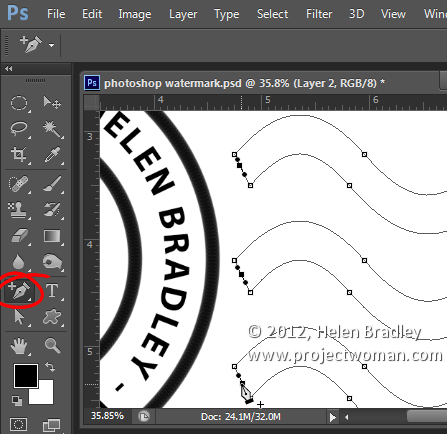
Select the Add Anchor Point Tool (it shares a position with the Pen tool) and click once in the middle of each end of the path to add a point.

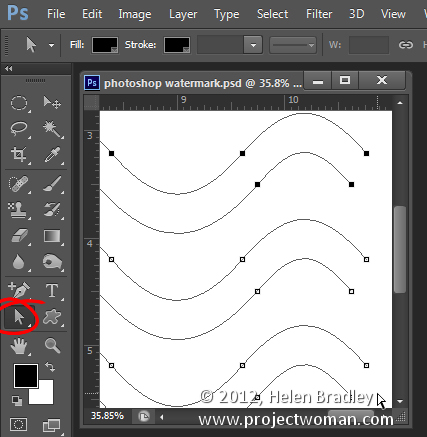
Target the Direct Selection Tool, click one at a time on the Anchor points you just added and press Delete – this breaks the 3 paths in half to make 6 paths. When the Anchor is selected it will show as a dark filled square.

Select your Brush and black paint and select the path in the Paths palette and click the Stroke Path with Brush icon.

Once you’ve done this you can add a grunge effect.

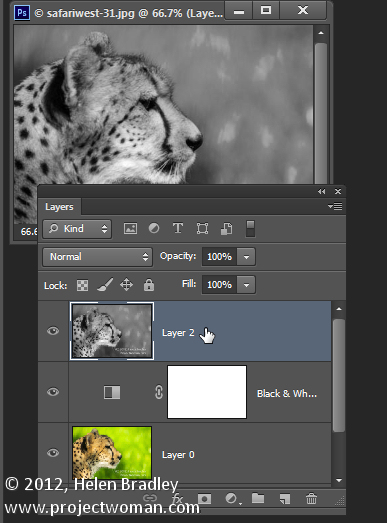
Start by hiding the background layer, target the top layer and press Control + Alt + Shift + E to create a flattened layer with transparency. Hide all layers but this top one.

If the lines aren’t dark enough duplicate this layer a few times and they will darken. Then merge all these duplicated layers

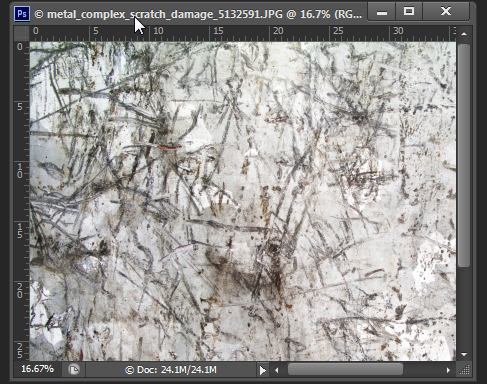
To add the grunge effect click Add a Layer Mask icon at the foot of the layers palette to add a mask to the layer. Locate an interesting texture image to use such as this one from www.mayang.com/textures.

Make it the same size as your image by choosing Image > Resize, deselect the Constrain Proportions checkbox and click Window and click your copyright image file to use its dimensions. Click Ok.

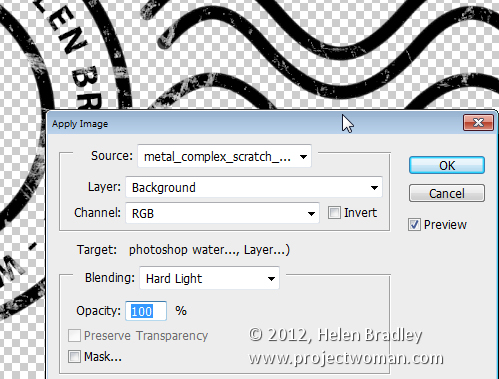
Now return to your Copyright image, click the mask to target it and choose Image > Apply Image. From the Source box select the texture image (it won’t appear in the list if it isn’t the right size), and then set the other options to suit so you get a distressed look to your copyright symbol. Click Ok.

Add a new layer and press Control + Alt + Shift + E to create a flattened version of the image on this layer but maintaining its transparency. Make all other layers invisible and crop the image close around your shape.

Then choose File > Save As and save it as a .PNG image to use in Photoshop or Lightroom as a copyright overlay.

If you select the top layer and press Control + I you’ll invert it to make a white version of the copyright image that you can then save as a second .png file.

Make sure to also save your file as a .psd file if you think you might need to make changes to it – for example, to change the date – a .png file is flattened so it won’t be easy to edit – a .psd file will be much easier to update.

Helen Bradley

Monday, July 29th, 2013

Lightroom Tip – Introduction to Lightroom Smart Collections

Get Up to Speed with Lightroom Smart Collections

Lightroom has two types of collections: regular Collections and Smart Collections. Smart Collections are live and they are created as a result of filtering your photos according to rules that you write. You cannot add an image to a Smart Collection by dragging and dropping it into the collection. You can’t remove an image from a Smart Collection just because you don’t want it in there – it can only be removed if it fails to meet the criteria you set up for the collection.
Smart collections are a handy way to create collections and to manage your photos and here I’ll show you how to make use of them.

Shipped Smart Collections
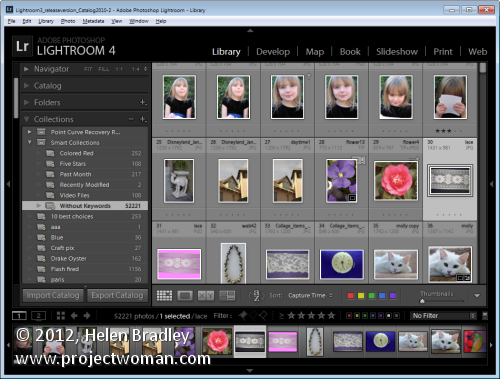
There are a few Smart Collections which ship with Lightroom. To find these, click the Collections panel in Lightroom and click on the Smart Collection Set. Click the Smart collection called Without Keywords. As its name suggests, this collection shows you all the images in your Lightroom catalog that do not have keywords associated with them.

If you’re like me you’ll want to close this one pretty quickly – it can be scary to see just how many images aren’t keyworded!

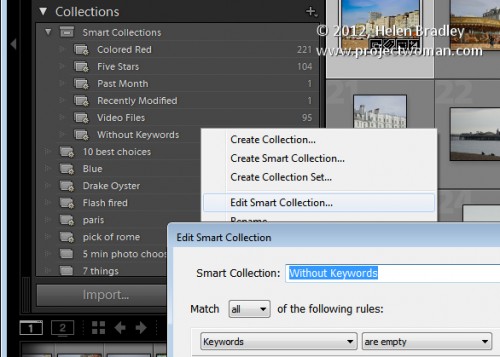
You can learn more about this collection by right clicking its name and choose Edit Smart Collection. You’ll see that the Smart Collection is configured to contain all those images for which the Keywords property is empty.

There are other collections which are shipped with Lightroom including Recently Modified which is a collection of images that have been edited recently.

You can, if desired, change the Recently Modified Smart Collection to span a different number of days. Click this collection , right click and choose Edit Smart Collection. You can see that the collection criteria is set to be Edit Date > Is in the last

When you do so, Lightroom checks the images in your catalog to determine which images meet this criteria and it displays these in this Smart Collection.

Make your own Smart Collections
In addition to those shipped with Lightroom you can create your own Smart Collections. For example, if you color your images red meaning a certain thing you can create a Smart Collection that contains all the images which are colored red.

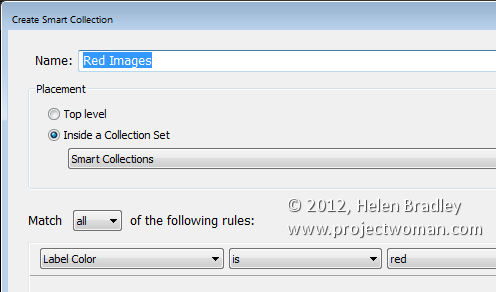
To do this, click to open the Collections panel, click the plus symbol and choose Create Smart Collection. Type a name for it such as Red Images, click Inside a Collection Set and choose to add it to the Smart Collections set. From the options below select Label color is red.

Click Create to create the collection – it will contain all images in your collection which have the red label color associated with them.

Remove an Image from a Smart Collection
The only way you can remove an image from a Smart Collection is to configure it so it no longer meets the criteria for the Smart Collection. For example an image will no longer appear in the Without Keywords collection if you add a keyword to it.

You can remove an image from the Red Images collection if you remove or change its color label. When it no longer has the red color label associated with it, it will no longer appear in the collection.

Similarly, if you apply the red color label to an image in Lightroom it will be automatically added to the Red Images Smart Collection.

One of the benefits of Smart Collections is that they’re continually updated by Lightroom. So Lightroom ensures that all the images which match the criteria you use to define the Smart Collection are in that collection.

How Smart Collections differ from Regular Collections
Smart Collections behave differently to Regular Collections in a few key ways. One difference is that you cannot arrange images in a Smart Collection into your own custom order.

The collection order can only be set to one of the Lightroom default Sort Order options; Capture Time, Edit Order, Edit Time, Edit Count, Rating, Pick, Label Text, Label Color, File Name, File Extension, File Type and Aspect Ratio. Regular collections, on the other hand, can be sorted into User Order which is useful for slideshows and web pages for example.
You also cannot set a Smart Collection as the Target Collection because you cannot add images to a Smart Collection manually. It can only be added if it matches the criteria which describes that collection.
Over to you .. Do you use Smart Collections in Lightroom and, if so, how do you use them? Do you use the shipped collections or make your own?

Helen Bradley

Monday, May 20th, 2013

Lightroom Tip – Create an Import Preset

Save Time when importing photos by Creating an Import Preset

If you use the same options every time you import your images into Lightroom, you can create an Import Preset to speed up this task.

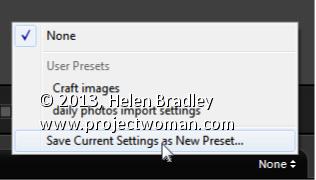
Start by selecting Import to open the Import dialog and go ahead and select those options you generally want to use and then locate the Import Preset option at the foot of the Import dialog. Click the drop-down list and choose Save Current Settings as New Preset. Type a name for the preset and save it.

In future you can select this preset when you are importing images. This gives you, at the very least, a starting point for your import as it sets up the import dialog to match the settings you saved. If you wish, you can make changes to the settings without altering the preset, allowing you to use it anytime.

You can create multiple import presets for different situations so you can select the most appropriate one to use each time you import photos.

Helen Bradley

Wednesday, April 24th, 2013

Word 2010 and 2013 Tip – Creating a New Page… Instantly

How to make a New Page (or Page Break) When and Where you Want

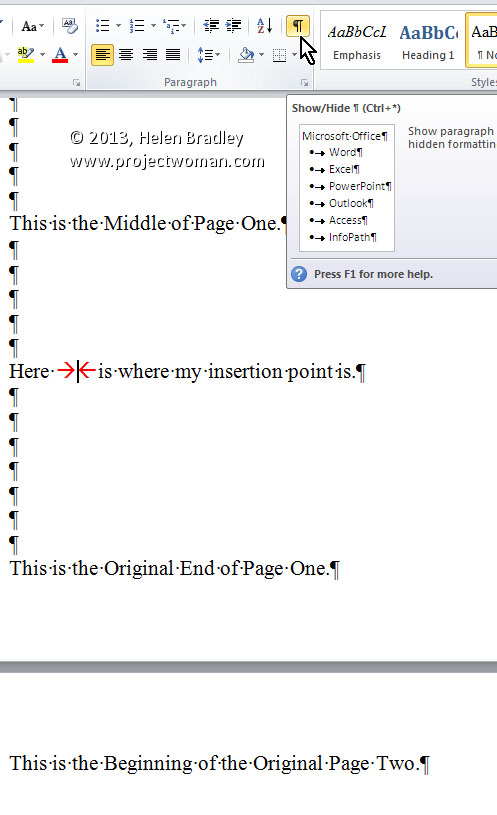
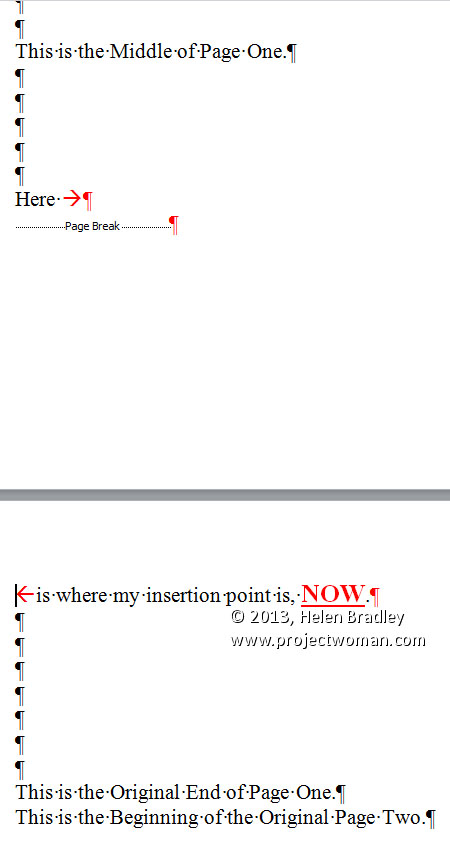
To create a new page in a Word 2010 and 2013 document before you’ve reached the end of your current page, simply press CTRL + ENTER. This places a ‘…Page Break…’ in your document exactly where your insertion point was. It also moves the insertion point onto the top of the next page. You can see the page break marker if you select the ‘¶’ button on the Home tab of the Ribbon.

Lastly, if you need to, you can delete the page break by positioning the insertion point immediately in front of it and pressing Delete.

Helen Bradley

Saturday, February 2nd, 2013

Easily Create Webpages with Google Docs – Quick Tip

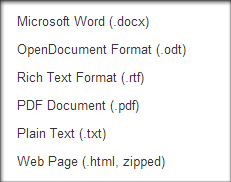
Google Docs provides a neat way of turning any document into a simple HTML web page, perfect for any novice interested in building a basic website. To do so, simply open the desired document and select File > Download as > Webpage (.html, zipped). The file will be compressed in a .zip file so you’ll have to extract it, but it will be instantly ready for use. This functionality can also be used with spreadsheets.

Helen Bradley

Saturday, January 19th, 2013

Create Complex Mathematical Equations in Google Docs

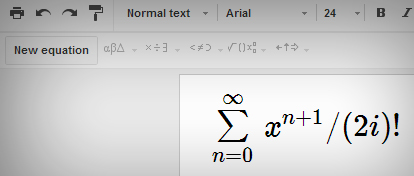
It can often be difficult to represent more complex mathematical equations in a word processor. Google Docs makes it easy with the equation toolbar. To activate it, select View > Show equation toolbar.

To create your equation, simply click New equation and begin filling it in with operations from the insert function dropdown menus. Even if you require none of the special operations provided, the New equation feature will also neatly format simple equations that can be entered using the keyboard.

Helen Bradley

Monday, November 12th, 2012

7 Cool Photoshop Layer Tricks

When you’re using layers in Photoshop for photo editing and composting you can speed up the process of working with them if you know these cool layer tricks.

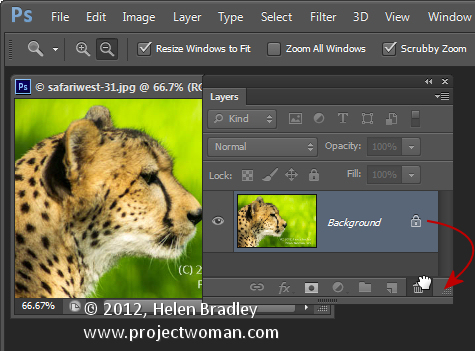
1          Unlock the Background

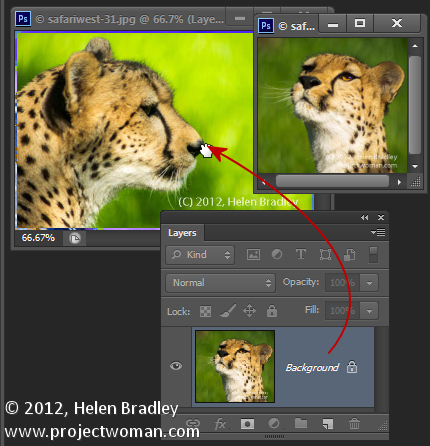
You will already know the Background of any photo is locked and you can’t do anything much with it until you unlock it. The quickest way to unlock a background layer is from inside the Layers palette. Drag the lock icon to its right and drop it in the Trash and the Background layer will be automatically converted to a regular layer.

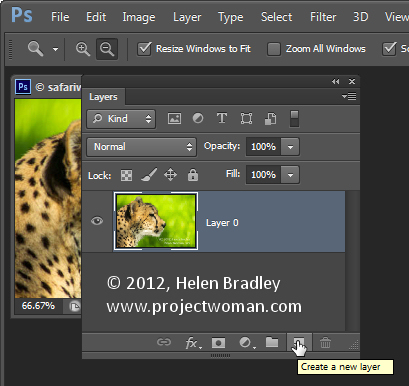
2          One click add a Layer

To create a new layer above the current layer click the Add New Layer icon at the foot of the Layer palette.

To add a new layer directly below the current layer Ctrl or Command Click on that icon. Both options add a layer but without displaying the Layer dialog.

3          Merge Everything to One Layer but Keep the Layers too

To merge all the current layers in the document to a single layer and at the same time to keep all the layers intact below it, click the topmost layer of the document and press Ctrl + Shift + Alt + E (Command + Option + Shift + E on the Mac). In case you are curious – it’s called Stamp Visible.

4          Select the Content on the Current Layer

To select everything on the current layer Ctrl + Click on the layer thumbnail in the Layers palette.

5          Copy a Layer to Another Document

To copy a layer from one document to another drag the layer from the Layers palette in one document and drop it into the other document. If you hold Shift as you drag the layer will be centered in the middle of the second document.

6          Quick Layer Moves

To quickly move a layer up the layer stack press Command + ] and to move it down, press Command + [.

7          Instant Delete a Layer

To instantly delete a layer, click the layer and press Delete.

Bonus Layer tip

To fill a layer or a selection with the foreground color press Alt + Backspace (Option + Delete on the Mac). Use Control + Backspace (Command + Delete on the Mac to fill the layer or selection with the Background color.

So, over to you now… what are your favorite Layer tips and tricks?

Helen Bradley

Monday, October 1st, 2012

Photoshop Create Plaids & Checks

Learn how to make plaids and checks in Photoshop very quickly. See how to save the plaids as patterns and how to  fill a shape with a pattern in all versions of Photoshop.

Check out all our tutorials on our YouTube channel.

Complete transcript of this video:

Hello, I’m Helen Bradley. Welcome to this video tutorial. In this video I’m going to show you how to create quick and easy plaids and checks in Photoshop. And this is going to work with pretty much any version of Photoshop. Before we start creating our plaid pattern let’s have a look and see exactly what we mean by creating plaids and checks. This is a simple sort of gingham style pattern that we’re going to create, and I’ve used it to fill a shape. And you’re going to see how you can do that as well. So let’s just tuck that away for now and let’s go and create our pattern. I’m going to choose File New and I’m going to create a workspace that is a fixed size and it’s going to be square. So I’m going to make this 200 pixels by 200 pixels because that’s going to be nice and easy to see. And I’m going to for this one create background contents as white because I actually want white as the basis of my pattern. So I’m quite happy to have white there. I’m going to choose View Rulers because I want to see my ruler right now. And I want to add two guides just to make sure that this is perfect. I’m going to choose New Guide and I’m going to make this 50 percent Horizontal and then add another one at 50 percent Vertical. These guides are going to help me draw in my shape. So I’m going to select the Rectangular Marque Tool and drag over one side of this shape. I need to work on a new layer so I’m going to click the New Layer icon here. And let’s choose a different color to the one we were working on before. Let’s create a sort of purple gingham this time. So I have purple selected as my foreground color, a brand new layer. I can fill this layer automatically with the foreground color by pressing Alt Backspace on the PC, Option Delete on the Mac. I’m going to add another layer. Still with this Marque Tool selected, this time I’m going to select the top area here, and I’m going to fill it again with the same color, Alt Backspace, Option Delete. And there’s the basics of my gingham check pattern. The only thing is is it doesn’t quite look the way it’s supposed to look yet. What I’m going to do is to make these layers both 50 percent opacity. And when I make both these layers 50 percent opacity you can see that we’re getting this sort of gingham check look. And I’m pressing Ctrl D, Command D on the Mac, to deselect my selection. To get rid of my guides I’m going to just click Clear Guides. So this is my gingham pattern. To make it a pattern I’m going to press Ctrl A or choose Select All to select everything and choose Edit and then Define Pattern. And I’m going to call this purple gingham and just click Ok. Now that pattern is created so I can just trash that document. But we might save it just for the moment because we might come back to that in a minute. Now let’s see how we could use our plaid pattern. I’m going to choose File New and create a letter size document with a white background. And here it is. Here I’m going to click the Custom Shapes Tool and I already have this rabbit shape selected. But you could select any shape. And I’m going to show you how to do this in any version of Photoshop because Photoshop CS6 is a little different. But the procedure I’m going to show you will work with any version. So with the custom shapes tool selected we’re going to make sure that we have path selected here. There are three options and they’re just different icons in earlier versions of Photoshop. But you want the Paths option. And we’re going to drag our rabbit shape. I’m holding Shift as I do so to constrain it to those proportions. Now in any version of Photoshop you can choose Layer New Fill Layer Pattern. Click to accept pattern fill and then you’ll find that it’s filled with the most recently created pattern which is the pattern we just created. If the scale of the pattern is too big, which it is really for me, I want to scale this down to 25 percent. I can just select Scale 25 percent and click Ok. And there is my rabbit filled with my pattern. Now in Photoshop CS6 you can do it a little differently. What we’re going to do is to choose a shape. And in this case we can fill our shape with a pattern. So now let’s grab our rabbit. And you can see that by default this is now created. It’s actually got a stroke on it. I don’t want any stroke. And with my pattern fill I can scale my pattern here in Photoshop CS6. So CS6 just makes it a little easier to do. But you can still do the same process in any version of Photoshop. Now let’s just go back for a minute to our original shape which is this one here. We could do some other things to make it a little bit more plaid like. For example I’m going to add a new layer, drag it to the very top, and I’m going to drag a very small stripe through here. And I’m going to fill it with a slightly darker version of this purple. So this is the foreground color, Alt Backspace, Option Delete. And then I could add another one again through here. This one I’m going to do twice. So I’m going to select the selection I have here and I’m going to Alt drag on it to create a couple of lines. Actually let’s do three. And I’m going to call that my new plaid shape. Having done that lets press Ctrl A to select everything, Edit Define Pattern. This is going to be my new pattern. It’s a little bit off in the spacing but I’m not going to worry too much about that. Let’s turn everything off here. Let’s go and grab a new shape. So for this one we’ll do a flower shape. And again, I’m just going to choose, well let’s go with Photoshop CS6. Let’s grab our pattern there and no stroke and just draw my flower shape holding Shift to constrain it to the shape. And you can see now that we have a more complex pattern fill for our object. We can again scale that down to 50 percent. But you can create plaids any way that you want to, and they’re going to fill any shape in Photoshop. I’m Helen Bradley. Thank you for joining me for this video tutorial. You can find more of my video tutorials on this YouTube channel and visit projectwoman.com for more articles on Photoshop, Lightroom and Illustrator.

Helen Bradley

Sunday, June 3rd, 2012

Edit and Create on the go with Adobe Photoshop Touch

By Helen Bradley

On Monday, Adobe launched its Photoshop Touch application for the iPad. This long sought after app runs on the iPad 2, and not on the iPad 1, and it requires that you have iOS 5 installed. The app costs $9.99 which is at the high end of the price range for photo-editing apps in general but Photoshop Touch seems to have got the feature set about right so most people will probably consider it worth the money.

I use the iPad a lot for working with photos I’ve shot using a digital SLR camera in raw and which I’ve resized, converted to jpeg and downloaded to the iPad. Those images I have on the iPad are there because they are funky or because they lend themselves to some artistic play. So, I looked at Photoshop Touch in this light – I wanted to see if it would be part of my iPad image creative workflow. For heavy duty work, Photoshop and Lightroom will remain my tools of trade.

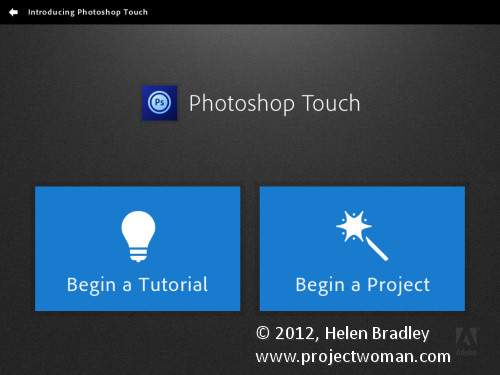
When you launch Photoshop Touch you get two options, viewing the tutorials or doing some work.

There are 10 tutorials that you can work through each of them is project based so you learn the program by learning a technique not by learning how individual tools work. These are text and image tutorials and not video ones, but they are interactive so you can learn as you go.

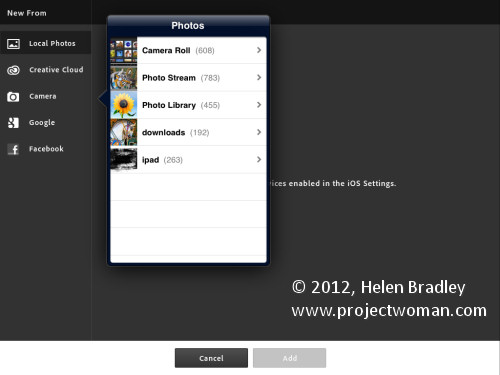
The second option is Begin a Project which is where I’ll start. You get the choice of adding an image from your iPad, the Adobe Creative Cloud, the Camera, Google or Facebook. I chose Local Photos then the Photo Library and an image from my iPad.

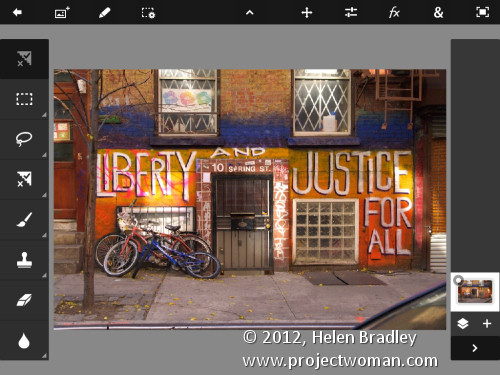
In the main editing area you’ll find the tools on the left, layers on the right and menus across the top. The program pays lip service only to Photoshop.  Some icons are familiar but others are more iPad than Photoshop so Photoshop users may find it a bit confusing where iPad artists will find it more familiar.

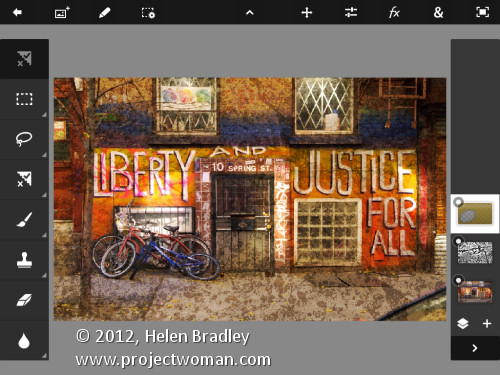
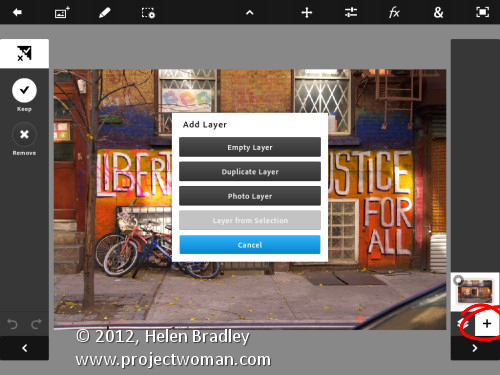
You can add multiple images and multiple layers. I wanted to texture this image so I clicked the Add Layer button and selected Photo Layer.

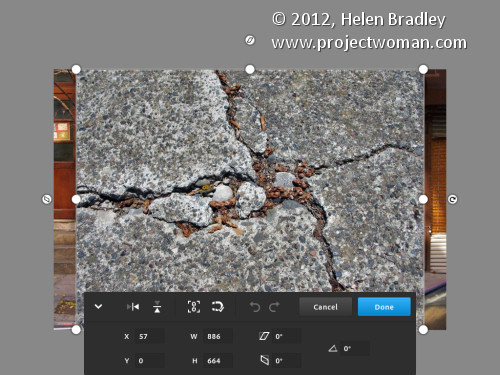
Once you select a second photo you get to size it as you import it – you can also rotate, flip or skew it too. Click Done to proceed to the editing area.

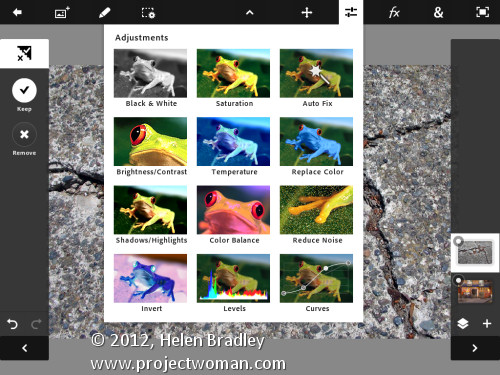
Now, with the layer selected, you can apply adjustments to it.

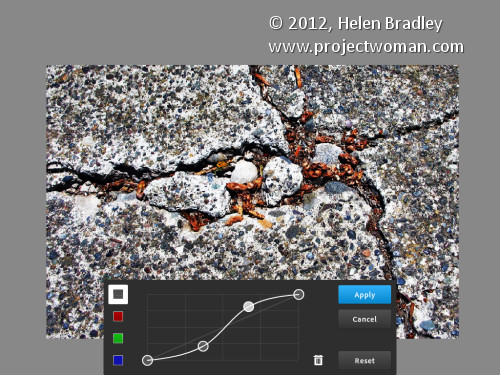
I chose Curves as this was a texture and I wanted more contrast. There are no adjustment layers so the Curves adjustment is being applied just to the targeted (top) layer. As you can see, you can adjust the RGB composite channel or the individual red, green and blue channels.

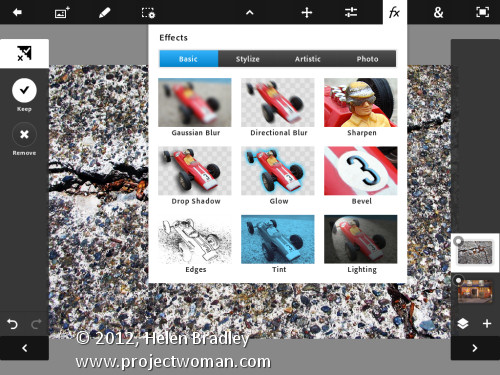
With the texture layer still targeted you can apply a filter to it by clicking the FX button. There is a range of filters including Basic, Stylize, Artistic and Photo. Some add things like drop shadows, blurs and glows and others are more artistic.

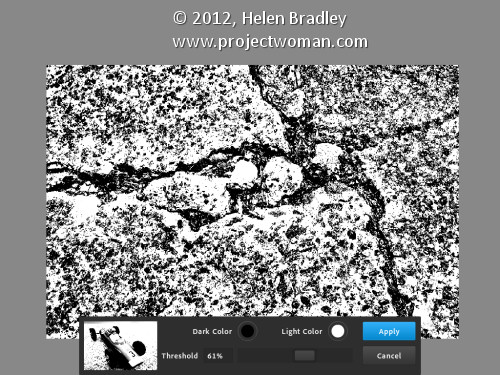
I chose Stylize > Old Photo, configured the settings and tapped Apply. Unlike Photoshop where the foreground and background colors need to be selected before you run a filter, here you can select the colors to use in the filter settings – this really is a feature that Photoshop should have.

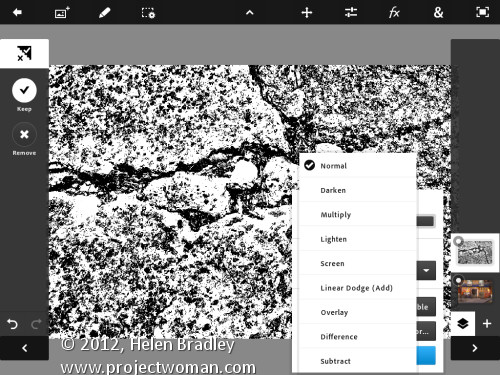
To blend the layers you click the Layer icon and you get a choice of blend modes and the chance to adjust the layer opacity.

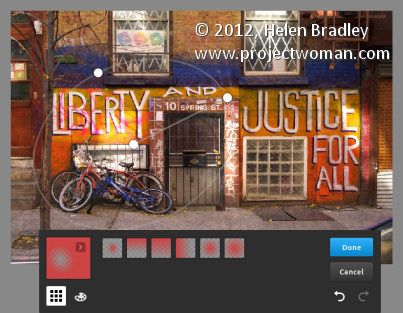
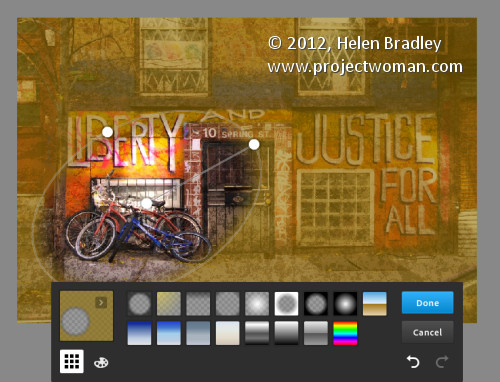
There are no masks but you can use a gradient to fade the effect – when you do the gradient is applied to the layer and you can only undo it by tapping Undo – you can’t go back and edit it.

You can also add a new Empty Layer and fill it with a gradient.

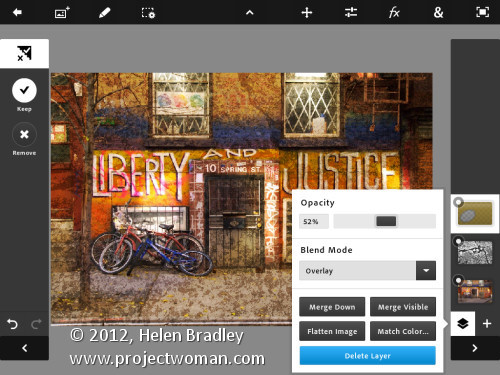
And then blend it using a layer blend mode as I have done here.

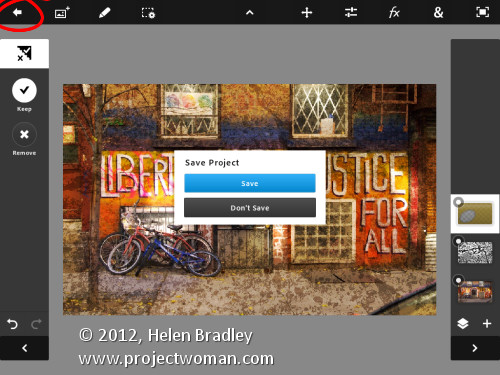
I finished by cropping the image and then saving it.

You can then email it or send it to the Camera Roll or upload the project to the Adobe Creative Cloud so you can access them from there.

There are limits to Photoshop Touch and one is the 1600 x 1600 pixel image size limit. The text tools are rudimentary and, as a long time Photoshop user, I’d like to see editable masks and editable text. That said, for fixing photos and tinkering with creative projects this program is a welcome addition to the Adobe family.

This app will appeal to a range of users. There are plenty of basic tools that are easy to use but also some more advanced features for working with images. The Scribble Extract tool does a reasonable job of extracting a subject from a background and you can tinker with gradients and fades to get some interesting effects. You don’t need to know how to use Photoshop to use the app but your knowledge won’t go astray.

Helen Bradley