Tidy up, rearrange and delete brushes in Photoshop
A reader just contacted me to ask how to delete a brush in Photoshop. It is an interesting question and one worthy of a post I think!
To do this, choose Edit > Presets > Preset Manager to open the Preset Manager dialog. From the Preset Type drop down list choose Brushes to view your brushes. Now you can click a brush to select it – it’s hard to see but it does get a narrow blue line around it. Click Delete to delete it.
Now, something else that is really handy about this dialog is that you can also move brushes! So drag a brush and you can move it to your chosen place in the panel. So, you can put those brushes you use most often at the top of the Brushes panel where they are nice and handy.
Learn a quick fix using lab color mode in Photoshop for adding a color boost to your images. It is simple, you can make it a preset so it is easy to use again in future and it packs a real punch!
Transcript:
Hello, I’m Helen Bradley.
Welcome to this video tutorial. In this tutorial I’m going to show you a simple photo fix using LAB mode that’s guaranteed to add punch to your photos. Before we get started let’s have a look and see what it is that we’re aiming for.
This is going to be are starter image and this is the effect that we’re going to get very quickly and easily with this image. Now this might not be my ending point traditionally in fixing this image but I want to show you how to get from here to here. And where you take it from there is up to you.
Now this fix that I’m going to show you uses the LAB color mode otherwise known as LAB color. And you can’t use it in other applications because it is not available. So for example this mode is not available in Photoshop Elements but you can use it in Photoshop. And it works particularly well when you have colors that are sort of all in the same palette.
You can see here that we’ve got some browns and sort of gray blues but there’s not a lot of differentiation between them. It also works pretty well with desert scenes, lots of greens in an image where there’s not a lot of definition between the greens. So the effect is very, very simple. I’m going to start with my layers palette visible and I’m going to choose Image > Mode > LAB Color.
I’m going into LAB color mode. And that’s just switched the image into LAB color. And then I’m going to duplicate the background layer. So I’m going to right click it and choose Duplicate Layer and click Ok. So now I have two versions of the image one on top of the other.
Now the adjustment that we’re going to use with this image is a curves adjustment. So I’m just going to put everything out of the way for a minute and let’s go and get our curves adjustment, Image > Adjustments > Curves.
Now I like to save this fix when I create it as a preset. So I have it here. It’s called three boxes. I’m not going to use it this time because I want to show you exactly how to do it but this is how you would do it. And you can actually then save it as a preset so you can use it over and over again.
Now the curves dialog is showing you at the moment the lightness, the L channel in LAB. The other two channels are A and B and we want to work on A and B. These are the two color channels. Now this is going to be a little bit confusing if you haven’t dealt with it before. I’m going to explain it to you but you don’t actually need to know anything about it.
I do want to make sure that I’m showing this smaller grid. So I’ve got my options available here and I’m making sure I’ve got a smaller grid. The A channel is the green magenta channel. So this is magenta, this is green. So when I drag in here I’m going to drag in three boxes and you can see that I’ve added a lot of green to the image.
And it works best when you have an image that’s nicely white balanced. So if your image has got a colorcast I suggest you fix it before you come in here. So I’ve dragged in here three boxes on the bottom of the image, bottom of the curve, and now I’m going to drag in three boxes on the top of the curve.
And you come in the exact same number of boxes. You can do one, two or three. Three is just a really, really big effect. And I want to show you exactly how that works. The idea is for this line to go through the middle. So we’re not adding a colorcast to the image. We’re just boosting the colors. So that’s the A channel, magenta and green.
The B channel is yellow and blue. And this is blue and this is yellow. We’re going to do the exact same thing. We’re going to come in a certain number of boxes. Now we could come in two boxes in either direction in this channel. I’m actually going to do three. But you can come in a different number of boxes than you used for the A channel but you’ve got to do the same number of boxes in a particular channel.
So if we’re in a B channel then we’ve got to go three boxes, three boxes or two, two or one, one. But we can’t do different numbers because if we do the line here no longer goes through the middle and we’re throwing a colorcast on our image. That’s why you’ve got to come in the exact same number.
So A channel, magenta/green, boosted that, B channel, blue/yellow, boosted that. The L channel is lightness. So if you want to you could add some contrast in using this channel but you don’t have to. The fix is not about that. So I’m just going to remove it. We’re just going back in with the colors that we’ve boosted.
At this stage if you want to save this as a preset click this little icon here and do Save Preset. And I’m just going to save it for you so that you can see how it works. Again, let’s call it LAB fix and I’ll click Save. And here it is here and we can apply it at any time to our image by just clicking on it. So now that we’ve done this we’re headed back into RGB mode.
So I’m going to click Ok. Now I’m going to choose Image > Mode > RGB Color. Now I’m going to be prompted to flatten this or not flatten. Now I don’t want to flatten. I want these two layers separate so I’m going to choose Don’t Flatten.
However, if we had done curves as an adjustment layer we would be forced into flattening that adjustment layer because it won’t come back into RGB color. That’s why I used just a regular adjustment on a duplicate layer because an adjustment layer won’t work for this process. So I’m going to choose Don’t Flatten because I want my two layers.
And you can see here that we’re back in RGB. And now what I’m going to do is I’m going to select a blend mode to blend these two layers together and I’m going to use the overlay blend mode. And I use that because it’s a really nice contrasty blend mode. If it’s too much of an effect you can always dial down the opacity.
I’m taking it back to the original image and now I can walk it back up and stop wherever it is that I think I’m getting a good fix. So that’s an LAB color fix. I think you’re going to really like it. It’s one of my go to fixes. I use it a lot and particularly on images like this because as you can see the starter image is really, really blah but this image a whole lot better and I really love it.
I’m Helen Bradley.
Thank you for joining me for this video tutorial. Look out for more tutorials on this YouTube channel and please subscribe to my channel so you’ll be notified when new videos are released. And at the moment we’re releasing every Monday and Thursday.
Also visit my website at projectwoman.com for more tips, tricks and tutorials on Photoshop, Lightroom, Illustrator, Photoshop Elements and a whole lot more.
Five Must Know Features of the Photoshop Brush Tool
Brushes are used a lot in photo editing from removing blemishes and smoothing skin to dodging and burning and painting on masks. Here are five important features of the brush tool in Photoshop.
1. Adjust Size, Opacity and Hardness from the Keyboard
When a brush is selected you can adjust its size without having to open the Brushes palette by clicking the [ and ] keys on your keyboard.
Provided a brush is selected you can change its Opacity by typing a number. For example, type 5 to set Opacity to 50%, type 1 for 10% and 0 for 100%.
To adjust the hardness of the brush hold the Shift key as you tap either the [ or ] keys on the keyboard. Each tap increases or decreases the hardness by 25% in the range 0%-100%. The results of doing this are harder to see as there is no hardness indicator on the tool options bar. However, if you have the Painting Cursor set to Normal Brush Tip in preferences you will see a difference in the brush size as you do so
2. Save the Brush
When you have a brush configured with your preferred settings, save it as a Tool preset. To do this from the Brush Preset list in the top left of the screen click the Create New Tool Preset button and type a name for the preset. Click Ok.
In future you can select this saved preset from the list and just start painting with it.
3. Disappearing Brushes
One of the very annoying things that will happen to most of us at one time or another is to have the brush appear to disappear. Instead of the regular brush cursor which shows the size and style of the brush you will see a crosshair cursor.
The issue is not with the brushes themselves but is with the Caps Lock key. If you disable Caps Lock on your keyboard the more visual brush cursor will reappear.
4. Paint a Straight Line
To paint in a straight line, click at one end of the line, hold the Shift key and click at the other end of the line. This draws a continuous brushstroke between both points.
If you adjust the spacing of your brush by using the Brush panel Spacing option to make it more than 100% you can create a line of dots this way.
This can also be used to remove power lines with the Spot Healing Brush Tool. Click at one end of the power line, Shift + Click at the other end to paint a straight line over the power line and it will be removed automatically.
5. Quickly Show the Brush Panel
You can quickly show the Brush panel so you can choose a brush to use by first selecting a tool that uses a brush such as the Brush Tool, Dodge, Burn, Eraser tool and so on.
Then right click on the image and the brush panel appears automatically. To select a brush and exit the panel in one step, double click the brush to use.
And now it is over to you. What other features of Brushes do you think are valuable for photographers to know?
Save Time when importing photos by Creating an Import Preset
If you use the same options every time you import your images into Lightroom, you can create an Import Preset to speed up this task.
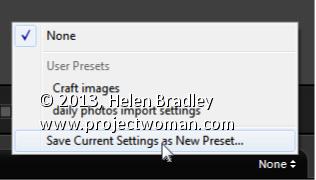
Start by selecting Import to open the Import dialog and go ahead and select those options you generally want to use and then locate the Import Preset option at the foot of the Import dialog. Click the drop-down list and choose Save Current Settings as New Preset. Type a name for the preset and save it.
In future you can select this preset when you are importing images. This gives you, at the very least, a starting point for your import as it sets up the import dialog to match the settings you saved. If you wish, you can make changes to the settings without altering the preset, allowing you to use it anytime.
You can create multiple import presets for different situations so you can select the most appropriate one to use each time you import photos.
As I mentioned in a previous post I am loving working with Trey Ratcliff’s HDR Presets for Lightroom. These presets really rock and for more than just images with great skies.
I have been sorting through a few thousand images I shot in Norway, Sweden and the UK last year and just seeing what is there. I tripped across these two images yesterday and something about them just screamed HDR.
This is the result and I have to say, these images totally rock. In the first, the intensity of the scene is enhanced by the HDR treatment – it makes this back alley really come to life.
In the lead image for this post, repeated here, I saw something in the HDR version I missed in the original – the guy’s reflection in the window. I checked back at the original – the reflection is there but it’s not obvious. In this version it is unmistakable and it takes the image from ho hum to wow – it makes it so much more than it was as an unprocessed image.
Now, as with all Lightroom presets there is nothing in the presets that you could not achieve if you adjusted the sliders in Lightroom yourself. However, these presets are single click fixes – they are quick to apply and they are great.
For me they’ve been an eyeopener and they are helping me to see my images in an entirely new light.
Learn how to create a Faux Orton Effect in Lightroom, which produces intriguing photos using glowy colors and contrasting details. I also demonstrate how to save the effect as a preset to reuse over and over again.
Transcript:
Hello, I’m Helen Bradley. Welcome to this video tutorial. In this tutorial I’m going to show you how to create the Orton effect or a faux Orton effect on an image in Lightroom.
I have an example of the Orton effect that we’re going to create here in Lightroom. This is the original image and this is the image with the Orton effect applied to it. What I’ve done is I’ve softened the image and then tried to boost the blacks a little bit. You can’t get a true Orton effect in Lightroom because you can’t apply layers in an image. So what I’m trying to do is to bring in some of the characteristics of an Orton effect, a slightly lighter more glowy sort of image with some sharp blacks in it and a sort of hazy look to it. So let’s see how we might do this.
With this image open in Lightroom, first of all I’m going to the Develop module and I’m going to upgrade this one because it’s been worked on in earlier version of Lightroom. So I’m just going to upgrade it to the new process version. And I’m happy with that so let’s just go back to the image that we’re working on. I’m going to make a virtual copy so we can see how far we’ve come. And we’re going to be working on this virtual copy.
Now the first thing I’m going to do is just adjust this image. I’m not so much worried about the histogram as I am about getting some things out of this image that I want to get out of it. But I’m going to turn off the highlight clipping because I’ve got that turned on here. You can see highlight clipping is showing here. So I want to hide this for now. Let’s turn off the histogram and let’s just adjust the image a little bit. I’m just going to set my black point. You can see I’ve got the Alt or Option key held and I’m just trying to darken this to get some blacks in the image. It needed quite a bit of darkness in the image. And let’s go up with the whites right now.
Okay, so once I’ve got the image adjusted reasonably well to get a little bit of contrast and I’m starting to see some blacks let’s start going for this Orton effect. And one of the things we’re going to do is to reduce clarity. So we’re going to bring the clarity right down on this image. I do want quite a bit of vibrance because I want a quite a bit of color. And now let’s go and add some more reduced clarity. I’m going to click the graduated filter. Now this allows me to apply a graduated filter to the image. And it needs to be anchored to a side of the image. So I want it anchored to the top so I’m just going to drag down here to create it. And because it has saturation set to minus one hundred what we’re seeing is that we’re seeing no saturation in this images at all. So that’s convincing us that this is the graduated filter. Of course I do want saturation in that image so I’m going to take it back to normal but I am going to reduce clarity. And that’s adding some more of that softening effect to this image. And I’ll click Done.
Now I can boost that even more by adding a second graduated filter to do exactly the same thing. So again, clicking on Graduated Filter, making sure I select New. This time I’m going to drag up. It doesn’t matter whether I go up or down but I just want two filters on this image. So I want to add the effect. So here’s the second filter. Again, the default on this one is for saturation to be minus one hundred. I just want to take that back to normal. And what I want to do is kill the clarity. And I can also kill the sharpness by taking that down a bit too. I might increase the exposure a little bit more in the way of highlights. And I can go to this one as well, click on this and again, bring down the sharpness on this layer, just tweak that a little bit and maybe add a little bit of exposure and highlights on that one, maybe even some shadows until I get the effect that I’m looking for. And I’ll click Done.
At this point I may want to come back and re-adjust my blacks on the whole of the image. You can see that the blacks have been affected by that adjustment and I don’t have nearly as much black as I had before. So let’s go in and adjust the blacks. Having done that I’ve brought way more black in I think than I want. So let’s just go and bring up the highlights a bit on the basic image underneath all those adjustments, and again, kick up the shadows a little bit.
So there’s the basic Orton effect applied to the image and having done that I could just go onto the next image. But I could also make this a preset that I can use in future. In the Develop module I can go up to presets here and I can click the plus symbol. So here we are New Orton because I think I have an old one, okay, and I’m going to select which options I want in there. I do want graduated filters. I didn’t use split toning. I did use color. I did use process version and calibration. I didn’t use any post-crop vignetting or grain. I didn’t use any lens correction or noise reduction here. I did use some color. I didn’t use any sharpening so I’m going to that out. I didn’t use any tone curve adjustment. But I did adjust clarity and I did adjust these settings. I didn’t adjust white balance. So now that I’ve made a selection of everything that I want added to this particular develop preset, I’m just going to click to create it.
Now this is a new Orton preset. And of course it’s been applied to this image by default. But let’s go and get another image shot in similar circumstances to this and let’s go and apply it to this image. And all I do is to click New Orton, and it is than applied to this image. The process version is applied and all of the settings that we included including the two graduated filters here and here. The reason why I used a graduated filter and not adjustment brush is that adjustment brush cannot be included in a develop preset whereas the graduated filter can. And now I’ve got a new Orton preset that I can use with any of my images. All I do is click on the image and then click on this new Orton preset and it’s automatically applied to the images.
Now if I don’t like it I can Ctrl Z to undo it. In the case of this image that I had already applied it to I kind of like it, but I think the saturation is too much. So I can use that as a starting point for working with this image. And I can then adjust the sliders because all you’re doing by creating a preset in Lightroom is actually recording what the sliders are set at. So you can use that as a starting point and then adjust the sliders as you like from there.
So there’s how to create a faux Orton preset in Lightroom to apply to your images. I’m Helen Bradley. Thank you for joining me for this video tutorial. If you liked the tutorial please like the video here on YouTube. Think about subscribing to my YouTube channel so that you get updates whenever we launch videos which at the moment is a couple of times a week.
If you’re a keen photographer, chances are that you publish some of your photos to Flickr for sharing with friends and family. One of the disadvantages of Lightroom 2 is that it does not come with a built in tool for publishing direct to Flickr although this has been addressed in Lightroom 3 which does offer this ability.
There are, however, tools like Jeffrey Friedl’s Lightroom plug-in that you can use to do the job. Here’s how it works:
Step 1
To download the tool, visit http://regex.info/blog/lightroom-goodies/flickr and locate the tool for your version of Lightroom. There are different downloads for Lightroom 1 and Lightroom 2 so get the right one.
Step 2
Download the zip file which, if you are using Lightroom 2 is via a link in the top right hand corner of the screen.
Unzip the downloaded file and, when you do, you will see a .LRPlugin folder inside the zip file.
You need the entire contents of this folder so drag and drop the entire folder from your Downloads folder into the place where you plan to keep it long term.
Lightroom isn’t fussy about where you place your plug-ins but it makes good sense to place them all in a central location where it is easy for you to find them. I suggest you place it nearby your Lightroom folder or in your Documents folder where it will be included in your regular system backup.
Step 3
Now return to Lightroom and choose File > Plug-in Manager. This opens the Plug-in Manager dialog where you install your Lightroom plug-ins. Click Add and navigate to the folder that you stored the .lrplugin folder. Click the folder to select it and click Ok.
Click Update if prompted to update your catalog to support the plug-in. A dialog will appear with more instructions in it. Read the information and click Ok when you are done.
Step 4
The Plug-in will be listed in the plug-in list so click Done to exit the dialog.
Step 5
Now select a few images to upload to Flickr. Right click one of the selected images and choose Export > Export.
At the very top of the dialog you will see the Files on disk heading, click this panel and locate the Flickr (Jeffrey’s) option in the list.
Go ahead and (ignoring the Export Location settings) complete the other areas of the Export dialog as you would for any export task.
Pay particular attention to the file names, file format and quality because, when you click to Export the files they are sent direct to Flickr.
If you plan to resize the images select the Image Sizing options and choose the desired option.
Step 6
Click the Authenticate to Flickr button at the top of the dialog. You only need do this the first time you upload images. Your browser will open and you should sign in using your Flickr log-in and password.
Step 7
When prompted, click the second Next button to authenticate the connection then click Ok, I’ll authorize it if you are happy with the conditions displayed.
Once you have done this, close your browser, return to Lightroom and click the I’ve authenticated at Flickr.com button to confirm you have done so.
Step 8
Once you are authenticated, additional options are available in the Export dialog. You can, for example, select the photosets for the images and ask to view the Flickr photoset when uploading is complete.
Step 9
You can also set Licence types for the images, add keywords and configure a range of options for uploading.
Step 10
When you are done, click the Export button to export your images to Flickr.
This Lightroom plug-in is, what is called, donation ware. It is functional for six week and then you’re asked to register and make a donation one cent is the minimum PayPal fee. If you don’t register then functionality is reduced to uploading ten images at a time.
This plug-in works well and, until you upgrade to Lightroom 3 it is a smart addition to your Lightroom toolkit. For my money it makes the upload process seamless. And, because it saves me an entire step by rolling Export from Lightroom and upload to Flickr into a single step it represents the difference between things being left on my to do list and tasks getting a big black line drawn through them – and I like that!
There are lots of Lightroom presets that you can download from the web and use in the program. The question then becomes where do you put these. There are a couple of ways to find the presets folder in Lightroom. One is to open the Develop module, locate the presets dropdown list and right-click one of the user presets that you’ve created and choose Show in Explorer. This opens the Lightroom presets folder inside Windows Explorer. If you’re using a Mac, the link will be to the Mac equivalent. The other method of doing this is to choose Edit > Preferences > Presets tab. Click the Show Lightroom Presets folder to view the presets folder location.
You will need this location to store downloaded presets, in and you will also need the location so that you can ensure that you back up your presets so that you do not lose them as, by default, they are not stored with the catalog and so will not be backed up with it.