Thursday, February 28th, 2013

HDR Presets in Lightroom


Processing an image with HDR presets in Lightroom

As I mentioned in a previous post I am loving working with Trey Ratcliff’s HDR Presets for Lightroom. These presets really rock and for more than just images with great skies.

I have been sorting through a few thousand images I shot in Norway, Sweden and the UK last year and just seeing what is there. I tripped across these two images yesterday and something about them just screamed HDR.

This is the result and I have to say, these images totally rock. In the first, the intensity of the scene is enhanced by the  HDR treatment – it makes this back alley really come to life.

In the lead image for this post, repeated here, I saw something in the HDR version I missed in the original – the guy’s reflection in the window. I  checked back at the original – the reflection is there but it’s not obvious. In this version it is unmistakable and it takes the image from ho hum to wow – it makes it so much more than it was as an unprocessed image.

Now, as with all Lightroom presets there is nothing in the presets that you could not achieve if you adjusted the sliders in Lightroom yourself. However,  these presets are single click fixes – they are quick to apply and they are great.

For me they’ve been an eyeopener and they are helping me to see my images in an entirely new light.


Helen Bradley

Wednesday, February 6th, 2013

Lightroom Presets for Adding Punch to your Images

 These downloaded presets will kick start your image processing.

I don’t buy a lot of presets for Lightroom – I prefer to create them myself. However I had a student the other day who had some images he was very unhappy with. They had been shot in the desert and they should have looked wonderful and they didn’t. In part this might have been the choice of white balance setting used in the camera and the fact that he shot in jpg, but in part the images just needed a real boost.

In the interests of having something to help him with I went hunting around the web and finally tripped over the very wonderful Trey Ratcliff’s presets. These cost $19.97 but if you have images that need a real kick ass fix it could be the best $20 bucks you spend.

You can find the presets here at his Stuckincustoms.com website: Trey Ratcliff’s Ligthroom Presets. There are 75 presets in the collection in all. 


I downloaded them, installed them and then put them to work on some images I had that had good skies and some potential but which really needed some serious work. These can be one click solutions and in some cases I took Trey’s presets as a starting point and added a few tweaks of my own but the presets really got the images well on their way. More so, they are quick to use and the results are fantastic.

The collection includes a heap of cross process and gradients, a collection of funky fixes and the HDR presets. It is the HDR ones I wanted to use to test for my student, but seriously all the presets are good and you’re sure to find some you like. One I love is the Flatjack HDR adjustment – it really works a treat.


Helen Bradley

Thursday, May 24th, 2012

Faux HDR effect in Lightroom 4

I just uploaded a new video tutorial on how to create a faux hdr image in Lightroom. This image really didn’t inspire me when I first looked at it, but clearly at the time I captured it something had caught my eye. When I applied this faux hdr effect to the image it just came to life. The process is very quick and very simple, and the video is very short – only just over 5 minutes and you’ll know all you need to know to salvage your own images.


Helen Bradley

Tuesday, September 20th, 2011

Stacking images in Lightroom

When you have a lot of similar images from a shoot, you can organizing them using the Lightroom Stacks feature. This allows you to stack images together so that only one image representing the stack appears in the Grid, Filmstrip and Loupe. This can clean up the screen reducing the number of images you see.

Get started with Stacks in Lightroom
To stack images, in the Library module, select the images to stack, right click and choose Stacking > Group Into Stack. This stacks the images on top of each other.

In Grid view you will see a small number in the top corner of the image at the top of the stack showing the number of images in the stack.

You can add an image to a stack by dragging and dropping it on top of a stack.

Expand a Stack
To expand a stack, right click on the number showing the number of images in the stack and choose Expand Stack from the Stacking shortcut menu or click the double line marker either side of the stack. Click the double line marker again to collapse the stack or right click an image in the stack and choose Stacking > Collapse Stack.

When you expand a stack, the images from the stack have a darker color underneath them indicating that this is an expanded stack.

There is some important terminology to know about stacks. You collapse and expand a stack to view or hide the images in the stack. If you unstack a stack you permanently remove the stack – you do not remove the images just the stack. There is no restack command so, when you unstack a stack, your only option for getting it back is to reselect the images and stack them again. You also cannot create a stack in a collection – you may only stack images in a folder.

Change the visible image
To change the image at the top of the stack, expand the stack, click the image to use as the top image and choose Stacking > Move to Top of Stack. The topmost image is the one that is visible when you collapse the stack again.

Remove an image from a Stack
You can remove an image from a stack by expanding the stack, right click the image to remove and choose Stacking > Remove from Stack.

Stack for HDR
There is another stacking option you can use, for example, where you have captured a series of images to use for a panorama or where you have captured a series of bracketed exposures for HDR processing. Because these images will have been captured within a short period of time, you can stack them based on capture time. To do this, select all the images, right click and choose Stacking > Auto-Stack by Capture Time. Set the time between stacks value – as you do you will see an indicator telling you how many stacks this will give you and how many images will remain unstacked. Use this as a guide to the optimal value to use. Click Stack to have Lightroom create your stacks for you.

Once this is done, right click and choose Stacking > Collapse Stacks to view the stacks that you have made. This is a quick way to group images that are most likely to be part of the same sequence of images and if one or more stacks aren’t correctly formed, you can either unstuck them or split a stack in two by right clicking the image at the point that the split should be made and choose Stacking > Split Stack.

Stacks are a useful way to restore order to a large folder of images containing a lot of similar images. By stacking images you’re not altering the images in any way, simply organizing them a little more neatly.

Helen Bradley

Monday, October 26th, 2009

Photomatix Pro: Create an HDR image


It seems like HDR or High Dynamic Range imagery is all the rage right now. There are lots of tools around for assembling an HDR image and, although Photoshop now has a tool to do this, PhotomatixPro is much more sophisticated and the results are much better, so I’ll show you how to use it.

Before we start, however, a bit of background as to what HDR is and why you might use it. One of the limitations of digital cameras is that they can only capture an image with a fairly narrow dynamic range – the range of lights and darks in the image. In fact, faced with a scene that has very bright areas and very dark areas, you and I can see much more detail in the scene than the camera can capture in one shot.

However, the camera can capture lots of images of the same subject each with a different exposure. So you can expose for the light areas and again for the dark areas and again for the midtones and capture 3 of more images of the same subject that together show all the rich detail in the shadows and in the highlights. What HDR software does is to help you assemble these images into one image with a wider range of lights and darks than you can get in a single image.

To capture for HDR, ideally you need a series of images shot using a tripod so you eliminate movement between the images. Your overall camera settings should not change from one image to the next – except that the exposure for each will be different. Typically you’ll use your camera’s Auto Bracketing feature to capture the series and it’s best to limit your shooting to a scene that won’t change while you’re capturing it so you don’t get movement between frames.

It is possible to render an HDR image from a single camera raw image and you would have to do this if you were shooting a moving crowd for example. However it’s best, where possible to capture multiple separate exposures. If you’re using an IS camera disable this feature when shooting on a tripod – leaving it on can actually cause camera movement.

A trial version of Photomatix Pro 3 is available from www.hdrsoft.com so download and install it. If you don’t have suitable images to work with, there are three sets of sample images on the site that you can use. Here’s how to assemble an HDR image from multiple exposures:


Step 1
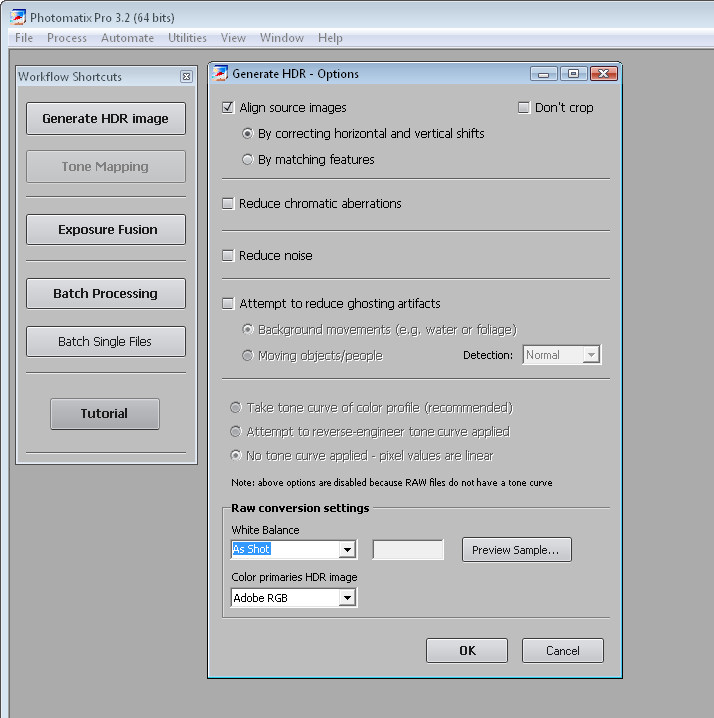
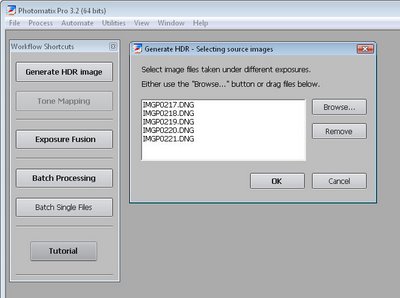
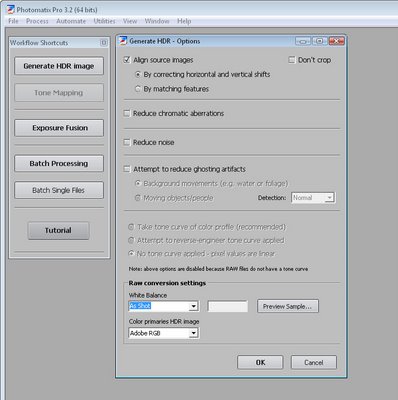
Launch Photomatix Pro 3 and select Generate HDR image. Select your series of images and click ok. You can use three or more images and the program can read DNG files so you don’t have to convert these first.


Step 2
In the dialog you can select to Align the images if you think there may be some movement and you can change the White Balance setting. You can also select to reduce ghosting artifacts which may occur if there is movement between images such as people walking.

Click Ok and wait as the processing is performed.


Step 3
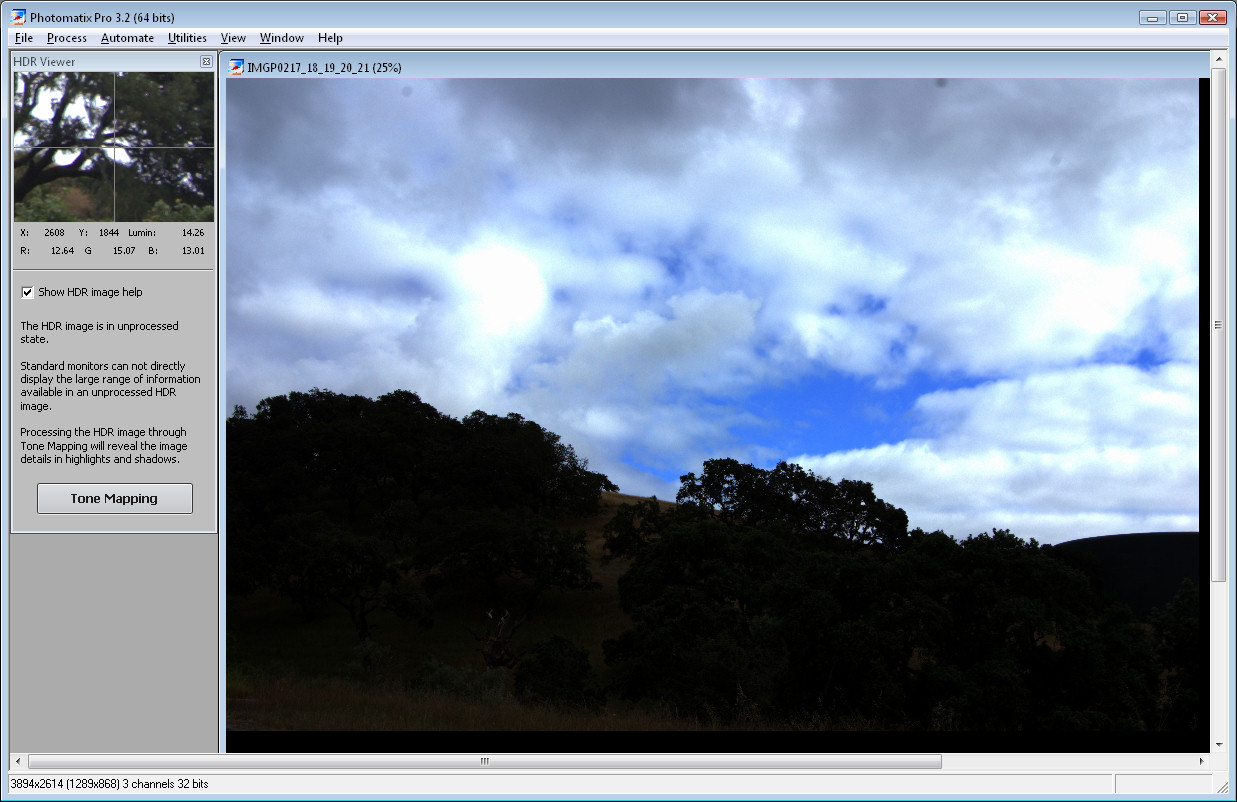
The resulting image won’t look good and that’s to be expected. You can save it at this point if desired by choosing File > Save As and save it as a .hdr image. You can later open this and work on it without having to generate the HDR version from the source images again.


Step 4
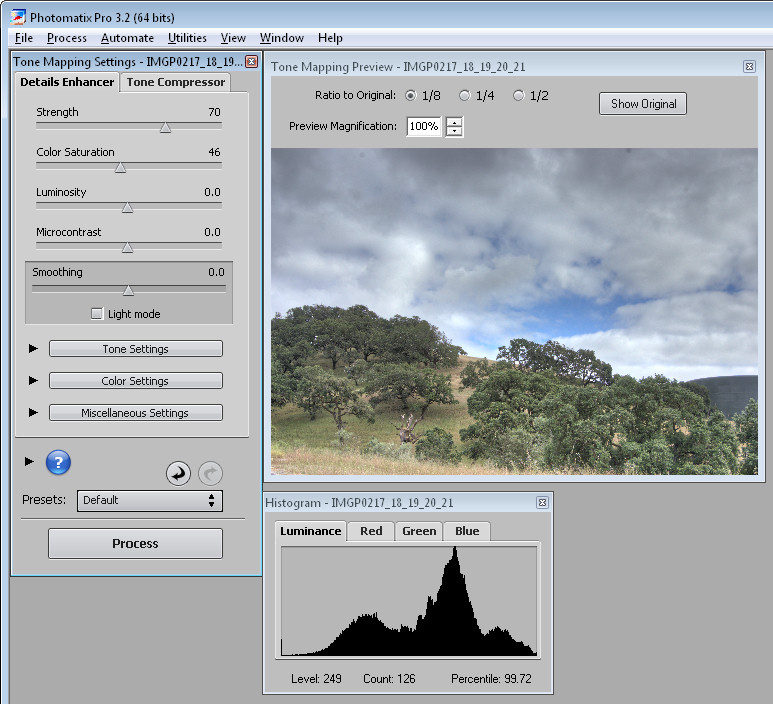
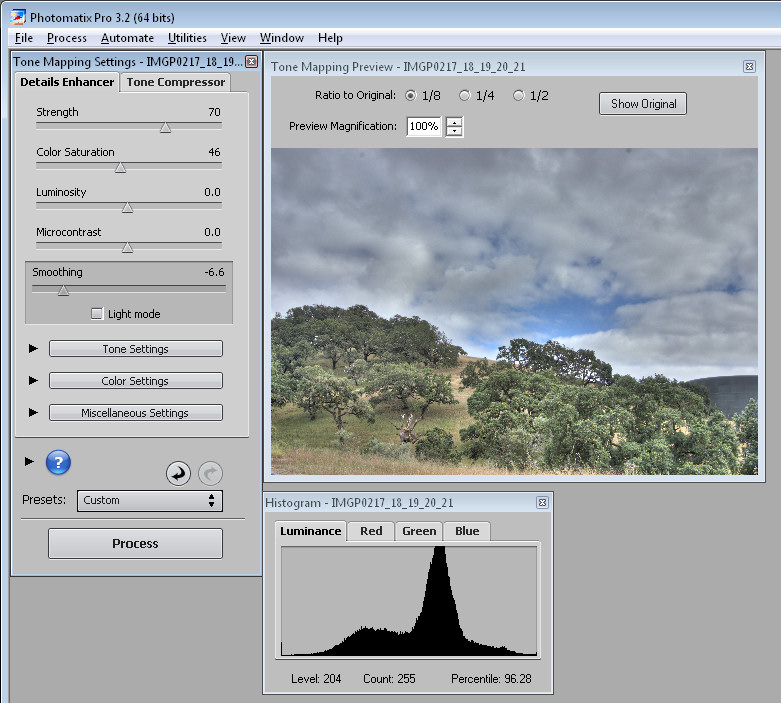
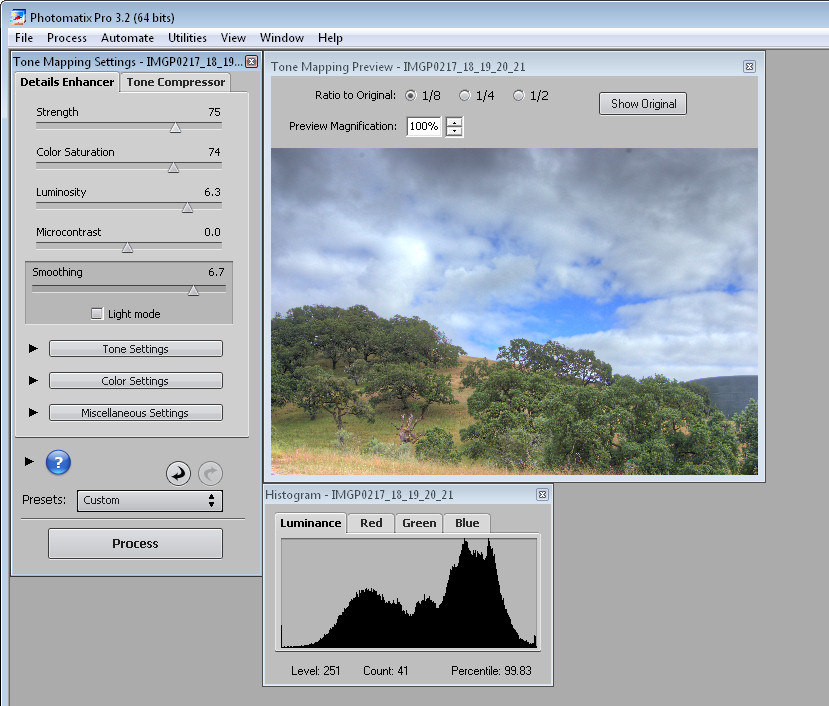
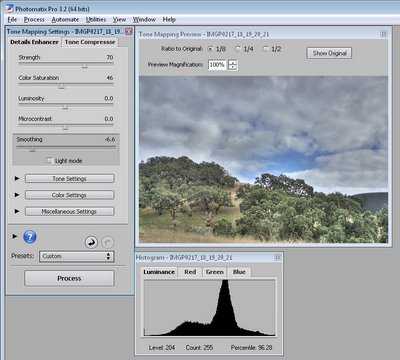
Choose Tone Mapping and you’ll begin to see the possibilities in the image. Click Show Original to compare the image with what you had previously. You should see enhanced detail in the shadows and in the highlights.


Step 5
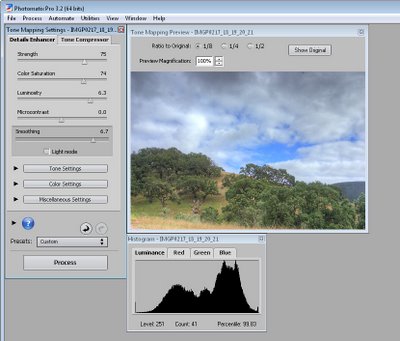
To get a surreal effect, from the Smoothing options, select a low value – the lower the value the more surreal is the image and the higher the value the more realistic is the result. Adjusting the Strength downwards will also help you retain more realism if that’s what you want.


Step 6
Use the Color Saturation slider to adjust the saturation of the colors in the image and use Luminosity to adjust the overall lightness.


Step 7
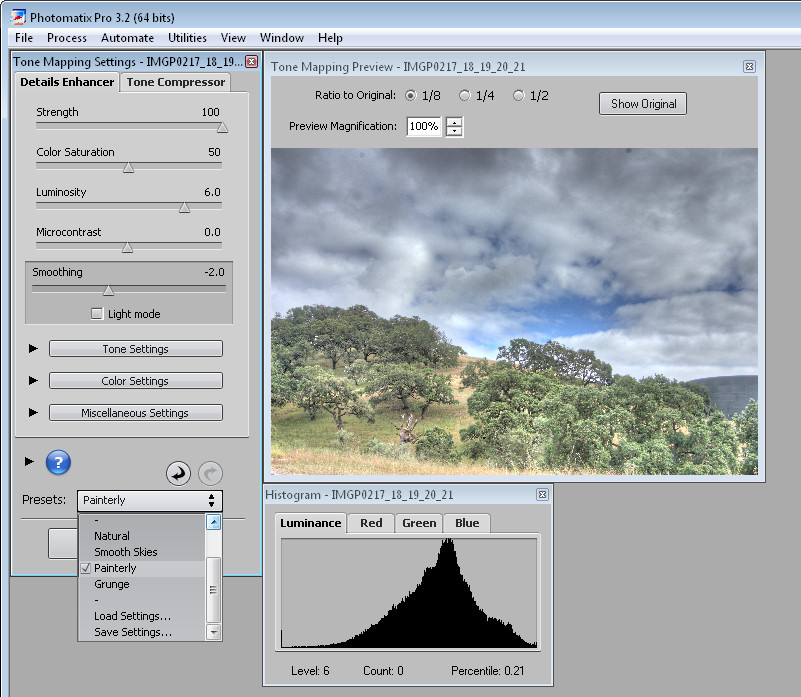
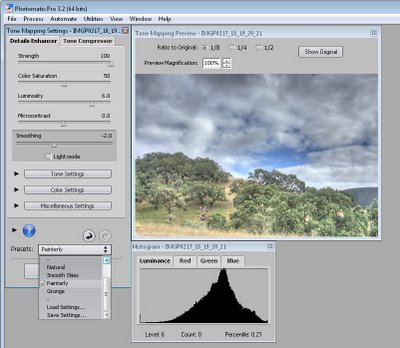
There are also presets you can select from in the Presets dropdown list such as Painterly, Grunge, Natural and Smooth Skies.

Step 8
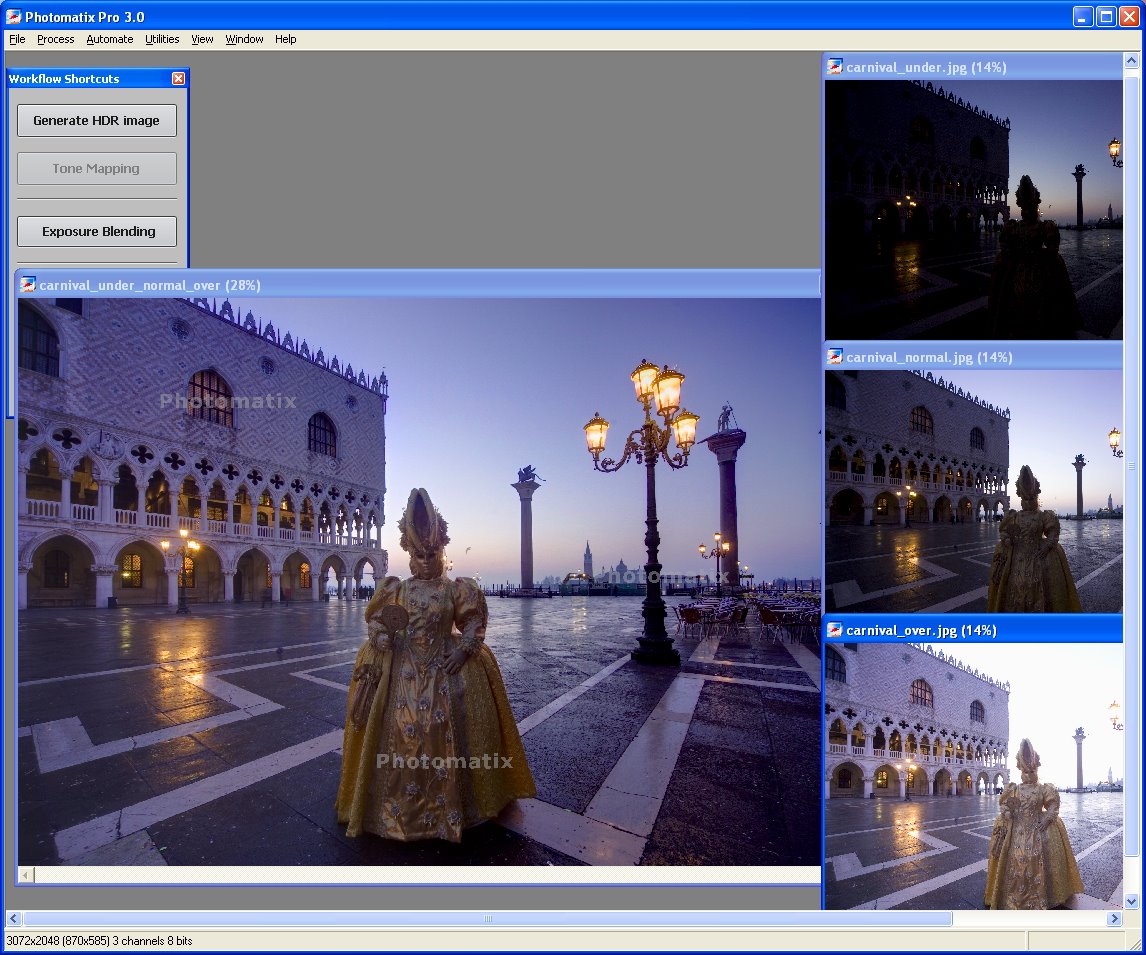
When you have an effect you like, click Process to process the image using the settings you chose.

When the finished image appears, choose File > Save As to save it and you can then open it in Photoshop or another editor to finish working on it.

Helen Bradley

Friday, August 28th, 2009

Cool Photo Apps #6 Create HDR images


Not all good applications come in big shinny boxes like Photoshop and Photoshop Elements. Many cool photo apps are available on the web and they’re free.

These apps do things that other programs don’t. They are fun to use and practical. In this Cool Photo Apps series I’ll show you some of these, today it will be how to create an HDR image.

Once of the limitations of digital cameras is that they are only capable of capturing an image with a fairly narrow dynamic range. You can, however, create images that have a higher dynamic range if you take a series of images at different exposures and combine them by selecting the best exposed pieces of each.

To do this, ideally, you need images shot using a tripod so there is no movement between images. In addition, the camera settings should not change from one image to the next – except, of course for the exposure settings.

While you can assemble the series of images manually, good software makes it much easier to do. Programs such as PhotoImpact and Photoshop have built-in tools to do this but you can also purchase standalone programs to do the work.

One specialty program is Photomatrix Pro 3 which you can find it at www.hdrsoft.com. Download and install the trial version and, if you don’t yet have suitable images to work with, download a set of sample images at the same time and unzip them.

Step 1
Launch Photomatrix, select Exposure Blending > Browse and load the images shot with different exposures.

Step 2
When the Exposure Blending dialog appears you will see the composite image appear and you can select fine tuning options such as Average, Highlights & Shadows – Auto, Highlights & Shadows – Adjust etc.. Select and compare the various options and adjust the sliders until you find a result you like.

Step 3
Once you’re done, click Process and the images will be compiled into a final HDR image.

Step 4
The program also includes a Generate HDR Image option which involves a more complex process than Exposure Blending.

Helen Bradley