Thursday, August 22nd, 2013

How to use the Masking Slider to limit image sharpening to only the edges in the image
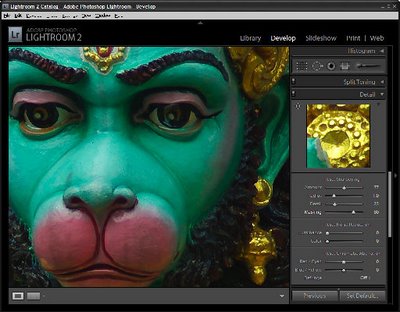
The Masking slider in the Lightroom Detail panel allows you to control the areas of the image that are sharpened and those that are not.
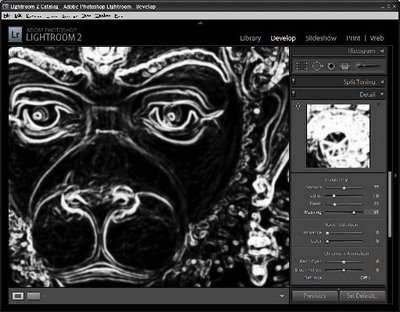
Hold Alt (Option on the Mac) as you drag on the Masking slider. As you do you will see a black and white overlay on the image. The areas that are black are not sharpened, those that are white are sharpened. The farther you drag to the right the more the sharpening is limited to just the edges in the image where you want it to be applied to.
Drag on the slider to control just how much of the image you want to have sharpened. When you’re done, adjust the Amount to a value that makes sense for the image.
Helen Bradley
Labels: Alt, amount, Amount Value, Black, blend, detail, Develop, Develop Module, edge, Lightroom, mask, masking, option, Photoshop, Sharp, Sharpen, Sharpening, sharpening in lightroom, slider, tip, trick, Tutorial, value, white
Categories:Lightroom, photoshop
posted by Helen Bradley @ 6:45 amNo Comments links to this post
Monday, August 19th, 2013

Learn how to suppress halos with the Detail Slider when Sharpening in Lightroom
The Detail slider in the Detail panel in Lightroom lets you suppress the haloes you create with the Radius slider.
At zero position you will fully suppress any halos and at 100 you will have no halo suppression so you will see all the halos added using the Detail slider.
This means that a low value for the Detail sider sharpens only the largest edges in the image and a large value for Detail will tend towards sharpening everything.
Hold Alt (Option on the Mac) as you drag on the Detail slider to see the effect on the halos around the edges in the image.
Typically if you use a high Radius value then you will want to use a low value for Detail and vice versa.
Helen Bradley
Labels: 100%, Alt, detail, Develop, Develop Module, edge, halo, Lightroom, option, Photoshop, radius, Sharp, Sharpening, sharpening in lightroom, slider, tip, trick, Tutorial, zero
Categories:Lightroom, photoshop
posted by Helen Bradley @ 6:39 amNo Comments links to this post
Wednesday, August 14th, 2013

Learn how to fine tune sharpening with the Amount and Radius Sliders
The Detail panel in Lightroom controls sharpening on the image. Use the Amount slider to manage the intensity of the sharpening – set this to a high value to begin.
The Radius slider adds halos around the edges in the image which is what gives the sharpening effect.
For an image with lots of fine lines and detail such as a building select a low radius. For a portrait or an image with softer detail, use a high radius value.
Hold the Alt key (Option on the Mac) as you drag on the Radius slider to see the halos.
Helen Bradley
Labels: Alt, amount, detail, detail sharpening, Develop, Develop Module, edge, effect, halo, Lightroom, option, Photoshop, radius, Sharp, Sharpening, sharpening in lightroom, slider, tip, trick, Tutorial
Categories:Lightroom, photoshop
posted by Helen Bradley @ 6:31 amNo Comments links to this post
Wednesday, June 19th, 2013

Create the Orton Effect in Lightroom with the Clarity Slider
The Orton Effect is named after photographer Michael Orton. This process results in a somewhat surreal image which has a slightly out-of-focus look while retaining lots of edge detail.
You can quickly give an image a faux Orton look using the Clarity slider in Lightroom. All you need to do is drag the Clarity slider to the left close to -100 and then, increase the Blacks in the image to an higher than usual value.
Of course there is a lot more to the Orton effect than this but this gives you a good start and, for many images, may be all you really need.
Helen Bradley
Labels: -, 100%, Blacks, blur, clarity, detail, Develop, Develop Module, edge, effect, faux, focus, image, Lightroom, negative, orton, out, out of focus, Photoshop, slider, surreal
Categories:Lightroom, photoshop
posted by Helen Bradley @ 6:15 amNo Comments links to this post
Thursday, June 6th, 2013

Find Lost Details Hidden in Shadows and Darker Parts of an Image
When you have an image that has details lost in the shadows or darker areas of the image, the Fill Light slider in Lightroom 3 or the Shadows slider in Lightroom 4 can be used to recover this detail.
Don’t use either of these as a tool for lightening an image or to lighten shadows if there is nothing interesting in the shadows. Use them instead when you want to get some interesting detail out of the shadows.
The result of using the Fill Light and sometimes using the Shadow tool is that some contrast in the image will be lost – so you nay need to increase Contrast as a result of using the Fill Light slider in Lightroom 3 or apply a tone curve adjustment in Lightroom 4.
Helen Bradley
Labels: area, contrast, dark, detail, Develop, Develop Module, Fill Light, image, light, Lightroom, Lightroom 4, lost, Photoshop, recover, shadow, shadows., slider, tip, Tone Curve, tool, trick
Categories:Lightroom, photoshop
posted by Helen Bradley @ 6:04 amNo Comments links to this post
Sunday, April 14th, 2013
Area Picker – Viewing a Preview Image when sharpening
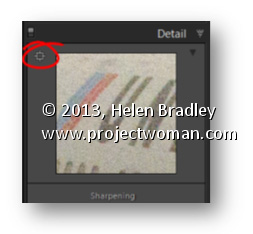
The Detail panel of the Develop module in Lightroom contains the features you need to sharpen an image. In this panel is a small square icon with lines radiating from it. Click this once and now hover over an area in the larger image. As you do this you will see that area of the image appears in the preview panel at 100% magnification. Use this tool to click on an area of interest in the image that you can view in the preview area so you can see how the sharpening is being applied.
If minor adjustment is required, drag the preview image in the preview area with your mouse to fine tune its placement.
Helen Bradley
Labels: 1:1, 100%, area, area picker, detail, Detail Panel, Develop Module, Lightroom, picker, preview, preview image, Sharpening, tip
Categories:Lightroom, photoshop
posted by Helen Bradley @ 10:34 amNo Comments links to this post
Thursday, May 24th, 2012

I just uploaded a new video tutorial on how to create a faux hdr image in Lightroom. This image really didn’t inspire me when I first looked at it, but clearly at the time I captured it something had caught my eye. When I applied this faux hdr effect to the image it just came to life. The process is very quick and very simple, and the video is very short – only just over 5 minutes and you’ll know all you need to know to salvage your own images.
Helen Bradley
Labels: basic panel, detail, faux hdr, HDR, Lightroom 4, punch up an image, Sharpening, Tone Curve, toning
Categories:Uncategorized
posted by Helen Bradley @ 4:43 pmNo Comments links to this post
Tuesday, August 11th, 2009
 Do your travel photographs look just like everyone else’s?
If you wonder why you bothered lugging your digital SLR half way around the world and didn’t just settle for buying postcards, it’s time to revisit the way you photograph your travels. Here is part 1 in my new series of Better Travel Photography – a guide to getting great travel photos that don’t look like everyone else’s..
Today’s tip: Move out of the way
If you’re tempted to stand alongside other photographers to capture photos of popular tourist destinations then it’s time to move away.
The really unique photographs are those that you take when you look at something through your eyes rather than following what everyone else is shooting.
Look for things that are different and interesting to you in the place you are visiting..
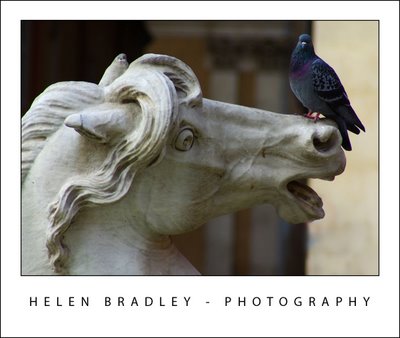
For example, when photographing fountains look for something other than the big picture.
Get in close to the fountain to capture close-up detail or wait for something to happen.
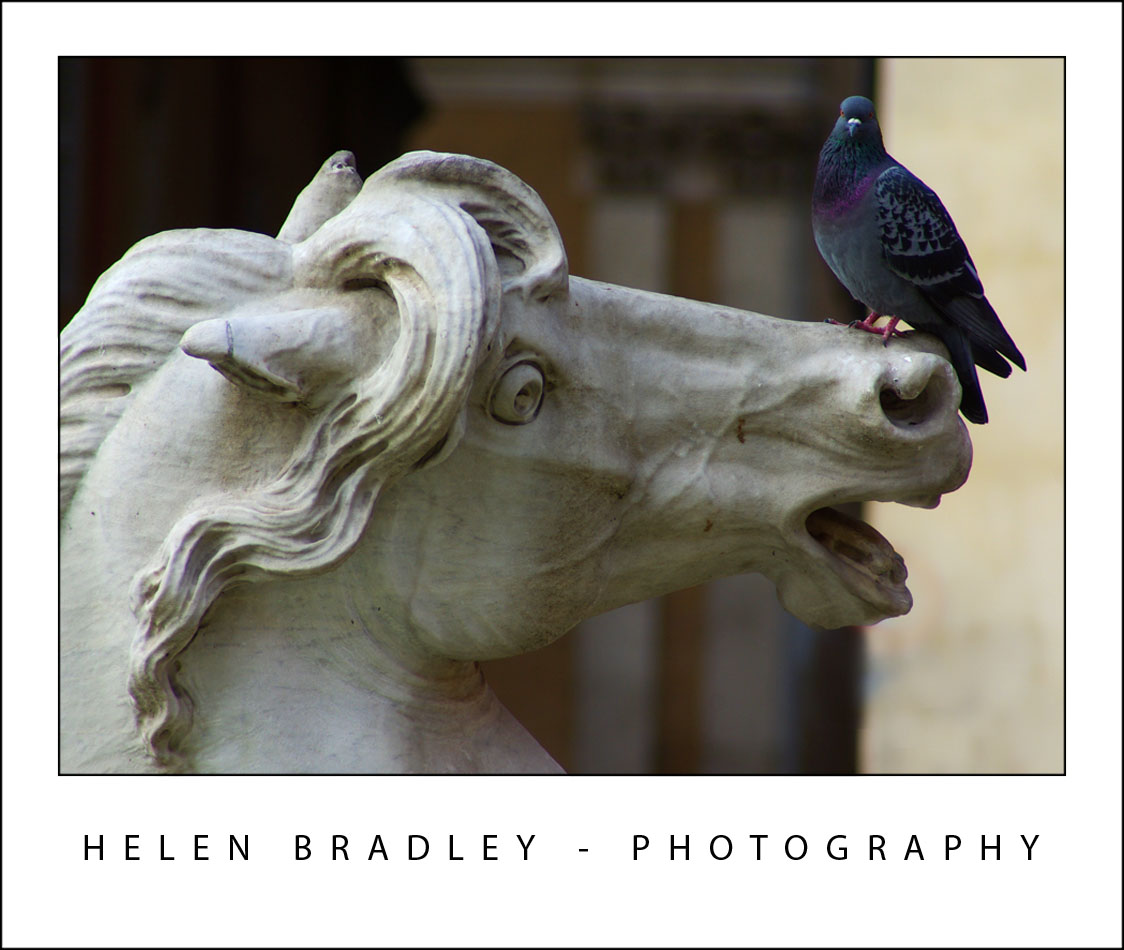
It might be a child splashing in the fountain, a couple sharing a kiss or it might be something as unusual as a bird perched on a statue.
Even in the most popular tourist places there are great and fun and unusual things to capture.
Helen Bradley
Labels: close up, detail, Photographing fountains, travel photography
Categories:Uncategorized
posted by Helen Bradley @ 9:58 pmNo Comments links to this post
Wednesday, March 4th, 2009
Sharpening is the last step in editing an image. If you’re working in Lightroom then you have a very sophisticated Sharpening tool at your disposal. It’s hard to determine what the coolest part of the process is – the Detail and Masking sliders or the fact that sharpening is applied to only the image luminosity so it doesn’t mess up the image colors.
To sharpen in Lightroom, open the Develop module and the Detail panel to show the sharpening tools. A good starting point for most images is to set the Amount to 100, set the Radius to 1.0 and the Detail to around 25. As an aside, it’s nice to see that Lightroom is realistic about the appropriate radius to use and it limits you to a value between 0 and 3 which takes some of the guess work away from determining what value you should use.
Now you have a starting point, adjust the Detail and Amount sliders to see how they affect the sharpening. To see the before and after, press the backslash (\) key. The Detail slider is unique to Lightroom – it doesn’t appear in Photoshop. What it does is to remove halos around the sharpened edges. Low values for Detail reduce halos and higher values allow them.
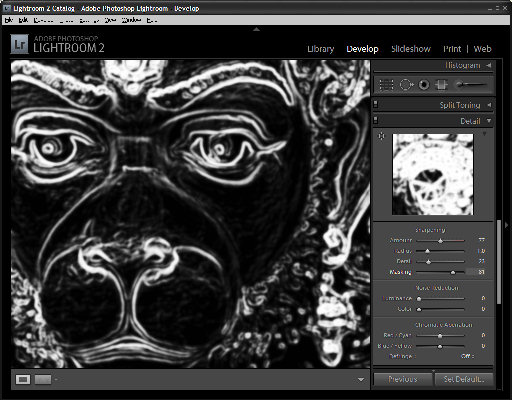
The Masking slider is a way cool tool. It lets you remove the sharpening from texture areas of the image and areas that you typically would not want to be oversharpened such as skin tones. To use it, drag the Masking slider to around 75 and compare the results. You should see less sharpening in areas that don’t typically need it the larger the Masking value. To see what the mask looks like, hold the Alt key (Option on the Mac) as you drag on the slider and you’ll see a grayscale mask in place of your image. The white areas of the mask are the areas that will be sharpened – they are the edges in the image – and the black areas are those that will not be sharpened or which will be sharpened with less intensity.
The mask gives you a lot of control over how the sharpening is applied to the image and it prompts the question “why isn’t this in Photoshop too?”
Helen Bradley
Labels: amount, detail, Lightroom 2, masking, radius, Sharpening, unsharp mask
Categories:Uncategorized
posted by Helen Bradley @ 3:15 am1 Comment links to this post