Monday, August 19th, 2013

Learn how to suppress halos with the Detail Slider when Sharpening in Lightroom
The Detail slider in the Detail panel in Lightroom lets you suppress the haloes you create with the Radius slider.
At zero position you will fully suppress any halos and at 100 you will have no halo suppression so you will see all the halos added using the Detail slider.
This means that a low value for the Detail sider sharpens only the largest edges in the image and a large value for Detail will tend towards sharpening everything.
Hold Alt (Option on the Mac) as you drag on the Detail slider to see the effect on the halos around the edges in the image.
Typically if you use a high Radius value then you will want to use a low value for Detail and vice versa.
Helen Bradley
Labels: 100%, Alt, detail, Develop, Develop Module, edge, halo, Lightroom, option, Photoshop, radius, Sharp, Sharpening, sharpening in lightroom, slider, tip, trick, Tutorial, zero
Categories:Lightroom, photoshop
posted by Helen Bradley @ 6:39 amNo Comments links to this post
Wednesday, June 19th, 2013

Create the Orton Effect in Lightroom with the Clarity Slider
The Orton Effect is named after photographer Michael Orton. This process results in a somewhat surreal image which has a slightly out-of-focus look while retaining lots of edge detail.
You can quickly give an image a faux Orton look using the Clarity slider in Lightroom. All you need to do is drag the Clarity slider to the left close to -100 and then, increase the Blacks in the image to an higher than usual value.
Of course there is a lot more to the Orton effect than this but this gives you a good start and, for many images, may be all you really need.
Helen Bradley
Labels: -, 100%, Blacks, blur, clarity, detail, Develop, Develop Module, edge, effect, faux, focus, image, Lightroom, negative, orton, out, out of focus, Photoshop, slider, surreal
Categories:Lightroom, photoshop
posted by Helen Bradley @ 6:15 amNo Comments links to this post
Sunday, April 14th, 2013
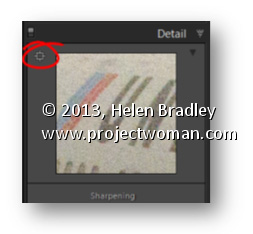
Area Picker – Viewing a Preview Image when sharpening
The Detail panel of the Develop module in Lightroom contains the features you need to sharpen an image. In this panel is a small square icon with lines radiating from it. Click this once and now hover over an area in the larger image. As you do this you will see that area of the image appears in the preview panel at 100% magnification. Use this tool to click on an area of interest in the image that you can view in the preview area so you can see how the sharpening is being applied.
If minor adjustment is required, drag the preview image in the preview area with your mouse to fine tune its placement.
Helen Bradley
Labels: 1:1, 100%, area, area picker, detail, Detail Panel, Develop Module, Lightroom, picker, preview, preview image, Sharpening, tip
Categories:Lightroom, photoshop
posted by Helen Bradley @ 10:34 amNo Comments links to this post
Thursday, June 28th, 2012

(photo by: Luis Gustavo)
A quick tip for Photoshop that will save you some time. To see an image at 100% size all you have to do is double click the zoom button in the tool bar.
Helen Bradley
Labels: 100%, how to, Photoshop, quick, tip, trevor adobe, trevor payne, Zoom
Categories:photography, trevor tip
posted by Trevor Payne @ 8:00 amNo Comments links to this post

