Thursday, September 19th, 2013

Extract a shape from its background in Photoshop

How to cut an image from its background – this buckle has hard edges and you will see how to select around it and cut it out using shapes and a mask – you don’t have to learn how to use the pen tool to make the selection (although it would be the better tool to use). The idea  with this video is doing it without having to use the pen tool.

Transcript:

Hello, I’m Helen Bradley.

Welcome to this video tutorial. In this tutorial I’m going to show you a method of removing an object’s background when that object has some very distinct edges. Before we get started with this tutorial let’s have a look and see what we are going to do.

A client of mine sent me this image of a buckle. And what we want to do is to extract the buckle from its background so we can do things with it. And this is the finished project that I’ve already created and you can see that now I can create things such as a ribbon running behind the buckle. I’ve added a background to it and it has a slightly dimensional look to it. I’m going to show you how you can do this without even needing to use the Pen tool in Photoshop.

So let’s tuck this out of the way for the moment and let’s consider the image that we’re starting with. When faced with a project like this I’ll always start by duplicating the background layer so I’ll right click the layer, choose Duplicate Layer and click Ok. As a passing comment I would probably rescan this image before I started if I had the actual piece. The image is a little bit fluffy around the edges which is going to make selecting anything a little bit difficult.

And it’s a fairly low res image because this is already at 200 percent so a good scan is a good starting point. But let’s assume that we have a good scan and let’s see how we would get this image or this buckle extracted from its background. I’m going to start by selecting the Elliptical Marquee tool because I’ve really just had a look at this image and said to myself ok what sort of shapes have I got here that I can use to extract the image. And one of them is this curve.

I’ve got a curve here and a curve here and one on the inside and another one here on the inside. They look to me pretty much like circles. I have the Elliptical Marquee tool here and I’m going to start by dragging out an oval shape. And what I’m looking for is something that will be approximately the shape of this outside edge. Now I need to move this so before I let go of the mouse button I’m holding the spacebar and I’m just going to move the shape into position.

And it needs to be a little bit bigger still because what I want to do is to match the outside curve. I’m ignoring absolutely everything else and all I’m seeking to do at this stage is to line this up along this outside curve. Now I’ve got a reasonably good fit for that so I’m going to run with this. I’m also considering here that all the shape, all this buckle is inside this selection so I don’t need to make any adjustments to this selection right now.

All I need to do first off is to create a mask from this. So I’m going to click the Add Layer Mask icon. And what that does when I turn this background layer off is it starts to extract this shape from its background. Now to make it a little bit easier for us to see what we’re doing I’m actually going to put a filled layer in behind the image, it’s this sort of magenta color, so you can see how it’s looking. I’m going back to my image layer and this time I’m going to seek to find a shape for this side. So, again, I’m going to draw my large oval.

I’m going to hold the spacebar so I can move it into position, let go of the spacebar, reshape the circle and just keep going with the spacebar and moving it but without letting go of that mouse button until I have got the shape that I want for this long edge of the buckle. Now we do have a light problem here that we’ll need to adjust for because what I would typically do is to select Inverse so that now I have selected everything that was not selected earlier and then I would fill it because I would target the mask and fill it with black.

The problem is that I’m now cutting off this edge of the buckle. So I don’t want to do that. I’m going to do Edit, Undo Fill and I’m going to again invert that mask so that we’ve just got this circle shape. To make sure that I don’t remove part of the buckle that I already have extracted I’ve selected the Rectangular Marquee tool here and I’m going to select the Add to Selection icon here. And I’m just going to add back in anything that was on this side of the buckle so that now my shape is this curve and everything over here.

Now when I choose Select Inverse the only area that is selected is this edge down here, exactly what I want to mask. I’ll target my mask and press Alt Backspace to fill it with the current foreground color which is black. And you can see that we’re powering along here. We’ve got two sides of this shape pretty near extracted. I’m going back to the Elliptical Marquee tool because this looks like the side of an oval to me. Again, I’m going to create my oval shape and push it into position, maybe shrink it down a little bit to get it a little bit more curvy.

And when I have it in position I’m going to let go the mouse button and again here I’m going to need to add some extra bits of the image here because I don’t want to remove them. So, again, I’m going to target the Rectangular Marquee tool and add to this selection. So right now my selection is this shape. I’m going to invert it, select Inverse so that the only thing selected is across the top here, the area that we no longer want, target the mask and Alt Backspace to fill it with black. And I’m going to continue at the bottom here.

Again, Elliptical Marquee tool, a flat sort of oval shape, move it into position, size it. Any time I want to move it I’m just holding the spacebar so I can move it a little bit more accurately. When I’ve got it into position I’m going to select the Rectangular Marquee tool to add to the section so that we don’t lose the shape that we’ve already extracted, select Inverse and make sure I have my mask targeted, Alt Backspace to fill my mask with black.

At this point I might go back and reform these sides. I think I’ve got most of what I want out but I may want to perfect them a little bit more. I’m not going to bother doing that now, but you can see that you can continue to work on that side if you want to. I’m going to have a look at these inner areas. And the inner area again is just another curve. And I can make that curve using the Elliptical Marquee tool. Now I’ve let go of my shape so rather than discard it completely I’m going to choose Transform, Selection and just move it into position. And I can nudge it with my arrow keys.

When I’ve got it pretty much where I want it to be I’ll click the checkmark. Now I’m going to again select the Rectangular Marquee tool but this time I only want to select this inside bit so what I want to do is to drag over this and take the intersection of the two shapes. So I’m going to click this option here and then I’m going to be really careful about locating the bit I want to select and I’m just going to drag over it. And this is going to give me the intersection of these two edges.

Now I’ve got a little bit of a problem here so I’ll probably just take the Lasso tool, hit the minus key and just lasso into the corner to just round off that corner. If I’m happy with the shape I can now click on my mask and Alt Backspace, Option Delete on the Mac, to again take that piece out of the mask. Now there’s a good chance that this shape is the save as this shape just mirrored. So let’s choose Select, Transform Selection. This time I’m going to transform the selection’s width to minus 100 percent which will flip it over and then I’m going to move it into position.

When I have it in position I’m going to click the checkmark here, target the mask, Alt Backspace, Option Delete on the Mac, to create the filled mask object. Now that I’ve done this let’s assume that we have a good selection. I’ve been working pretty quickly here so I think I could probably have done an even better job had I been a little bit slower. I’m going to right click and duplicate this layer entirely so I have a second layer with its mask.

Now I’m going to trash that mask and I want to delete it. I don’t want this layer to have a mask at all. So I’m going to turn that off. I’m going back to this mask here. This is my good mask and I’m going to Alt click on the mask. And what that does is it shows me the mask itself. I’m now going to click on the Quick Select tool and I’m going to select the mask. I just want the white area selected. Now I’m going to turn off this layer and return to this top layer.

I’m going to turn everything else off. With the top layer selected I’m now going to use this tool that is new in Photoshop CS5, Select, Refine Edge. If you’re using an earlier version of Photoshop you’ll go into Modify and then you could expand or contract the border or add a little bit of a feather to it to soften it. In Refine Edge we get to refine the edge by looking at the background.

At the moment I have it against white so I can see what my edges are going to be like. I’ve seemed to have lost that so let’s go back and get Refine Edge. Here what I’m going to do is to smooth it out a little bit. I’m going to feather it a little bit and I can even shift the edge. So what I’m looking for is a good selection here. I’ve used my original mask that I created using the shape tools but I’m actually perfecting it now using this Refine Edge tool or we could perfect it with adding a slight feather to it or contracting or expanding it using the tools that were available in earlier versions of Photoshop.

Once you’ve perfected the edge I’m going to click Ok because I have its output to a selection. This is my new selection. I’m going to add a layer mask to this layer. So this is a little bit better selection than I had before. You can see that this new version is a little bit better than the last. Now to work on this image a little bit more I might want to add a little bit of a bevel to it so I’m going to add a layer style. I’m going to choose Bevel and Emboss. I don’t want to emboss it and I don’t want a shadow at this stage but what I might want is a little bit of a bevel just a slight rounding of the edges.

And you can fiddle here in this dialog to see exactly what you can achieve for the shape that you’re working on. But I might come in here and have a look at that as an option. I may also want to add a drop shadow to this shape in which case I’ll go to the Drop Shadow tool here and I can drag out and create a drop shadow for the object. You can also add a pattern overlay. Now it’s possible to add a pattern overlay in a number of different ways but since we’re already in this layer style dialog we’re going to use this as our pattern overlay.

I’m going to click here and go and select a pattern. Now I have a stripped pattern here that I created a long time ago. Now the pattern is sort of ok but I wanted lots of stripes not just a few of them so I’m going to scale it right down. And we can blend it in if we want to. So if you’ve got a shape that you want to start blending and using some of the detail or some of the shading on the layer below you can do that here using these blend modes. I’m not going to do that. I’m just going to add it in normal mode here and I’m just going to click Ok.

So there’s my shape and now I can do things like test it on a background to see if it is as I want it to look. And I can save it out now as a png file with some transparency. If you want to sharpen up these edges these edges would sharpen up a bit if this object were rescanned. But you can also sharpen edges by choosing Filter and then Sharpen and then Sharpen Edges. Now this filter just sharpens edges. There’s no settings for it but you can run it a couple of times if you need to so you could sharpen the edges just a little bit more. That might give you a slightly better effect.

So there is a handy way of extracting an object from its background when the object has some hard edges and where you can see visually that you’ve got some shapes on that object that you could use to make the extraction a whole lot easier.

I’m Helen Bradley.

Thank you for joining me for this video tutorial. Look out for more of my tutorials on this YouTube channel and please consider subscribing to the channel so you’ll be alerted when new videos are released. Visit my website at projectwoman.com for more tips, tricks and tutorials on Photoshop, Illustrator, Lightroom and a whole lot more.

Helen Bradley

Tuesday, August 27th, 2013

Make an illustration in Photoshop using free fractal tree brushes

Learn how to download and install free fractal tree brushes and a texture and see how to use these to create your own Photoshop art.

Covers how to install brushes in Photoshop. How to add new layers, how to use masks and a gradient fill. Also shows how to add a drop shadow and an outer glow layer style. The land is created using a filled shape and made more organic using the Warp transform feature.

Transcript:

Hello, I’m Helen Bradley.

Welcome to this video tutorial.

In this tutorial I’m going to show you how you can download and install the fractal tree brushes from projectwoman.com and how you can use them to make art in Photoshop.

Before we get started with this project let’s look and see what we’re going to do.

We’re going to create an image that’s something like this.

It uses one of the fractal tree brushes and also uses part of the brush to create a sort of highlight effect that is the result of the sun going down.

So we’re going to add our tree and then we’re going to make this sort of background look with this blue fill background and we’re going to use the texture that we’ve downloaded.

So I’m going to show you how you can put it all together using the brushes and a texture file.

I’m just going to tuck this away for now and let’s have a look and see where we’re going to get the bits and pieces that we need.

Well first of all we’re going to flicker to some images that are offered by a gentleman called Skeletal Mess and we’re going to download this image.

And it’s in his 2009 texture of the day.

So here it is, texture of the day 2009, and this is the one that you want.

So just click on it, from Actions choose View All Sizes and then you can just go and download the largest size of this image or the original.

It doesn’t really matter too much.

I’m just going to work on the larger size one for now.

So I’m going to open the folder that it has been stored in and its here.

And I’m just going to open it in Photoshop so I’m going to right click and I’m going to open with Photoshop CS6.

Well it’s not in the list there so I’m just going to go and grab Photoshop and we’ll just drag and drop it in there.

Okay, so the image is now in Photoshop and now we need to get our brushes.

And they’re available on my website so that is at projectwoman.com.

So you’re going to projectworman.com and click here on the Free Photoshop Brushes option and just scroll down because the ones we’re looking for here are the rendered fractural tree brush set.

So click on that and then click here to download the brush set and that’s going to download to your Download folder.

And what you’ll do then is just double click on the file so that you can locate and expand the fractal tree brushes file.

And you need this in Photoshop so again I’m going to tuck this just out of the way for now and open Photoshop because there’s a quick and easy way of installing brushes in Photoshop that I want to show you.

So the way I install brushes in Photoshop is to first go and get the brushes option here.

So I click on Brushes and I’ll choose the brush dropdown list here and then click here and go to Save Brushes.

And what that does is it shows me the folder where Photoshop brushes are saved and you can see here that it’s a long string of folders that you need to go through.

But it’s easier if you just open this up in Photoshop and then what you’ll do is you’re go and get your file, your brushes file that you downloaded and then just drag and drop it.

Now my machine is playing games with me right now so I’m just going to make Photoshop a little bit smaller and bring up my brushes file at the same time which is hiding all the way around here.

So let’s just go and get the brushes again and we’re going to open this up.

I’m going to go to Save Brushes.

So I open this folder.

Here are my fractal tree brushes and I’m just going to drag and drop them in there.

So that’s done now.

The brushes are installed where Photoshop can find them.

So what I need to do now with my brushes palette is to go and open that set of fractal tree brushes.

So here are the fractal tree brushes and when Photoshop asks me if I want to replace the current brushes, cancel or append I’m just going to select append because that’s going to add them to the very end of my brushes collection.

Now, I’ve added them twice but they’re here now.

So we’re ready to get started and create the effect that we had on this image here.

So any time that we work with an image like this we’ll want to be working on a new layer to paint our tree so I’m going to add a new layer.

I’m going to go and get my tree.

I’m just going to choose a tree to use.

I think this one this time.

I’m going to size it up using the open square bracket key and I’m going to select black.

So I want to be looking at my swatches.

So I’m going to select black as my foreground color and let’s also go and get our tools so that we can see what we’re doing here.

So I’m going to paint with black on this layer and I’ll probably press it a couple of times in the same place so I make sure I get a really dark tree there.

Now what I’d like behind the tree is some sort of a sort of land mass if you like so I’m going to select the Rectangular Marquee tool here and on a brand new layer I’m just going to drag out a rectangle behind the tree.

I’ve add a new layer below.

And I’m going to select a sort of dark reddish color as my foreground color.

That’s a sort of maroon.

Let’s go a bit more for dark red.

And I’m going to fill that layer with this.

Since it’s my foreground color I can press Alt Backspace, Option Delete to fill that layer.

To blend it in I’m just going to use the multiply blend mode because that gives me a darker sort of effect.

Now this is probably not dark enough for me so I’m just going to open the color up and let’s select a much darker version and again Alt Backspace, Option Delete.

So now I’ve pressed Command D to deselect the selection.

Now the land mass is a little bit too regular for me so I’m going to Ctrl Click on this layer and choose Edit and then Transform and then Warp because warp allows me to create a sort of a bit more organic land mass.

So I’m just going to do that very, very simple, not very much happening there at all.

Now we need our setting sun so again a new layer.

I’m going to select a sort of lighter color.

Let’s go for a sort of lighter orange color.

I’m going to use the Elliptical Marquee tool and drag a circle by holding the Shift key to constrain the ellipse to a circle.

I want to move it into position so I’m going to hold the Spacebar as I move the circle down into position, let go of the Left Mouse button and then let go the Spacebar and the Shift key.

Again, this orange is my foreground color so Alt Backspace, Option Delete on the Mac will fill the shape with this orange color.

Again, I think it’s way too light so I’m just going to redo that with a darker color.

Now I want my sun to be behind my land mass so I’m just going to drag on the sun layer and move it behind the land mass layer.

Now I think I’ll blend my sun in a little bit so I’ll probably select multiply as the blend mode to darken it.

And I also want to add a slight glow around the edge so I’m going to select the Add Layer Style option.

I’m going to add an outer glow here.

The white is not the color I want.

I really just want to grab the color that I had for the sun and maybe just go a little bit lighter than that as my outer glow.

Size is really the sort of ambit of the glow.

It’s not really how many pixels it is.

It’s a bit more feather than anything.

And spread is a bit more pixels.

So I’m just going to add that glow in.

And I can also multiply it if I want to so I can get a sort of darker glow.

Now I’m trying to keep things pretty light right now because I don’t want to be working on a totally dark image.

But what I do want here is I really want the tree all over.

Again, I want a sort of drop shadow for the tree.

So, one of the ways that I can do this is by just adding a light drop shadow layer.

2,368So I’m going to add a layer style.

I’m going to choose drop shadow but instead of doing a darker drop shadow I’m going to do a lighter drop shadow.

In fact let’s just sample the color from the sun for this and maybe just go a little bit lighter than that.

Maybe a little bit more yellow still, okay.

And this is going to be a drop shadow.

And we want it to look as if it’s coming from the sun so it’s going to be out this direction.

But we’re going to screen this because we want it to be lighter and we also don’t want it to be both sides of the tree.

So we’re going to just play around with the spread and the size until we get the slightest suggestion of lightening on this side of the tree but not too much, probably about 4 pixels.

Something like that looks pretty good to me so I’m going to click Ok to select it.

Now what I want is to be able to work on this shadow independent of the tree itself so I really want to move the shadow to a new layer.

So I’m going to right click that and choose Create Layer.

And what that does is it creates the drop shadow as a new layer so I’m just going to click Ok.

So here’s my drop shadow on a new layer.

And because it’s on a new layer I can add a mask to it by clicking the drop shadow layer and click the Add Mask icon.

I’m going to select my brushes.

Let’s just go and grab a brush.

And this time I’m going to select a soft, round brush, something like this, make it a bit larger.

I want to be painting with black because I want to paint out this shadow area and make sure I have the mask targeted and on this side of the tree I’m just going to remove the shadow.

Now because this is a mask layer I can switch and paint with white and I can bring the shading, the highlighting back anywhere I want it.

So I can just paint it on or off as I wish.

I think too I’m going to soften this edge because I think it’s a bit harsh.

And again a mask will do that.

Just click on the layer, click on the layer mask, click on black paint.

This time I’m going to reduce my opacity way down and just gently tip over the edge here, press X to go back.

So I can make that as dark or as light as I want and I can just sort of blend that in to the background by just switching colors, painting with black on the mask to blend it, painting with white to bring it back again.

Now what I did on the original image that we haven’t done right now is to add a blue to white layer over the top of this background layer to just blend everything in so I’m going to that now.

I’m just going to add a new layer.

I’m going to select the Gradient tool and then I’m going to select a sort of darkest blue.

I’m thinking it needs to be a bit darker and a big grayer than that.

So that sort of color blue to white.

So I’m just going to select white here or a light blue.

It doesn’t really matter too much.

And then we’re going to use the gradient to apply that.

So let’s just have a look.

We’re on this foreground to background gradient.

We have linear gradient selected.

We have the layer here and I’m just going to drag to fill it with the gradient.

And I’m holding the Shift key down as I do so my gradient goes in nice and level.

Now it’s going in blue at the top, white at the bottom and I’m just going to blend it using the multiply blend mode.

You can see that my edge here is way too much but we can go back and fix that, again with brush and again, painting with white this time.

I’m just going to be painting on this mask and just bring back that edge a little bit and then we could fix the tree up.

So there you have a small project that you can do using the fractal tree brushes to create a sort of sunset landscape image in Photoshop.

You now know how to download and install the brushes.

And you can find this interesting texture online at Flickr to use and you can go and create your own art in Photoshop.

I’m Helen Bradley.

Thank you for joining me for this video tutorial.

Look out for more of my video tutorials on this YouTube channel.

And visit projectwoman.com for more tips, tricks and tutorials on Photoshop, Lightroom, Illustrator and a whole lot more.

Helen Bradley

Wednesday, March 20th, 2013

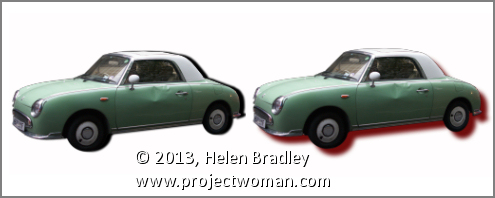
Photoshop Elements – Edit a layer style

Adjust a shadow in Photoshop Elements

You have probably played around with the styles in Photoshop Elements and added things like a drop shadow to an image. But did you know that these can be  edited once they are created? Doing this gives you the ability to customize the shadow to suit your needs.

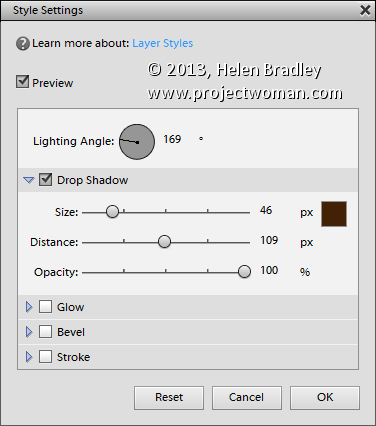
To adjust an effect such as a drop shadow, with the layer that you have applied the shadow to selected in the Layers palette, choose Layer > Layer Style > Style Settings. Alternately you can double click the fx icon in the  layer to open this dialog.


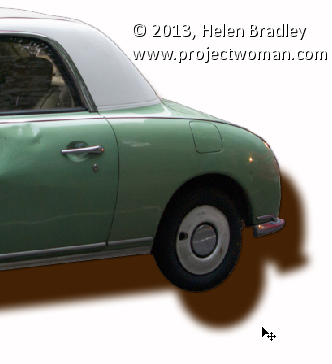
This dialog has the tools you need to adjust the shadow or other effect you have applied. Note that when you are working with shadows the Size is really a feather type effect and Distance is more what you might consider to be size and it positions the shadow at a distance from the original shape or object. 

Here too  you can change the shadow color and the direction it comes from by altering the Lighting Angle. You can also click and drag on the shadow on the image itself to move it into position. Click OK when you are done.

Helen Bradley