Wednesday, March 20th, 2013

Photoshop Elements – Edit a layer style

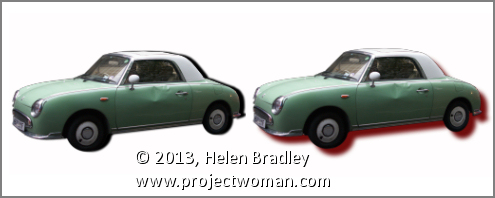
Adjust a shadow in Photoshop Elements

You have probably played around with the styles in Photoshop Elements and added things like a drop shadow to an image. But did you know that these can be  edited once they are created? Doing this gives you the ability to customize the shadow to suit your needs.

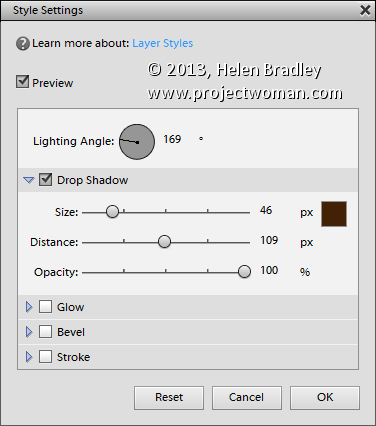
To adjust an effect such as a drop shadow, with the layer that you have applied the shadow to selected in the Layers palette, choose Layer > Layer Style > Style Settings. Alternately you can double click the fx icon in the  layer to open this dialog.


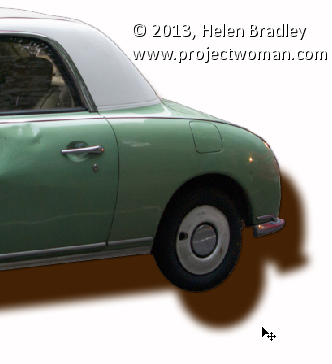
This dialog has the tools you need to adjust the shadow or other effect you have applied. Note that when you are working with shadows the Size is really a feather type effect and Distance is more what you might consider to be size and it positions the shadow at a distance from the original shape or object. 

Here too  you can change the shadow color and the direction it comes from by altering the Lighting Angle. You can also click and drag on the shadow on the image itself to move it into position. Click OK when you are done.

Helen Bradley

Sunday, January 6th, 2013

Photoshop Elements & Lightroom – Image Frame Effect

Use your preferred software to create an image frame effect in either Photoshop Elements or Lightroom.

Photoshop Elements:

See how to use the Custom Package in Photoshop Elements to create a neat frame effect for your photos, whether for print or for the web.

Lightroom:

See how to create a simple framed image effect in Lightroom 3 & 4. Includes an Identity Plate to display your name below the image.

Transcript:

Hello, I’m Helen Bradley. Welcome to this video tutorial. In this tutorial we’re going to look at creating a framed photo in Photoshop Elements.

I’m here in Photoshop Elements and I have my image already open. And I’ve sized it down just a little bit so that I can actually see around the surrounds of the image here in the window. That’s pretty important right now. Now I’m going to select white as my background color because I want to add some white around the image.

So first of all I’m just going to select around the image just by selecting over it. And I’m going to add a very, very narrow black border to it so I’m going to choose Edit and then Stroke Outline Selection. I’m going to add a white pixel black border on the Inside just so it’s easy to see and then just click Ok. And that will give my image just a one pixel black edge which will stop it from sort of bleeding into the white surrounds.

With white as my background color I’m now going to choose the crop tool and I’m going to select over my image with the crop tool. I’ve selected over and let go of the mouse button. That’s pretty critical the let go bit. And now I’m going to hold the Alt or Option key as I drag out on this corner handle. And see what happens when I do. When I drag outwards I’m adding some extra area around the image and because I’m using the Alt or Option Key the exact same amount of image is being added to the left and right of the image on top on bottom.

Now I want this to be a museum style frame so I’m actually going to let go the Alt or Option key and then drag down on this bottom so that I get some extra room here. And because white is my background color when I click the checkmark we’re going to have a white border around the image. Now if this were going up on the web onto a website that perhaps had a white background, I might add an extra black edge to it. So again I’ll go and select everything and I’ll go to Edit and then Stroke Outline Selection. I’m going to add a one pixel black inside. But you don’t have to do that if you’re perhaps going to print and you just want this nice muted down border effect.

Now the next thing to do is to add our text so I’m going to click on the text tool and click here on the image where we’re actually going to apply the text. Now I’m using Myriad Pro but for this image that’s way too big a font size. I’m thinking something like 12 points will be plenty and I’m just going to type in my name Helen Bradley and photography. And it looks like we’re using a white color so that’s a little bit difficult. Let’s go and get a dark gray instead.

Now once I’ve finish typing I can click the checkmark and then I can move it into position just using the move tool. So I’ll place it in position here. And then my image is ready to save or to print whatever I want to do with it.

I’m Helen Bradley. Thank you for joining me for this very quick video tutorial. Look out for more video tutorials on my YouTube channel. Visit projectwoman.com to find more tips, tricks and tutorials. And please if you like this video click the Like button.

Helen Bradley

Friday, July 6th, 2012

Editing JPG images in Camera Raw from Photoshop Elements


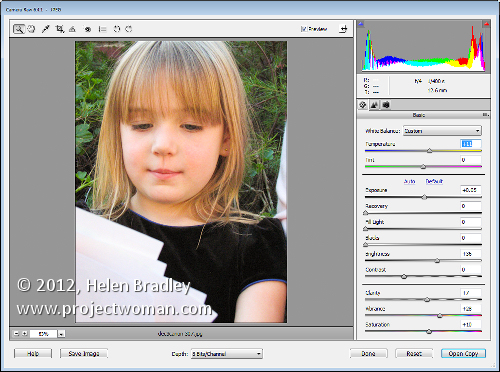
If you capture in jpg you may believe that you cannot take advantage of the Camera Raw processing features built into Photoshop Elements. This is because, by default, when you open a jpg image in Photoshop Elements it will open automatically in Elements bypassing the Camera Raw tool.

Only when you open a raw or dng file does will the Camera Raw tool appear allowing you to use its features to edit your image.

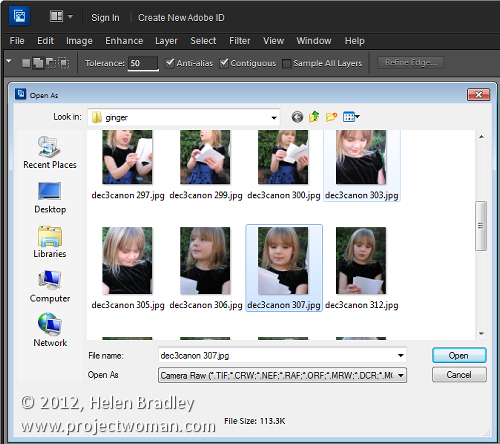
You can, however, get Photoshop Elements to open any image including a jpg image as a Camera Raw file. To do this, choose File > Open As and locate the jpg image to work with. From the Open As dropdown list, select Camera Raw as the option and click Open.


This treats the jpg image as a Camera Raw image so you have access to the superior processing tools available in Camera Raw for processing the image.

When you’ve finished with Camera Raw, click Open Image to move the image to Photoshop Elements with the Camera Raw adjustments in place. If you don’t want to go into Photoshop Elements then just click Done to save the fixed version of the image.

Helen Bradley

Monday, March 5th, 2012

Templates in Photoshop

A short while ago I wrote an article on using templates to create a collage or montage of images in Gimp. Sometime after, the templates that I suggested you  could use were taken down from the original website.

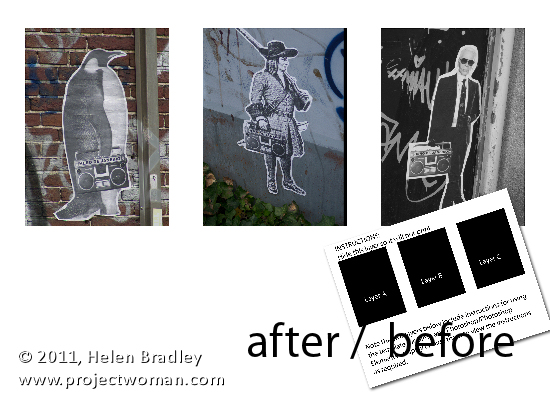
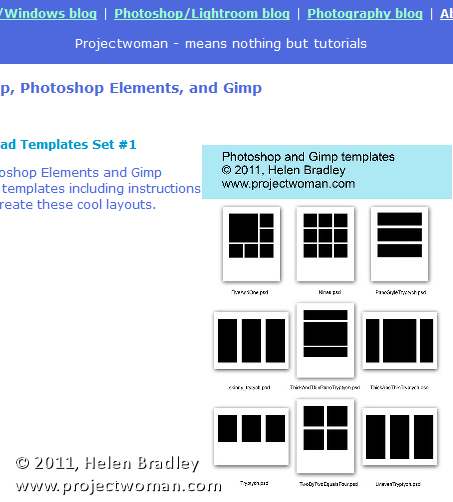
To help out our Gimp readers, I created a new set of templates and as I was making them, it seemed like a good idea to include instructions for Photoshop and Photoshop Elements as well as for Gimp. Here, therefore is how to use a downloadable template to create a montage of images:

Start by visiting this site and download the template zip file: http://projectwoman.com/articles/45PhotoshopTemplates.html

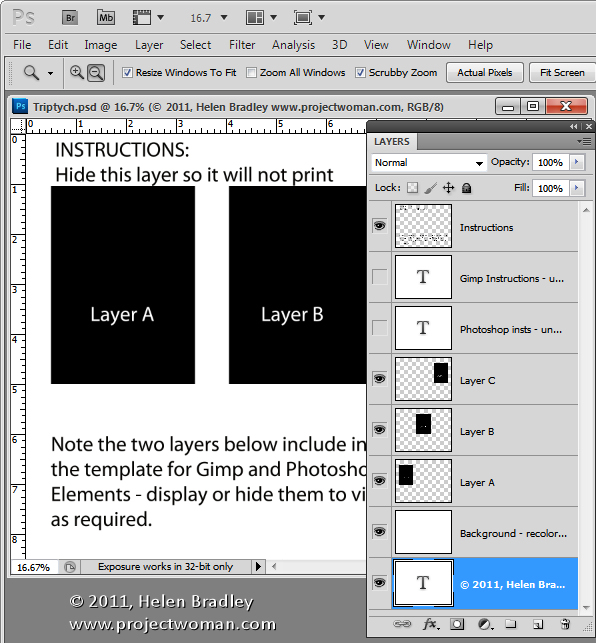
Then unzip the templates, save them where you can find them when you need to use them and open one of them. I’ve used the template triptych.psd.

When you open it, you’ll find that there are a series of layers. The top layer can be disabled or deleted at this point. The next two layers are instructions for Gimp and Photoshop users. Again, you can discard these two layers.

Open up the three images that you plan to use for this triptych. Images that are in portrait orientation will look best but you can use anything that you like – just be aware that you’re going to take a portrait orientation slice of the image.

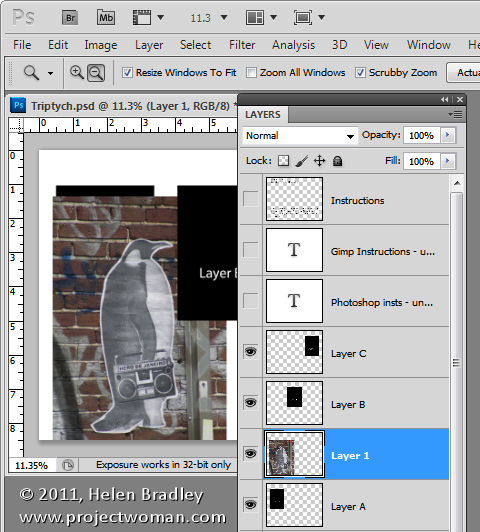
In the template, click on Layer A and then click on the first of your images and drag and drop the background layer from the first of your images into the main image.

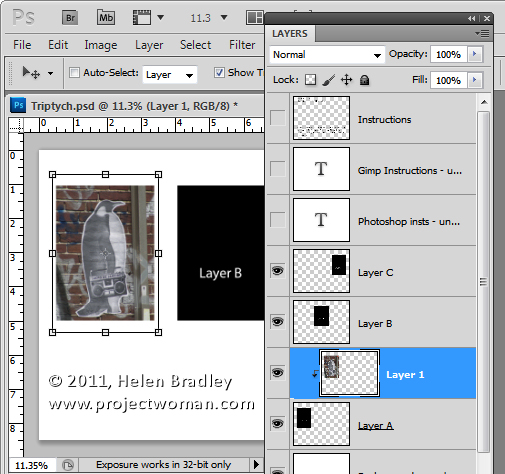
Click on the Move tool and size and position the image so that the interesting portion of it is over the black background. Click to accept this size and positioning and then with the new layer still selected, choose Layer > Create Clipping Mask. You’ll see that your layer is clipped to the size of the underlying shape.

You can fine-tune the placement and sizing by moving the contents of the new layer.

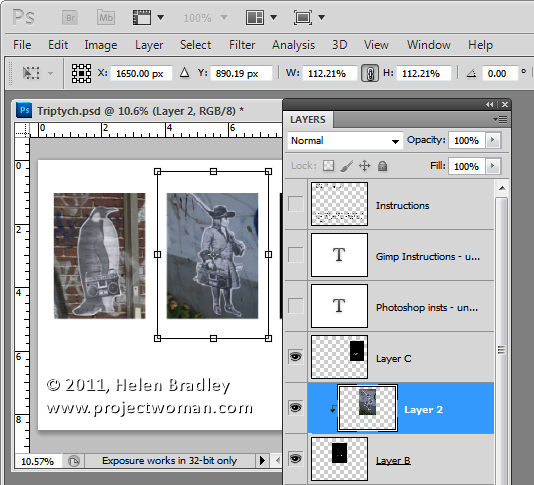
Now click on Layer B and again drag and drop the background layer from the second image into this template. Again, position the interesting portion of the image over the underlying background, sizing the image if desired. Create the clipping mask for that layer by selecting the image and choose Layer > Create Clipping Mask.

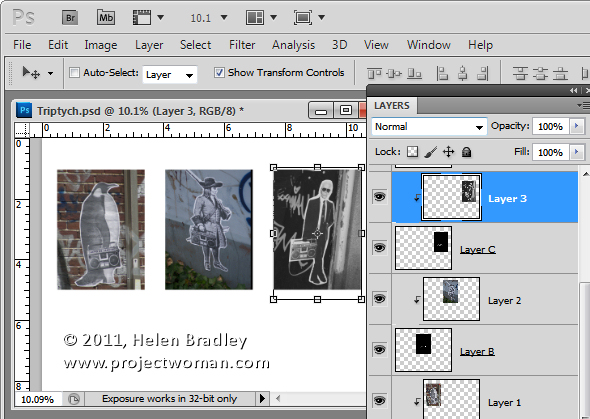
Repeat this for Layer C using your third image.

When you’re done, you can adjust the background of the image if desired by recoloring the layer marked background recolor if desired. You can now save and print the image or upload it to the web.

This same process can be used in Photoshop Elements.

Helen Bradley

Tuesday, October 4th, 2011

Batch resize images in Photoshop Elements

Some time ago I wrote a post on batch resizing images in Photoshop. You can find the link here: http://projectwoman.com/2009/09/batch-resize.html. I also wrote an article on resizing in Lightroom which you can find here: http://projectwoman.com/2009/10/resizing-images-in-lightroom-2.html.

Someone then wrote to me explaining that they are using Photoshop Elements and that the resize feature in Photoshop does not work in Photoshop Elements. They are correct, but there is a way of batch resizing in Photoshop Elements and here’s how to do it.

Step 1
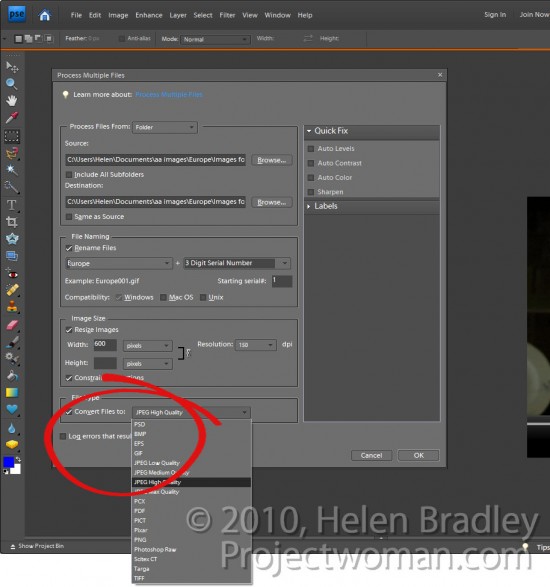
In Photoshop Elements, choose File > Process Multiple Files. This opens the Process Multiple Files dialog.
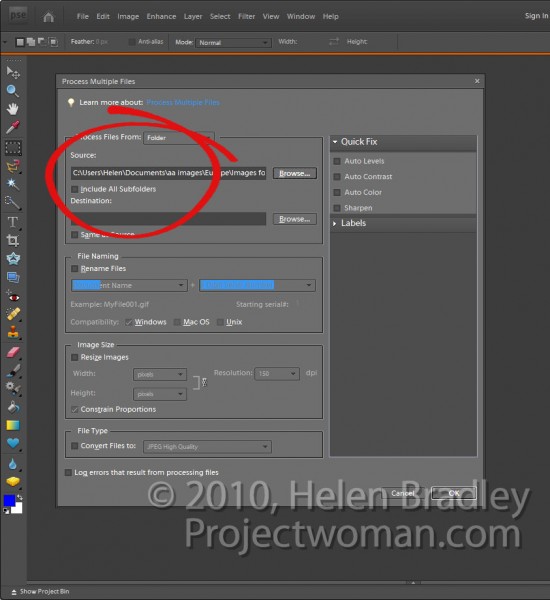
Here you can select which images to process. You can select either a folder of images, all opened files or you can click import and import images from an external device such as a camera card.

Typically, the best option will be to place all the images in a folder and process the files from that folder. To do this, click the Browse button opposite the Source box and choose the folder to process. Enable the Include All Subfolders checkbox if desired.

Step 2
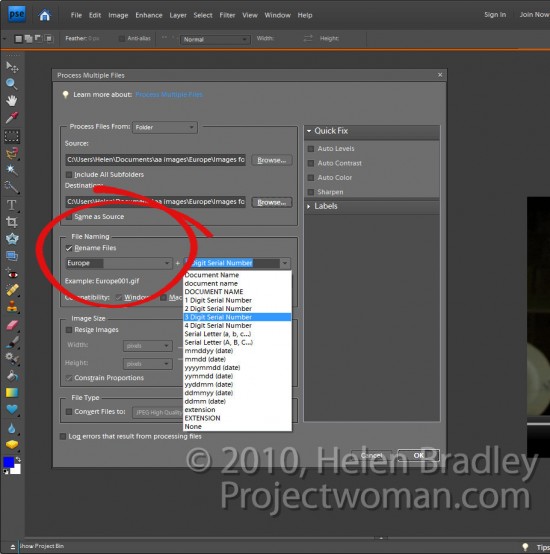
Select the destination folder for the resized images (you can create one from this dialog), or, if desired, select Same as Source.

In the file naming area, select Rename Files if this is desired. You can then choose the naming convention such as typing a document name and the sequential numbering system to be used.
Step 3
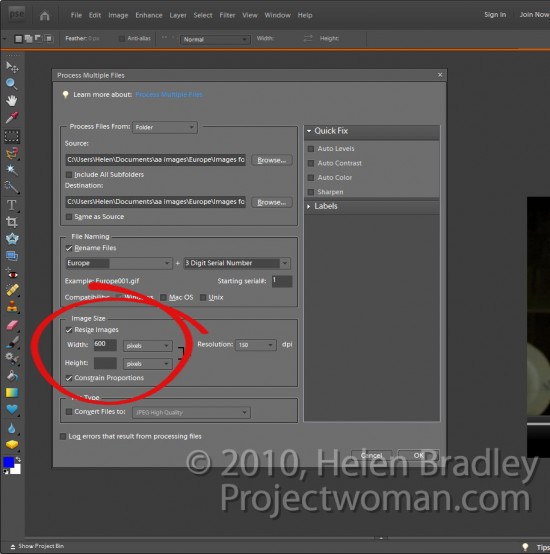
In the image size area, select Resize Images as that’s what we came here to do.

Select Constrain Proportions as you will want your images to be resized in proportion and not skewed or distorted out of shape.

Now type the largest Width or Height to use for your resized images. If you enter 600 for the Width you will be unable to enter a value for the Height and vice versa. This is because you can only set one value – width or height (in this situation this resizing tool works differently to the corresponding tools in Photoshop and Lightroom).

So if you enter, for example, 600 as the Width all images will be sized so their width is 600 and their respective heights will be adjusted in proportion. Portrait images will be taller than 600 pixels and Landscape ones will be shorter.

Here too you should set the resolution for the images. If you plan to send your photos to an online sites for printing, you may want to match the resolution to what that site requires. For the web select 72 dpi.
Step 4
To convert the files to a different format or to compress them, from the File Type dropdown list, select the file format to use. For JPEG format images, you can choose Max, High, Medium or Low quality.
Step 5
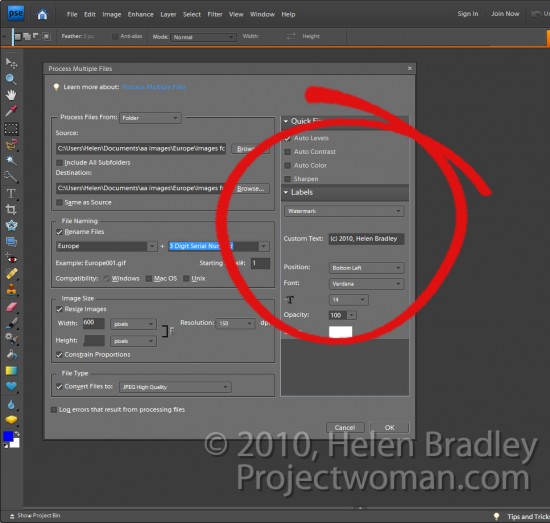
You can also apply a Quick Fix to your images as you process them. These fixes include Auto Levels, Auto Contrast, Auto Color or Sharpen.

You can also apply Labels to your image such as adding a watermark or caption by configuring the options in the Labels area.

When you are done, click Ok to process the folder of files or the group of files that you had selected for processing.
Tip
If you want to resize images so their longest edge is a set value such as 600 then you will need to presort Landscape and Portrait images into separate folders and process them separately.

Helen Bradley

Tuesday, January 25th, 2011

Simple Photoediting workflow – Step 14 – Optimize your image

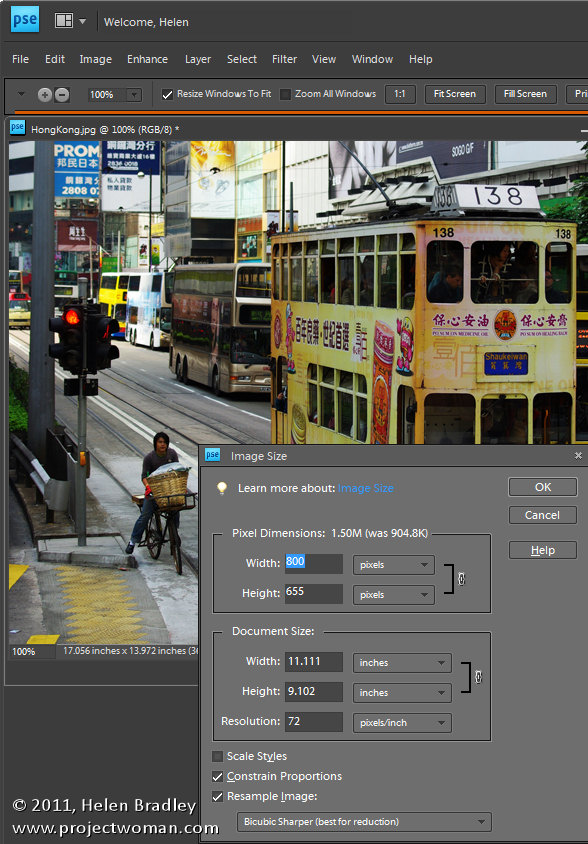
When you’re ready to prepare your photo for printing or sharing on the web. Use the Image > Resize > Image size option to adjust the image size.

Make sure the Constrain Proportions and Resample Image checkboxes are selected so you can set the desired size correctly.

For web display, set the resolution to 72 pixels per inch and then set the Width and Height dimensions to the desired value. Remember as you do this that even a very large monitor is only 1920 x 1080 pixels in resolution so you don’t generally want an image to be more than that size if you’re just putting it up on your website, for example.

For printing, set the resolution to anything from 150 – 300 pixels per inch and set the size to your desired print size such as 5 x 7in. Because you are resizing the image (not cropping it), it probably won’t resize to the exact proportions but you can get it close to this.

To save the image, choose File > Save As and, if you are planning to display it on the web save it in the JPEG format.

For printing and storing locally on your computer, the TIFF format, Photoshop .PSD format or a high quality JPEG are acceptable.

If you plan to both print a copy of the photo and share one on your web site, for example, size it for printing first, and save that copy and then resize for the web and save this version with a different name.

Other stories in this Simple Photo- Editing Workflow series:

Step 13 – Sharpen

Step 12 – Major Surgery

Step 11 – Getting to black and white

Step 10 – Fixing Redeye

Step 9 – Fixing Imperfections

Step 8 – Fix Skin tones

Step 7 – Fix Color problems

Step 6 – Fix muddy images

Step 5 – Fixing under and overexposed images

Step 4 – Straighten

Step 3 – Crop an image

Step 2 – Make a duplicate

Step 1 – Assess the image

Helen Bradley

Thursday, January 20th, 2011

Step 13 – Simple Photoediting workflow – Sharpen the image

When you have finished working on an image you should sharpen it to make the edges in the image look crisper so that they look better when printed on paper and displayed on the screen.

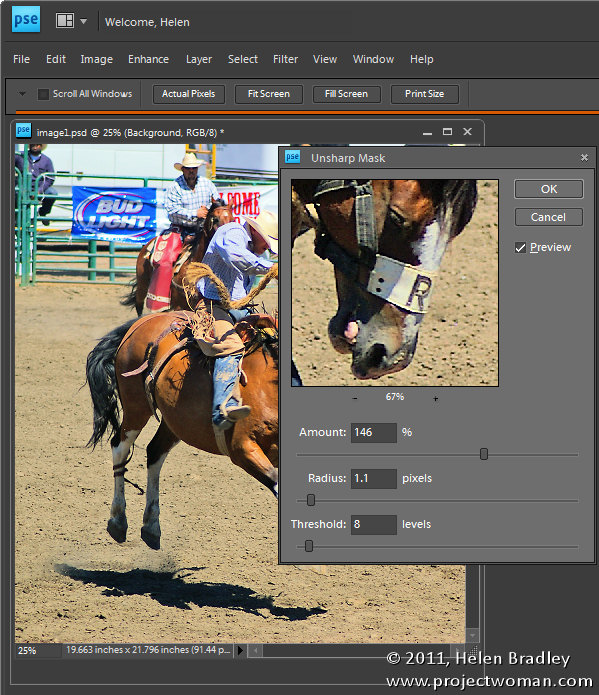
In Photoshop Elements, choose Enhance > Unsharp Mask and set the Radius to around 1.0 – 2.0 pixels. Select a low Threshold value of somewhere between 3 and 10 and adjust the Amount as required.

You will require a higher level of sharpening for images that you will print than you need for display on your computer screen or on the web, for example.

Use the Preview option to check the before and after results of sharpening to ensure you are getting the desired result. You should see the sharpening effect clearly at 100% view, but you should avoid making  visible halos around the edges in your image.

If your image was a little soft and lacking sharp focus before you begin, use a larger Radius value for the sharpening.

If you have been creating layers as you fix your image you must apply sharpening to a flattened version of the image, so choose Layer > Merge Visible to do this.

Other stories in this Simple Photo- Editing Workflow series:

Step 12 – Major Surgery

Step 11 – Getting to black and white

Step 10 – Fixing Redeye

Step 9 – Fixing Imperfections

Step 8 – Fix Skin tones

Step 7 – Fix Color problems

Step 6 – Fix muddy images

Step 5 – Fixing under and overexposed images

Step 4 – Straighten

Step 3 – Crop an image

Step 2 – Make a duplicate

Step 1 – Assess the image

Helen Bradley

Monday, January 17th, 2011

Step 12 Simple Photo-editing workflow – Performing major surgery

Quite often you will find that an otherwise pleasant image has been ruined by some distracting background element.

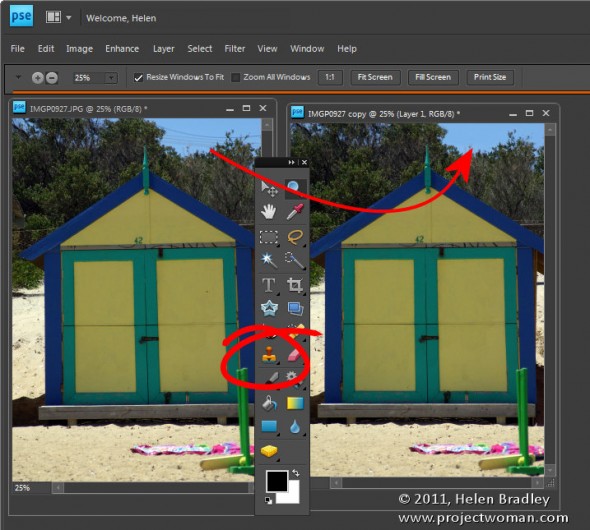
To remove this, use the Clone Stamp tool. Start by sampling an area of the image to use as the source data to fix the problem – you do this by Alt + Clicking on the portion of the image to use.

Then “paint over” the problem area. The results will be less obvious if you click with the brush rather than drag in a painting motion.

You may need to resample the source area from time to time as you work to find a good match for the area you are painting onto.

It is best to use a brush that is an appropriate size for the task – for detail work it should be quite small, for example, and it should have a low hardness value so you don’t get harsh edges on the fixed area.

If you are familiar with using layers, apply the fix to a new empty layer so that you can adjust and blend the layer later on if need be.

If you are cloning onto a new layer, make sure to have the All layers checkbox selected on the tool options bar so you sample from all the layers – the layer you’re working on won’t have any data so you can’t sample from it alone.

Other stories in this Simple Photo- Editing Workflow series:

Step 11 – Getting to black and white

Step 10 – Fixing Redeye

Step 9 – Fixing Imperfections

Step 8 – Fix Skin tones

Step 7 – Fix Color problems

Step 6 – Fix muddy images

Step 5 – Fixing under and overexposed images

Step 4 – Straighten

Step 3 – Crop an image

Step 2 – Make a duplicate

Step 1 – Assess the image

Helen Bradley

Wednesday, May 26th, 2010

Step 10 Simple Photo-editing workflow – Fixing redeye

Redeye is caused by the camera’s flash and is often difficult to avoid. Some photographers, and I count myself in that group, would prefer to have to deal with redeye if that means we get good photos. Often the redeye reduction feature on a camera signals to your subject that the image has been taken before it has – they relax and start moving and you get unwanted movement in the shot. When there is a balance to be struck between redeye and movement – I’ll take redeye everytime.

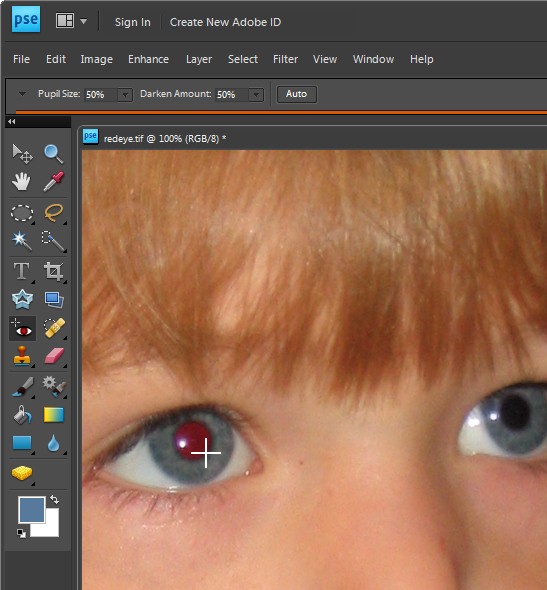
If your photograph has a subject with redeye you can fix it using the redeye tool in Photoshop Elements.

Click the Zoom Tool and click and drag over the eyes in the image to make them large enough that you see them clearly.

Click the Redeye removal tool and click on the red part of the eye. If necessary, adjust the Darken amount and the Pupil Size on the toolbar to get a good result. Fix each eye and then save the image.

Helen Bradley
Monday, May 24th, 2010

Step 11 Photo-editing workflow – Getting to black and white

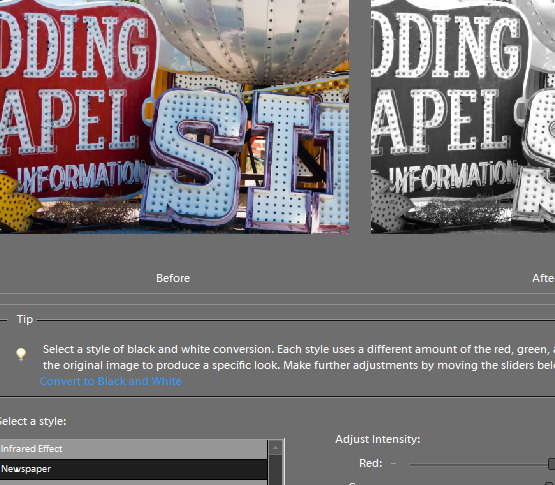
Some images look much better in black and white than they do in colour.

Increasingly photo editing programs are shipping with very good tools for converting to black and white. These allow you to select which portions of an image become black and which become white which is necessary when you want to differentiate between colours which have the same intensity such as green and red values which would, otherwise, be converted to the same shade of gray.

In Photoshop Elements, choose Enhance > Convert to Black and White and select a style from the list at the left of the dialog. These include Infrared, Newspaper, Urban Snapshots, Scenic Landscape, Vivid Landscape and Portraits. While the names suggest the type of image they are well suited to it is a matter of personal preference as to which you use.

Once you have chosen the image type you can select from options at the bottom of the image to adjust the various colours to darker or lighter shades of grey. You can also select the more or less contrast options to adjust the image contrast.

When you have a result that you like, click Ok.

Helen Bradley

Page 1 of 212