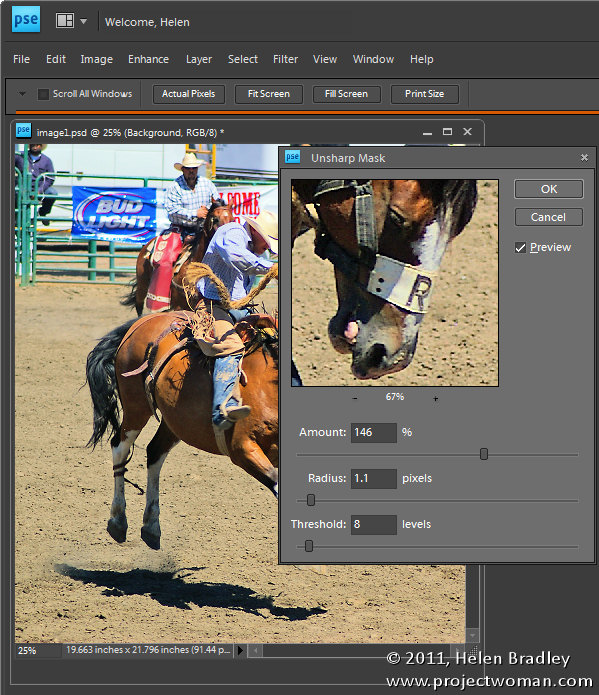
When you have finished working on an image you should sharpen it to make the edges in the image look crisper so that they look better when printed on paper and displayed on the screen.
In Photoshop Elements, choose Enhance > Unsharp Mask and set the Radius to around 1.0 – 2.0 pixels. Select a low Threshold value of somewhere between 3 and 10 and adjust the Amount as required.
You will require a higher level of sharpening for images that you will print than you need for display on your computer screen or on the web, for example.
Use the Preview option to check the before and after results of sharpening to ensure you are getting the desired result. You should see the sharpening effect clearly at 100% view, but you should avoid making visible halos around the edges in your image.
If your image was a little soft and lacking sharp focus before you begin, use a larger Radius value for the sharpening.
If you have been creating layers as you fix your image you must apply sharpening to a flattened version of the image, so choose Layer > Merge Visible to do this.
Other stories in this Simple Photo- Editing Workflow series:
Step 12 – Major Surgery
Step 11 – Getting to black and white
Step 10 – Fixing Redeye
Step 9 – Fixing Imperfections
Step 8 – Fix Skin tones
Step 7 – Fix Color problems
Step 6 – Fix muddy images
Step 5 – Fixing under and overexposed images
Step 4 – Straighten
Step 3 – Crop an image
Step 2 – Make a duplicate
Step 1 – Assess the image


Post a Comment
Please feel free to add your comment here. Thank you!