Tuesday, January 25th, 2011

Simple Photoediting workflow – Step 14 – Optimize your image

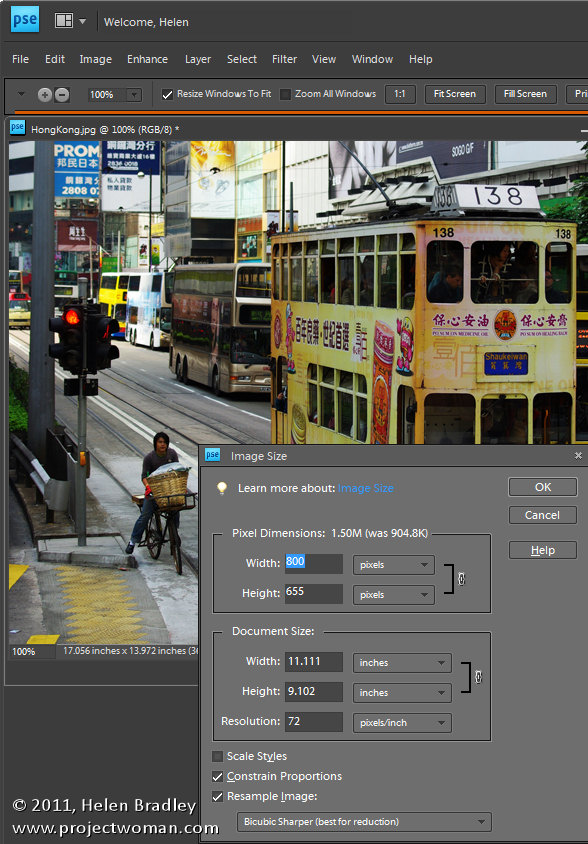
When you’re ready to prepare your photo for printing or sharing on the web. Use the Image > Resize > Image size option to adjust the image size.

Make sure the Constrain Proportions and Resample Image checkboxes are selected so you can set the desired size correctly.

For web display, set the resolution to 72 pixels per inch and then set the Width and Height dimensions to the desired value. Remember as you do this that even a very large monitor is only 1920 x 1080 pixels in resolution so you don’t generally want an image to be more than that size if you’re just putting it up on your website, for example.

For printing, set the resolution to anything from 150 – 300 pixels per inch and set the size to your desired print size such as 5 x 7in. Because you are resizing the image (not cropping it), it probably won’t resize to the exact proportions but you can get it close to this.

To save the image, choose File > Save As and, if you are planning to display it on the web save it in the JPEG format.

For printing and storing locally on your computer, the TIFF format, Photoshop .PSD format or a high quality JPEG are acceptable.

If you plan to both print a copy of the photo and share one on your web site, for example, size it for printing first, and save that copy and then resize for the web and save this version with a different name.

Other stories in this Simple Photo- Editing Workflow series:

Step 13 – Sharpen

Step 12 – Major Surgery

Step 11 – Getting to black and white

Step 10 – Fixing Redeye

Step 9 – Fixing Imperfections

Step 8 – Fix Skin tones

Step 7 – Fix Color problems

Step 6 – Fix muddy images

Step 5 – Fixing under and overexposed images

Step 4 – Straighten

Step 3 – Crop an image

Step 2 – Make a duplicate

Step 1 – Assess the image

Helen Bradley

Thursday, January 20th, 2011

Step 13 – Simple Photoediting workflow – Sharpen the image

When you have finished working on an image you should sharpen it to make the edges in the image look crisper so that they look better when printed on paper and displayed on the screen.

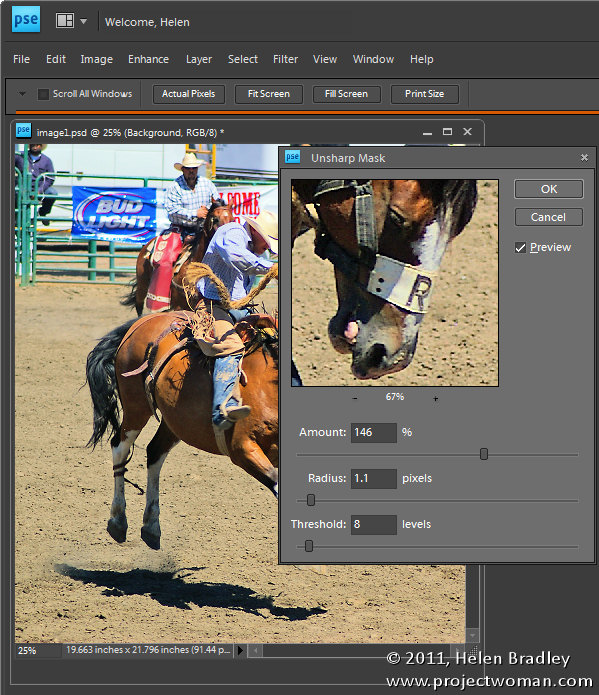
In Photoshop Elements, choose Enhance > Unsharp Mask and set the Radius to around 1.0 – 2.0 pixels. Select a low Threshold value of somewhere between 3 and 10 and adjust the Amount as required.

You will require a higher level of sharpening for images that you will print than you need for display on your computer screen or on the web, for example.

Use the Preview option to check the before and after results of sharpening to ensure you are getting the desired result. You should see the sharpening effect clearly at 100% view, but you should avoid making  visible halos around the edges in your image.

If your image was a little soft and lacking sharp focus before you begin, use a larger Radius value for the sharpening.

If you have been creating layers as you fix your image you must apply sharpening to a flattened version of the image, so choose Layer > Merge Visible to do this.

Other stories in this Simple Photo- Editing Workflow series:

Step 12 – Major Surgery

Step 11 – Getting to black and white

Step 10 – Fixing Redeye

Step 9 – Fixing Imperfections

Step 8 – Fix Skin tones

Step 7 – Fix Color problems

Step 6 – Fix muddy images

Step 5 – Fixing under and overexposed images

Step 4 – Straighten

Step 3 – Crop an image

Step 2 – Make a duplicate

Step 1 – Assess the image

Helen Bradley

Monday, January 17th, 2011

Step 12 Simple Photo-editing workflow – Performing major surgery

Quite often you will find that an otherwise pleasant image has been ruined by some distracting background element.

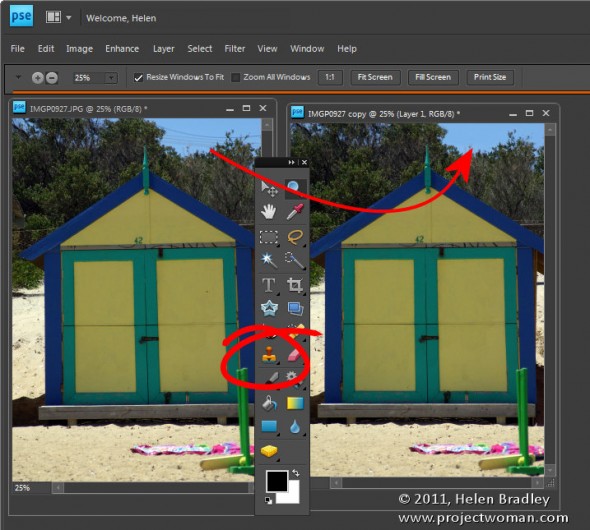
To remove this, use the Clone Stamp tool. Start by sampling an area of the image to use as the source data to fix the problem – you do this by Alt + Clicking on the portion of the image to use.

Then “paint over” the problem area. The results will be less obvious if you click with the brush rather than drag in a painting motion.

You may need to resample the source area from time to time as you work to find a good match for the area you are painting onto.

It is best to use a brush that is an appropriate size for the task – for detail work it should be quite small, for example, and it should have a low hardness value so you don’t get harsh edges on the fixed area.

If you are familiar with using layers, apply the fix to a new empty layer so that you can adjust and blend the layer later on if need be.

If you are cloning onto a new layer, make sure to have the All layers checkbox selected on the tool options bar so you sample from all the layers – the layer you’re working on won’t have any data so you can’t sample from it alone.

Other stories in this Simple Photo- Editing Workflow series:

Step 11 – Getting to black and white

Step 10 – Fixing Redeye

Step 9 – Fixing Imperfections

Step 8 – Fix Skin tones

Step 7 – Fix Color problems

Step 6 – Fix muddy images

Step 5 – Fixing under and overexposed images

Step 4 – Straighten

Step 3 – Crop an image

Step 2 – Make a duplicate

Step 1 – Assess the image
Helen Bradley