Marketing template shown here is a free downloadable template from Hubspot: https://offers.hubspot.com/monthly-marketing-reporting-template
Learn how Excel templates help you manage your marketing tasks
If you surveyed people about the tools that they consider among the most important in their software arsenal, there is no doubt that Microsoft Excel would be at or close to the top of that list.
In a world where just about every job requires reports, presentations, and budgets in spreadsheet format, Microsoft Excel is indispensable. It’s hard to imagine doing our jobs today without it. If the Gods of information technology didn’t create and develop Excel, our working lives wouldn’t just be tougher they would also be more chaotic, especially when you’re in marketing.
Nowhere is the need for Excel spreadsheets more evident than in the world of marketing, where tasks can be incredibly varied, and you’re expected to do them all. With its unparalleled ability to organize information and simplify tasks, Excel is an indispensable tool for marketers of all types.
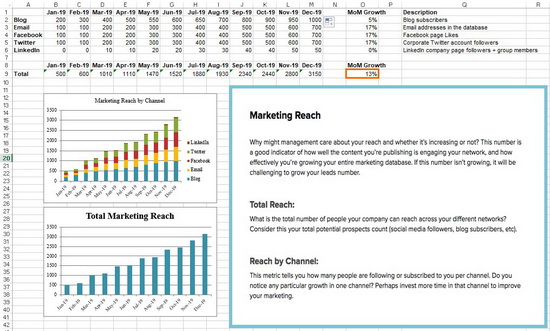
Monthly reports are par for the course in any industry workplace. Making them can be tedious, but they are always a great way to communicate to your boss how your marketing campaign is going.
For simplified reporting, you can use a monthly marketing metrics template that allows you to lay out data pertaining to monthly visits, leads, conversion rates, and customers. Once the layout is there, you can update the worksheet quickly and easily. Tracking and reporting on which channels are doing well also will also be more accurate when properly structured.
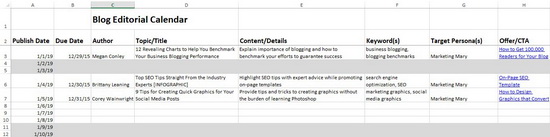
Blog editorial calendar
Creating a blog post that will help draw in visitors and leads to your website is easy enough. Managing that blog, however, is an entirely different story.
You need to keep track your blog post ideas and published posts. You also need to distribute them strategically. If there are contributions from other bloggers, you will need to monitor those too.
To keep track of everything you need a blog editorial calendar, and Microsoft Excel is an excellent tool for creating one.
With a blog editorial calendar, you can keep an eye on all your content. It can also help you when it comes to choosing topics, managing buyer personas, and aligning your calls-to-action, amongst other things.
On-Page SEO Template
When running an SEO campaign, there are so many things that a marketer needs to track. In addition, periodic algorithm changes will force you to rethink your SEO strategy and make the necessary adjustments.
If you don’t have an Excel template where you can see all the information you need to manage your SEO strategies, your life as a marketer is bound to be more difficult. An on-page SEO template will help guide your SEO strategy and remind you of SEO best practices that you need to employ for the best results.
Budget template
No marketing campaign will ever run effectively without a properly allocated budget. Preparing a budget could be complicated work, but if you use an Excel budget template, you will be able to organize your marketing spending better.
Aside from establishing a clear alignment between your spending and your goals, an Excel budget template can also help you keep track of your spending and help you ensure you don’t go over budget.
There are many other ways that you can use Excel templates to make your marketing job easier. You can create these special templates yourself, or you can avail of the many Excel templates being offered online.
Need to manage your Microsoft Office templates but can’t find them?
It’s not easy to find the templates folder on your Mac. You might know it is My Templates but a typical search in Finder won’t turn it up.
Luckily help is at hand. Launch Finder and choose Go > Go to Folder. Now paste this folder name into the search box to go to your My Templates folder where you can now see and manage your templates!
Learn how to make a vector repeating pattern swatch from a pattern created using a MadPattern template.
The Madpattern Illustrator templates include instructions for saving swatches as bitmap files but most users will want to create vector swatches. How to do this is not either clear or intuitive. This video shows you how to make a vector pattern swatch and how to save and open it so you can use it again in future.
Video covers downloading and opening a MadPattern template. How to create a pattern and then how to save a vector repeating pattern swatch. It also shows how to save the swatch and how to load it to use it again in future. Also covered is how to recolor the pattern and resize it.
Transcript:
Hello, I’m Helen Bradley.
Welcome to this video tutorial.
In this tutorial I’m going to show you how you can create a vector pattern swatch using Mad Pattern templates for creating repeatable patters.
Before we get started making our vector pattern swatch let’s have a look and see what we’re aiming at.
This is a vector pattern swatch that I created earlier using the Mad Pattern templates and all I need to do is to open the swatches library they’re saved into and add it as a fill to a shape such as this one here.
It can be scaled and colored and we’ll see that again in a short period of time.
But for now we need to go and have a look and see where we’re going to get these Mad Pattern templates from.
You’ll find the Mad Pattern templates at madpattern.com.
They’re said to be compatible with Illustrator CS4 and 5.
They’re also compatible with 5.
Click here to download them.
On my website at projectwoman.com you’ll see that I have a link from my Home page to Mad Pattern template images.
These show you the series of templates that you’re being given and how they repeat.
It’s pretty critical once you get into this to know exactly which one you need to get the repeating style that you want.
We’re actually going to use P3M1 here in just a minute.
Now once you’ve downloaded and extracted the files you can open them in Illustrator.
You can choose File, New from Template but I’m actually just going to open the template itself and this is the P3M1 template.
Now when you open these templates the first thing you’ll want to do is to show your layers palette because that will show you what’s going on.
Every template will have a layer that has the exact same name as the template itself.
It will also have a small amount of information which you can turn off by clicking the Info icon here.
If you read the info it does tell you a little bit of what you need to do to actually start creating the illustration for the template and also it will tell you how you can save this for web and devices.
Now the swatch saved for web and devices is a raster swatch so it won’t be scalable to a really high degree.
It would of course be a document that you could use in Photoshop but if you want a vector swatch then that’s what I’m going to show you how to do.
So we’re going to turn off the Info and we’re going to turn off the template elements and we’re going to click in here in this clipped elements area because that’s where we’re going to create the pattern itself.
I’m just going to zoom in here, make this a lot larger to that we can see the area that we’re going to be working.
I’m going to create a simple heart for my pattern swatch so I’m just going to quickly with the Pen tool draw a heart shape.
I’m not worried too much about how it looks.
I’ve got my handles turned off so I’m just going to make sure I turn them on and let’s just call that good for my heart.
Now I am going to color it so I’m just going to get my color swatches.
I’m going to fill it with a pink color and around the edges I’m just going to make it a navy blue.
Now I’d like my stroke to be a little bit bigger so I’m just going to grab my Appearance panel because I often find that stroke and things are a little bit easier to manage in the Appearance panel.
So we’ll give it a nice wide stroke.
Now before we leave here we can also grab the Ellipse tool and we’ll drag out a couple of circles.
So I’m just going to click on the edge here of this triangle.
So I’m looking for the anchor point.
I’m going to hold Alt and Shift so I can grab and drag a circle.
I’ll just reverse the colors here.
I’ll choose my Move tool, click on the object, choose Edit, Copy and then Edit, Paste in Place.
So that gives me a duplicate of this which then I can move over the very edge of this end of the triangle.
I’m going to do the same thing with Edit, Copy, Edit, Paste in Place and this time I’ll put mine at the very bottom of the triangle.
So this is what we have so far as our pattern.
Oops, let’s just grab that there.
So this is our pattern.
And having created the pattern we’re now in a position where we can go and save it as a vector swatch.
Now to do this we need to understand a couple of things about these Mad Pattern templates and one is that this is the area in which we draw our shape.
But this is an art board and this art board is fairly critical because it tells us how big our pattern repeat is going to be.
So I’m going to click here on this Art Board tool here and I just want to click on Art Board too because I want to select it because I want to read off a little bit of information about it.
To do this I’m going to click Art Board Options and this opens this Art Board Options dialog.
And these are the two measurements I’m interested in.
I want to know the width and the height of this art board and I need to know it exactly.
So this .21 pixels, that’s critical too.
So it’s 300 x 173.21 pixels.
I’m just going to cancel out of here because I just need that information, nothing more.
Now I’m going to select and create a rectangle but I’m just going to click once on the background here because I want to type in those measurements that I just got, 300 x 173.21 pixels and click Ok.
Now this is my shape but as you can see it’s got a blue fill and a pink outline.
We just can’t see that because the shape is not in the area in which the repeat pattern is being created.
If I do move it into that area you can see that it does have that fill and that edge to it.
Now it’s critical that it doesn’t have any of those features so with it selected I’m going to turn off the stroke and I’m going to turn off the fill.
So this is now an empty rectangle.
If you’re familiar with working with repeating patterns in Illustrator CS5, 4 and earlier then you’ll know that you need this unfilled rectangle to actually select and create a repeating pattern.
Now I’ve just opened my clipped elements group here.
I’m just going to drag the path all the way down to behind the background.
I just want to tuck it away for now.
And now what I want to do is to expand this layer P3M1.
Now I can’t expand it right now with this clipping mask and also this dummy path that are here with lock icons on them so I need to go in and unlock these two icons.
And then I’m going to select P3M1, the layer that corresponds with the template name, and click on all of these layers here so that everything is selected.
Now I’ll choose Object, Expand Appearance.
If you don’t see Expand Appearance here, if it’s grayed out, then you’ve done something or left something unselected or selected when it shouldn’t be.
So just exit out of this menu and go back and check that these lock icons are deselected and that you have P3M1 or whatever the layer is that corresponds with the template name selected and that these are all selected here because you absolutely have to have Expand Appearance available.
So I’ve clicked Expand Appearance and now you can see that I’ve got this very interesting sort of pattern of things happening in the background.
That’s exactly as it should be because I did need to expand the appearance of all these shapes.
So now I’m going to go back and reselect here the rectangle shape and then I’m going to select all these other objects as well.
So I’ve got everything selected here that makes up the swatch that I want to save.
And having done that I’m going to go and grab my Move tool and drag from the middle of this rectangle so that I’m dragging and dropping it into the Swatches panel.
And this then becomes my swatch.
So to test it before we leave here I’m going to turn off all these layers.
I’m going to click the topmost layer and I’m going to add a brand new layer so that I can add a filled rectangle over the tops.
I’ve just dragged out a rectangle here.
Now we can’t see it.
But you can now see it has a border and we want to select Fill and we want to drop our pattern fill in there so that we can check to make sure that everything looks perfect.
And I suggest you go one step further and that you actually resize this pattern.
So again, making sure that we have this rectangle selected let’s go to Object, Transform Scale and let’s make sure that we’re not transforming the object ourselves but that we are transforming the pattern.
And now we’re reducing it to 25 percent and we can see that this is a perfect pattern.
It’s repeating exactly the way it should be.
It’s looking absolutely perfect.
And if it looks perfect then you’re right to go.
If it isn’t perfect then just turn off this layer, get rid of this layer and just step back and recreate your pattern.
But we’re ready to go.
Now the problem with this is if I get rid of this document as I’m tempted to do I’m going to lose this pattern swatch and it’s not coming back any time soon.
I would have to recreate it.
So I need to save it.
So I’m going to click the dropdown list here now and chose Save Swatch Library as an Eye.
This is the one you want, the one at the very bottom.
And I’m going to call this heart2 mad pattern because I’ve got a heart1 already there just so that we know that this is the pattern swatch we just created.
I’m going to click Save.
So having done that I can now get rid of this image.
I don’t need it any longer and while I might usually save it in case I want to come back and make alterations to it today I’m just going to trash it.
So I’m just going to close it.
And now let’s go and test our pattern swatch.
I’ll choose File and New because I’m going to create a brand new landscape orientation document.
I’m going to drag out a rectangle on that document and if we go to the swatches palette you’ll see that our swatch has gone.
And that is to be expected.
We have to go and grab it.
We have to go and load it.
So from the swatches palette I’m going to choose Open Swatch Library and we’re going to choose User Defined and then heart2 mad pattern because that’s the one that I just saved.
Here is my pattern swatch.
I’ve got fill selected so I’m just going to click here and the object is now filled with my pattern.
And again we can test this by choosing Object, Transform, Scale.
Now this pattern can be scaled as big or as small as you like because it is a vector pattern.
So I’m just going to scale it here.
Now not only can we scale it we can also recolor it.
So if all you wanted to know was how to create a vector pattern for a Mad Pattern template then you’re off and running now.
But if you want to know how to recolor this hang around and we’re going to have a look at this too.
So to recolor it I’m going back to my swatches here.
I’m going to grab my color swatches and I want to create this color scheme here as a new swatch.
So I’m going to click here for new color group and I want to use the selected artwork and I’ll click Ok.
And so now these are here as global colors.
I’m going to select over that and click here the Edit or Apply Color Group button and this opens this color dialog.
Now I can use this color dialog to make changes for example I can say I don’t like this blue for example and I want to make it a sort of aqua color.
And that will make it aqua.
But I can also click the Edit button here and individually change these colors by dragging on the slider.
So I can drag around and the two colors maintain the same distance from each other but I can make them less saturated or more saturated by just dragging in or out on either of these sliders.
Now I can also unlock the slider here so that they’re now independent of each other.
So I can select whatever colors I want for the fill and for the stroke color on the pattern that is being used to fill this rectangle.
So when I’m done I’ll click Ok and I do want to save the changes and so they’re now saved as a swatch.
So you have all sorts of options here using the Mad Pattern templates and there are some really, really good patterns there.
And we’ll have a look at some more things that you can do with these Mad Pattern templates in upcoming videos.
But for this video I just wanted to make sure that you were able to save your patterns as a vector swatch because that’s going to be critical in being able to resize these patterns to any size and particularly very, very large sizes without losing details in your patterns.
I’m Helen Bradley.
Thank you for joining me for this video tutorial.
Look out on this YouTube channel for more YouTube videos on Illustrator, Photoshop, Lightroom and a whole lot more.
Transcript:
Hello, I’m Helen Bradley. Welcome to this video tutorial. In this tutorial I’m going to show you how you can actually make use of your reusable layout template that we made in an earlier video. In the previous video I showed you how to create this template.
It has a background color of white but that could be any color. It has space for two images. And then it has two copyright symbols here. One is black and one is white depending on which we want to use for any particular layout.
Now I’m going to show you how you can take this particular template and make it into this by adding images to it. I’m just going to hide this one away and we’ll focus on the one that we created.
I haven’t saved that yet but that doesn’t matter too much. Now I’m going to open some images that I want to use in it. So I’m going to go and select the images that I’d used previously. That’s winter7. And I want bird7 as well. So I’m just going to move these images into position. This is the main template and these are the individual images.
So to start off with I’m going to just drag and drop the background layers from each of these images into my main template. So this is this image first. I’m going to drag and drop it into position and I’m going to drag and drop this one in. Now you can see that the images that I’ve dragged and dropped in are way, way bigger than the template is. But that doesn’t matter because we know how to make them smaller. I’m going to click on the layer thumbnail, Ctrl T and then Ctrl Zero. You can see how much bigger these images are than the actual template itself. I’m going to size the image down quite small, click on this link here so I make sure that I don’t destroy its ratio of width and height, and I’m just going to move it roughly into position as to where it’s going to be in the final template. Now I’ll click the checkmark here and let’s go ahead and resize this one.
Click on the layer thumbnail, Ctrl T, Ctrl Zero. And now I’m going to scale it small, place it roughly in position, make sure that the width and height are scaled correctly in exactly the same proportion, finish off the positioning of it and then click the checkmark here. Now let’s zoom into the image. To make sure that this now works as we expect it to we need to bring back this line down here and we probably need to crop these images. Now the template has those crops already built into it.
The first thing I’m going to do is to drop this particular layer immediately above the layer that’s going to control its size. And then I’m going to drop this one immediately above the layer that’s going to control its size. And we’re going to use a simple feature called Clipping Path. With the topmost of this pair of layers selected, I’ll choose Layer and then Create Clipping Mask. And what that does is it clips this image to the exact size of the rectangle below. And now let’s do that with this one, click on the layer, Layer, Create Clipping Mask. And you can see that that’s clipped this particular image here to the exact size of the black box below.
The black has disappeared. It has nothing to do with it. These colors could be any color you like. But you can see that in doing so we’ve brought back the color from this layer here. And we can prove that that’s where the color is coming from. So I’m just going to select a blue color here and I’ll just fill this layer with blue. And you can see now that the space between those two images is the exact same blue as I just filled the background layer with. I’ll just undo that because I don’t really want blue.
To finish off I’m just going to decide which of these two copyright symbols is going to work better in this instance. Well I think the white one is. So I’m going to click its eyeball or its visibility icon and turn off the black one. So that’s how we would fill that template that we created in an earlier video.
Now your templates don’t have to be as simple as this one. They can be quite complex. And you may be aware that I have templates available on projectwoman.com. This is a free set of templates that you can download and use exactly as you’ve seen here. There are some triptychs and there are also some layouts with 9, 4 and 6 images in them.
I’m Helen Bradley. Thank you for joining me for this video tutorial. If you liked this tutorial place click the thumbs up to give it a like. Think about subscribing to my YouTube channel and visit my website at projectwoman.com for more tips, tricks and tutorials on Illustrator, Photoshop, Lightroom, Photoshop Elements, iPad and a whole lot more.
This technique shows a quick way to create even complex layouts using selections and layers in Photoshop. It is simple to achieve for any one with advanced beginner skills or better in Photoshop.
Transcript:
Hello, I’m Helen Bradley. Welcome to this video tutorial. In this tutorial I’m going to show you how you can use Photoshop to make a reusable layout template. In a later video I’ll show you how you can go ahead and reuse that template.
This is the type of template that I’m going to show you how to create in this video and in the next video I’m going to show you how to populate it. Basically the template is made up here of a background layer which can be any color you like and you can also change the color if you want to. And into the template we’re going to put two black boxes and these later on are going to be filled with images. Here’s one image and here’s another. And it’s going to be done in a way that’s going to be very easy for you to limit the size of these images to match these black boxes. And then you can add copyright symbol.
Now I’ve got two in this particular template because I’m not sure whether I’m going to need a black one or a white one. And that will pretty much depend on what the images are that I’m using. So into this template I’m going to put both of them so they’re both available. So in this particular video this is the point at which we’re going to have the template created. We’ll have a backing, the two boxes and then two alternate copyright symbols that we can use. So let’s get started.
The first thing to do is to choose File, New and then make a size for your template. I’m using one that could be used for a blog so it’s a mere 650 by 300 pixels in size, 72 pixels per inch because this is going to the web, RGB color mode, and because I want a white background I’m just going to select Background Contents White. But we could color that later on if we wanted to, and I’ll just click Ok. And here is my new document. It has just a background layer.
The next thing to do is to add a guide that I’m going to use to make it just a little bit easier to make those black boxes. I’m going to choose View and then New Guide and I want this one to be at 40 percent vertical. So that’s a little bit more than one-third of the way across this document. Now I’m going to add a new layer by clicking the Add New Layer icon here at the foot of the layer pallete. I’m going to target the Rectangular Marquee tool. And making sure that I’m pointed to this new layer I’m going to drag over to create a rectangle. Now I’m going to do that again so that you can see that I start my rectangle here outside the edge of the image to make sure that I get all the image up to this line. And because View is set to Snap I’m snapping to this guide so I’m making sure that I’m filling this exact area.
I have black selected here as my foreground color so I’m going to press Alt Backspace or Option Delete on the Mac to fill my rectangle with that black color. Now I’m going to add another new layer and this time I’m going to choose Select, Inverse because what that does is to select everything that I didn’t have selected before. Now I’m going to fill this with black again, Alt Backspace, Option Delete.
Now right now I’ve got two black boxes. And if I turn off these guides, I’m just going to clear the guides, you’ll see that these two boxes in fact butt onto each other so they’re creating an entire document. That’s not what I want. I want a marker between the two of them.
So I’m going to click on the topmost layer, click the Move tool and then just tap with the right arrow key and I’m just visually deciding how much space I want between these two boxes. And I think that’s a pretty good amount. So having done that I’m just going to select a different tool and that will turn this off. So here I’ve got my two layers and my background layer.
And all I need to do now is to add the copyrights so I’m just going to choose File, Open Recent because I recently opened my black and my white copyrights. So here they are. I’m going to just pull these images out of the way so that I can see my main image. And this is the white copyright here that is selected so this is its layer. So I’m just going to drag and drop it into my image. It’s way too big but we’ll worry about that in a minute. I’ll close it down. And now this is my black copyright image and I’m going to drag and drop its background layer into my image. And again, it’s way too big too. I’m now going to select the black copyright layer here and I’m going to press Ctrl and T and then Ctrl and zero. And what that does is it lets me see my sizing handles because this image this copyright image is really, really huge.
So I’m just going to size it down so it’s going to fit better in this area here. I’m going to make sure that I click this link here so that it’s sized in proportion. And now I’m going to just drag it back to approximately where I want it to be and click the checkmark. I can hide that now. And now let’s focus on the white layer exactly the same, click the layer thumbnail to select it, Ctrl and T and then Ctrl and zero. Now I’m going to drag in on the sizing handles to make my copyright small enough to position it in place on my image. I’m just going to click this link again just to make sure that this is scaled in proportion and click the checkmark.
So this is my template. It’s all done and now I can save it. So I can choose File and then Save as and I would give it a name such as 40, 60 something, like that to indicate to me that this is a template that I can now use to create other documents in future. In the next video I’ll show you exactly how to do that.
I’m Helen Bradley. Thank you for joining me for this video tutorial. If you liked the tutorial please click Like. Think about subscribing to my YouTube channel and look at my website at projectwoman.com for more tips, tricks and tutorials on Photoshop, Lightroom, Illustrator, iPad and a whole lot more.
I use Lightroom to prepare the images ready to upload to my blogs so it’s critical that I can get them out of Lightroom all ready to upload without having to do any more work on them.
On one blog I use framed images and therein lies a problem – the images need a thin keyline around them so you can see the edge. Without an edge the image would just blend into the surrounding white background of the blog page.
So, here’s how to create a frame effect in Lightroom – the images will be sized for the web with the appropriate resolution, they will have a frame around them, together with my name, and they will have a keyline around the image and around the page itself. And, to finish, it will all be saved as a reusable template.
Start outside Lightroom in any graphics or photo-editing program and create an image 500 x 600 pixels in size and filled with white. Save it as a jpeg format image and import it into Lightroom – place it somewhere easy to find.
Then, in Lightroom place the images for the blog post into a collection and add the empty image you just created to the same collection. For convenience I use a single collection for the images destined for my blog – it makes them easier to find and it simplifies the output process.
Switch to the Print module and select the collection. To configure the document size, from the Layout Style panel select Custom Package and from the Print Job panel set Print To to read JPEG file. Set the File Resolution to 100 ppi and select the Custom File Dimensions to 5 in x 4 in to make a landscape orientation image which will ultimately be created as a 500 x 400 pixel image. Set Color Management Profile to sRGB.
Now, drag and drop the first image into the work area and size it to suit. Choose Image Settings > Inner Stroke and then set the width to 0.2 pt black line. This will appear around the image.
Now drag the empty white image into an empty place in the work area and then size it to just smaller than the size of the work area. It will automatically have a line around it – the Inner Stroke setting is applied to all the images. To place this image behind the first image, right click it and choose Send to Back.
The text is added using an Identity Plate. To make one, click the Page panel and enable the Identity Plate checkbox. Click the small triangle in the Identity Plate box and click Edit and then click Use a styled text identity plate. Type the Identity Plate text – for example, mine reads Helen Bradley | Photography – select and format it as desired. Click the Custom button, click Save As and type a name for it, click Save and then Ok to add it. Move it into position and size it to suit.
When you’re done click Print to File to print the image.
To save the design as a template you can use over and over again, click the + opposite Template Browser in the left panel. Type a name for the template.
In future you can select this template and use it to print another image. Before you do so, you will need to drag and drop an image into the image placeholder and add the empty image to the larger placeholder. If you want to be able to print portrait orientation images, repeat the process to create a second template – you can reuse the empty image and the Identity Plate.
With the increasing popularity of the iPad and iPhone it’s no longer appropriate for most of us to create Flash based web galleries – they just can’t be easily viewed on these devices. If you want almost everyone to be able to see your galleries then you need to create them as HTML galleries and not Flash.
Lightroom has a range of HTML Templates you can use to create a reasonable looking gallery in a very short time.
To make your web gallery in Lightroom start by placing your images in a Collection. This makes it easier for you to work with the images and you can save the gallery so you can edit it in future if needed.
Select your Collection and switch to the Web module. From the Layout Style options, you can select Lightroom HTML gallery or, easier still, from the Template Browser panel on the left of the screen, select a gallery that is HTML based. If you look in the preview area the HTML gallery templates all have the letters HTML in their bottom left corner. Select a template to use.
From the toolbar (press T if it isn’t visible), choose All Filmstrip Photos if you have a Collection selected and this will add all the images to your gallery. What you see on the screen in the editing area is a live version of your web gallery. You can click on any image to view it as it will look on the web.
Open the Site Info panel and type a Site Title, a Collection Title and a Collection Description. If you don’t want to use all of these simply delete the placeholder text for those items you don’t want to use and the space they take up in the template will be freed for use for your images.
For the Contact Info, type your contact name if desired and then complete the Web Or Mail Link and this will be linked automatically to the contact name in the web gallery.
You can add an identity plate to the gallery, if desired, it will sit above the Site Title. You can link it back to your site if desired by completing the Web or Mail Link box.
The Color Palette options let you change the colors for the various elements in the website template.
In the Appearance panel you can set the thumbnail image grid size – it defaults to 3 x 3 and cannot be any smaller but it can be considerably larger. If you want to show cell numbers over the images you can do so – this is useful when you need to give viewers an easy way to identify images they like. Images are numbered sequentially and if you have multiple pages the images on the second page continue sequentially from the numbering from the first page.
You can control the size of the full size image on the Image Page by adjusting the Size slider. You can also add Photo Borders to the images in the Image Pages. Note that the Appearance panel is divided into Common Settings, Grid Pages and Image Pages allowing you to make change that effect the entire gallery, only the grid pages or only the image pages.
In the Image Info panel you can select to add labels to your images. These appear on the Image Page only. You can select a Title which appears above the image and a Caption which appears below the image. For each you can source the text from the image metadata and there is no reason why you can’t set the Title to be the Caption metadata and the Caption to be your Equipment metadata, for example.
In Output Settings select the quality of the larger size JPG images – 0 is low quality and 100 is high quality. If you want to include Metadata with the image select what to include – your choices are Copyright Only or All.
Also add a Watermark if desired. If you select to add a watermark, you’ll see it on the image page and the index pages so you can check to see that it’s what you want.
Select whether or not to sharpen the images – this sharpening is only applied as the images are output so you won’t see it on the screen. If you’re unsure what to use, enable Sharpening and set it to Standard.
When you’re done, click Create Saved Web Gallery – this is a new option in Lightroom 4 and it appears to the top right of the main editing area. Type a name for your web gallery and click Create. Doing this ensures that the gallery is saved and once you have done this, Lightroom will track your changes from now on.
In future you can come back to the web gallery by clicking the special collection that Lightroom creates for you.
If you want to upload your gallery to the web later on, click Export to export it to disk. Otherwise you can upload it direct to your website by selecting the Upload Settings panel and configure your FTP server. For this, you’ll need your server details, user name and password. You’ll also need the server path although you can click Browse to browse your server to find it if desired. Type a subfolder in which to place the gallery – you’ll need to do this if you plan to have multiple galleries in the server folder you are using. Each gallery needs to be placed in a different subfolder or it will overwrite the previously uploaded gallery.
When you have everything configured click Upload to render the gallery images, create the necessary html code and upload it all automatically to your server.
The HTML galleries in Lightroom aren’t the best looking galleries in town but having a gallery accessible to almost any device is definitely and incentive to use them in place of Flash galleries.
Historically a contact sheet was a page of images each printed at the same size as the film negative – they were used as a reference for the images on the film roll. They were called contact sheets because the film was placed in close contact with the paper when printing them.
These days the term contact sheet loosely means an arrangement of multiple, small, same size images on a single page usually with some identifying information such as the image filename placed under the image. The purpose is to provide reference to a larger number of images. You may print them to keep or give to a client as a catalog of the images from a shoot, for example.
You can create a contact sheet inside Lightroom and here’s how to do it:
Select a template
Start by selecting the folder or the collection that contains the images that you want to add to the contact sheet.
Launch the Print module and, from the Template Browser, select one of the contact sheet options. There are a few grid layouts including two with square image cells – a 4 x 8, and a 5 x 8. There are two with landscape orientation cells – one 5 x 9, and one 5 x 11.
I chose the 5 x 8 one.
Set up the print job
If you plan to ‘print’ the contact sheet to a jpg file, from the Print Job panel on the right of the screen, choose Print to JPG File. As contact sheets are just that – a contact sheet and not full scale images – select to use Draft Mode Printing to speed up their creation.
The page dimensions will be preset for 8.5 x 11in. You can set your own Custom File Dimensions but increasing the size of the page simply changes the page size not the size of the cells – you have to adjust them separately.
Adding images
If you have only one image selected in the Filmstrip then the contact sheet will only display one image.
You’ll need to select all the images on the filmstrip to add them to the contact sheet. To do this, either click on the first image and Shift + Click on the last or select All Filmstrip Photos from the Use: list on the toolbar. If the Toolbar is not visible, press T to display it. You can also select Flagged photos, if desired.
The Toolbar shows you how many pages you will use and you can click the arrow keys on the toolbar to navigate the pages.
Add image captions
To add information below the images, from the Page panel on the right, select the Photo Info checkbox and choose the field to display. You can use one of the preset options such as Caption, Date, or Filename or click Edit to create your own field.
In the Text Template Editor, you can access to fields such as the filename, a sequential numbering or date as well as EXIF and IPTC data. You can also type your own custom text to create detailed photo info to add to the contact sheet. Here I typed some text, added a sequential number and the filename.
Customize the Contact Sheet
The template contact sheets are a starting point but you do not need to strictly adhere to their design if you don’t want to and they can be easily customized.
For example, from the layout panel if you click the Keep Square checkbox you will find that in some layouts your images may change orientation so the page will be a mix of portrait and landscape images.
You can adjust the maximum cell size and width using the Cell Size Height and Width sliders in the Layout panel. As you adjust the cell size, notice that the Cell Spacing values will change.
You can decrease the number of rows and/or columns using the Page Grid options. By decreasing the number of rows or columns, you can increase the cell size.
Adjusting margins
If you increase the Bottom or Top margin you can give yourself room to, for example, place an Identity Plate on the page.
Here I’ve reduced the number of rows and increased the bottom margin and added an Identity Plate from the Page panel options. In the Page panel, select the Identity Plate checkbox and then select the Identity Plate to use.
The Identity Plate will appear, by default, in the middle of the page so drag it into position on the page. Adjust its scale by dragging on the Scale slider.
You can adjust its Opacity if desired and, if it is a text identity plate (rather than a graphic), you can also select Override Color to make it any color you like.
Print the result
When you’re done, you’re ready to output the result. If you selected to print to a JPG file click Print to File and type a name for the file and select a location for them. The pages will be printed to a JPG file and if there are more than one they will be sequentially numbered.
Print to PDF
If you want to print to a PDF on a Windows machine you will need to have a PDF printer driver installed such as Adobe PDF or one you have downloaded from the web.
Select Page Setup, select the pdf printer driver and configure the page size so it matches the template size – such as letter paper portrait orientation. Then set the Print to: option in the Print Job panel to printer and click Print to print to a pdf.
Save the Template
If you have customized a template and want to be able to use it again in future, save the design as a new template.
Click the plus symbol opposite the Template Browser panel header and type a name for your template. You can store it in User Templates or create a new folder for it. Click to create it.
In future you can save yourself the time setting up the template by starting with your customized version.
A short while ago I wrote an article on using templates to create a collage or montage of images in Gimp. Sometime after, the templates that I suggested you could use were taken down from the original website.
To help out our Gimp readers, I created a new set of templates and as I was making them, it seemed like a good idea to include instructions for Photoshop and Photoshop Elements as well as for Gimp. Here, therefore is how to use a downloadable template to create a montage of images:
Then unzip the templates, save them where you can find them when you need to use them and open one of them. I’ve used the template triptych.psd.
When you open it, you’ll find that there are a series of layers. The top layer can be disabled or deleted at this point. The next two layers are instructions for Gimp and Photoshop users. Again, you can discard these two layers.
Open up the three images that you plan to use for this triptych. Images that are in portrait orientation will look best but you can use anything that you like – just be aware that you’re going to take a portrait orientation slice of the image.
In the template, click on Layer A and then click on the first of your images and drag and drop the background layer from the first of your images into the main image.
Click on the Move tool and size and position the image so that the interesting portion of it is over the black background. Click to accept this size and positioning and then with the new layer still selected, choose Layer > Create Clipping Mask. You’ll see that your layer is clipped to the size of the underlying shape.
You can fine-tune the placement and sizing by moving the contents of the new layer.
Now click on Layer B and again drag and drop the background layer from the second image into this template. Again, position the interesting portion of the image over the underlying background, sizing the image if desired. Create the clipping mask for that layer by selecting the image and choose Layer > Create Clipping Mask.
Repeat this for Layer C using your third image.
When you’re done, you can adjust the background of the image if desired by recoloring the layer marked background recolor if desired. You can now save and print the image or upload it to the web.
This same process can be used in Photoshop Elements.