Saturday, September 21st, 2013

Photoshop – 3 Vignette Techniques

Learn to add vignettes to your photos in Photoshop using three different methods. One uses a Inner Glow style, one a filled and blurred layer and the third the Lens Correction filter.

Transcript:

Hello, I’m Helen Bradley.

Welcome to this video tutorial. In this tutorial I’m going to show you how you can create vignettes in Photoshop in three different ways. Before we get started with this tutorial let’s have a look and see what a vignette is so that we can understand what it is that we’re aiming for.

This image has a vignette. It’s a darkening around the edges of the image. If I turn this layer off you can see the original image and now there is this darkening edge. And that’s the vignette that we’re going to create. And I’m going to tuck that image away for now and let’s go and get the original image and we’ll create that same vignette style. To do this, first of all I’m going to add a new layer to the image so I’ll click on the Add New Layer icon at the foot of the layers palette. I’m going to target the Rectangular Marquee tool and I’m going to drag in here to create a marquee just inside the edge of the image because this area is going to be my vignette.

Because I have selected the middle of the image I need to invert my selection with Select Inverse and that inverts the selection so just this edge is selected. I’ll now grab a color from my image. I’ve used the Eyedropper tool here and I’m just going to grab a brown color from my image as my foreground color. And now I’m going to fill the edge here with that color by pressing Alt Backspace on the PC or Option Delete on the Mac. Now I’m going to choose Select, Deselect because I’m about to blur the edges of this and I need to get rid of the selection before I do or else I won’t be able to blur it correctly.

With this layer selected I’ll choose Filter, Blur and I’m going to choose Gaussian Blur because that gives me a nice blurred edge. I’m going to wind up the blur until it’s nice and soft and so you can do this as much or as little as you like. I’ll click Ok. Now to get this effect on the image rather than being painted on like this to blend it in I’m going to set the blend mode to multiply. And that multiplies the edges. It darkens it all around the edges where the image is darker and it’s not quite so dark where the image is lighter. And now I’m just going to adjust the opacity until I get a pleasant darkening of the image.

Now if I wanted to I could go one step further with this and I could with this layer still selected choose Edit and then Transform and then Warp and this would allow me to warp this layer. So for example I could pull it away from the edges but leave it more definite in the corners. So you might want to try something like that if you’re using this particular effect. It can’t be done with all other effects. So there’s one of the vignette possibilities. Let’s go and get a second version of our image and we’ll try another vignette. This time I’m going to choose Filter and I’m going to choose the Lens Correction filter.

The Lens Correction filter has two panels. I’m going to click Custom because what I want to do is to add a vignette and I’m going to drag towards the darken side so that you can see that the edges of the image are being darkened. And when I have the vignette that I want here I’ll just click Ok. So now I’m going to wind this back so that you can see the effect. That’s the original and this is the vignetted version, before and after. For this final vignette we’re going to use a style. This layer has been converted from a background layer into a regular layer so I’m going to click the Effects or Style button and we’re going to add an inner glow to the image.

Now a glow can be something light but it can also be something very dark. So I’m going to click here and we’re going to choose a really dark color for our glow. So I’m looking for a sort of brown color here to use. Let’s click on that. Because I want it to be darker I need to use a different blend mode than screen because screen will always be lighter. So I’m going to use multiply and I’m going to increase the size of this quite a bit so it comes in around the edges of the image. And you can see it in place here.

And now I can adjust down the opacity if I don’t want it to be quite as dark and here I can work on the choke and I can also change the contour. So for example you can get different effects by choosing different contours here. You get a different effect again by choosing one of the ones that is looped inwards rather than bent outwards. And once I’ve got the vignette effect that I’m looking for I can just close this dialog. Now one of the things about a vignette done this way is that it’s able to be saved. For example we could save this and call it vignette and then in future we could add it to an image by adding that vignette style to it.

So I’ve just dropped the style off but let’s select this layer and now let’s choose Window and then Styles and this opens up the styles panel. This is our vignette style. We can just click to apply it to that image. So that is a very reusable vignette created using a style. So you can create vignettes using styles. You can create them using filled layers that are blurred or you can create them using the Lens Correction tool in Photoshop.

I’m Helen Bradley.

Thank you for joining me for this video tutorial. Look out for more of my tutorials on this YouTube channel. Please if you liked the video consider subscribing to this YouTube channel. And visit my website at projectwoman.com for more tips, tricks and tutorials on Photoshop, Lightroom, Illustrator and a whole lot more.

Helen Bradley

Tuesday, September 3rd, 2013

Photoshop – Craft a custom Black & White Photo

Learn how to craft a custom black and white image in Photoshop using the Black and White adjustment layer and a curves adjustment. The process also includes adding a simple vignette effect.

Transcript:

Hello, I’m Helen Bradley.

Welcome to this video tutorial. In this tutorial I’m going to show you how you can create a custom black and white conversion for your images in Photoshop.

Before we get started with this process let’s have a look and see what it is that we’re aiming at. Here is just a standard conversion to black and white of an image and I just used the desaturated command to get this image. And here is a more crafted version.

Here I’ve been able to make choices about exactly how my black and white image looks. And I like this one a whole lot better and I’m going to show you how you can create this affect yourself. And what we do is use a black and white adjustment layer to do it. So first of all I’m going to take all these layers and just trash them.

And let’s get started with this image which of course was originally a color image. Now one thing I did do to this image is I cropped the beam across the top of the image out of the way because I didn’t think that helped it at all. And now instead of doing a desaturation which you might do by choosing Image > Adjustments > Desaturate, which gives you this sort of flat conversion into black and white, we’re just going to undo that and we’re going to choose Layer > New Adjustment Layer > Black and White.

Now this allows us to craft a black and white and what you get is a series of sliders. And you get a sort of standard black and white adjustment. But with these sliders you can determine how individual colors in the image are converted. Now right now I want you to look at this Konica Minolta sign here and it was originally blue.

Now you can see that if I take the blue slider towards the left it becomes very dark. If I take it towards the right we actually lose that sign completely. And this is the way that we craft our black and white image. All we need to do is to bring the sliders to where we want them to be to get the effect that we want on the image.

Now for me I wanted my greens to be a big lighter. So I’m going to take my greens to the lighter side of the slider and I’m testing each slider individually to see which gives me the effect that I’m looking for. And I’m looking for a bit of a moody image here.

So everything is going to be towards the darks for this image. But I might kick the occasional color up to light to that I get a little bit of variety in the image. And I’m just going to craft that until I get what I want and close the dialog.

Now the beauty of using an adjustment layer by choosing Layer > New Adjustment Layer is that this is now editable so I can double click on this adjustment layer at any time and I can redo the adjustment. I can tailor it again to my specific needs.

Having done this I wanted to really give this image a kick so I also added a couple of adjustments to it and these were curves adjustments. I chose Layer > New Adjustment Layer > Curves and I did this twice because I wanted to use standard curves adjustment. So from the presets the first thing I did was I chose a strong contrast because I really, really wanted a contrast here.

But then I realized that that was over darkening it so I added another adjustment layer and this time I went for a lightening curves adjustment layer. So I just went straight back into Curves and this time chose Lighter because that gave me a lighter but still very strong contrast image. And I finished off with a vignette.

Now with the vignette I added a new layer so Layer > New Layer. And then I chose the Rectangular Marquee tool here on this brand new layer and I just selected inside the image, sort of around I guess about half an inch inside the image. Then with that selection in place I chose Select > Inverse so that now I have this very edge of the image selected.

And you can see that I made a really poor job of this so let’s go back and I missed the top of the image. Let’s try that again, select Inverse. Now it looks pretty even all the way around. I have a sort of brown selected here but it could be black. It could be anything. I’m going to press Alt Backspace or Option Delete on the Mac just to fill the selection with that color and then I’m going to deselect the selection with Select > Deselect.

I’m going to blend it in using a multiply blend mode because the multiply blend mode darkens everything. And you can see the darkening effect around the edge of the image when I turn it on and off. Of course it’s not only way too much but it’s also a really hard edge. So with this layer selected I’m going to choose Filter > Blur > Gaussian Blur.

Gaussian Blur is my sort of go to blur because what it allows you to do is to really heavily blur the edges. Now I’m down at the very bottom of the image so that we can see the edge that we’ve got. This is it with a zero radius blur but as soon as I start increasing the blur you can see that it softens out nicely. So I’m just going to make it nice and soft and then bring down the opacity of it until I get what I want. So this is the original image and this is our new crafted black and white version.

And I think that for me is a lot more interesting than this particular version that I got by just choosing to desaturate the image. If you like this sort of dark, grungy sort of version or if you want to be able to craft your black and white images with a bit more control than just a one-step click select option then this is the tool you need to do it. Use the black and white adjustment layer and craft your own images.

I’m Helen Bradley.

Thank you for joining me for this video tutorial. Look out on this YouTube channel for more of my video tutorials.

And subscribe so that you’ll be advised when new tutorials are launched and also visit my website at projectwoman.com where you’ll find more tips, trick and tutorials on Photoshop, Photoshop Elements, Lightroom, Illustrator and a whole lot more.
Helen Bradley

Sunday, August 25th, 2013

Lightroom Tip – Add a Vignette Effect to an image

Learn how to darken the edges of an image using a Vignette in Lightroom

Vignettes are a darkening or lightening of the edges of an image – they can make an image look very attractive.

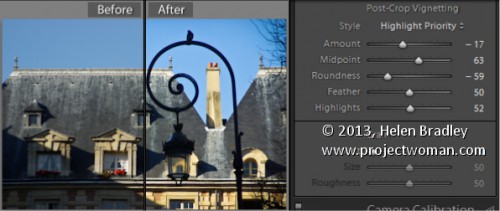
To add a vignette, open the Effects panel, set the Style to either Highlight Priority or Color Priority – Paint Overlay is the least attractive option. Drag to the left on the Amount slider to add a dark vignette and to the right to add a light one.

The Midpoint slider adjusts how the effect is applied to the edges of the image. Increase it to remove the vignette from the edges leaving it mainly in the corners.

Roundness controls the roundness of the vignette, drag to the left to make it more square, to the right to make it more circular. Feather controls the softness of the edges so use 0 for a hard-edge and 100 for a very soft edge.

Highlights applies when you use a negative Amount to create a darkened vignette. Zero gives no change and larger values preserve highlight contrast when you select Highlight Priority or Color Priority.

Helen Bradley

Friday, July 26th, 2013

Photoshop – Create Art from Photos using Textures

Here I show you how to create works of art using your images in Photoshop. Included is how to find and select texture images to use, how to blend these into the image and, how to add a lightening effect to highlight areas of the image to draw attention. Also, included is one method of adding a vignette to an image.

Transcript:
Hello, I’m Helen Bradley. Welcome to this video tutorial. In this tutorial I’m going to show you how you can make art from your photos using textures in Photoshop. Before we get started with this video tutorial let’s have a look and see what we’re aiming for. This is the image that we’re aiming for. And quite often when I’m doing these tutorials I’ll play around with a few images before I come up with something that I really want to share. But today it was just this one image, this one texture and the whole thing just blew my mind. So here it is in video form.

To start off with I’m going to show you where I got my textures because these textures are totally awesome and I love this guy’s work and I want to introduce it to you. So this is a Flickr photo stream and the guy is called Skeletal Mess. And he has a whole lot of textures that you can download. Now I downloaded this one. It’s very big but I just want to show you his set that he has on Flickr so you can see the sort of potential for what there is available. Now with this particular image I was having a look through his sets and just having a look to see what I might use. And this one really spoke to me and I’m going to show you why because we’ll go back to the image that I have and we’ll see why blue worked particularly well for this image. So let’s just wind back what I’ve done.

So I’m just going to the layers palette for this image and let’s go and create a brand new image. Okay, so here’s our duplicate image that we’re going to work with. That was what we were aiming for so now I’m going to take away the pieces that went to make up this image. Now you’ll see why I thought that that blue texture would work particularly well here because this image has no sky and if we can borrow the blue from this texture then that would give us an awesome result. We could have used this one too or this one and perhaps just rotated them. But this one really spoke to me so I downloaded that. So I’m just going to grab it now because whenever I download an image even though I can just drag and drop it into Photoshop I’ll also save it just in case I want to use it again later on.

So I’m just going to bring it in here. It’s a whole lot smaller than my image but because it’s a texture that doesn’t really matter. So now I’m going to grab the move tool and just size it to fit all the way across my image. And again because it’s a texture it doesn’t matter that it’s pulled a little bit out of square. So it’s been pulled a little bit wider than it was tall. The next thing I’ll do is just run down these blend modes and just see what it gives me because this is like totally the most exciting thing that you get to do. So I’ll just select Dissolve and then we’ll just run down these blend modes until we get what we’re looking at. And Multiply I think is probably the one I’m going to come back and use but let’s just see what there is in this list. And it was at the point at which I got to that Multiply blend mode that I thought I actually had something I really wanted to work with but you might find other things here that are speaking to you. There’s a whole lot of potential. I usually run down the list and then come back up and by then I’ve pretty much made my choice as to what is working for me. This one possibly but it’s not nearly as good as the Multiply one. So here’s the Multiply blend mode applied to this image.

Now having achieved that I thought in actual fact the middle of the image could be a bit lighter. So what I did was I added a brand new layer and from my tools palette which has gone walkabout here I just grabbed the elliptical marquee tool and just dragged out an oval on that image. I switched so that white and black would be my colors and I also added a feather to this. So I’ll choose Select and then Modify Feather. This is not a very sophisticated feather option but I’ll just add a 100 pixel feather radius to it. That just really softens this edge so now when I fill it by pressing Ctrl Backspace, Command Backspace on the Mac, it’s going to have this feathered soft edge. So now Command or Ctrl D to deselect the selection.

Now I have a big white splat right in the middle of image. That’s obviously not going to work but what I’d want to do then is to blend it in so again I’ll just select the first blend mode in the list and then just run down until I find something that works for me. And here’s Overlay blend mode. That’s lightening that image really well in the area where the lightening effect was. I’m thinking that’s probably the blend mode of choice. But let’s just go and check these others particularly in this lighter area with soft light, hard light, vivid light and pin light. You’re never really sure that they’re not going to give you something so I always run through those just in case one is better than the other. So we’re pretty much to the end and Overlay is going to be our choice. So I’m going back up to pick up Overlay. Now this is too white for me so I’m just going to drag down on the opacity of that layer just to make it a little less opaque. I’m also going to test around this area. I’m thinking that some of this lightness is coming through from this layer and it’s probably a bit more than I want.

So again I’m going to add a layer mask to this layer, go and grab a paintbrush and just paint with black with a very small opacity brush, you can see it’s only 26 percent opacity, just to knock out the bits where I think the lightening effect is too much. I really just want it on the front part of this boat. So once I’ve neatened that effect up now I’m thinking a vignette around the edge. Now there’s umpteen ways of adding vignettes. I’m just going to show you one of them. So a brand new layer, I’m going to go back to my marquee tool, this time the rectangular marquee, I’m just going to drag in around about probably an inch into the image and then I’m going to invert the selection, select Inverse so everything that was selected is now not selected.

So I’ve got this outside edge selected. Now I’m going to sample a color from the image by clicking the eyedropper. I’m thinking one of the colors around here is kind of pretty good. It’s sort of dark but not really, really dark. I’m thinking that color was pretty good. And now I’ll Alt Backspace, Option Delete on the Mac, to create that as my fill color. Now I can deselect my selection with Ctrl or Command D. Now this is not looking like a vignette but that’s fine because we’re going to again run down our blend modes and look for something that is going to give us a darkening effect at the edge. Things you would look for are going to be in this light field. Obviously Overlay is going to do it. Multiply will do it as wells. That will always darken everything up a little bit.

So they’re the ones to look out for but also look out for any surprises as you run down. You might see something that gives you an effect that makes you go oh, wow, that is just too amazing. So I’m headed towards probably Overlay. So now it’s still not the vignette effect that I want but I’m going to blur this. So with that layer selected I’m going to go Filter > Blur > Gaussian Blur. Gaussian Blur is an awesome blur for just blurring things to almost oblivion. So here it is at zero radius effectively and now we’re just going to wind it up to soften this edge and pretty much just blend it into the image. And at some point it just becomes a really, really nice soft vignette effect for our image. So I’m just going to click Ok.

So there we have the effect. It’s very, very simple. This is a throwaway image. It’s just the sky is gone. It’s Hong Kong. It’s smoggy. It’s an overcast day. The sky is just nonexistent and I really wouldn’t have given this image a second look except that I was looking for a challenge. Add a really nice texture from Skeleton Mess free online textures from Flickr, add a bit of a highlight in the middle and then add this vignette effect and we’ve got an image that is now a keeper.

I’m Helen Bradley. Thank you for joining me for this video tutorial. Look out for more of my tutorials on this YouTube channel. Please subscribe and also visit my website at projectwoman.com for more tips, tricks and tutorials on Illustrator, Photoshop, Lightroom, iPad and a whole lot more.

Helen Bradley

Monday, November 19th, 2012

Photoshop Smart Objects

Learn how to link Smart Objects so, when one changes, they both change and how to un-sync them so they are separate. I’ll also show you how to replace the contents of a Smart Object with another image. Useful for wedding photographers and for creating albums in Photoshop.

Transcript:

Hello, I’m Helen Bradley. Welcome to this video tutorial. In this tutorial I’m going to show you how to work with smart objects in Photoshop. In this video I’m going to show you how you can use smart objects to assemble complex images, and you can do it in a way that harnesses the value of the smart objects. For example, I’m going to create a smart object for this background and then a smart object for this couple. This will allow me to go to this smart object and choose Replace Image. This will allow me to go to this smart object layer, right click and choose Replace Contents. And I can then replace the contents of that smart object with any of the images from that album. And so I can quickly and easily create images for an album with a background in place. But there is a catch and you’ll want to use the right tool for creating these smart objects so I’m going to show you that too.

Let’s just hide this away and let’s go and get our starter document. I’ve already got a vignette that I’m going to use, but we’re going to put in here the original background. So I’m going to choose File and then Place because that’s a way of getting an image in as a smart object. Here’s the portion of this image that I want to use as my background. I’ve already extracted it as a separate image so I’m going to click Place. And I know that this needs to be enlarged a little bit so I’m just going to enlarge it to 75 percent and then click the checkmark. So it’s now in place and it’s a smart object. It has a special little smart object icon. And I’m just going to show you that you have this vignette which is separate and it just goes over the top.

Now we want to create another smart object, but we want this smart object to be unhooked or unlinked to this one. So I’m going to right click and I’m going to choose New, Smart Object via Copy. And what that does is makes a copy of the existing smart object as a separate layer,  but it is not linked to the original layer. So now if I go into this and resize it, I’m just going to link these two together, this gives us a new smart object layer in the image which is not linked to the background layer although the two share the current image. I’m just going to add a drop shadow to it. So if we were creating a bridal album we could use this as the starting point for our album. I’m just going to get a slightly nicer drop shadow here and pull that vignette down so that it’s over the top of the background and not the image here. So having created this, this could be the first image in our album. And we can then go ahead using the same background image and just change the smart object out without having to recreate this document, right click, choose Replace Contents.

This time I’m going for an image of the bride and groom, and here they are in place. They’re a little large so I’m just going to choose the transform tool with Ctrl or Command T. I know they need to be taken down to about 10 percent so I’m going to scale them down to 10 percent and just move them into position. You can see that the drop shadow is still in place, the background is still in place, the vignette is still in place, and we’ve got another page of our album already created. If I right click and choose Replace Contents I can go and select yet another image to go in here. And again, the border and everything are already on that image. So it gives me a smart way of creating an album very quickly.

I’m just going to discard that for now and let’s have a look at what you might want to use and which would be a bad choice in this situation. And that would be to right click and choose Duplicate Layer. Now that would give us on the face of it exactly what we had before, a smart object with a second smart object layer over the top. Let’s just go ahead and select that and let’s add our drop shadow to it. Let’s position it where we want it to be above the vignette. And here’s what we had, an image over the background. And we’re ready to print that out.

But look what happens if we go to replace the contents of this image with our bride and groom. Not only do we replace the contents of the image with our bride and groom, and we can scale them back down to the 10 percent size that we were using before, but let’s just link that so that it’s going to be 10 percent in both directions. But look what’s happened to our background. These two smart objects instead of just being a duplicate of each other are in actual fact an exact copy of each other. And so anything that happens to this background smart object is also going to happen to this one and vice versa. If we change this one we’re going to change this one. So if we want the ability to create a smart object from another one but to unlink it so that they’re no longer the same image each time, we need to right click and choose New Smart Object via Copy.

But if we do want two smart objects that are linked and they’re always going to be the same image even if they’re different sizes of the same image then we would simply use Duplicate Layer. Smart objects are a really good tool to use when you’re assembling an album like this because it gives you the ability to create a background image and a smaller image on top and to easily replace that image and create an album very quickly.

I’m Helen Bradley. Thank you for joining me for this YouTube video tutorial. If you liked the tutorial please like it and feel free to add comments to the video tutorial. I encourage you to subscribe to my video YouTube channel. We release videos twice a week at the very least and you’ll be alerted to the new video releases. And don’t forget to visit my website at projectwoman.com. There you’ll find more tips, tricks and techniques for Photoshop, Lightroom, Illustrator and lots of other programs.

Helen Bradley

Friday, April 15th, 2011

Lightroom Vignettes aren’t all equal

I was recently looking around for some cool Lightroom Presets to replicate vintage and toy camera effects. I found a couple of Lomo ones which had some good features but one horrendous failure that really made them usable in all conditions and that’s sad ’cause it didn’t have to be that way.

You see the problem was that the designer didn’t know the difference between vignette tools in Lightroom and they picked the wrong one to use. They used the Vignette tool in the Lens Correction panel to add the vignette – Way Wrong Technique. This tool is for removing vignettes and while it might seem to work for adding vignettes when used on one or a few images it won’t work on all images – hence it is a very poor choice for a preset when there is a better alternative.

The Lens Correction vignette tool removes a vignette from (or adds one to) the edges of the image. So, if you later crop the image, the vignette gets cropped away. If you’re using the tool to remove a vignette then that’s not an issue at all. However, if you are using it to add a vignette – it is a big issue. The presets I found with the vignette added using Lens Correction made a mess of any image I’d cropped – the vignette either got cropped away or worse still it appeared on one side of the image and not the other – yikes!

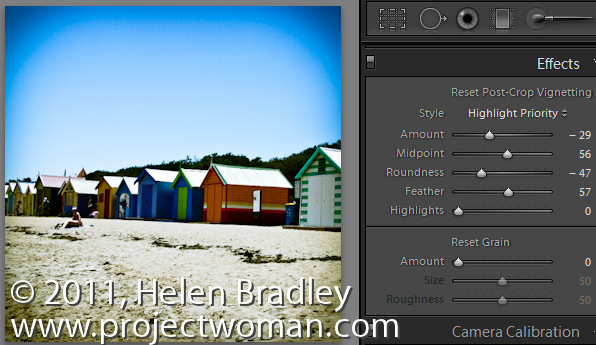
The correct tool to use to add a vignette is the Effect panel’s Post Crop Vignette. This, as its name suggests is a vignette added after the image is cropped so it always appears around the edge of the image regardless of whether it is full size or severely cropped or anything in between and regardless of when you choose to crop the image.

To add a vignette to darken the image edges drag the Amount to the left – dragging to the right will lighten the edges. The Midpoint setting moves the vignette inwards or pushes it outwards. The Roundness setting makes it rounder or squarer and Feather adds a softer or harder edge. For Style, I prefer Highlight Priority although Color Priority is ok – Paint Overlay is an overlay effect and not a blended one so I like it least of all.

So, next time you need a vignette effect for an image, choose the one that not only has plenty of customization options but also the one that will survive any cropping applied to the image.

Helen Bradley