Perspective problems vary – they include keystoning issues where a building is smaller at the top than at the bottom. There is barrel distortion where the sides of the image bend out and pincushion distortion where they are sucked in. Luckily, for all these distortion and bending lines issues Lightroom has a tool that will fix them for you.
In this video you will learn to use the Upright tool and the manual adjustments for fixing lens distortion and perspective problems in Lightroom.
Learn to add vignettes to your photos in Photoshop using three different methods. One uses a Inner Glow style, one a filled and blurred layer and the third the Lens Correction filter.
Transcript:
Hello, I’m Helen Bradley.
Welcome to this video tutorial. In this tutorial I’m going to show you how you can create vignettes in Photoshop in three different ways. Before we get started with this tutorial let’s have a look and see what a vignette is so that we can understand what it is that we’re aiming for.
This image has a vignette. It’s a darkening around the edges of the image. If I turn this layer off you can see the original image and now there is this darkening edge. And that’s the vignette that we’re going to create. And I’m going to tuck that image away for now and let’s go and get the original image and we’ll create that same vignette style. To do this, first of all I’m going to add a new layer to the image so I’ll click on the Add New Layer icon at the foot of the layers palette. I’m going to target the Rectangular Marquee tool and I’m going to drag in here to create a marquee just inside the edge of the image because this area is going to be my vignette.
Because I have selected the middle of the image I need to invert my selection with Select Inverse and that inverts the selection so just this edge is selected. I’ll now grab a color from my image. I’ve used the Eyedropper tool here and I’m just going to grab a brown color from my image as my foreground color. And now I’m going to fill the edge here with that color by pressing Alt Backspace on the PC or Option Delete on the Mac. Now I’m going to choose Select, Deselect because I’m about to blur the edges of this and I need to get rid of the selection before I do or else I won’t be able to blur it correctly.
With this layer selected I’ll choose Filter, Blur and I’m going to choose Gaussian Blur because that gives me a nice blurred edge. I’m going to wind up the blur until it’s nice and soft and so you can do this as much or as little as you like. I’ll click Ok. Now to get this effect on the image rather than being painted on like this to blend it in I’m going to set the blend mode to multiply. And that multiplies the edges. It darkens it all around the edges where the image is darker and it’s not quite so dark where the image is lighter. And now I’m just going to adjust the opacity until I get a pleasant darkening of the image.
Now if I wanted to I could go one step further with this and I could with this layer still selected choose Edit and then Transform and then Warp and this would allow me to warp this layer. So for example I could pull it away from the edges but leave it more definite in the corners. So you might want to try something like that if you’re using this particular effect. It can’t be done with all other effects. So there’s one of the vignette possibilities. Let’s go and get a second version of our image and we’ll try another vignette. This time I’m going to choose Filter and I’m going to choose the Lens Correction filter.
The Lens Correction filter has two panels. I’m going to click Custom because what I want to do is to add a vignette and I’m going to drag towards the darken side so that you can see that the edges of the image are being darkened. And when I have the vignette that I want here I’ll just click Ok. So now I’m going to wind this back so that you can see the effect. That’s the original and this is the vignetted version, before and after. For this final vignette we’re going to use a style. This layer has been converted from a background layer into a regular layer so I’m going to click the Effects or Style button and we’re going to add an inner glow to the image.
Now a glow can be something light but it can also be something very dark. So I’m going to click here and we’re going to choose a really dark color for our glow. So I’m looking for a sort of brown color here to use. Let’s click on that. Because I want it to be darker I need to use a different blend mode than screen because screen will always be lighter. So I’m going to use multiply and I’m going to increase the size of this quite a bit so it comes in around the edges of the image. And you can see it in place here.
And now I can adjust down the opacity if I don’t want it to be quite as dark and here I can work on the choke and I can also change the contour. So for example you can get different effects by choosing different contours here. You get a different effect again by choosing one of the ones that is looped inwards rather than bent outwards. And once I’ve got the vignette effect that I’m looking for I can just close this dialog. Now one of the things about a vignette done this way is that it’s able to be saved. For example we could save this and call it vignette and then in future we could add it to an image by adding that vignette style to it.
So I’ve just dropped the style off but let’s select this layer and now let’s choose Window and then Styles and this opens up the styles panel. This is our vignette style. We can just click to apply it to that image. So that is a very reusable vignette created using a style. So you can create vignettes using styles. You can create them using filled layers that are blurred or you can create them using the Lens Correction tool in Photoshop.
I’m Helen Bradley.
Thank you for joining me for this video tutorial. Look out for more of my tutorials on this YouTube channel. Please if you liked the video consider subscribing to this YouTube channel. And visit my website at projectwoman.com for more tips, tricks and tutorials on Photoshop, Lightroom, Illustrator and a whole lot more.
Sometimes you’ll capture an image that should be rectangular but is anything but. In this example I shot an image of a 6 x 6 inch sheet of paper for a project. The aim at the time was to have a reference image before the project was shipped.
Later I found I need to do more with the image and because it had been shot so casually the proportions were all wrong and the image does not look like a square sheet of paper. I also no longer have the project so reshooting is out of the question.
Luckily Photoshop and Photoshop Elements both share a similar tool for adjusting perspective which will go a long way towards fixing an image like this.
To do this choose Filter > Lens Correction in Photoshop and then click the Custom tab to access the custom tools. In Photoshop Elements choose Filter > Correct Camera Distortion.
Make sure the Show Grid option is checked and you may want to adjust the grid size so it is useful for determining the straightness of the edges in the image.
The Vertical Perspective adjustment will fix this image’s perspective problems so drag it to the left to increase the width at the top of the image to adjust for the incorrect perspective.
When you do this you may notice that the image has some geometric distortion. In this case it’s barrel distortion and the edges of the subject are billowed out.
To remove this adjust the Remove Distortion slider to counteract the distortion. It won’t be possible to get it perfect but it will be possible to reduce it to acceptable levels.
In this same dialog you may occasionally want to adjust the Vignetting slider if your lens causes dark vignettes in the corners of the image. In most cases you will drag to the right to slightly lighten the edges of the image.
Once you’re done click Ok to return to Photoshop.
The only problem that cannot be fixed in the lens correction filter is the one that would stretch the image so the subject looks closer to its original proportions which are of a 6 x 6 inch page.
For this you’ll need to click the Move tool and drag up or down on the image to stretch it.
If you need to stretch the image beyond the current image canvas dimensions, do so and confirm the change. Then choose Image > Reveal All to reveal the area of the image off the side of the canvas. While the final image isn’t perfect it looks a lot better than the original.
This same tool can be used to adjust perspective on buildings which show a keystoning effect where the building appears to be narrower at the top than at its base.
If you don’t have a fish-eye lens or don’t have yours on hand when you need it, don’t worry. With Lightroom (or Adobe Camera Raw) you can create a fish-eye effect with any photo. Here’s how:
Start with an image that lends itself to being made a fish-eye image. You want something that was shot with a fairly wide angle lens to begin with so you don’t want to be zoomed in very close on your subject.
With the image open in Lightroom go to the Develop module and select Lens Correction and then the Manual tab. You’ll see the Distortion slider at the top of the Transform tools. Drag the Distortion slider to the left to blow out the middle of the image.
Deselect Constrain Crop and decrease the value for Scale so that you can see the image edges very clearly. If you like the result you can stop at this point.
Alternately if you want to give the image a bit more punch, you can go one step further by exporting the image and importing it again and repeating the process. To do this, right clicking the image and choose Export. Export the image as a non-lossy format image such as TIFF, enable the Add to This Catalog checkbox so the image comes back into Lightroom automatically and select a folder for the image – the same folder that the original image is stored in is the best choice. Click to Export the image.
The exported version will then be automatically imported back into Lightroom. You can find it by returning to the Library module, open the Catalog panel and click the Added by Previous Export collection – it will be in that collection.
Select the newly imported image, return to the Develop module and again drag the Distortion slider to the left to increase the bowing in the image. Make sure Constrain Crop is not selected and decrease the Scale until you get a good result on your image.
I was recently looking around for some cool Lightroom Presets to replicate vintage and toy camera effects. I found a couple of Lomo ones which had some good features but one horrendous failure that really made them usable in all conditions and that’s sad ’cause it didn’t have to be that way.
You see the problem was that the designer didn’t know the difference between vignette tools in Lightroom and they picked the wrong one to use. They used the Vignette tool in the Lens Correction panel to add the vignette – Way Wrong Technique. This tool is for removing vignettes and while it might seem to work for adding vignettes when used on one or a few images it won’t work on all images – hence it is a very poor choice for a preset when there is a better alternative.
The Lens Correction vignette tool removes a vignette from (or adds one to) the edges of the image. So, if you later crop the image, the vignette gets cropped away. If you’re using the tool to remove a vignette then that’s not an issue at all. However, if you are using it to add a vignette – it is a big issue. The presets I found with the vignette added using Lens Correction made a mess of any image I’d cropped – the vignette either got cropped away or worse still it appeared on one side of the image and not the other – yikes!
The correct tool to use to add a vignette is the Effect panel’s Post Crop Vignette. This, as its name suggests is a vignette added after the image is cropped so it always appears around the edge of the image regardless of whether it is full size or severely cropped or anything in between and regardless of when you choose to crop the image.
To add a vignette to darken the image edges drag the Amount to the left – dragging to the right will lighten the edges. The Midpoint setting moves the vignette inwards or pushes it outwards. The Roundness setting makes it rounder or squarer and Feather adds a softer or harder edge. For Style, I prefer Highlight Priority although Color Priority is ok – Paint Overlay is an overlay effect and not a blended one so I like it least of all.
So, next time you need a vignette effect for an image, choose the one that not only has plenty of customization options but also the one that will survive any cropping applied to the image.
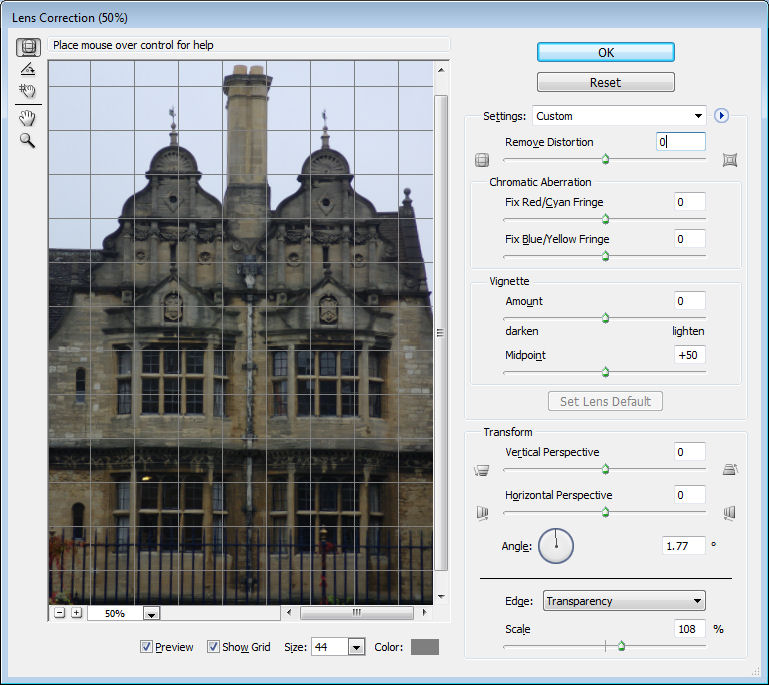
Let’s be honest, Photoshop’s tool for straightening an image sucks – well it would if it really were a tool – it’s not even that. It’s a cumbersome workaround.
Start with the Ruler tool (if you can find it – it’s stuck away under the Eyedropper) then ‘measure’ along the line you want to be horizontal. Then choose Image > Rotate Canvas > Arbitrary and accept the value for the angle – that’s what you used the Ruler tool to measure. Wow, that’s sophisticated – NOT! And it gets worse. While now have a ‘straight’ image, the edges look horrible. Grab the Crop tool and crop the image to remove the messy edges.
So, while there isn’t a tool, there is a slightly smarter workaround. Choose Filter > Distort > Lens Correction – ok, I promised it would be smarter – I didn’t say it would be any easier to remember where to find it.
In the Lens Correction dialog, drag on the Angle to straighten the image – best thing about this is that you get a grid to guide you. Then, drag the Scale slider upwards until the rough edges disappear. Then click Ok and you’re done.
So, there you have it, a one stop straightening tool – still sucks compared with programs like Paintshop Pro and Photoshop Elements which will straighten and crop in one step but it does it in one menu rather than 3 tools – I call it an improvement – just!