Sounds easy but it isn’t! How to turn a dotted stroked line into a line of dots
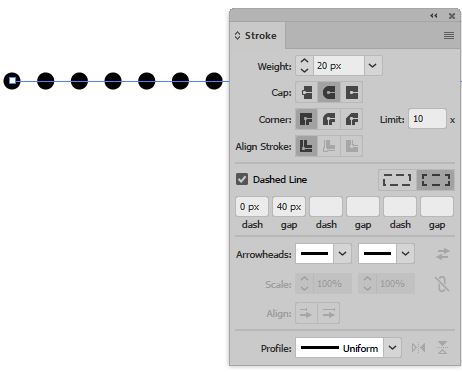
Adding a series of dots to a line in Illustrator is as easy as setting some stroke options. For example, with a black stroke and no fill, set the stroke to a Weight of 20, select Rounded Caps, select Dashed Line, set the Dash value to 0 and the Gap to 40. This will give you a line like this:
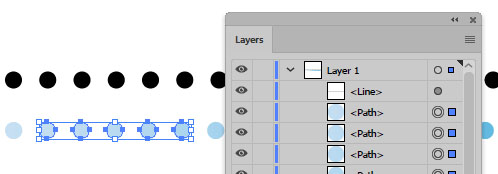
To turn the dotted stroke into individual dots, select the line and then, with the line selected perform this set of instructions without changing the selection:
Select Object > Expand Appearance
Select Object > Expand, disable Fill and enable Stroke and click OK
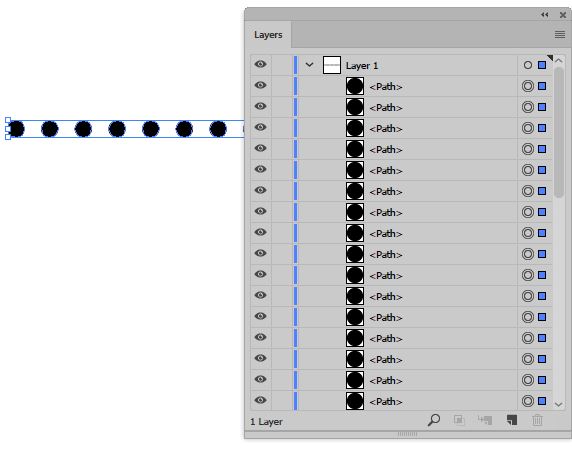
Select Object > Compound Path > Release
Select Object > Ungroup repeatedly until it can no longer be selected
Then, optionally, choose Object > Group
There is a lot of discussion on the web offering solutions which involve rasterizing the line at high resolution. Luckily my method is much better as it doesn’t require you to then trace the dots which results in them looking just horrible. My method is 100% vector all the way and it works!
This method will work for capsule shapes and dashes – in fact, any shape you can design to stoke a line with, this process will extract the shapes from that stroke for you.
If you already use Photoshop you’re well on your way to using Illustrator
)
Designed specifically for people who already use Photoshop, this video is part 1 of a series on learning Illustrator. What makes this video different from most is that it uses what you already know about Illustrator from using Photoshop as a starting point.
The similarities and differences between Illustrator and Photoshop are explained and the video introduces you to the basic tools in Illustrator that you need to know to create designs.
Learning Illustrator is different and easier if you already know Photoshop
So, you’re pretty handy with Photoshop but Illustrator is different – isn’t it? It is not easy to understand when you first start and you might be scared off by an interface that looks both familiar and foreign at the same time. I certainly was when I started out. Illustrator was like a foreign language and it took a lot of time to learn it.
But learning Illustrator when you already use Photoshop can be simplified. You see you already know a lot about Illustrator so we can start out with that knowledge and build on it. You need to know what is the same and what is different between the two programs and you need to know what is important and what you can ignore for now.
So, to help you, I created this video. It’s for anyone who knows Photoshop and who wants to learn Illustrator. I will build on your knowledge so we don’t waste time on things you already know but so you learn quickly how Illustrator is different and how to get started with it.
No laborious “how to use the Pen tool” stuff here. Just quick and fun and interesting stuff guaranteed to get you on your way to loving the creative potential of Illustrator.
Learn to create a vector sunburst in Illustrator – This works with all versions of Illustrator including the new CS6. The process is simple and uses a stroke to make the sunburst – it is quick and doesn’t require a lot of fiddling to create.
Transcript:
Hello, I’m Helen Bradley. Welcome to this video tutorial. In this tutorial I’m going to show you how you can create a sunburst vector shape in Illustrator.
Before we get started creating our sunburst effect let’s have a look and see what it is that we’re aiming for. Here I have a sunburst and it’s just offset in this rectangle, but you could have a circular one if you like.
We’re going to start with circular and then we’re going to crop it to a rectangle. So if you’re ready let’s have a look and see how we create this effect in Illustrator. And we’re going to start by creating a brand new document so I’ll just choose File, New. It doesn’t matter too much what my document looks like.
I’m going to start with the Ellipse tool. So, I’m going to select the Ellipse tool and drag a shape on my image. And I need this to be a perfect circle so I’m going to hold the Shift key as I draw it and then just let go. I want this to be black stroke and no fill so I’m just going to click on the fill here and turn the fill off.
Now let’s go to the Appearance panel for this selected path and I’m going to click the Stroke option. And I’m going to set the stroke to about 200 points. And when I do you’ll see that we get this sort of circle all the way around our shape which is pretty near exactly what we want when we click the Dash Line option. Now with the Dash Line option I can set the dashes to whatever I want and this is going to affect how many of these sunbeam things there are around the shape.
So let’s just go to 20 and try that. This is what I’m a little concerned about. You can see that there’s an uneven spacing here, but you’ll see that you can adjust that by clicking this option here. So just work out how many points you need to get the number of sunrays that you want for your particular shape. I’m going to do a few more in this one rather than less so I’m going to 10 points. And when I’ve got what I want I’m just going to click away from this. And this is the basic shape. Now before we can do anything with this shape we’re going to first have to expand its appearance.
So with the shape selected I’m going to choose Object and then Expand Appearance and then Object, Expand because I want this dialogue here. And I’m going to expand both fill and stroke So I’ll select both of those and click Ok. And now each of these sunbursts is a separate shape and I need now to close up the middle. And I can do that by grabbing the Lasso tool. It’s the easiest tool to use. And all I’m going to do is just drag around because I want to select all the nodes and pointers’ handles in the middle.
Now I’m going to choose Object and then Path, and I’m going to choose Average. And with Average I’m going to select both Horizontal and Vertical and click Ok. And what that does is it just closes up the middle nicely for me. So I’m going to click outside my shape and here is my sunburst shape. So with it selected I can then go to what is now my fill color and I can choose a different fill color for it. And we could fill it with a gradient.
We could do anything we liked at this point. So let’s see now how we’re going to crop it. So I’m going to select the Rectangle tool. I’m going to start by drawing a rectangle and I’m just going to hold the spacebar as I bring it in position over the top of my sunburst because I want to work out exactly where the sunburst is going and where the rectangle is going relative to it. So I think that’s a pretty good position for me. So I’m going to let go of the spacebar and let go of the left mouse button and now select all my objects. I’m selecting other everything, and in the Pathfinder I’m going to select Crop. And that crops the shape to the size of that rectangle. And we lost our fill here so let’s just click on the fill and put the fill back on.
So here is a shape that we could save to our Symbol library. And those sunbursts are very, very easy to create in Illustrator as vector shapes. And of course if you add it to your Symbol library then you’ll have it available anytime you want to use it. And it’s very easy to create ones with different numbers of rays in them.
I’m Helen Bradley. Thank you for joining me for this video tutorial. Look out for more of my videos on this YouTube channel and please like and comment on the videos. Look out too for my website at projectwoman.com. There you’ll find more tutorials and tips and tricks for Illustrator, Photoshop, Photoshop Elements, Lightroom, GIMP and a whole lot more.
See how to create some effects such as rotations and a transparency heart effect in Illustrator. This is Part 2 of the videos on halftone hearts.
Transcript:
Hello, I’m Helen Bradley. Welcome to this video tutorial. In this tutorial we’re going to take a step further from our halftone hearts tutorial and have a look and see what we can do with the halftones that we create. In this video we’re going to go one step further than the last video.
In this video we’re going to create this sort of circular effect from the string of hearts that we created using the Blend tool in Illustrator. And then I’m going to show you how you can use a transparency mask to create this sort of effect in Illustrator as well.
We’re going to start with a brand new file. And I have some of the elements left over from the first video here that we’re going to use. And we’re going to bring in this heart shape. And I also have a spare set of this string of hearts that we created so I’m going to bring that in. That just saves us having to recreate those. Now I want two sets of this so I’m just going to drag a second set away from the first.
Let’s have a look first at how we would create that sort of spiral. I’m going to size the hearts down in proportion so I have a small set because I’m going to rotate these around to create the full rotation. To do that I’m going to choose Effect and then Distort and Transform and I’ll select Transform. I’m going to click Preview so I can see what’s happening, and I’m going to rotate these around at this bottom point. So this is the very bottom point of this chain of hearts and I’m going to rotate them 10 degrees. Now I haven’t got Copy set so this individual string is going to be rotated 10 degrees but I want enough rotations that I can go all the way around a circle. And if I rotate something 10 degrees in 10 degree increments I need 36 of those to go around the circle because a circle has 360 degrees. And that’s all I need to go to create this shape so I’ll click Ok.
And now that shape is created but of course it is still really just a string of heart. And to make it into the individual shapes we’ll choose Object and then Expand Appearance. And now it is those little heart shapes individually. The other thing I want to do is to create a set of halftone hearts that we can use as a transparency mask for this particular heart.
First of all I’m going to switch the foreground and background colors here so that we have a pink heart. And I need to create a box, a sort of rectangle of these hearts. So again I’m going to shrink these down so they’re about the same size or height as this heart is because they’re going to be used for a transparency mask for that. I’m going to select these and again I’m going to do is the transform so I’m going to choose Effect, Distort and Transform and then Transform. This time I’m going to create about 20 copies. And I want to move these so I’m going move these in a horizontal direction about 7 or 8 pixels, let’s say 8 pixels here, and just click Ok.
I just want a block of hearts big enough for me to put my heart on top of that. So they just need to be that size. I’m going to expand the appearance of this halftone effect so I’ll choose Object and then Expand Appearance. And then I want to copy it to the Windows clipboard so I’ll select it all and choose Edit and then Copy. So it’s now in the Windows clipboard and I can just tuck it outside out of the way because we don’t need it anymore.
With the heart shape selected I’m going to use the Transparency palette which we can get to by choosing Window and then Transparency. And I’m going to click to make a mask. And because I want this mask to be clipped to the heart shape I’ll click Clip. I’m going to select on the mask here and I’ll just choose Edit and then Paste. And here is the halftone heart shape. And I’m just going to position it into position here. And I want the little hearts to be pretty much up around the top curve of the heart so it’s really quite well defined. So I’m thinking that’s probably going to be about the right position. And then to go back to working with my heart I’ll click on the heart in the Transparency palette. And that’s how the final effect looks.
What I did when I showed it to you earlier was I created a filled, a red filled square that was over the top of the heart. I’m just going to create my square. And this needs to be sent behind so I’m going to send it to the back. And the heart itself instead of being filled with pink was filled with black so I’ll just click the fill color and we’ll fill it with black. Now if the mask is not in exactly the right place we can also just select back on the heart, reselect the mask and perhaps adjust the positioning of the mask by a pixel or two, reselect the heart and we’re back working with the heart itself.
So there are some effects that you can create using this sort of halftone effect which we created this time using halftone hearts rather than halftone dots in Adobe Illustrator.
I’m Helen Bradley. Thank you for joining me for this video tutorial. Look out on this YouTube channel for more of my video tutorials and go to my website at projectwoman.com for more tutorials, tips and tricks on Illustrator, Photoshop, Photoshop Elements, Lightroom and more.