Thursday, August 31st, 2017

Illustrator: Extract dots from a stroked line

how to extract vector dots from a dotted stroke

Sounds easy but it isn’t! How to turn a dotted stroked line into a line of dots

Adding a series of dots to a line in Illustrator is as easy as setting some stroke options. For example, with a black stroke and no fill, set the stroke to a Weight of 20, select Rounded Caps, select Dashed Line, set the Dash value to 0 and the Gap to 40. This will give you a line like this:

how to make a dotted line in Illustrator

To turn the dotted stroke into individual dots, select the line and then, with the line selected perform this set of instructions without changing the selection:

  1. Select Object > Expand Appearance
  2. Select Object > Expand, disable Fill and enable Stroke and click OK
  3. Select Object > Compound Path > Release
  4. Select Object > Ungroup repeatedly until it can no longer be selected
  5. Then, optionally, choose Object > Group

There is a lot of discussion on the web offering solutions which involve rasterizing the line at high resolution. Luckily my method is much better as it doesn’t require you to then trace the dots which results in them looking just horrible. My method is 100% vector all the way and it works!

convert a dotted stroke into a series of dots

This method will work for capsule shapes and dashes – in fact, any shape you can design to stoke a line with, this process will extract the shapes from that stroke for you.

Wednesday, November 4th, 2015

Make a Classic Glowing Neon Sign in Illustrator


This fun neon illustration is quick and easy to make in Illustrator

 
This video tutorial shows how to create a glowing neon sign in Illustrator. You will start by learning some quick and easy ways to draw the sign and then you will see how to make the neon glow. The glow is made in such a way that you can save it as a Graphic Style which means that you can then apply it to any shape in future. The entire sign is very easy to make even for a competent beginner Illustrator user and it is fun to make too. Once you’ve made it you can turn any drawing or even text into a neon sign.

Wednesday, October 31st, 2012

Trevor’s Quick Illustrator Tip – Quick Close

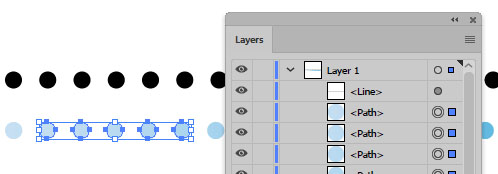
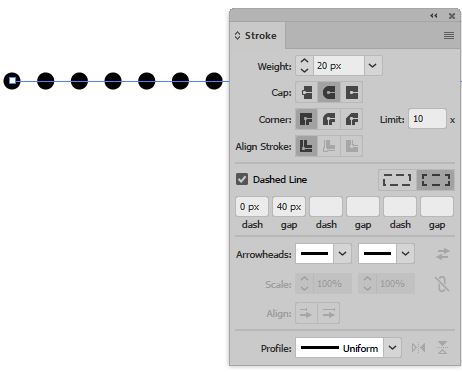
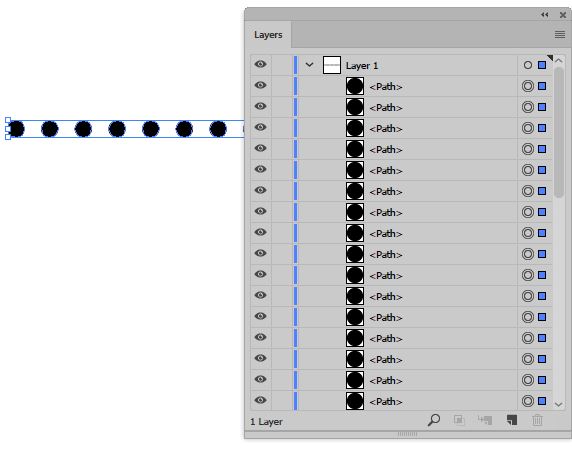
Photo by: salssa via sxc.hu

You can close the current document you are working on to clean up your work area, by pressing Ctrl + W on a PC and Command + W on a Mac. If you haven’t saved the image you’ll be prompted to do so before it closes.

Helen Bradley

Wednesday, October 24th, 2012

Trevor’s Quick Illustrator Tip – Simple Zoom

Photo By: Joana Croft
It’s true you can press Ctrl + + and Ctrl + – to zoom in and out on a PC or Command + + and command – on a Mac, but I find this tricky to do on a small keyboard such as the one on my laptop. If you have a mouse with a scroll wheel you can hold the Alt key and scroll up to zoom in or scroll down to zoom out. This works no matter which tool is selected at the time. The tool you were working with gets targeted again when you release the Alt key. I find this an easier way to zoom in and out when I am working on an image.

Helen Bradley

Friday, August 24th, 2012

Illustrator make complex shapes from simple pieces part1

Learn how to turn an oval into a flower and then some cool tricks for doing things with it in Illustrator. Covers using the Rotate tool.

Check out all our video tutorials on YouTube.

The transcript from the video:

Hello, I’m Helen Bradley. Welcome to this video tutorial. Today I’m going to show you how to make cool shapes In Illustrator the easy way. Before we get started on this video making shapes let’s have a look at the sort of things that we’re going to do. The first thing I’m going to show you how to do is to create this shape really, really easy. And then having created this shape all I did was duplicate it to make these shapes. And all of this is done with just an ellipse and a circle. And you’re going to see how all of these can be done really, really easily. Let’s get started with a brand new document. Now I’m just using a letter size document, RGB color space. So I’ll click Ok. Let’s just size the document and create an oval. Now I’m going to fill this oval with a purple color, and I’m just going to extend the stroke to about 4 points. Now I’m going to click the move tool to just position it where I want it to be and then select the rotate tool. Now this tool allows me to rotate the shape. And what I’m going to do is set the center point, which at the moment is here in the middle of the shape, and I want it down here. So I’m going to position my cursor there and Alt Click. And this allows me to now rotate around this location here. I want 13 petals on my flower. So I’m going to type 360 divided by 13 and Illustrator will make the calculation for me as to how many degrees I need to rotate this to fit 13 in exactly around the circle. I’m going to click Preview, make sure that it rolls forward, which is exactly what it’s supposed to do, and then click Copy. And now I’m just going to press Ctrl or Command D another series of times and each time I press one of things shapes is created and rotated. And I do that until I have my 13 petals. Now I’m going to add a center to the flower. So I’m going back to the ellipse shape. I’m going to drag in here to create a flower center. Now I want my circle over the middle of my flower so I’m just holding down the Spacebar as I draw it to make sure it goes in correct position. If I hold Shift it’ll be constrained to a circle shape. I’m going to let go now and I’m going to fill this with orange. Ok, I now have my flower shape so I’m going to select it all with Ctrl or Command A, and I’m going to choose Object and then Group. And this will group this object together so now I can operate on it as a single shape. And this is my starter shape. This is the flower that we were going to create. I’m going to select it again and this time Alt or Option drag on it because I want a few more copies of this shape because I want to show you what the possibilities are for working with a shape like this. And the first one we’re going to focus on is this one here, so let’s just zoom into it. I going to select the shape and now I’m going to transform it. I’m going to use Effect Distort and Transform Pucker and Bloat. And what this allows me to do is to create interesting effects. You can see that all I started with was an ellipse and a circle and already I’ve got a shape like this because I have my Preview turned on and I have Pucker and Bloat selected. And I can drag across here and create all sorts of different effects with my shape. If I didn’t have a really thick stroke then I wouldn’t have quite such strong black lines, but you can just determine exactly what you want. And this Pucker and Bloat will give you all sorts of shapes. Just a few extra percent and you’ll get a different shape entirely. So I’m just going to look for a good shape there and when I’ve got it I’m just going to call that done. So there’s one of the sorts of shapes that we can create just using a starting point of an oval and a circle, create a flower and then use Pucker and Bloat to create a shape like this. Let’s have a look at this flower. And this time I’m going to choose Effect Distort and Transform and I’m going to select Twist because twist allows me to twist this shape. You can see that I’m getting those curly ends to my flower. And I can go more or less. So let’s try say 30 degrees and see what that gives us. And it gives us a less of a twist. And if we go to 90 let’s see what we get there. We get a much greater twist. So you can do all sorts of things with your basic flower shape with that twist tool. And finally let’s have a look at another one of these effects. I’m going to choose Effect Distort and Transform again, and this time I’m going to select Tweak because what tweak does is actually fracture this image. You can see that we’ve got a horizontal and vertical setting of 10 percent here. And look what happens when I preview this and then go and really, really tweak it. If I choose between relative and absolute you could see I’m getting a sort of almost graffiti style effect. And it’s all done without having any skills at all in creating shapes beyond an oval and a circle. And you can experiment here with these sorts of options that allow you to get different effects from this tweak tool. So there we have a different effect from our flower. It’s obviously something very, very different but we could use this for example as a background for something later on. If we want to use this you’ll see that whenever we select it we’ve actually got our basic flower shape. Here’s a basic flower shape. Here’s our basic shape. If we want to use it elsewhere in Illustrator we may want to convert this. So we would choose Object and then Expand Appearance. And now we’ve actually got the shapes selected not the original flower, Object, Expand Appearance. And now we’ve got something the vector paths are actually around the physical shape not what it had been before we worked with at, again Object, Expand Appearance. And that would allow us then to come in and do things with the shape itself. Let’s just go and grab an object here and you can see that we can then start rescaling this portion or we can work with it in some way. But we can do things with it because it is no longer a flower shape. And we can do things such as dragging on points and making it all sorts of things. So I’ve totally messed that up there, but you get the idea as to what Expand Appearance will give you in terms of turning this flower shape into a something that then could be taken further in Illustrator, for example a repeat pattern. I’m Helen Bradley. Thank you for joining me for this video. Look out for more of my Lightroom, Photoshop and Illustrator tutorials on my YouTube channel.

Helen Bradley

Friday, May 6th, 2011

Illustrator – my Direction handles have gone!

Ok, this has probably happened to you before and it is horribly frustrating. You draw a shape with the Pen tool or you open a file with a shape on it. You click the Direct Selection tool and you click on the shape expecting the anchors and direction handles to appear. But they don’t!

Your direction handles and anchors are gone, vanished, not there – nada – yikes!

The solution is to press Control + H (Command + H on the Mac). Quite simply it’s the shortcut for Hide Edges and that means it’s not exactly obvious that it hides or reveals anchor points and direction lines – like these are edges? Well, I for one don’t call them edges – but, swallow your frustration with the poor terminology and hit the keys – it works.

Now write it down – share it with your friends, someone you know needs this shortcut key – today!

20110924-160039.jpg

Helen Bradley

Tuesday, May 3rd, 2011

Quick and easy pattern making in Illustrator CS4 & CS5

Creating repeating patterns in Illustrator can be a time consuming process but, with MadPattern, it can be simplicity itself.

MadPattern is a series of templates you can use to quickly and easily create repeating patterns in Illustrator CS4 and CS5.

To get started, visit http://madpattern.com and click the download icon to download the zip file. Double click it and extract its contents.

You’ll need to put these files in your Illustrator template folder. The easiest way to do this is to open Illustrator, choose File > New from Template to open the template folder. In Windows, right click and choose New > Folder and add a new folder for these templates. Drag and drop the templates that you just unzipped and extracted – they are all .ait files – into the template folder that you just created.

You can now select a template to get started with. I suggest you choose p3m1.ait at this point.

What you’ll see on the screen is a grid with characters and some instructions along the right of the screen.

Open the layers palette (Window > Layers) and locate the bottommost layer which will be called p3m1 (the template’s name). Click its visibility icon to make it invisible.

You’ll now see clearly the triangle in the top left corner of the Artboard and a rectangle in the middle of it. Before you leave the layers palette, click the Clipped Elements layer to select it. This is the layer you will work on.

Use the Zoom tool to drag over the topmost triangle to make it larger – this is where you’ll create the image for your pattern.

Create a shape within the triangle. For example, you can select the pencil tool and draw a wiggly line or use the pen tool. Here I’ve drawn a rough heart shape using the pen tool – as soon as the shape is created you will see it repeated across the Artboard.

You can now use the Direct Selection or any of your favorite tools in Illustrator to fine tune your shape – for now, keep the shape within the triangle.

Choose a fill and stroke color for your shape.

Each of the templates in the MadPattern download contains the same basic elements and works in this same way. You will find a small triangle on the template in which you design your pattern and the remaining elements in the template take care of the rotation and duplication of the shape.

In this tutorial I’ve shown you how to design within the triangle shape but this is only the tip of the iceberg of what you can do – the edges in most templates can be used to create mirror shapes as I’ll show you in a future post.

In the meantime you can learn more about the math behind repeating patterns by visiting http://en.wikipedia.org/wiki/Wallpaper_group. This Wikipedia article includes reference to a 17 groups – click on any of them to learn more about the pattern. You can work backwards from this article by finding a pattern that has the elements that you want to use rotated as you want to see them and then identify which of the MadPattern templates you’ll need to use to create it.

I have also created a page showing thumbnails of all the MadPattern patterns so you can quickly preview them to see which ones you want to use.

In future blog posts I’ll show you how to change the background color, how to save and reuse your patterns and how to create way more complex patterns with ease.

Helen Bradley

Saturday, January 8th, 2011

Create a Vector Sunburst in Illustrator

I’ve been looking around for some time for a good way to make sunbursts in Illustrator. Those methods I’ve seen suffer from one of two problems, one is that some use a triangle shape which is repeatedly copied and rotated to create the sunburst – I’m lazy so that’s too much repetition for me to be bothered doing. In addition, getting a good balance between width of the ray and the number of rays is also a problem with this method so it’s a lot of trial and error. The other method uses a dash line stoke on a circle but it suffers from the problem that the middle of the shape never closes up to a good tight fit.

So, I’ve come up with my own take on creating sunbursts in Illustrator. What I like about it is that you can decide as you are making it the number of rays so you can make lots of thin rays or a few really thick ones and it’s all done automatically so there’s not copy and rotating involved. You can also adjust the spacing between the rays on the fly. The final thing I like is that the middle closes up nicely into a small circle.

The finished sunburst can be saved as a symbol so you can reuse it and, of course you can crop it to fill the artboard and color it to suit – I’ll show you how to do all this. Here’s how:

Step 1

Start with any sized document in Illustrator. Select the Ellipse tool, hold Shift as you draw a circle on the screen. Set the Fill to No Fill and the Stroke to black.

Step 2

Choose Windows > Stroke to display the Stroke palette. Click the Dashed Line checkbox.

Here you determine the width of the rays and the gaps so don’t leave here till you have it right. Adjust the Weight value so you can see the rays – ignore the fact that they don’t meet in the middle but you will want to set a large enough value for weight that they come close to meeting – if you don’t the inside points will be difficult to select later on. Weight only affects the length of the rays and not their number or spacing.

Set the Dash value to a value that gives you the number of rays you want. The larger the Dash value the smaller the number of rays.

This is a Dash of 36 pt:

This is a Dash of 8 pt:

Make sure that you have an even arrangement of rays around the circle and that two rays aren’t joined together or too close to each other – which can happen. If it does, try a slightly different value for the Dash – sometimes changing it by one or two points is all you need to even everything up.

If you want to adjust the spacing between the rays, enter a value for Gap – again, check that the rays look balanced before continuing. The larger the value of the Gap, the fewer the rays you will have.

Step 3

Now use the Selection tool (V) to select the Circle. Choose Object > Expand > Select Fill and Select the Stoke checkboxes and click Ok.

Now your vector shape is the rays themselves – not a stroked circle.

Step 4

Click outside the shape to deselect it. Select the Direct Selection tool (A) and drag over all the inside anchors leaving the outside ones unselected. This is a little fiddly and you’ll find that the smaller the inside circle the easier it is to do.

If you have lots of narrow rays you may need to enlarge the Illustrator window and zoom in close to be able to start your selection not on a path.

Step 5

Right click your selection and choose Average > Both and click Ok. This positions all the anchor points at the center of the shape closing up the rays perfectly.

Step 6

Now you can select the shape and resize it.

You can change the fill color and add it as a symbol to the Symbol library by dragging and dropping it into the Symbol pane.


Step 7

While you’re on a roll, create a few more sunbursts with less or more rays that you can then add to the Symbols collection and then save as a Symbol set you can use any time.

To save the Symbols, remove all but the symbols you just created from the Symbols pane by selecting them and drop them on the Delete Symbol icon.

Click the Symbol flyout menu and choose Save Symbol Library and save the symbols to a file on disk. In future you can select the same flyout menu on the Symbols pane and choose Open Symbol Library to import the symbols back into Illustrator so you can use them.

Step 8

To use a sunburst symbol, drag it from the Symbol pane into the Artboard.

To recolor it, right click it and choose Break Link to Symbol, then select the shape and alter the Fill color and add a stroke color if desired. If you plan to crop the sunburst to the Artboard size following step 10 below, don’t recolor the shape right now.

Step 9

To trim the sunburst to the shape and size of the Artboard, first size it to fill the Artboard.

Step 10

Drag a rectangle over the Artboard to the exact size of the Artboard.

Select both the rectangle and the sunburst under it using the Selection tool (V).

Display the Pathfinder palette by choosing Window > Pathfinder and select the Intersect option.

Step 11

The sunburst will be cropped to the Artboard shape.

Step 12

You can now set its fill color and stroke to suit.

Helen Bradley