How to start a new path at the exact same place as another path starts or ends
In Illustrator, when you go to start a new path on the exact place that there is another path Illustrator wants to join them together – if you click on the start or end anchor. Or it wants to delete the anchor if you are over an anchor elsewhere on the path. If you’re just hovering over the path it tries to add an anchor point. Sucks doesn’t it? It seems impossible to make a totally new path and leave the existing one exactly where it is, untouched.
So, here’s the solution. First of all there is no key you can press to change this behaviour so you didn’t miss the memo on how to do this. You have to execute a workaround. So, you have two choices. Firstly you can go to the Layers palette and lock down the path that you want to draw on top of. When it is locked you can’t alter it so you can go ahead and start your new path anywhere on it. The second option is a little tricky but works a treat. Start your new line away from the path you don’t want to effect – you can be close but not close enough to effect the line. Then, while you have the mouse still pressed on the start point, hold the SpaceBar and move the starting point to where it needs to be. Then let go the SpaceBar and continue drawing.
It’s not a pretty solution but it does work. So there you have it – how to draw a path in Illustrator on top of an existing path without the auto merge / auto join behaviour. Oh! and if you need it, the shortcut key to lock the currently selected object is Command (Control) + 2.
Photoshop CS6 has new tools for working with Paths and Shapes. Learn how to use these and how to turn shapes into paths and how to fill and stroke paths and shapes.
Check out all our tutorials on our YouTube channel.
Complete transcript of this video:
Hello, I’m Helen Bradley. Welcome to this video tutorial. In this tutorial we’re going to look at the new vector tools in Photoshop CS6. And we’re going to answer questions like what’s a path, how do I find it, how do I turn a path into a selection, how do I make a path from a selection, and how I can work with the new vector tools.
Photoshop CS6 has some new vector tools and we’re going to have a look at those in this video. And we’re going to work out how you can use those tools to do exactly what you want to do.
Now the Custom Shape tool is in the position it always used to be and it’s sharing a toolbar position with things like the Rectangle, Rounded Rectangle, Ellipse, Polygon and Line tool. And all of these are Path tools. But we’re going to select the Custom Shape because it’s a little bit of an interesting tool.
And here are my Custom Shapes so I can select any of these custom shapes to draw on my space. Now I’m going to choose a filled shape such as this one here and just click it so it is selected. Now I can draw it on my workspace, but the way I draw it depends on what I have chosen here.
And I can choose a shape, a path or pixels, and we’re going to look at the shape and path options. So let’s start with shape. And let’s select some colors for this shape because when you’re working with shapes color is important. Now I have a shape selected I’m just going to drag this flower shape into my workspace.
If I hold the Shift key it’s going to be constrained to the shape of a flower that was originally drawn. If I don’t hold the Shift key you can see that I can make it wide or tall. And if I draw it with the Alt key pressed it’s going to be drawn around my initial starting point. Let’s just let go of that for now and let’s click and drag here to start drawing my flower.
Now if I want it placed around the initial starting point I’m going to press the Alt key and you can see that it jumps back into position. If I add the Shift key I can get it constrained to the right shape. And only when I let go the left mouse button does anything happen.
So what’s happening is I’m getting a filled flower. And we can see up here that the fill is the current foreground color, but it can be changed. While this shape is selected we can select a different fill for it. You can see that blue is now its fill but that’s not the foreground color for our workspace. And you can see that it has no stroke but we can add a stroke if we want to.
So let’s add a pink stroke to this shape. At the moment the Stroke is 3 points but we can increase that so we can make it thicker or thinner. And we can also change the nature of the stroke. For example we could have a dashed stroke or a dotted stroke. And there are other options that we’ll look at in future videos. But this shape is a path, so we can actually make changes to it.
I’m going to grab here the Direct Selection Tool because that allows me to select points on this path. And you can see by dragging over these points I can select anyone of these points. I’m just going to turn the stroke off for the moment because I think it might be easier to see the points without the stroke in the way.
When one of these points is filled and the others are empty this is the one that we’re going to affect. So let’s just drag out on that. And you can see that my shape has now changed shape because I have altered that point. So it is a path that is able to be adjusted. But still we can change the fill. And when we change the fill the fill of the entire shape is affected.
When we add a stroke back onto this the stroke of the entire shape is being affected by our choices. Now there are some other things that we can do with shapes. I’m just going to add a new layer to this image, just put it at the top, and I’m going to fill it with the red.
Now let’s consider the situation where we may want to for example cut out a shape from inside this red selection. So let’s go back and grab our custom shape tool. And we have our same flower shape selected. And I’m going to draw the shape onto my area. And because I was working with a red fill it has a red fill. But let’s just color it green so that we can see it clearly.
Now let’s consider the situation where really what we wanted to do was to create a path from this. Well, we don’t have to undo it and start all over again, particularly if this is a complex shape because what we can do is go to the paths palette. And here is our shape path, and we can do with that anything that we could do with a path originally in Photoshop.
One of the things that we can do is click on it and load that path as a selection. Now if that path is a selection then we can do things with it. For example we could come down to this red filled layer and we could poke a hole in this layer by just pressing Delete. And that will delete the contents of the layer where this selection is made.
One of the other things that we can do, I’m just going to Ctrl Z to undo that, one of the other things that we can do with selections is we can stroke them. So we could choose Edit Stroke and we could stroke this selection with a different color. So let’s stroke it around its inside.
Let’s press Ctrl D to undo the selection, and you can see that now we have a stroked flower because we’ve been able to stroke that selection. I’m just going to undo this again. And let’s go back to our shape up here. I want to just make sure that we just have a red filled layer here and we have our shape up here.
And here it is as a shape. And it can be moved around because it is a shape. So we can move it around the workspace. Let’s go back to the Path’s tool and there’s something else that we can do with shapes. What we can do in addition to loading the path as a selection is that we can stroke it with a brush. But to do this we’re going to have to make a work path out of the shape.
So what I’m going to do is with the shape selected I’m going to choose Edit Copy so I’ve copied the shape onto the clipboard. And now I’m just going back to this layer here and I’m going to do Edit Paste. And look what happens in my Paths palette. This time I have a Work Path. And a work path not only can be turned into a selection and not only can be filled with a foreground color, but I can also stroke it with a brush.
Let’s go and get my Brush and let’s go and get a brush to use. Now I’ve got lots of brushes here, but let’s create something like this particular little leaf brush. And I’ve got it at a fairly small size. I’m hoping that this is going to work just fine here for this particular image.
We’ve got a foreground color so I’m going to click Stroke Path With Brush. And what that does is it applies that brush to the current path. But we need to of course make that into a work path before that’s going to work. Now let’s have a look at how we can turn a selection into a path. Let’s just go and get another filled layer. I’m just going to get rid of everything that I have here right now.
Let’s fill this with white, and then we’ll just get rid of the Work Path as well. So I’m going to press Alt Backspace on the PC, Option Delete on the Mac, and I’m going to make up a selection here. So I’m going to make a rectangle, and then I’m going to go and grab the elliptical marque, and with Shift held down I’m going to add to that. So this is now my selection.
Now let’s say I want to make this into a shape that I can use over and over again. Well with the Paths palette open I can create a work path from this selection. So I’m just going to click to Make Work Path From Selection. And now this is a path. Now because it’s a path we can do all sorts of things with it.
For example we can click on it to select it and we can change its points. And we can also do things like turn it back into a selection, stroke it with a brush and fill it, and we can make it a shape. Let’s choose Edit and then Define Custom Shape. And this now becomes a custom shape in my shapes collection. I’m going to call that a Tab shape and just click Ok. Let’s get rid of our Work Path.
And now let’s go back into our shapes collection. So I’m going to click on Custom Shapes. And this time I’m going to make it a shape and I’m going to give it a fill and I’m going to give it a stroke. And let’s go into our shapes collection and let’s go and grab our new custom shape.
And now when I drag it onto the workspace it’s going to behave like any of the custom shapes inside Photoshop. It has this stroke and we can adjust the stroke size. We can adjust the type of stroke that it has. We could fill it with everything that we can fill a regular shape with.
So there’s the basic introduction to some of the new shape and path features of Photoshop CS6. My name is Helen Bradley. Thank you for joining me for this video. You’ll find more of my video training sessions on my YouTube channel.
Here’s how to create a perfectly symmetrical heart shape in Illustrator:
Start in Illustrator and drag a guide to use to position the shape.
Select the Ellipse tool, click on the guide to start and draw a circle shape to one side of the guide. Add the Shift key to make a perfect circle.
Select the direct selection tool, drag over the bottom half of the circle to select it and press Delete. You should now have a semicircle shape.
Click the pen tool and then click on the outermost anchor point, the one furthest away from the guide. Click and drag downwards adding the Shift key after you’ve started dragging to ensure the line curves correctly.
Click again on the guideline and immediately add the Shift key and drag downwards to create half of a heart.
Click on the half heart shape to select it. Drag to the right and as you do, add the Alt and Shift keys (Option and Shift on the Mac) and move the shape until it snaps to the grid line. This should create a duplicate shape.
Right click this shape, choose Transform > Reflect > Vertical and click Ok. You now have two halves of the heart.
With the selection tool, drag over both sides of the heart to select them, choose Object > Path > Join to join these into a single shape. You can now remove the guide and you have a custom heart shape.
Ok, I am first to admit it, when I stumbled across this trick I went “Wow! I didn’t know you could do that!” I was designing a small heart using the pen tool and I dragged near one side of the shape with the Direct Selection tool and woah! The entire side of the heart moved. Amazing what you find when you get some time to play – well I was going over some notes for a Photoshop presentation I was doing but all the same – it was a lightbulb moment and I just love them when they happen.
So, here’s how to do it. Make a shape with the pen tool or choose the Custom Shapes tool and the Paths option and draw a path in an image. Click the Direct Selection tool (it shares a toolbar position with the Path Selection tool). Drag over one of the nodes to select it and now drag near the path either side of that node. When you do, the path moves with you. It’s yet another way of reforming your paths and it’s not what I would call intuitive but it is very handy when you know how it works.
One of the most difficult things to work out how to do in Photoshop if you work with paths is to know how to merge or combine two paths into one.
Say, for example, you have a working path and a second path and you want the two to appear as one path so you can save it or work with it as a single entity. It sounds easy but merging or combining paths is anything but.
The solution is this:
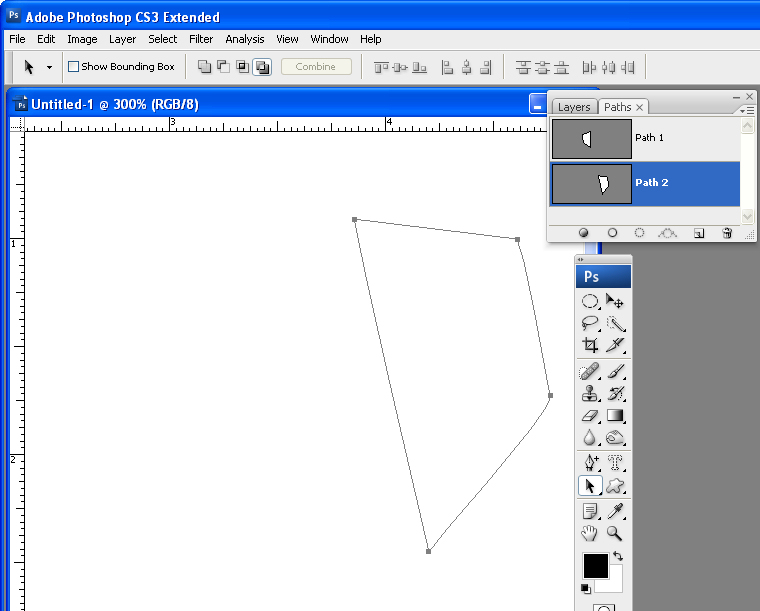
First, convert the working path to a regular path by double-clicking on its name and click Ok. In this example, I have Path1 and Path2.
Click to select Path2 in the Paths palette. Select the Path Selection Tool and click on the path so it is selected (you will see its nodes appear). Press Ctrl + C (Command + C on the Mac), to copy it to the clipboard.
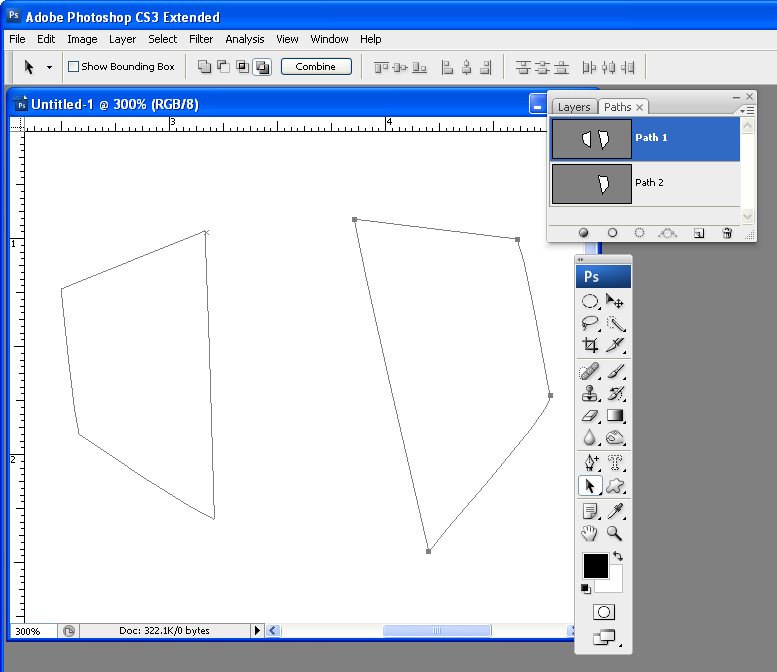
Click on Path1 in the paths palette so that it is now selected and press Ctrl + V (Command + V on the Mac) to paste the copied path into this path. You now have a single path that contains both your paths and you’re almost done.
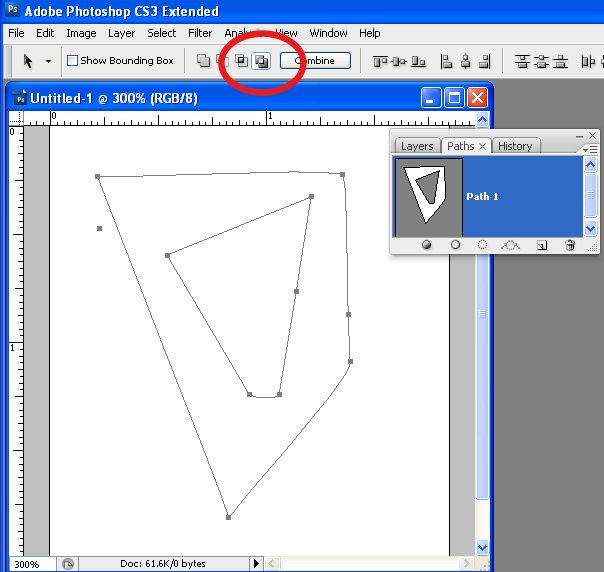
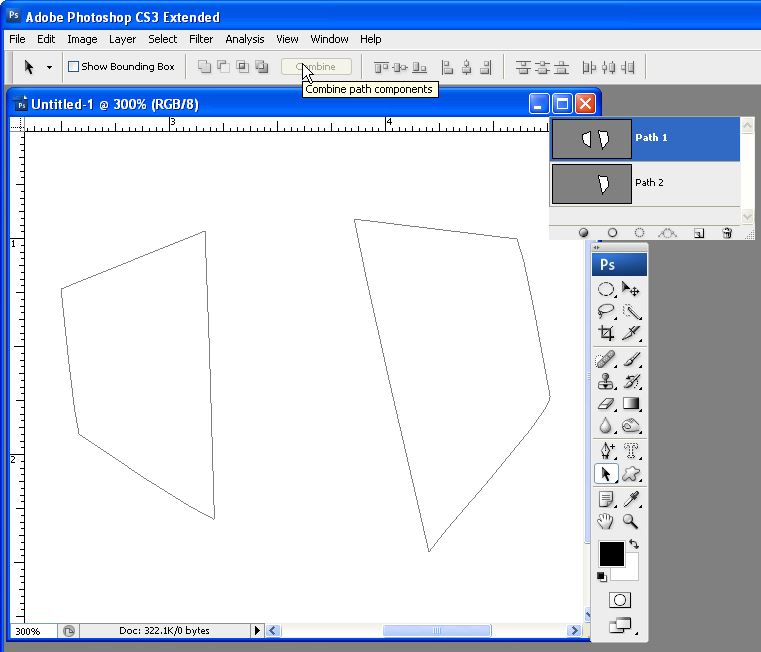
Check the Tool Options bar as it contains the tools you need to work with the two paths. You can add the shape, subtract the shape, take the intersection of the two shapes or exclude overlapping shape areas – click each and check the diagram in the path thumbnail to see the result to determine which one you want. Select the desired option and click the Combine button and the paths will be permanently joined.
Here is an example where one path is contained inside a second path. You can choose from a number of options for combining the paths depending on whether you want the doughnut, the hole or something different!