How to draw flowers in Illustrator quickly and easily using rotated shapes
Illustrator has a great rotation tool which makes it easy to make flowers. In this video you will see four very different flowers made in Illustrator and you will see now only how to make flowers but also how to use gradients and transparency and how to harness the power of the distort and transform effect to make the flowers automatically from one single shape.
Learn how to make bracket frames in Photoshop, how to save them as shapes and how to use them over and over again. This process is guaranteed to be fool proof! It is easy, repeatable and doesn’t need a wealth of Photoshop skills. The frames can be used for digi scrapping as well as for displaying photos – pretty much whatever you want to do with them, you can.
Transcript:
Hello, I’m Helen Bradley.
Welcome to this video tutorial.
In this tutorial I’m going to show you how you can make bracket frames very quickly and very easily in Photoshop.
Before we get started with this tutorial let’s have a look and see what it is that we’re aiming for and I’m going to show you how you can create this sort of bracket frame in Photoshop.
And I’m also going to show you then how you can fill it and add a background so you could get this kind of effect.
I’m going to tuck this one away for now and let’s start with a brand new image.
I’m choosing File, New and my image is going to be 1,200 pixels by 1,200.
I think if you start with an image this size you’re going to find that it’s a workable solution.
So I’ll click Ok.
Now we’re going to use some guides so I’m going to choose View and then New Guide.
And I need a number of guides and they need to be 200 pixels in from the edges.
So I want a horizontal one at 200 pixels.
I want another new guide at 1,300 pixels because that’s 200 in from the other edge.
Now I’m going to choose New Guide and do some verticals exactly the same values, one at 200 pixels and one at 1,000.
So this is going to help us align everything.
I’m now going to choose the Text tool and I’ve got a really large font size or I’m going to select a really large font size about 400 points which is really quite big.
I’m going to click here and I’m going to type a curly bracket and that’s just a curly bracket shape.
Now we can’t see it because it’s white on white so let’s just go and get a color for it right now.
Now this is an extremely unattractive for my purposes here curly bracket so let’s just select it and let’s find a nicer type.
So I’m just going to run through my typefaces until I find a curly bracket that I think is attractive.
I want it to have a fairly short start and something pointy or nice and curvy so that we can actually use it.
And it would be nice if it was sort of balanced.
I think this one might actually make quite a good frame so let’s settle for this one.
Having created it the next thing I’m going to do is this is the text layer, I’m going to right click it and I’m going to convert this to a shape.
So this character is now a shape.
And I’m going to select the Move tool and I’m going to hold the Shift key as I do because I want to constrain this so that it is created at a very large size and so it doesn’t lose its nice curviness.
And so I’m going to just make sure that it lines perfectly with these guides that I’ve created.
And because I’ve got smart guides turned on you can do this by choosing View and then Show and then Smart Guides you’ll see that you’ll see actually little red lines when everything is lined up.
So now that it’s lined up to the guides that I’ve created these two at the top and the bottom, now I’m going to drag it out and align it perfectly to this other guide here as well.
So I’m looking for nice little red lines to appear telling me that it’s lined up in this box here absolutely perfectly.
I’m not totally convinced right now.
Let’s just make sure that it is, okay.
So once it’s in position I’m going to hit the checkmark here.
You can see that it’s extending a bit beyond the edge of the image.
I’m not a slight bit worried about that.
All I need to do is to choose Image and then Reveal All and we can see its edge.
So now that we’ve got one in place the rest of it is really easy.
I’m going to drag this layer down onto the New Layer icon so I now have two.
I’m going to make sure that I target this layer and that I have the Move tool selected, I’m going to choose Edit and then Transform Path and I’m just going to flip this horizontally.
And what that does is create a mirror image of my shape.
Now provided I select the shape that I want to move and start moving it, if I hold the Shift key it will be constrained so it can only be moved in a horizontal direction.
So it’s going to line up perfectly to these guides here and all I need to worry about is that it lines up with this guide here that I’ve created.
And again, I’m just going to choose Image, Reveal All so that we can see both sides of this.
Now I’m going to select both these layers and I’m going to drag the selected layers onto the New Layer icon so that I’ve got another set of these braces.
And I’m going to link these.
I’m going to right click and choose Link Layers because I want these two to travel together.
And what I’m going to do with them is simply rotate them through 90 degrees.
So I’m going to make sure that I have them selected and that I have the Move tool selected and I’m just going to rotate these around 90 degrees and so they’re going to move exactly into position.
And I’m going to click the checkmark here to accept that and again, Image, Reveal All so that I can see the image.
Now I’m going to unlink these layers by clicking them and click Unlink Layers.
And the reason why I want to unlink them is that I want to now move each one of these layers independently of the other.
So I’m going to select this one first and I’m just going to use the arrow keys to nudge it in because I want to join up these gaps.
And I’m going to nudge it in and I’m going to count as I go.
Now I nudged that 20 times.
This one’s got a much bigger gap than I normally see so I’m going to have to do that 20 times for each of these.
And I’m going to continue all the way around.
And then I’m going to continue and do it again.
I’m moving the edge ones inwards and the top ones down.
Now you can see that some of these are coming in more quickly than others.
I’m not really worried about that because you’re not going to see it later on if it’s slightly off skew.
I’m just going to bring this one down a bit too.
I just want to join it up so that the edges are pretty even all the way around and some of them are going to join up in different ways.
It’s going to depend on the curly braces that you’re using.
I’m going to press Ctrl semicolon to turn off the guidelines now.
And this basically is my new curly bracket shape.
But of course I want to save it as a shape so that I can reuse it.
So I’m going to click on the topmost layer and then click on the bottommost of these four shape layers.
I’m going to right click and I’m going to choose Merge Shapes because what that does is it merges these into a single shape so they can be sized and moved and dealt with as a single shape.
And now so that I can use it later on as a shape I’m going to choose Edit and then Define Custom Shape.
And I’m going to call this bracket shape and click Ok.
And now of course we’ve created this bracket we can just discard that shape, that image.
We don’t need it any longer.
So I’m going to choose File, New and let’s create a brand new image.
Now we’re going to find this custom shape in our shapes collection so we’ll click here on the Custom Shape tool.
It shares a toolbar position with the Rectangle tool and a number of others.
But it’s the Custom Shape that we want.
And I’m going to go to the very bottom of my list because this very last one is the bracket shape that we just created.
You can see that I’ve created a few others using different fonts.
Now that I’ve got my shape I’m going to hold the Shift key as I draw it out on this image.
And you can see it’s coming in as a new shape layer because I had it designated as a shape.
In earlier versions of Photoshop you won’t have this dropdown list but you’ll be able to select the shape from the toolbar.
So now that I’ve got my shape let’s have a look and see how we would create some of the other effects that were around that original shape.
The first thing I’m going to do is add a background.
And I have already created a very simple pattern so I’m going to choose Edit, Fill and I have a pattern fill that I’m going to fill the background layer with.
And it’s just a little blue strip pattern.
But I don’t want it to be blue so I’m going to choose Image, Adjustments, Hue/Saturation and I’m going to adjust the layer so that it’s a color that works a little bit better with the shape color that I’m using.
So I’m just going to select that and click Ok.
Now I can of course go back to my shape and change the fill color for it.
So I might make it a little less obvious of a pink.
So I’ll select that.
I’m also going to add a stroke to it so I’m going to choose a white stroke or a creamy short of stroke and I’m going to make it a dot stroke.
So we can now see that we’ve got a dot stroke here.
Now I want the middle of this pattern to be a different color again.
And this is the important to see how you can actually create a fill for this shape so that it blocks out the background behind it.
To do that I’m going to take the shape layer and drop it on the New Layer icon so I have a duplicate.
And I’m going to right click and I’m going to rasterize this top layer.
So it’s now a raster layer.
Because it’s a raster layer I can now use the Magic Wand tool and I’ll click just outside the frame so that I select all the area around this shape.
And then I’m going to choose Select Inverse so that I’ve got the entire area of the shape selected.
And because I want to just miss the edge of this shape I’m going to bring this selection in 2 or 3 pixels.
So I’m going to choose Select, Modify, Contract.
I’m just going to bring it in a couple of pixels to make sure that I’m well clear of the border.
And now that I am clear of the border I’m going to select a color here, a sort of orangey yellow color and I’m going to fill my selection with this sort of yellowy orange.
But I don’t want to fill the layer that has the pink on it so I’m going to create a brand new layer and fill that.
So Alt, Backspace, Option, Delete and I’ll press Ctrl D to deselect the selection.
Now I’m going to get rid of the shape copy because I only needed that to create my fill and now I’m going to drag this below the frame and above the background.
And when I do we end up with the final effect that we saw in the original image.
So this was the original image that I created.
And the only real difference between these two is the style of bracket that I used to create the bracket edge.
So I’ve chosen a rather plain one here but in this case I chose a very fancy one.
But the process is identical to create these frames.
And once you get used to it you’ll be able to create these very quickly and very easily.
And this gives you the ability to create your own frames at any time to your own specifications.
I’m Helen Bradley.
Thank you for joining me for this video tutorial.
Look out for more tutorials on my website at projectwoman.com where you’ll find tutorials for Photoshop, Illustrator, Photoshop Elements, Lightroom and a whole lot more.
And please subscribe to my YouTube channel so that you’ll be notified when new videos are released.
See how to turn simple shapes in Photoshop into ornate circles. The process is simple and you can source the elements to use from the web as free shapes – I tell you where to get them from.
Transcript:
Hello, I’m Helen Bradley.
Welcome to this video tutorial.
In this tutorial I’m going to show you how you can make circular ornaments in Photoshop.
Before we get started with this tutorial let’s have a look and see what we’re aiming for.
This is one of the floral ornament shapes that I’ve created and I’m going to show you how you can create this quickly and easily in Photoshop.
And I’m using Photoshop CS6 for this technique.
If you’re using an earlier version you may need to adapt parts of the tutorial but you can still do it.
So let’s just close this down and let’s create a new document, File, New.
And it doesn’t really matter too much.
I’ve just got a 600 x 600 RGB document with a white background.
You can create pretty much anything.
Now before we actually start making our shapes we’re going to need to find some things to make them with and what I’ve done is I’ve located some places on the web that you can get these from.
So I’m going to this particular site here which is all-free-download.com.
It’s all-free-download.com.
And if you go searching for vector floral clipart you’ll be able to find this file here.
And this is the one that I’ve used so you just click it and then go ahead and download it.
And once you’ve downloaded it you can open it.
And I’ve got it open here now in Windows Explorer and I’ve actually gone ahead and extracted all the files.
And in this particular file there’s a floral clipart AI which is an Illustrator file and there’s also a CSH file.
And the CSH file is a Photoshop one so you can use that.
And what I did was I put the shapes in Photoshop’s shapes collection.
So I’m going to show you how you can do that now.
I’m just going to size the Photoshop screen down so that I can see the Photoshop screen as well as my Windows Explorer screen here.
And I’m going to grab the tools and I want the Shapes tool because I want the Shapes panel here.
So I’m going to open this up here and click this icon here which opens up the Shapes fly out menu.
And I’m going to choose Load Shapes because when I do that Photoshop takes me to the custom shapes location.
So this is where it expects the custom shapes to be.
So what I’m going to do is show here my Windows Explorer folder and I’m just going to drag and drop floral clipart into here.
In fact I’ve already done it.
You can see it’s here so I’m not going to drag it in a second time.
But you would drag the floral clipart CSH or the shapes file which is a Photoshop file into this custom shapes folder.
And when you do the custom shapes are now available inside Photoshop.
So you can close everything down.
I’ll just close this for now.
Okay, let’s go back to our document untitled2.
I’m going to make this screen, Photoshop screen, the full screen size.
So now we’re ready to go to our shapes.
I’m going to click here.
This is the Shapes collection.
Usually you’ll see the Rectangle tool but we’re actually going for the Custom Shape tool.
And because my image is 600 x 600 in size I’m going to put a couple of guides in here.
So I’m going to choose View, New Guide and I’m going to put a vertical one at 300 pixels, that’s 300 px, and click Ok.
And I’m going to go ahead and put a horizontal one in, click Horizontal, type 300 px and click Ok.
So now I have my center point marked and that’s just going to make things a whole lot easier in a minute.
So I’m going to create a new layer by just clicking the Create New layer icon here at the foot of the Layers palette because I want to work on an empty layer.
Now I used Kuler a little bit earlier to get my color scheme and I have a video on using Kuler in Photoshop that you may want to look at on this YouTube channel.
But basically what I did was I went to Window Extensions, Kuler and I launched Kuler.
Well, that’s just hidden it, hasn’t it.
So here’s Kuler and I went looking for flowers and I searched for flowers and I located a flower color scheme that I really like.
So I just clicked here and choose Add to Swatches Panel.
And here are the flower colors added to my Swatches panel so I thought we’d choose a different color flower this time.
So I can just tuck Kuler away because I don’t need it anymore.
I do need my Layers panel.
I do need my tools and I will like my swatches to be open.
So with the custom shape selected I’m going to go and first show you how you would add these shapes in because I’ve already done that.
But you’ll click the fly out menu and you should see your shapes in here.
They should be listed.
If they’re not then you can click Load Shapes and go and load the floral clipart shapes and click Load and then they’ll be loaded into your panel.
So they’ll be here.
Now I’ve got two sets of them but that doesn’t matter too much.
Now the first thing I’m going to do is choose one of these shapes to work with and the ones that I worked with were the fairly small ones, things like this or this that had sort of nice floral elements.
But they were fairly simple.
So I think we’re going to start with something a little bit more complex this time.
So let’s select this one.
I’m just going to click it.
And on the toolbar here I want to be working in shapes so I want this to be shape not path or pixels.
In earlier versions of Photoshop you will need to select an icon here.
It won’t be on a dropdown menu and you won’t have these features here for fill and stroke.
But you’ll be able to select the fill color and I don’t want a stroke on this at all.
But I do want a fill color and I’m going to select one of my floral colors that I used or grabbed from Kuler.
So now I’m going to make a blue shape with no stroke and I’m just going to draw it out here.
And I’m going to hold the Shift key so it’s constrained to its original proportions.
I’m just going to let go.
So you can see now I have this shape on a new layer and it’s just a blue shape.
I’m going to drag it into position.
Now I think in actual fact that I would like the bigger end on the outside so I’m going to drop it down here because that means that this bigger end is going to be on the outside of the circle as I work.
And now I’m going to press Ctrl or Command T because this gives me my Transform tools.
And what I want to do first of all is find this little marker that’s in the very, very center of the image.
And I’m going to drag it around and I’m going to pop it just right over the middle the image.
And then I’m going to set this option here this angle option to how many degrees I want to transform this image in.
And there is 360 degrees in a circle so we need something that will divide into 360 equally.
So for example if we want 10 shapes around it we could do 36 degrees.
Numbers like 30, 60, 45, 10 are good values.
I’m going to choose 30.
So I’m going to type in 30 here and you can see that the shape has started to rotate.
And I’m going to click the checkbox.
So it’s started its rotation and to complete the rotation all the way around the circle I’m going to hold Ctrl and Shift and Alt all at the same time.
So I’m going to press Ctrl, Shift, Alt on the Mac, that would be Command, Shift, Option and then the letter T for Transform.
And every time I press the letter T because I have Ctrl, Shift and Alt held down you can see that it’s adding another shape.
So all I have to do is to press the letter T enough times that my shapes creates an entire circle.
And here is my shape here.
Now you can leave it as a shape layer if you want to.
You can resize it if you want to by holding Shift and Alt as you drag in or out on the handles.
I’m going to drag mine out a little bit.
I think this is going to be the larger of the shapes and I’m going to click the checkmark to confirm it.
Now so that my computer doesn’t get stressed out with having such a large shape I’m going to rasterize this.
So I’m going to right click and just rasterize the layer.
But you could leave yours as shapes if you wanted to.
Now I’m just going to click Create a New Layer.
And we’re just going to repeat this over and over again.
So I’m going to choose my Shape tool, my Custom Shape tool.
I’m going to choose a different shape this time.
So I’m looking for something interesting that will complement the shape that I have here.
And last time I used this shape as my final shape so I think I’m going to do that again.
So we’ll wait for a minute before we use that.
But let’s go and get this one that’s sort of like a leaf shape.
I’ll click on it.
And now on a new layer I’m going to turn this layer off for a minute so that I can see what I’m doing here.
I’ve got no stroke.
I’m going to change my fill this time to a green color and I’m going to just drag out my leaf shape.
I’m going to hold the Shift key so it’s constrained to its original size and dimensions and I’m going to position it pretty much over the center of the image.
And I’m doing that by holding the Spacebar down as I drag it into position.
And now I’ve got my green shape.
I’m going to select the Move tool so I can now rotate it and press Ctrl or Command T.
I’m going to drag this little indicator into the very middle of the intersection where those two gridlines are.
So I’m going to rotate around that location and I’m going to select the amount of rotation.
And I’m going to use 30 degrees again so I’ll type 30 and then I’m going to press the checkmark here to accept that transformation.
Now I’ll press Ctrl, Alt, Shift T to repeat that transformation and copy that shape.
And I’m going to do that until I get all the way around the circle.
So this is my second shape and if I click to show my first shape I can see the two shapes as they’re interacting.
I think I want to change the size of my top shape so I’m going to select that layer and with Shift and Alt held down I’m going to size it so that it appears as a much smaller shape here.
And I many also want to rotate it for example because I initially set 30 degrees as my rotation.
If I rotate this through 15 degrees it’s going to be slightly offset.
And I think that will be a good choice here.
So now let’s go ahead and make a third shape, again creating a brand new layer, selecting the Custom Shape tool and this time I’m going to go for this sort of filler shape.
I think this one here is going to be a good choice although this leaf could be used as well.
I’m going to select it and select a different color to use.
This time I think I’m going to choose this very light green color.
I’m on a new layer.
I’m going to drag out my shape.
I’m going to hold the Spacebar to move it into position and perhaps even hold the Shift key so that it’s constrained to its original proportions the way it was drawn originally.
And then I’m going to let go the Mouse button and then let go the Shift key so that it is now drawn on this new layer.
Now this is really quite a big element so I’m not going to need to have too many of them.
I’m just going to use the Move tool to line it up very neatly here.
I’m going to press Ctrl or Command T to get into free transform mode.
I’m going to move its little indicator all the way down to the middle here so that it is going to rotate around the circle and this time I only want a small number.
So if I rotate it through 90 degrees I’m going to get four of these shapes on the screen.
And that will be plenty.
I’m going to press the checkmark here to confirm this transformation and then let’s go back and press Ctrl, Alt, Shift T to make the additional shapes.
I’m going to press that three times so that we get this finished shape.
Now I’m thinking this particular shape might look better with a border on it so I’m going back to the Shape tools and this time I’m going to select a stroke.
And I’m going to add a lighter green stroke around it.
I’m going to make it a single line stroke and I’m just going to make sure that the size of the stroke is correct or sufficient for my needs.
I’m thinking probably about a 2 point stroke will be nice.
And I’m going to again make this into a rasterized layer by right clicking and choose Rasterize Layer.
And so there’s my additional shape.
I’m now going to drag on my greenery layer and move it on top of the original layer and I can also resize this layer if I want to make it smaller or larger or even moving it behind everything else.
Now one of the things that you can do then is to make the background layer a different color such as black.
I’ve selected the background layer and I’m pressing Alt Backspace to fill it with black.
I can also add effects to these layers.
Let’s go to this greenery layer and let’s add an outer glow.
So I’m choosing the Add Layer Style icon here and I’m going to add an outer glow.
At the moment it’s a white glow.
So I’m just going to increase its spread a little bit.
You can see it’s some dimension and a little bit of a glowing effect here.
And then let’s go and get a green color from the underlying image and use that as our glow.
Now we may not want it to be quite as feathered and we may just want it to a more harsh sort of glow which is quite possible and just click Ok.
And then we can do the same for this shape here and we could add a glow to it, again, Outer Glow.
Again, I’m going to sample a color.
I’m actually going to sample this blue color and then use something in that sort of same color range perhaps a bluey green for my outer glow.
I’m going to increase the spread and also soften it up a little bit so it really looks like a glow.
Perhaps we could use a different blend mode such as lighten or we could play with overlay or color dodge.
Some of these will work and some of them may not.
But you can certainly experiment with how these interact with not only the black layer but also the green sort of colored layer below.
And I’ll click Ok and then I’m going to press Ctrl and the semicolon to turn off the gridlines.
Now this shape is very different from the shape we saw earlier.
It’s created in exactly the same way but you can see the color scheme and the actual elements that I used to create these shapes are quite different.
But I’ve got two very interesting shapes that I could now use as backgrounds or elements in a collage or for some other purpose.
It’s very easy to create these rotated shapes and lots of fun.
I’m Helen Bradley.
Thank you for joining me for this video tutorial.
Look out for more tutorials on this YouTube channel and follow me at projectwoman.com where my blogs include tips and tricks on Lightroom, Photoshop, Illustrator, Photoshop Elements and a whole lot more.
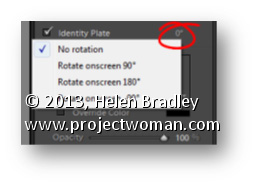
In the Print module, watch out for items that don’t even look like they are selectable. For example, in the Page panel’s Identity Plate area, when you have the Identity Plate check-box enabled you will see a small indicator to the right of it showing the current rotation in degrees.
When you click this you’ll see a popup menu offering other rotation options to choose from.
Angle of your object not right? You can rotate it by selecting the object, hover just outside one of the bounding boxes corners. Your cursor will change to a curved double headed arrow and when it does you can rotate the object by clicking and dragging it until you get the perfect rotation..
Learn how to create a Kaleidoscope in Photoshop. Video includes tips for a shortcut for copying and rotating a layer.
Check out all our video tutorials on our YouTube channel and subscribe to receive all of our tutorials as soon as they come out.
Transcript for video:
Hello, I’m Helen Bradley. Welcome to this video tutorial. In this tutorial I’m going to show you how to create quick and easy kaleidoscopes in Photoshop. Before we begin let’s have a look at the sort of thing that we can create. This is the kaleidoscope I created earlier from the image that we’re actually going to use. And as you can see I’ve layered various copies of the same kaleidoscope on top of it, changed some of the colors to create an even more distinct pattern effect. This was my original kaleidoscope. This is a second version of it on top and this is another version of it in the middle. So let’s get started with our image. This is an image I shot at the Neon Bone Yard in Las Vegas. The first thing I’m going to do is to convert this background layer into a regular layer just by dragging and dropping the lock icon into the trashcan. Then I’m going to move this image. So I’m going to first of all zoom out a little bit so I can see where I’m going. Then I’m going to select the Move Tool and I’m going to start transforming this shape. And what I want to do is to transform it through 60 degrees, some sort of 60 degrees, minus 60 plus 60. And what I’m going to do is drag this shape over the edge of the image here. I can resize it if I want to but I want it to only go over two edges of this image because I want to use the 60 degree angle that we have. So I’m going to save it. That’s good because I’ve got some nice texture in here and I’m just going to click the checkmark. So if we had a really good look at this we would see that there’s some anti- aliasing down here on this edge. So to get rid of it I’m going to click the Magic Wand Tool here. I’m going to click on this side of the image. And you see perhaps even on the video that there’s a little bit of a gap between the selected area and the image itself. So I’m going to choose Select Inverse to inverse the selection so I have only my corner piece selected and then I’m going to bring it in by choosing Select Modify Contract. And I’m going to bring it in one pixel and that should make it just a little bit smaller. And then so that I get just that piece I’m going to choose Image and then Crop. And this is the piece that I’m going to use to create my kaleidoscope from. So we have it on its own layer. But we need a bit more area to work in. So I’m going to select the Crop Tool. And if you didn’t know that you can do so you’re going to find out now that you can actually crop in a negative direction. So you can use the Crop Tool to add space to your image. So I’m just going to add a little bit of extra space around my image so we have a bit of a better area to work with. I’m going to select my layer with my shape and I want to flip it. So I’m going to choose Layer New Layer via Copy. And with this shape I’m going to transform it. So I’m going to choose Edit and then Free Transform. And I want to transform it around this side. So I’m just going to click on this side so it’s anchored here so that when I flip it over it doesn’t move. And I want to flip it over so it’s exactly mirrored which means that it’s negative 100 percent. So I’m just going to make that negative 100 percent and then I have an exact duplicate of this shape. And this is the piece that I’m going to rotate around to create my kaleidoscope so I’m going to merge these two layers together. I can do that by selecting both layers and choose Layer Merge Layers or Merge Visible, either of those would work. So too would Flatten Image or I could just press Ctrl E. But let’s choose the menu option. Now that we have our basic shape I’m ready to rotate it. And I’m going to do this the smart way so I don’t have to do every single one of them. I just want to do it once, Layer New Layer via Copy, Edit Free Transform. I’m going to anchor it at its bottom center point. And I’m going to rotate it around 60 degrees, and I’m going to click the checkmark here. And having done that once I’m now going to get Photoshop to do it automatically for me. And all I need to do to do that is to press these keys, Ctrl Shift Alt T, and that’s Command Option Shift T on the Mac. So I’m going to press all these keys and every time I do it Photoshop duplicates the layer and rotates it. So with four keystrokes I’ve now got the rest of my kaleidoscope. Again I’m going to select all these layers and Ctrl or Command E to merge them into one. And now I’ve got one layer I can make a duplicate of it. And then I can size it as we saw earlier. If I want to size it around its center point I’m going to hold Alt and Shift as I resize it. And now I can also rotate it. So I might rotate it for example 15 degrees. And then I might make another duplicate of this and do something similar to this duplicate layer, again holding down the Shift and Alt so I’m rotating or sizing around the middle point, place my shape in and then rotate it. This time I might choose say let’s go 30 degrees. And then for each of these I could add a hue/saturation adjustment. And that will allow me just to recolor the shape and perhaps get a more interesting effect in doing so. I’ll do that and just click Ok. So there is the basics of creating a kaleidoscope in Photoshop. Now you could use a different measurement than the 60 degrees that I used. You might want to try it with 30 degrees to get a more complex kaleidoscope. But basically once you get your flipped shape and you merge it you can get Photoshop to do all the copying and rotating work for you. I’m Helen Bradley. Thank you for joining me for this video tutorial. Look out for more of my Photoshop video training on my YouTube channel.
I’m sure this has happened to you – you’re zooming along drawing a path around an object using the Photoshop pen tool and all of a sudden you’re running out of room – the image is off the screen. The solution is simple, press and hold the Spacebar and the cursor turns into the Hand tool so you can move the canvas around to get the next bit of the image in view. Let go the Spacebar and you’re back to working on your path.
And, while you’re there – wanna rotate the canvas so you can draw your path more easily? Easy! Press and hold R (R for rotate) then drag the canvas to rotate it.
There’s been a lot of excitement over the Content Aware Fill feature in Photoshop CS5 (Edit > Fill > Content Aware). It’s a big new feature but it’s often the little day to day changes that really make a difference. For me there are two big “little” changes that I love.
One is the ability to stop Photoshop wanting to save files to where they came from. So, now, when you choose Save As, Photoshop doesn’t have to default to where the file came from and it can be made to point to the last place you saved a file into. This could mean the difference between using Photoshop for day to day screenshots and not.
Until now I’ve used PaintShop Pro and I’ve done so for around 10 years because it defaults to the last save location which works best for me. Now, at last Photoshop can be configured to behave the way I want it to behave. You will find this setting in Edit > Preferences > File Handling – disable the Save As to Original Folder checkbox.
The other big plus is that the Ruler tool now includes a rotate feature. In the past you’d choose the Ruler tool, mark the horizontal line then go to Image > Image Rotation > Arbitrary to make the rotation. Now there’s a Straighten option on the tool options bar when you select the Ruler tool.
Still on my wishlist is a one step paste to new image option. I’d love to be able to have something on the clipboard and choose Paste to New Image and have a new image the size of the clipboard object automatically created for me. Shouldn’t be too difficult – really! For now I have an action which does it but it would be nicer to have a menu item.