Monday, September 10th, 2012

Photoshop – make a Kaleidoscope

Learn how to create a Kaleidoscope in Photoshop. Video includes tips for a shortcut for copying and rotating a layer.

Check out all our video tutorials on our YouTube channel and subscribe to receive all of our tutorials as soon as they come out.

Transcript for video:

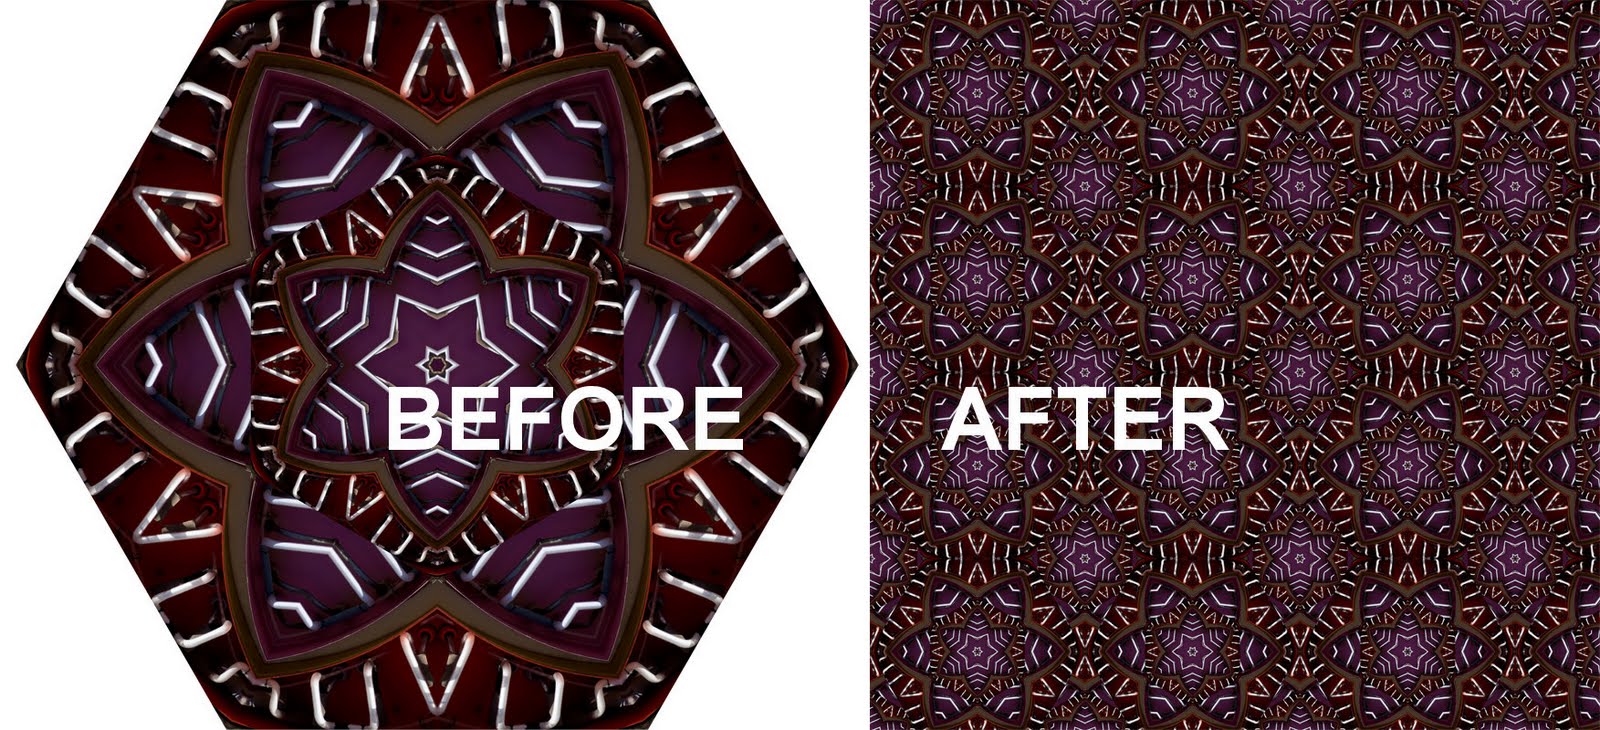
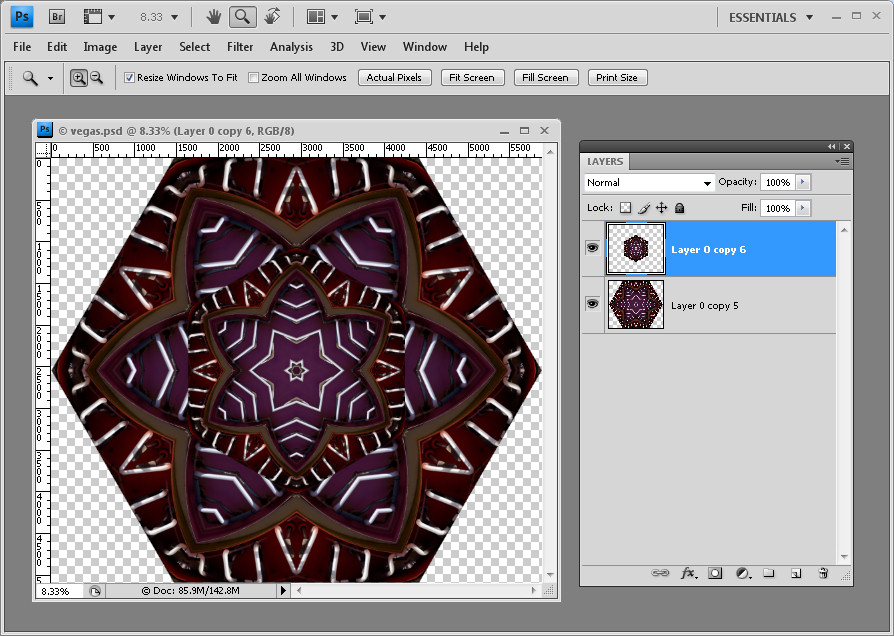
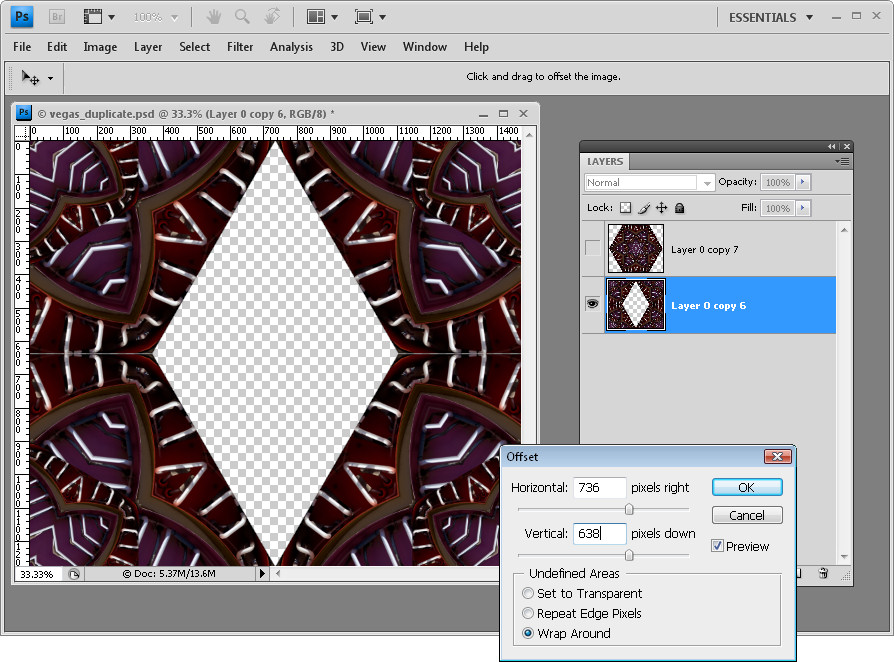
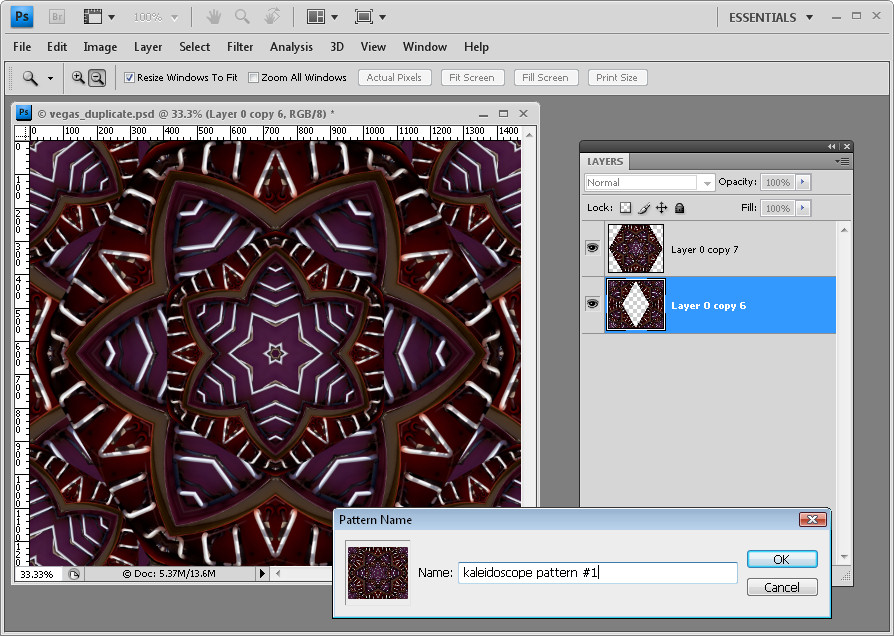
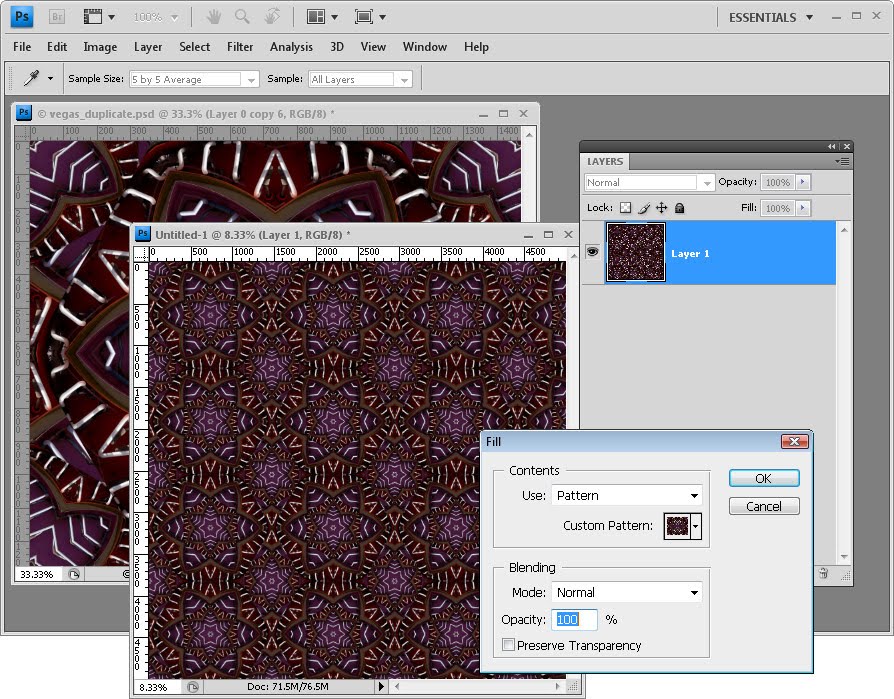
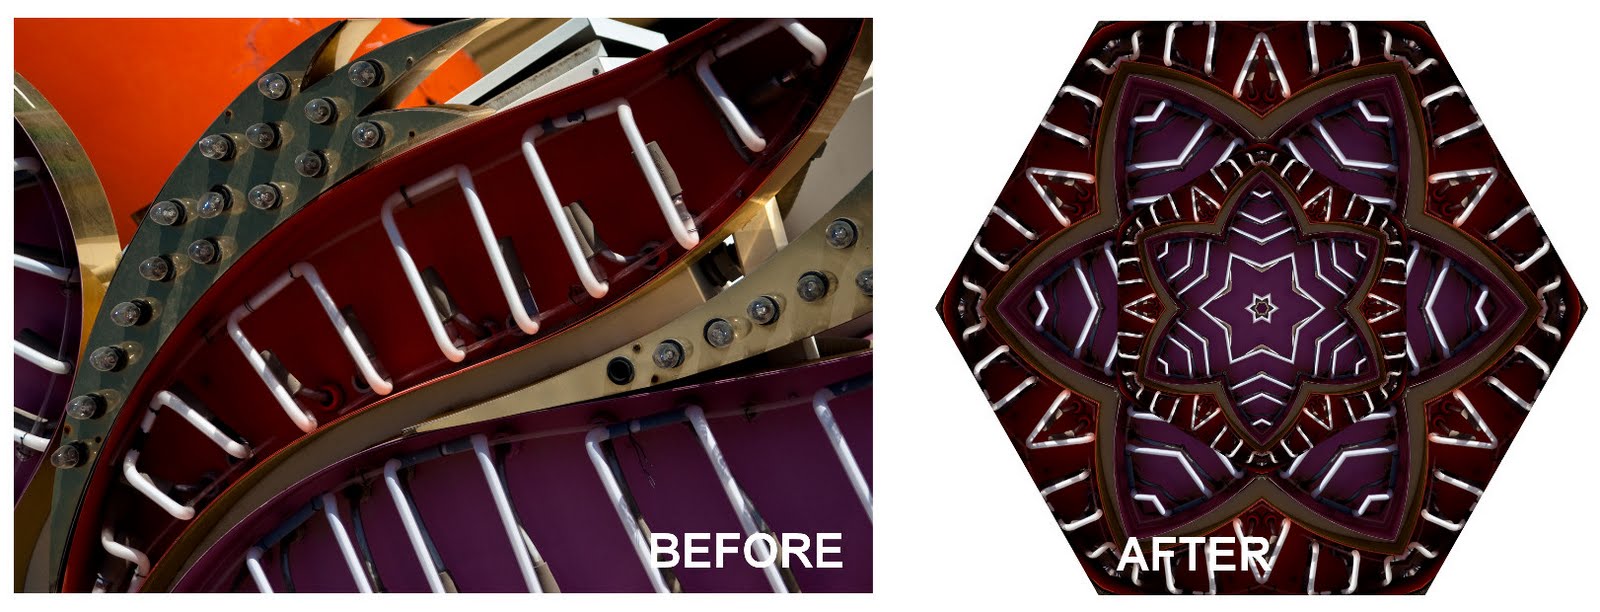
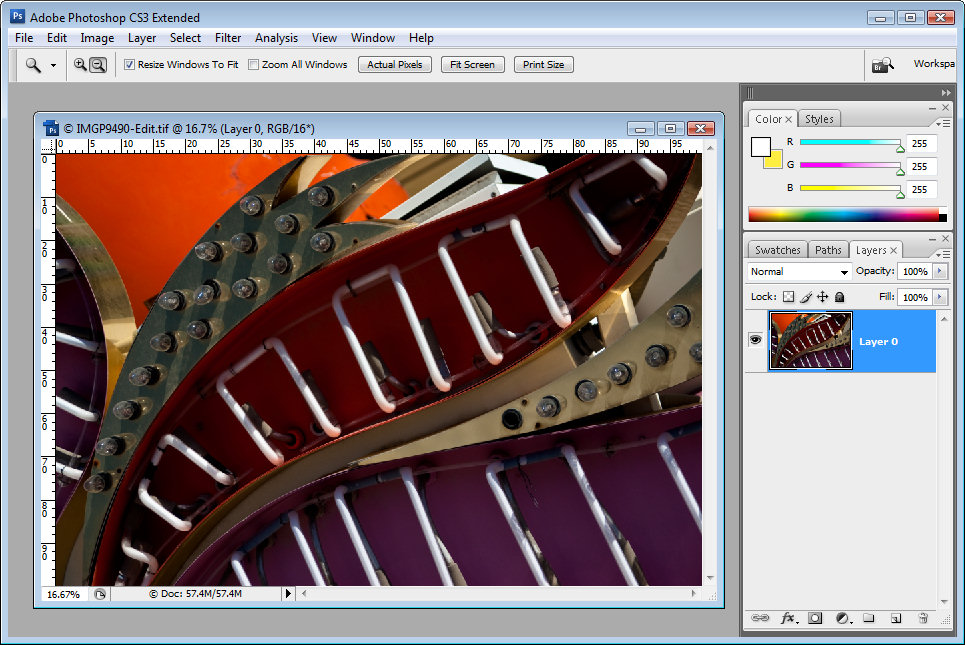
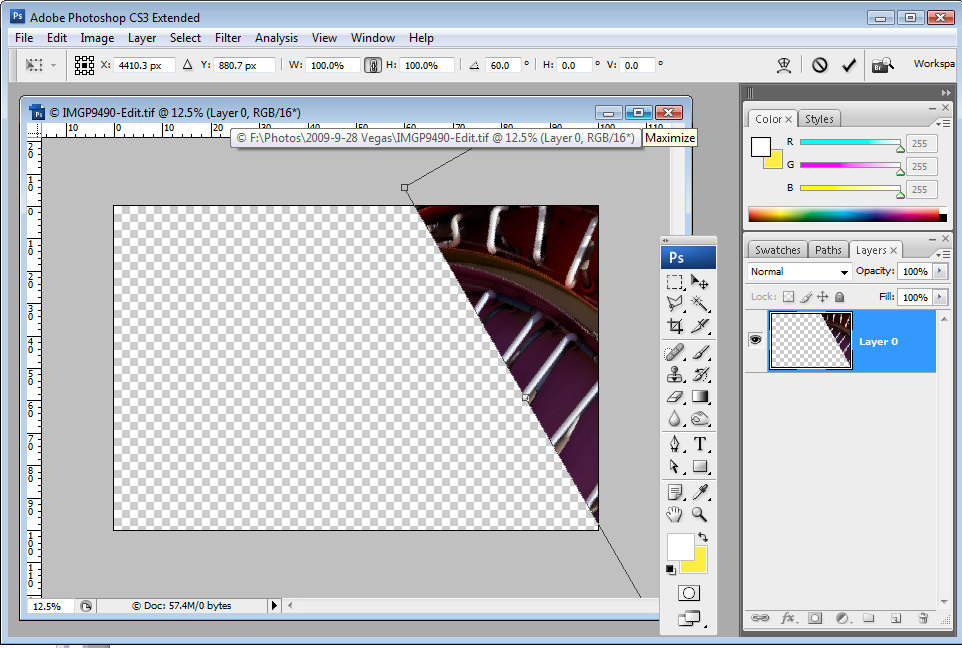
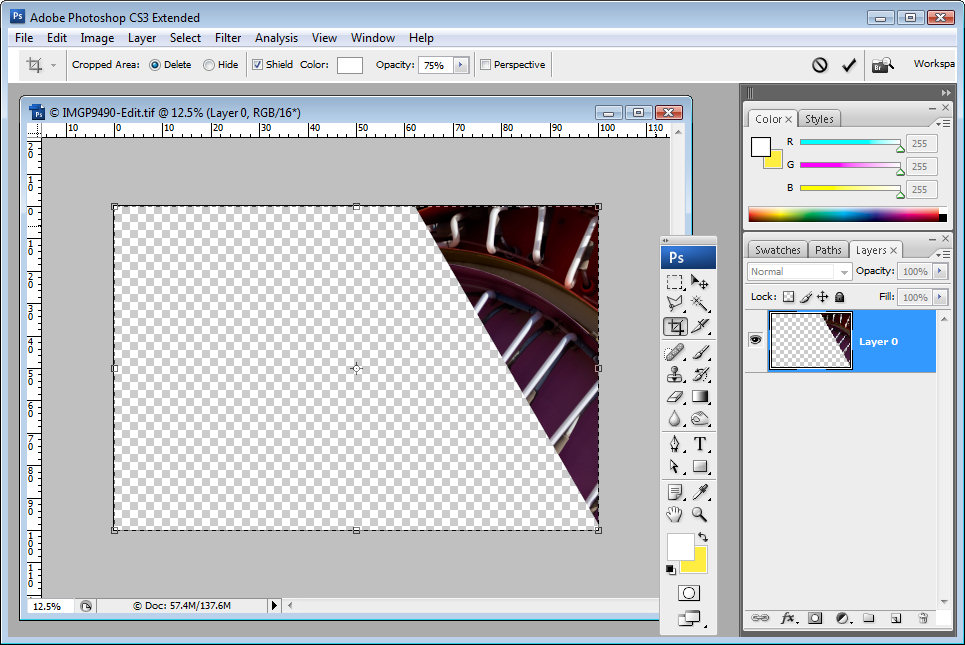
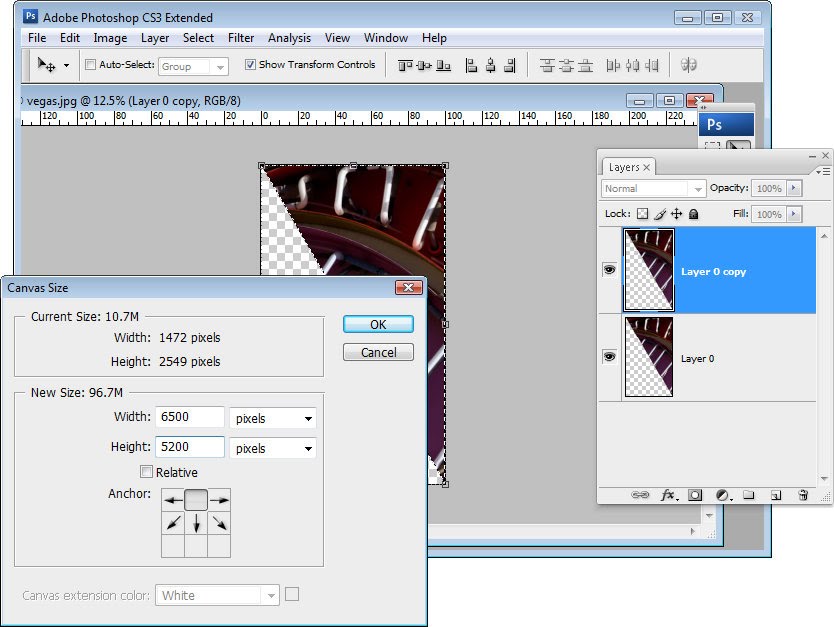
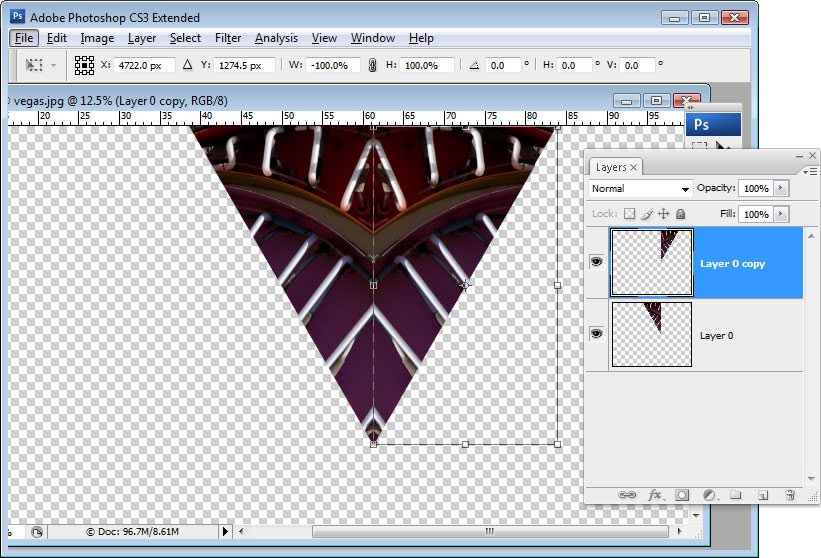
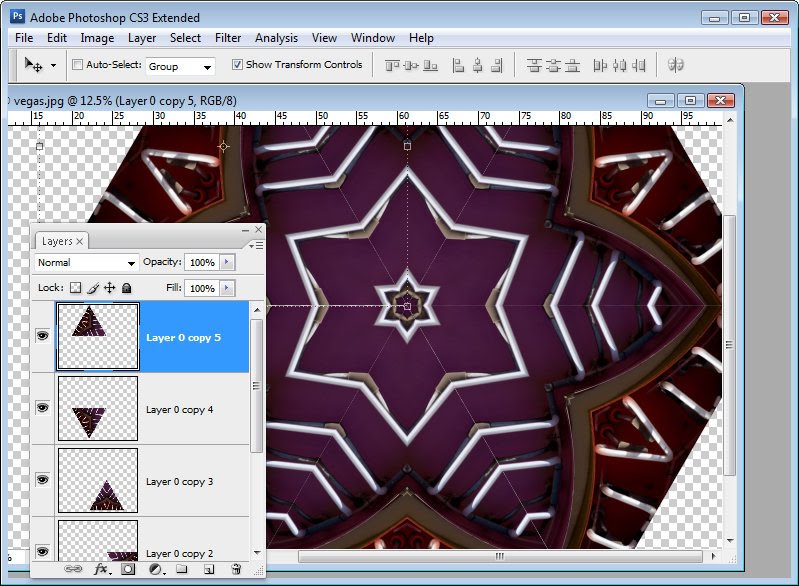
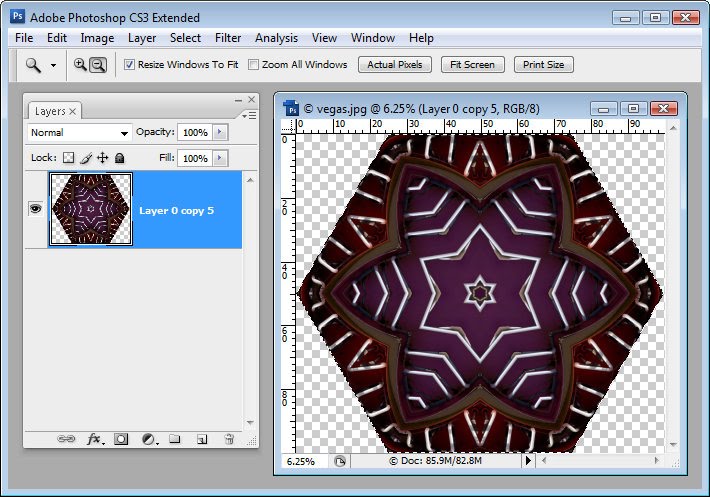
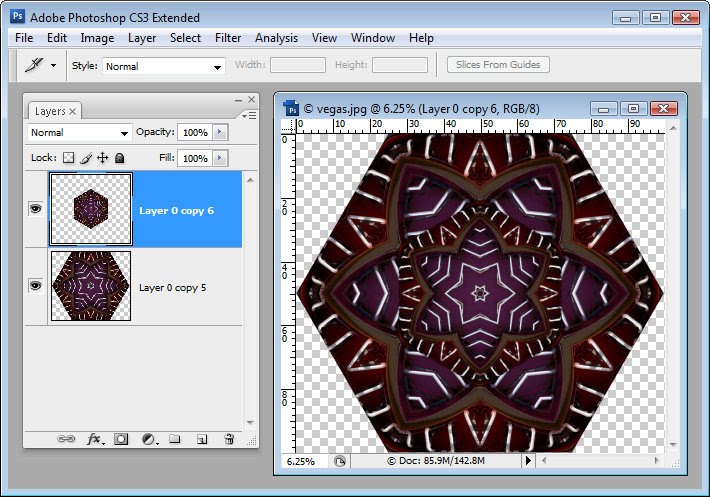
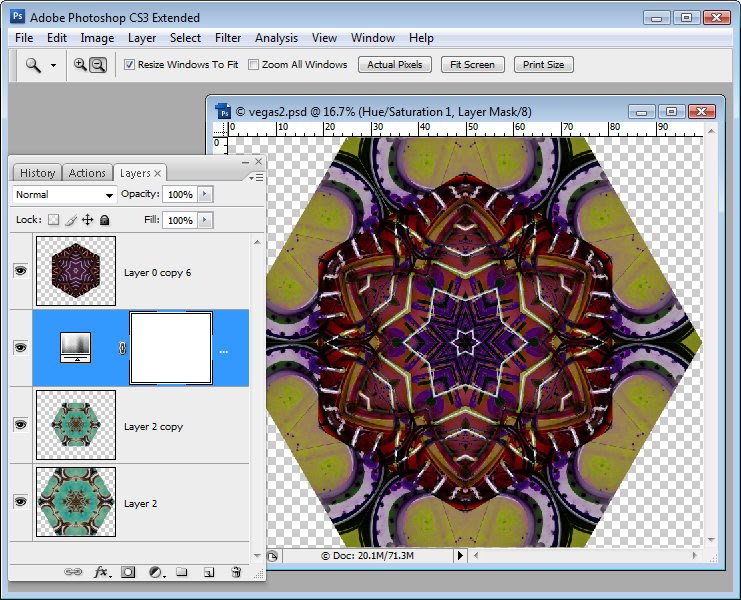
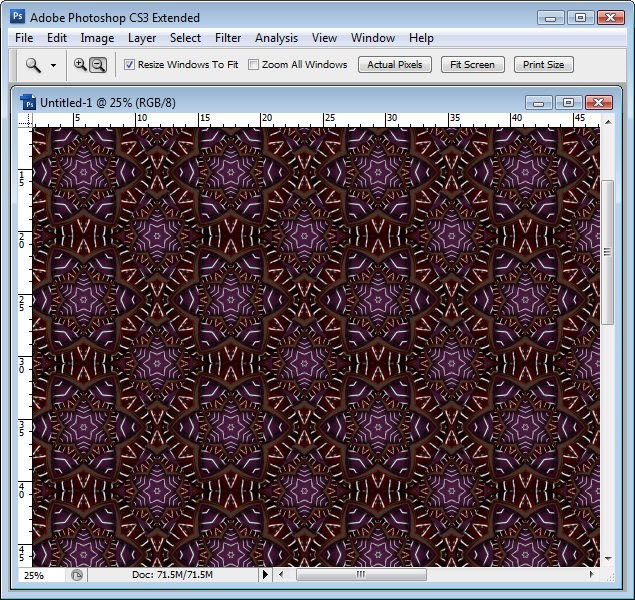
Hello, I’m Helen Bradley. Welcome to this video tutorial. In this tutorial I’m going to show you how to create quick and easy kaleidoscopes in Photoshop. Before we begin let’s have a look at the sort of thing that we can create. This is the kaleidoscope I created earlier from the image that we’re actually going to use. And as you can see I’ve layered various copies of the same kaleidoscope on top of it, changed some of the colors to create an even more distinct pattern effect. This was my original kaleidoscope. This is a second version of it on top and this is another version of it in the middle. So let’s get started with our image. This is an image I shot at the Neon Bone Yard in Las Vegas. The first thing I’m going to do is to convert this background layer into a regular layer just by dragging and dropping the lock icon into the trashcan. Then I’m going to move this image. So I’m going to first of all zoom out a little bit so I can see where I’m going. Then I’m going to select the Move Tool and I’m going to start transforming this shape. And what I want to do is to transform it through 60 degrees, some sort of 60 degrees, minus 60 plus 60. And what I’m going to do is drag this shape over the edge of the image here. I can resize it if I want to but I want it to only go over two edges of this image because I want to use the 60 degree angle that we have. So I’m going to save it. That’s good because I’ve got some nice texture in here and I’m just going to click the checkmark. So if we had a really good look at this we would see that there’s some anti- aliasing down here on this edge. So to get rid of it I’m going to click the Magic Wand Tool here. I’m going to click on this side of the image. And you see perhaps even on the video that there’s a little bit of a gap between the selected area and the image itself. So I’m going to choose Select Inverse to inverse the selection so I have only my corner piece selected and then I’m going to bring it in by choosing Select Modify Contract. And I’m going to bring it in one pixel and that should make it just a little bit smaller. And then so that I get just that piece I’m going to choose Image and then Crop. And this is the piece that I’m going to use to create my kaleidoscope from. So we have it on its own layer. But we need a bit more area to work in. So I’m going to select the Crop Tool. And if you didn’t know that you can do so you’re going to find out now that you can actually crop in a negative direction. So you can use the Crop Tool to add space to your image. So I’m just going to add a little bit of extra space around my image so we have a bit of a better area to work with. I’m going to select my layer with my shape and I want to flip it. So I’m going to choose Layer New Layer via Copy. And with this shape I’m going to transform it. So I’m going to choose Edit and then Free Transform. And I want to transform it around this side. So I’m just going to click on this side so it’s anchored here so that when I flip it over it doesn’t move. And I want to flip it over so it’s exactly mirrored which means that it’s negative 100 percent. So I’m just going to make that negative 100 percent and then I have an exact duplicate of this shape. And this is the piece that I’m going to rotate around to create my kaleidoscope so I’m going to merge these two layers together. I can do that by selecting both layers and choose Layer Merge Layers or Merge Visible, either of those would work. So too would Flatten Image or I could just press Ctrl E. But let’s choose the menu option. Now that we have our basic shape I’m ready to rotate it. And I’m going to do this the smart way so I don’t have to do every single one of them. I just want to do it once, Layer New Layer via Copy, Edit Free Transform. I’m going to anchor it at its bottom center point. And I’m going to rotate it around 60 degrees, and I’m going to click the checkmark here. And having done that once I’m now going to get Photoshop to do it automatically for me. And all I need to do to do that is to press these keys, Ctrl Shift Alt T, and that’s Command Option Shift T on the Mac. So I’m going to press all these keys and every time I do it Photoshop duplicates the layer and rotates it. So with four keystrokes I’ve now got the rest of my kaleidoscope. Again I’m going to select all these layers and Ctrl or Command E to merge them into one. And now I’ve got one layer I can make a duplicate of it. And then I can size it as we saw earlier. If I want to size it around its center point I’m going to hold Alt and Shift as I resize it. And now I can also rotate it. So I might rotate it for example 15 degrees. And then I might make another duplicate of this and do something similar to this duplicate layer, again holding down the Shift and Alt so I’m rotating or sizing around the middle point, place my shape in and then rotate it. This time I might choose say let’s go 30 degrees. And then for each of these I could add a hue/saturation adjustment. And that will allow me just to recolor the shape and perhaps get a more interesting effect in doing so. I’ll do that and just click Ok. So there is the basics of creating a kaleidoscope in Photoshop. Now you could use a different measurement than the 60 degrees that I used. You might want to try it with 30 degrees to get a more complex kaleidoscope. But basically once you get your flipped shape and you merge it you can get Photoshop to do all the copying and rotating work for you. I’m Helen Bradley. Thank you for joining me for this video tutorial. Look out for more of my Photoshop video training on my YouTube channel.

Helen Bradley

Sunday, April 24th, 2011

Photoshop – “repeat rotate with a copy” shortcut

This week I discovered a totally cool new keystroke combination which I just have to share. Here’s the back story…

I love making regular shapes from irregular ones. Think kaleidoscopes but not always made from images – sometimes I make the kaleidoscope shapes from other shapes. Shapes are the best kept secret in Photoshop because, unlike brushes, they can be scaled up or down to any size and they don’t lose their smoothness.

So, here’s how to make shapes from shapes and how to put my new keystroke to use:

Click the Custom Shape tool and select a shape to use – you can use anything – I’ve used an ornament. On the Tool Options bar, click the Shape Layer icon – it’s the first of the three at the far left of the bar.

Drag the shape onto the image. It will appear as a new layer. It doesn’t really matter what color your shape is right now.

Click the Move tool then choose Edit > Free Transform Path (or press Control + T), click to select the point around which the shape will rotate. You do this using the small indicator on the toolbar – you can choose any of the squares to get an interesting effect – each one will give a different result.

On the Tool Options bar set the Angle to something which is a factor of 360 – 10, 15, 30, 45, 60 and so on. I typically use 30. Press Enter to confirm the rotation.

So far you have created a shape and rotated it. Now for the fun stuff – it is time to use the new keystroke combination. With the shape layer selected press Control + Alt + Shift + T (Command + Option + Shift + T on the Mac). Press it a few times until you have duplicated the shape sufficient times to rotate around 360 degrees. The key combination Control + Alt + Shift + T (Command + Option + Shift + T on the Mac) repeats the most recent rotation with a new copy of the shape. Totally cool stuff.

If the final shape goes off the edge of the image you can automatically resize the canvas to include the shape by selecting Edit > Reveal All.

If you like the final shape you can make it a single shape – instead of multiples – by selecting the Path Selection tool and drag over all the shape so you have it selected. From the Tool Options bar select the Add to Shape Area icon and click the Combine button. This makes a single shape from all the combined shapes.

To save the shape so you can use it again in future – with it still selected, choose Edit > Define Custom Shape. Now your kaleidoscope shape is a shape you can use any time in Photoshop by selecting it from the Custom Shape collection.


Helen Bradley

Saturday, February 13th, 2010

Master Repeating Patterns in Photoshop

By Helen Bradley

In a recent post I showed you how to create a kaleidoscope using Photoshop. As one of the techniques for using a kaleidoscope, I suggested you could create a repeating pattern from it. One reader posed the question as to how a repeating pattern could be created given that there were spaces around the original shape. Today, I’ll show you how to solve the issue and, in the process, get a grasp on creating repeating patterns in Photoshop.

Step 1
Start with the finished kaleidoscope image document. If you didn’t see the original article, here’s a link to it http://digital-photography-school.com/how-to-create-kaleidoscope-patterns-from-your-photos
Step 2
Save a copy of this image and this time flatten the image layers – not any solid color or white background layer you may be using.

To do this, select all the layers containing content by Control or Command clicking on them and choose Layer > Merge Layers.

Create a duplicate of the image layer so you have two copies of it.

Hide the top layer for now and select the second of the image layers.

Choose Image > Image Size and read off the image width and height. Divide each by two and write down the resulting values. Click Cancel to exit out of this dialog.

Step 3
Choose Filter > Other > Offset and enter the values for half the width and height of the image. Select the Wrap Around option and click Ok. This offset command creates the repeating part of the pattern and it saves quite a bit of manual work in carving up the image.

Step 4
Reveal the top layer again and your canvas will now be complete. Flatten this image and use it to create your pattern. If it is a large design you may want to reduce its size to 25% or less before making it into a pattern by choosing Edit > Define Pattern. Type a name for the Pattern and you’re done.
Step 5
Create a new empty document many times larger than your pattern image and fill it with your pattern by using Edit > Fill > Pattern and choose your pattern from the very end of the pattern palette.

Step 6
If you start with a regular rectangular or square image you can create it as a repeating pattern in a similar way. However instead of getting a big empty area in the middle of the image you will have seams. Use your clone tool or some other tool of choice to remove the seams without touching the edge pixels. Then create your pattern and it will repeat perfectly!

Helen Bradley

Wednesday, February 10th, 2010

Kaleidoscope patterns

Helen Bradley

If you are like me you had a kaleidoscope as a kid. You would look through one end and turn a dial and the world would be displayed as a mirrored fractured shape. Thanks to Photoshop you can create kaleidoscopes from your photos. Any image with interesting color and shapes will work just fine.

Step 1 Convert the background layer to a regular layer by double clicking it and click Ok.

Step 2
Select the layer and use the Move tool to rotate to 60 degrees and position it over one corner of the image canvas making sure one side of the image sides crosses two sides of the canvas.
Step 3
Use the Magic Wand tool to select the empty background, choose Select > Inverse to select the shape and choose Select > Modify > Contract and contract the shape by one pixel. Now choose
Image > Crop to crop the image to the shape itself. It is important to do this to remove the anti-aliasing that Photoshop applies to the image edge as it rotates it.
Step 4
Duplicate the image layer.

Choose Image > Canvas size, click Relative and set the width to around 3 times the current image height (NOT its width), and the height to 2 times the current height. Select the middle top of the nine positioning boxes and click Ok.
Step 5
Choose View > Snap to > All and make sure View > Snap is selected. Click the Move tool and the top layer of the image and drag the left edge over the right until the W: value is -100%. Ensure the piece is lined up against the edge of the piece on the layer below.
Step 6
Merge these two layers by selecting the top one and press Control + E (Command + E on the Mac).

Duplicate this merged layer, select the top layer and choose Edit > Free Transform and, in the tool options area, select the middle bottom of the 9 point grid to fix the point around which the shape rotates. Set the Rotation to 30 degrees.
Step 7
Press Control + J (Command + J on the Mac) and then Control + Shift + T (Command + Shift + T on the Mac). This duplicates the current layer and repeats the transformation on it.

Repeat this until the kaleidoscope is complete – four times in all.
Step 8
Merge all the layers. Use the crop tool to select around the canvas. You can drag outwards if necessary to add back in any of the image that extends beyond the outside of the image canvas.
Step 9a
Now you can get creative with the shape. For example, you can make a duplicate of the shape and place it in the middle of the original shape sizing this second version down to a small size and then cropping the final image to a square shape. Use the Alt and Shift keys (Option and Shift on the Mac) to size the shape down leaving the middle in the same place and in proportion.
Step9b
You can fill the middle with another kaleidoscope if desired. Here I used a Hue/Saturation adjustment layer to match the colors of the two kaleidoscopes better.
Step9c
You can select the shape and choose Edit > Define Pattern to make it a pattern. You can then fill a larger image with it so it displays as a repeating shape.
There are lots of creative ways you can use your Kaleidoscope.

Helen Bradley