Friday, September 27th, 2013

Put the Apps back on my Chrome New Tab! NOW!

If the new Chrome Update (Sep 2013) messed up your browser, here’s how to get the old look back

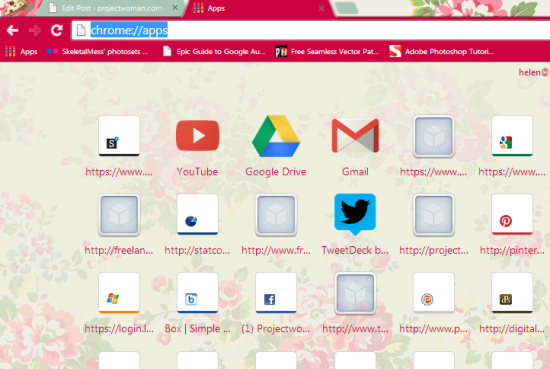
Ok, I am rightly angry – my Chrome browser just updated and all the Apps on the New Tab (that I had laboriously configured and which I use daily because, hello Google I need them)disappeared.

Sure, I can click the new little Apps button on the Bookmark bar to view them – I get that – but why? I had Chrome all nice and organized – I didn’t need Google’s input to fix it… just like I don’t expect Google to walk into my house and rearrange my desk or my bookshelf or anything else I have organized the way I want it.

So, rant aside, here’s the solution to how to put the Chrome Apps back on the New Tab:

UPDATE:

As of Chrome 33 the option to fix the problem as detailed below (in red) has been removed. Seriously at Google people actually worked hard to remove this feature so we can no longer make Chrome behave the way we want it to? Way to go! Yet another reason I hate the Cloud and I hate apps that automatically update and companies that couldn’t care less about the needs of their user base. I just don’t understand why Google doesn’t listen to its users and help them out instead of giving us a totally useless Google search box in the middle of the new tab window. Now I understand that not everyone wants or likes the old style interface but why break the fix (that worked), for those of us who do?

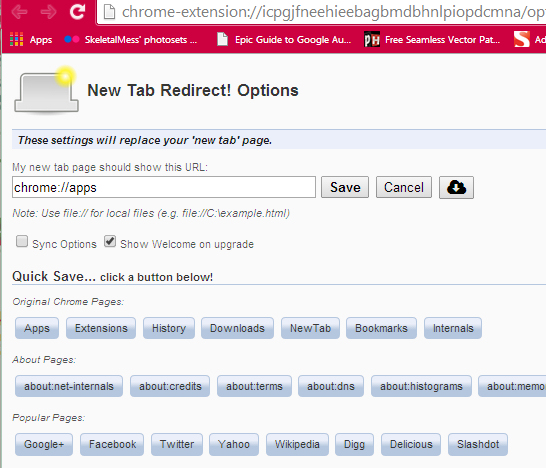
Ok, today’s solution (until Google folk mess with this and break it too) is to download the New Tab Redirect app from the Chrome Web store here. Once installed, the Extension launches so you can set it to show your apps. So, you need the My New Tab page should show this URL to read:

chrome://apps

You can do this by typing the entry yourself or you can click the Apps button below Quick Save and it will be done automatically for you.

Now, in future when you click the New Tab button it will show your apps.

It works, no thanks to Google.

I hope this solution saves you from the stress of having Chrome apps disappear from your New Tab Page. It has certainly reduced my blood pressure!

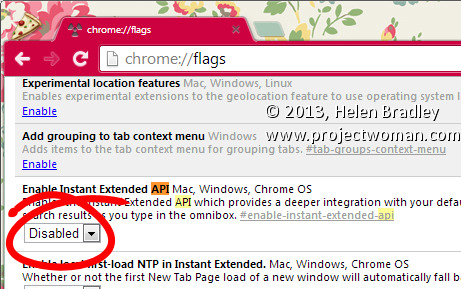
1.    Go to the address bar and type this in:

chrome://flags/

2.    Press Enter and then search for this word:

Extended API

This will take you to the Extended API option which is set to Default

3.   From the drop down list choose Disabled and then close and reopen Chrome.

Voila! your browser is now restored to its former glory!

Helen Bradley

Sunday, June 16th, 2013

Lightroom Tip – Missing Folders?


How to solve the problem of Lightroom reporting a folder as missing

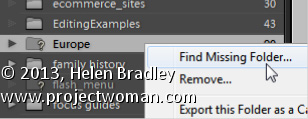
If a folder is missing, it will have a question mark beside its name in the Lightroom library.

You can sort out Lightroom’s problem by locating the missing folder – to do this, right click the folder name in Lightroom and choose Find Missing Folder.

Now navigate on your disk to find the folder that Lightroom can’t find. When you have done this all the contents from that folder will be added back into the Lightroom catalog automatically.

The reason that Lightroom can’t find your folder is because you have done something to it outside Lightroom. In future, move and rename folders from inside Lightroom and this problem won’t occur.

Helen Bradley

Friday, December 28th, 2012

Why would you do that (Microsoft?)

Ok, I really really like the new Office 2013 suite. But there are always some things you don’t like and this one is a biggie. It is in Word 2013 and it’s not like I don’t like an added feature it is that Microsoft removed a feature I love and that I use every day.

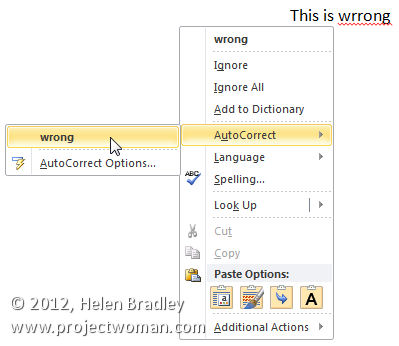
What is gone is the right click auto correct from the shortcut menu. In earlier versions of Word when you saw a spelling mistake indicated by a wiggly red line under a word you could right click and choose AutoCorrect and then select the correct spelling of the word. Word would then add this misspelling and the correction to its AutoCorrect list so that, in future, whenever you typed the word incorrectly Word would automatically fix it for you.

This right click feature has been removed from Word 2013 – Why? Who knows? It has to go down as one of the stupidest things that Microsoft has done – really there is no reasonable explanation for this feature being removed. It is totally frustrating not to have this feature on the right click menu.

If you need to use this feature you’ll need to make your own AutoCorrect list entry by choosing File > Options > Proofing > AutoCorrect options and enter the misspelling in the Replace list and the correct spelling in the With list. This is extremely inconvenient but it’s how Word 2013 now works – go figure! Thanks for the AutoCorrect love Microsoft – Not..

Helen Bradley

Sunday, November 25th, 2012

Help! Lightroom Lost My Files

If there’s one thing that confuses new Lightroom users it is that quite often files that should be in Lightroom appear to have gone missing. Here are some things to look out for when this happens to you.

Is a Filter Hiding Things?

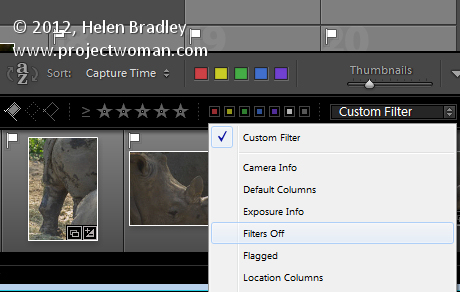
If you think a folder should be displaying more images than it does, check that there is not a Custom Filter in place. In the Library module, make sure the Filmstrip is visible and if there is a filter listed in the Filter box then that’s affecting what you’re seeing. To return to showing all your images in the currently selected folder, select Filters Off from the Filters list.
Are you looking in the right place?

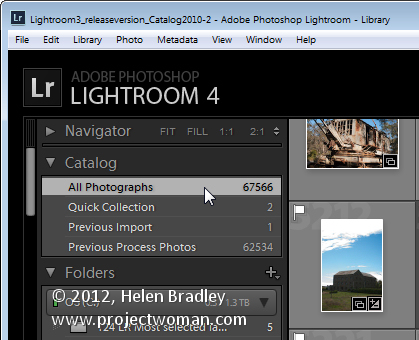
While Lightroom’s folders mimic the folder structure on your computer and external drives sometimes you really want to look through all the files in Lightroom. To do this, open the Catalog panel in the Library and select All Photographs. This selects all the photographs in the Lightroom catalog as the basis of your search.
Images in Subfolders

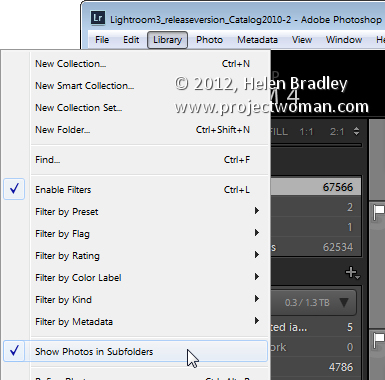
If you click on a folder that has subfolders but you see nothing or none of the images in the subfolder that is typically caused by a Lightroom setting. This setting lets you control whether or not you see photos in subfolders when you click that folder in the Library module. To view the current setting choose the Library menu > Show Photos in Subfolder. The setting can be enabled or disabled depending on your preferences but it’s often the cause of photos in subfolders not showing when you think they should be there.
Look in Folders and not Collections (or vice versa)

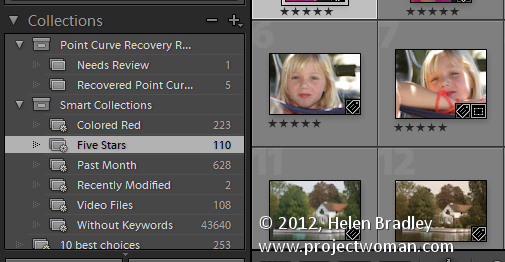
Lightroom has folders and collections and they can have the same name. You’ll find Collections in the Collections panel and folders in the Folders panel. A collection can include files from a number of folders but a folder can only contain images which are stored in that folder on your disk, so make sure you’re looking for the right folder or collection.

Contents of Smart collections Change

Regular collections are fixed so that the images, once placed in the collection, remain in that collection until you remove them. Smart Collections are dynamic so the images in them change depending on the criteria you have set for them. For example, the 5 Star Smart Collection shows all images that are 5 Star images. If you make an image a 5 star image it automatically gets added to that collection. If you change a 5 star image to a 4 star one then it no longer appears in that Smart Collection and that might be the cause of images going ‘missing’.
Search for Lost Images

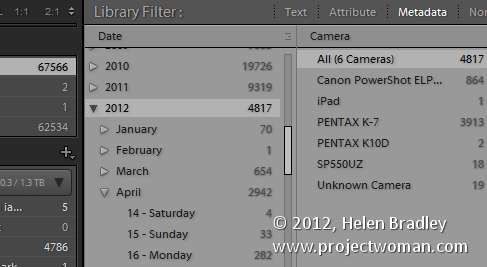
If you’ve lost photos and you know roughly when they were captured or which camera you captured them with it is possible to search your Lightroom collection for them. Start in the Library and click the Catalog panel and click All Photographs. Then choose View > Show Filter Bar. Click Metadata and you can then locate images by their metadata. For example if you know the approximate capture date was January 2012 then make sure that the first filter is set to Date and click 2012 and then January. This will show only those images that you shot during that time.

It’s also possible to filter by camera, lens and other metadata. You’ll just need to make sure that the primary field that you are filtering on is the one on the left of the Filter Bar. Images are filtered from left to right so, if the leftmost panel is Date and the one to its right is Camera type – you’ll see the camera types for only those photos shot on the specified date. If Camera type is the leftmost column and Date the rightmost one, then you’ll filter out all the images captured with a certain camera and see only those dates you actually captured images with it.
Lightroom Can’t Find the Image

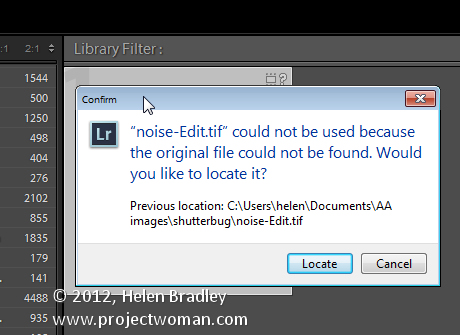
Sometimes Lightroom will display an image with a question mark in its corner indicating that the photo is missing. This means that the image was imported into Lightroom but Lightroom can’t find it any longer. To return it to Lightroom, click its question mark icon and you’ll be prompted to locate the image on disk. Click Locate, find the image on disk, select it and it will appear again and it will be editable inside Lightroom.
Lightroom Lost the Entire Folder

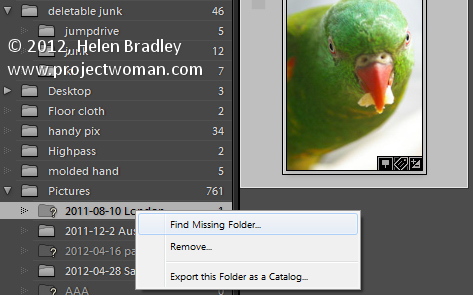
If you move or rename a folder on your disk outside Lightroom then Lightroom won’t know what you’ve done. If there are photos in the Lightroom catalog in that folder it will report the entire folder as missing when you launch it next. Missing folders will have a question mark beside their name. If you know where you moved the folder or that you renamed it, you need to tell Lightroom where it is. To do this, right click the folder in Lightroom and choose Find Missing Folder then locate the folder on disk and Lightroom will update accordingly.
A Folder is Missing Some Files

If you have a folder which you think should have more images in it than are currently showing in Lightroom this could well be the case. The Lightroom folder structure mimics the disk folder structure but only those images you import into Lightroom will actually be in Lightroom. It is also possible to remove images from Lightroom but in such a way as they remain on disk.

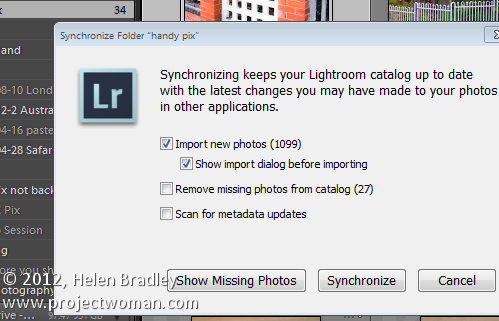
To check to see if there are additional images in a folder that aren’t showing in Lightroom, right click the folder in Lightroom and choose Synchronize Folder. Make sure that the Show Import Dialog before Importing option is enabled and select Synchronize. This shows the import dialog and those images that are in the folder but not in Lightroom so you can synchronize the contents of the folder with Lightroom.

Now it’s over to you. Have you ever experienced missing files in Lightroom and, if you did, what was the cause and how did you resolve the issue?

Helen Bradley

Thursday, October 18th, 2007

Where did my Photoshop cursor go?

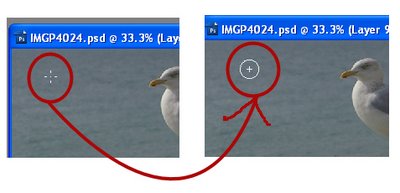
Ok. So this morning I went to do some work on my images from my trip and my Photoshop cursor went missing. All I had was a funky little cross hair thingie. It’s not a machine I use a lot so I thought it was just that the brush hadn’t been set correctly. Into Edit, Preferences and – well, all the brush settings look ok. So I try another brush option just in case. Same problem. Not good.

The solution is, luckily very simple. When you know how. It’s just a matter of pressing the Caps lock key. In fact, I suggest you do it right now so you know how it works. Choose a brush tip and press the Caps Lock key – voila, your cursor changes and disappears. Press it again and it comes back. That’s what happens, your Caps lock key toggles the brush tip display. So, when your brush tip goes west and you can’t see it so you have no idea how big it is or pretty much where it is, the Caps lock key is about to become your new best friend. Promise.

Helen Bradley