Sunday, July 22nd, 2018
Format a drive for PC and Mac – Quick & Foolproof
In the last couple of years Apple broke the system that let you take a USB from a Mac to a PC and visa versa seamlessly. Now, it’s perilously easy to have a regular drive or a Flash drive that works fine on a PC but which isn’t recognized by a Mac. It’s also possible to happen the other way. So, if you’re faced with the issue of needing a drive that works on both, here’s what to do.
Firstly backup everything that was on the drive (you’re about to lose it all!).
Did you get that last step? Yup. Seriously. BACK IT UP!
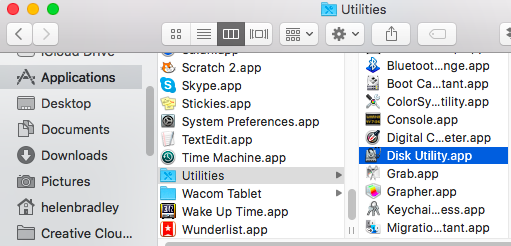
Now, put the drive in your Mac. The Mac is fussier than the PC so get it to do the work. It doesn’t matter if your drive is recognized by the Mac or not. Choose Applications > Utilities > Disk Utility.
Wait until your drive appears in the External list (don’t touch the Internal drives).
Select your drive and click Erase.
Type a name for your Disk, from the Format dropdown list choose ExFAT and set the Scheme to Master Boot Record (if that is an option), and click Erase.
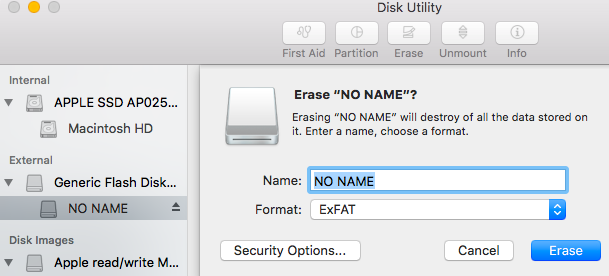
This erases and then formats the drive in a format that the PC can read.
Once it’s finished. Eject the drive and test it in your PC. I typically place a file on the drive using both the PC and the Mac (to check it writes ok) and then I open it on the other machine (to check it reads ok). If it works, you’re good to go!
NOTE: This is also the way you can erase everything from a USB drive on the Mac – often I find I have a drive that shows there is ‘nothing’ on it but which has part of the available space used up. Erase/format the drive fixes this quickly.
Labels: erase a usb drive, exfat, fat, fat32, format usb, mac, ntfs, OSX format, usb drive, usb drive compatible, windows
Categories:Mac, Windows
posted by Helen Bradley @ 2:34 pmNo Comments links to this post
Tuesday, December 5th, 2017
Quickly Launch Task Manager with one keyboard shortcut
I have been helping people fix computers that aren’t behaving and moving from an old computer to a new one. It seems like I am spending half my time launching the Task Manager to fix issues. Eventually it dawned on me that I can save myself a lot of messing around with pressing Control + Alt + Delete and selecting Start Task Manager by quickly going direct to the Task Manager. It’s simply a case of learning a new shortcut. Imagine that? One keystroke shortcut to get direct to the Task Manager.
So, here it is – remember and use it!

Simply press Control + Shift + Esc
Why not try it out now, practice it and you’ll seldom need to use Control + Alt + Delete ever again.
Labels: keyboard shortcut, start task manager, task manager, windows
Categories:General, Windows
posted by Helen Bradley @ 10:30 amNo Comments links to this post
Friday, May 29th, 2015

Learn how to quickly make a printable list of files in a folder (and how to import it into Excel)
Sometimes I need to get a list of files or folders inside another folder in Windows. I like to either print the results or take them to Excel to work on them. However, it isn’t self evident how to do this – there’s no print command in Windows Explorer that can do it for you. However, once you know how to do it, it’s easy to do.
Start by navigating to the folder whose contents you want to print. You want to have this folder visible in the right hand pane in Windows Explorer. Hold the Shift key as you right click this folder. A shortcut menu will appear, from it choose the Open Command Window here option.

This opens a MSDOS window inside the folder.
Now type this DOS command at the prompt and press Enter:
dir > filelist.txt
The name filelist.txt can really be any file name of your choice, I just like to use the .txt extension since its contents are plain text.
When the prompt reappears close the window.

If you now look inside this folder you will see a text file called filelist.txt. You can now print it by right clicking it and choose Print or double click to open it in Notepad and print it from there.

You can also open it in Excel and convert it to columns of text using the Text Import Wizard. The file is a fixed width file so it converts pretty easily into columns of text – you simply need to drag the lines in the preview to mark out how the text will convert to columns.

Then, when you are done, click Finish and you have the data in Excel – save it as an .xlsx file and you’re good to go.

Labels: command window, convert text file, Excel, print file list, windows
Categories:office, Windows
posted by Helen Bradley @ 1:57 pm2 Comments links to this post
Sunday, October 5th, 2014

Notice the refresh icon is greyed out!
Help! Kuler won’t sync with Illustrator!
Unfortunately when Adobe changed how Kuler works with Illustrator CC they broke a great tool. Instead of being able to search for color schemes from inside Illustrator you now have to do this on the web and favorite a color scheme if you want it to appear in Illustrator. At least that’s the theory – in practice Kuler is very slow to update in Illustrator making it nearly impossible to use it in a meaningful way – unless you know how to force it to update.
While you should be able to click the Refresh button at the foot of the Kuler panel most of the time this is greyed out – so you can’t force a refresh. The only solution that reliably works for me is to sign out of your Creative Cloud account inside Illustrator then sign in again.
So, to force the update, go to Help and click to sign out – in practical terms you are deregistering your Adobe account on this computer for now. Now close Illustrator and restart it – when prompted to do so, log in to your Adobe account and voila! Kuler will update.

Seriously Adobe really should be more proactive in fixing this stuff when it breaks like this. It shouldn’t be too hard to do – just make the Refresh button do what it is supposed to do!
For what it is worth, the problems with Kuler occur with both the Windows and Mac version of Illustrator.
Labels: Adobe, color schemes online, creative cloud, Illustrator, kuler, kuler update, osx, windows
Categories:Illustrator
posted by Helen Bradley @ 10:54 am1 Comment links to this post
Monday, June 9th, 2014

Help! My Recycle Bin just disappeared!
This is a major annoyance – your Recycle bin just ups and disappears from your Desktop. Well it’s easy to get back – when you know how.
Click the Start button and type Desktop Icons – wait as the search results appear. Click Show or hide common icons on the desktop to open the Desktop Icon Settings dialog.
Here you will find icons for common tools including the Recycle Bin. Click its checkbox to select it and click Ok to return it to the desktop. Notice too that you can add icons for My Computer, Your User Account files, Network and the Control Panel to your desktop by simply clicking the appropriate checkboxes.
Labels: desktop, display icon, recycle bin, windows
Categories:Windows
posted by Helen Bradley @ 1:46 pmNo Comments links to this post
Thursday, January 10th, 2013
 Photo Credit: Kriss Szkurlatowski
Creating multiple new folders in windows can be a pain, since it forces you to click through multiple context windows every time. It can, however, be bypassed with a nifty set of keyboard commands that navigate those windows for you.
While in the Windows Explorer view, simply hold Alt and press F+W+F. This opens the File menu, selects New, and chooses Folder almost instantly. This is extremely useful because it allows you to create and rename multiple new folders without taking your hands off of the keyboard.
You can use these commands to open other menus as well. While holding Alt you will notice certain letters of menu selections become underlined. Pressing these letters on your keyboard will select that menu option. For example, Holding Alt and pressing F+W+S will create a new shortcut. This functionality extends to Microsoft Office as well. The next time you’re in Word, press Alt and see what you can start controlling with a few key strokes.
Helen Bradley
Labels: explorer, folder, keyboard, Microsoft, new, Office, shortcut, windows
Categories:hunter, office
posted by Hunter Delattre @ 9:00 amNo Comments links to this post
Thursday, December 9th, 2010

When I use a calculator I like to see the tape – that way I can see what I have done so I can check that the result is based on correctly input data and operators.
Frustratingly the Windows calculator does not include a tape function – seriously it’s not like it would be wasting trees to include one!
My solution is to use Moffsoft FreeCalc which you can find here: http://www.moffsoft.com/downloads.htm. This is a simple calculator you can enter values into using the buttons or the keyboard and it includes a tape that lets you check your entries.
Unbeatable value and a smart replacement for the Windows Calculator app.
Helen Bradley
Labels: calculator, FreeCalc, replacement, tape, windows
Categories:Uncategorized
posted by Helen Bradley @ 12:14 pm3 Comments links to this post
Monday, March 1st, 2010

Ok. It should be dead easy to install fonts into Windows if you have been doing it since Windows 3.1. Until Windows 7 you went to the Control Panel, chose Fonts then installed them using the handy dandy dialog. Ok. Not so simple but it worked and it has done so for years.
Fast forward to Windows 7. No Font dialog as I remember it and no font install option. Ok, step backward, think, investigate, light bulb moment encountered.
In Windows 7 there are multiple ways to install fonts but seriously only one I’d bother using. Open the folder containing the font file, unzip it to see the TTF file if it is zipped then double click the font’s ttf file name. A dialog opens showing you what the font looks like and, at the top, you will find an Install button. Click it and seconds later the font is installed. Really? It’s how it always should have been done.
You can drag and drop the .ttf file into the fonts list via the Control Panel but seriously – why bother going to the effort. You can also right click on a font’s .ttf file and choose Install from the menu too but I like to check the font before installing so it is method #1 for me.
Helen Bradley
Labels: Control Panel, font, install, windows, Windows 7
Categories:Uncategorized
posted by Helen Bradley @ 5:00 pm16 Comments links to this post
Tuesday, August 25th, 2009
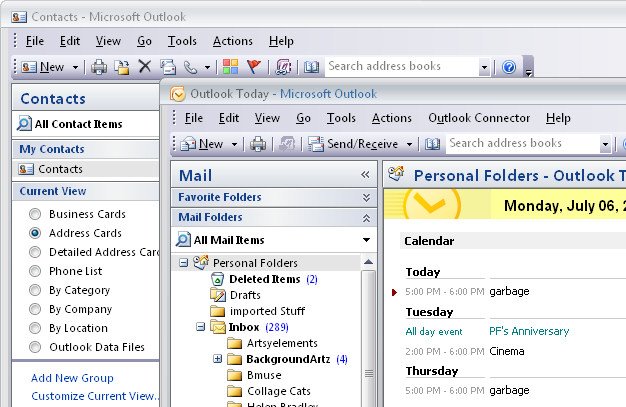
 Often it is easier to work with multiple windows in Outlook 2007 rather than having to switch between modules to show just one at a time.
You can open each different Outlook tool in its own window if you right click the icon (eg. Calendar) in Folder view and choose Open in New Window.
Each window will display on the task bar as its appropriate icon so it’s easy to switch between tools.
To ensure that each tool always opens in separate windows leave them open when you select File > Exit to close Outlook 2007. When you open the program again, all the windows will open automatically.
Helen Bradley
Labels: multiple windows, Outlook 2007, tools, windows
Categories:Uncategorized
posted by Helen Bradley @ 8:45 pm1 Comment links to this post
Wednesday, August 19th, 2009
 Do your travel photographs look just like everyone else’s?
If you wonder why you bothered lugging your digital SLR half way around the world and didn’t just settle for buying postcards, it’s time to revisit the way you photograph your travels. Here is part 2 in my new series of Better Travel Photography – a guide to getting great travel photos that don’t look like everyone else’s..
Today’s tip: Glass is your friend (not the lens type of glass either!)
If what you are photographing is in a busy location you can capture unusual detail by turning your back on it and find ways to capture it reflected in surrounding windows.
While the object’s details might be less well defined when reflected and while you’ll get a combination of the window detail and the object itself, the collage effect can make for a unique image.
If it rains as you travel, celebrate the opportunities available in shooting reflections in puddles. Capturing a popular tourist destination reflected in water is a way of seeing things that are there all the time but which few people ever really “see”.
 When you shoot reflections, in windows or in puddles take care to make sure your camera is focusing on what it is that you want it to focus on.
You’ll want the detail in the reflection to be visible and in sharp focus with the surrounding area out of focus.
If you’re used to using a polarizing lens on your camera – which you should when shooting in sunlight conditions – remove it when you’re shooting reflections.
One of the roles of a polarizing filter is to cut out a lot of reflected light from entering your camera and, when you’re shooting reflections that’s exactly what you want to capture.
Helen Bradley
Labels: glass, Photographing reflections, polarizing filter, puddles, reflected objects, travel photography, windows
Categories:Uncategorized
posted by Helen Bradley @ 10:02 pm1 Comment links to this post