

Saturday, March 14th, 2009
15 ways to size a Tweet to 140 characters
If you’re a twitterer you know Twitter gives you only 140 characters to get your message across. So you have to be short and sweet – but not so much so that no one gets your message.
Lance Ulanoff editor of PC Mag (an organisation I have had a long and very happy association with as a Contributing Editor to the mag), has a great post 14 Tricks for making 140 character Tweets.. to which I am going to add my 15th!
What are you trying to say?
Focus on what you are trying to say first and add descriptive extras later. I do a lot of posts mentioning cool free Photoshop brushes so I put Free Photoshop brushes first in my post as that’s the most important part. Then I briefly describe the set so folks know if it might be of interest to them and finally I’ll add a tinyurl link.
I know there are other link shortening services like the bit.ly that Lance mentions but, personally, I’ve had problems with using links created by just about every service except TinyURL – somehow, TinyURL has never let me down. I prefer to use up a few extra characters and stick with what works.
I also assume that folks know that if I’m putting up a link to free brushes that the brushes are worthy of notice, but sometimes I can’t help myself so I add that I like them. In future I’ll be putting in place Lance’s suggestion to do ME:They Rock type additions… ME: I think that suggestion rocks!
I’m also always stripping out extra spaces and full stops when I post. I’m a big fan of using ellipsis… if you haven’t noticed but on Twitter they just gobble up precious space. Instead I use dashes between words-they still give me the change of pace I need but don’t take up any more space than a space would.
As for one of Lance’s suggestions that you remove unnecessary vowels, I’m reluctant to misspell words by removing vowels. I am a little old school here and I prefer to spell correctly – it’s all about my brand – I pride myself on accuracy – technical and otherwise so I never want my tweets to go out in a way that might have someone look at them and think I don’t know how to spell or that I’m careless about accuracy. That said, this is my pet peeve – you make your own choices!
Labels: 140 characters, 15 ways, shorten tweets, Twitter
Thursday, March 12th, 2009
PowerPoint slide show file – PPSX vs PPTX
What is in a name? Is there a difference between a PowerPoint 2007 PPSX and a PPTX file? (or a PPS and a PPT file in PowerPoint 2003 and earlier versions?)
The simple answer is, of course, yes there is a difference.
The long answer explains that difference so sit tight, here’s the long version:
The PowerPoint Slide Show files (PPSX and PPS) are files you can double-click on in Windows Explorer and the presentation will launch and start to display automatically bypassing PowerPoint itself. When you exit the presentation you will be taken back to Windows rather than left in PowerPoint with the presentation layout visible on the screen.
On the other hand, when you double click to open a PPTX or PPT file, it opens inside PowerPoint ready for editing or presenting. When you’re done, you get dumped back in PowerPoint with, you guessed it, your presention visible on the screen – not very professional if your audience is watching.
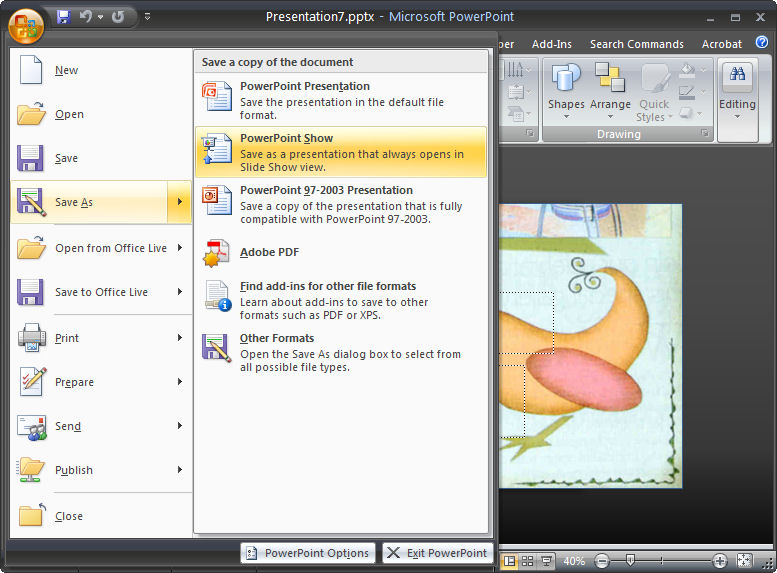
To save a presentation as a PPS file in PowerPoint 2003 and earlier, choose File > Save As and from the Save As Type dropdown list choose PowerPoint Show (*.pps) and click Save. In PowerPoint 2007, choose File > Save As > PowerPoint Show and the correct format will be automatically created for you.
PPSX and PPS files can be edited in PowerPoint in the same way as PPTX and PPT files can – you just have to open PowerPoint first and then choose File > Open to open the PPSX or PPS file as you can’t double click to open it.
So, now you know.
Labels: PowerPoint 2003, PowerPoint 2007, PowerPoint Show, PPS, PPSX, PPT, PPTX
Wednesday, March 11th, 2009
Instant text boxes in Microsoft Word
Just a short tip today, I just tripped over this and thought “WOW! I didn’t know that!” so I wonder if you know it too?
Ok.. step back a bit. I’m doing a column on columns in Word and I’m showing how to place a text box or image in a document laid out in 2 columns so the text box or image travels with the text and how to take it out of the line of text so it floats independently.
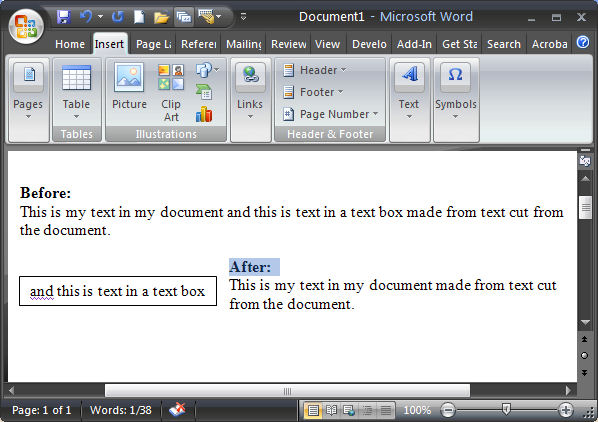
To create the text box, I select my text, then realize I need to create the text box first and click the Text box button without deselecting the text. [insert WOW moment in here].
What happened was that the text box got created automatically and the selected text appears inside it – just like that – how cool is that?
So, next time, instead of creating a text box and then copying and pasting text into it, select the text and click the Text Box button on the Drawing toolbar in Word 2003 and earlier and it will all be done automatically for you in one smooth step. The same process works in Word 2007 too but you must click the Insert tab, click the Text box button and choose Draw Text Box for it to happen.
Instant text in text boxes in Microsoft Word – can’t ask for anything more simple than that.
Labels: Microsoft Word, text box, text in a text box, textbox, Word 2003, Word 2007
Tuesday, March 3rd, 2009
Protect part of a Word document
You know when it happens. You’re developing a template or document for someone to work on and you know that they will clobber part of it when you least expect it. So, you want to protect this from happening and make sure your document never gets destroyed.
Problem is how to do it?
Solution? Read on..
Ok.. so, Word has a document protection feature you can use but it only protects the whole document. But, it can be tweaked to protect only part – but we have to set it up to work this way. So, you have to add section breaks around the area to protect. Pretty easy to do. Click just above where the protection is to start and choose Insert > Break > Continuous – this adds a continuous section break in at this point and, because it’s continuous there isn’t really any indication it’s there.
Move to just beyond the area to protect and repeat to add another continuous section break. If you just want to protect the beginning or end of your document you only need one section break.
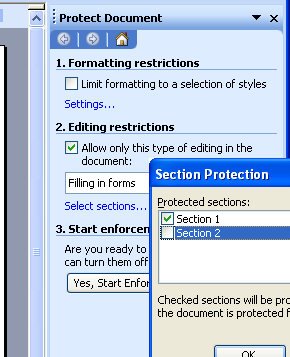
So far, so good. Now for the protection bit. Choose Tools > Protect Document and in the Editing Restrictions area, click the checkbox and from the list choose Filling in Forms. Now click Select Sections and check the sections to protect (ie leave the ones you want to be able to edit unchecked).
Then click Yes, Start Enforcing Protection and, if desired, add a password.
Now users are locked out of the protected area of the document and they can’t change it.
In Word 2007 it works just the same. Find the section breaks in Page Layout > Breaks > Continuous and the protection tool in Review > Protect Document > Restrict Formatting and Editing.
Neat huh?
Labels: protect part of a document, protection, sections, Word 2003, Word 2007
Tuesday, February 24th, 2009
Copy a worksheet – Excel 2007
I work with monthly worksheets and they develop over the month in such a way that I want the starting point for the next month to be where this month stops. So, I need to copy this month’s worksheet to make next month’s.
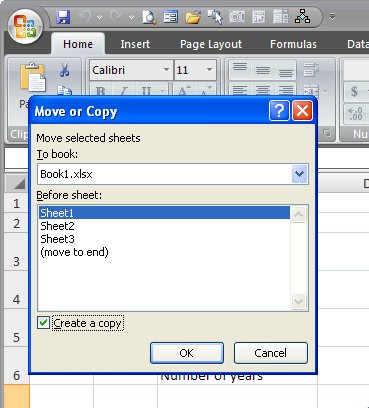
In Excel this is simple. Right click the tab at the foot of the worksheet and choose Move or Copy sheet. Make sure you click the Create a Copy checkbox so you make a copy or you’re toast – you’ll lose your original.
Now choose the position in the current workbook to make the copy or choose another or new workbook. Click OK and the copy is made.
I then strip out all of last month’s variable data and start over for this month… but I always make sure I made a copy before I do this, you never can be too sure.
Labels: Excel 2007, named range
Sunday, February 22nd, 2009
Excel 2007: quick format your data
I earlier versions of Excel there were some pretty horrid autoformats you could use to quickly format your tables. These are gone from Excel 2007 – thankfully!
Instead, Excel 2007 offers sophisticated formatting options, but they can be applied only if you’re prepared to convert your range to a table. However, this isn’t always a desirable outcome but luckily there is a work around.
Start by selecting your data and click Home tab > Format as Table and select a table format. You will notice that Excel applies an AutoFilter to your data which is typically the most obvious part of the conversion that you don’t want. Other things come with this table format too – if you have data alongside the table – but not part of it – and you delete a row from a table or insert a row into a table, the data alongside remains in place.
So, if you want to retain the nice formatting but not the table behaviour, click in the table and choose Table Tools > Design tab and click the Convert to Range option and click Yes when prompted to convert the table to a normal range. The range will go back to behaving like a typical Excel range and the formatting will be retained.
Labels: autoformat, Excel 2007, workaround
Monday, February 16th, 2009
Excel: Open multiple workbooks
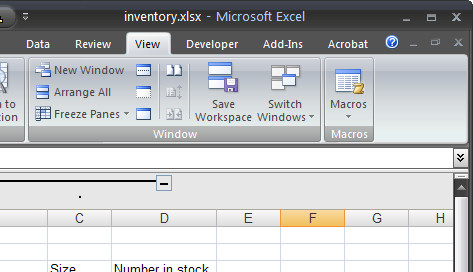
If you’re like me, you will open Excel in the morning and then open a series of workbooks that you work on each day. You can save time in finding and loading these files by creating an Excel Workspace.
To do this, open all the workbooks you want to have opened each time you launch Excel and then save them as a Workspace file by choosing File > Save Workspace and type a name for the file. Click Save and you can then open all the workbooks at one time by opening the Workspace file. Of course, if you just want to open a single file you can open it as normal.
In Excel 2007 – find the Workspace feature by choosing View > Window > Save Workspace.
Another alternative for opening files automatically when Excel opens is to save the file to the XLStart folder – when you do this, the file is opened every time Excel launches.
Labels: Excel 2003, Excel 2007, multiple files, Workspace
Wednesday, January 14th, 2009
Custom formats in Excel
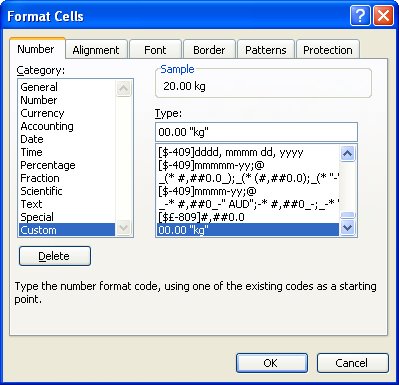
Ok, so here’s the scenario, you want to enter a value like 20Kg (or 44 lb) into an Excel cell. All goes well until you try to multiply the value. Instant disaster. Your number isn’t a number it’s a piece of text and you can’t multiply or add text. You can’t divide or minus text or find the 4th power of it either – you get the idea.. it’s basically a useless entry – pretty but useless.
SO, how do you format a cell so it displays the Kg after the number but so it still treats the entry as a number? I’m so glad you asked!
The answer is to create a custom number format. Click the cell or a range of cells and choose Format > Cells > Number tab. Select the Custom entry and type something like 00.00 “kg” in the text box and click Ok. Now, enter the numbers again as 20 or 40 etc and the kg will appear automatically after the number courtesy of the format – and the number, well it’s still a number so you can add, multiply, divide and do all sorts of other wonderful things to it as you like.
You can also add the text before a number. So, for all those lovely Canada dollars I get paid by the folk at Hub Digital Living where I write a monthly Office column, I type a Custom format like “CAN” 00.00 in my sheet where I record my payments. It’s all so easly when you know how.. and now – you do too..
Labels: custom formats, Excel, formatting
Saturday, January 10th, 2009
Converting Imported data in Excel
I encountered an interesting problem with Excel this morning when I tried to import data copied from a table in a PDF file. The table was bad news from my accountant about my retirement investments. I won’t be retiring any time soon 😉
The point of the issue however was that the data when copied and pasted into Excel came in neatly aligned in column but the numbers wouldn’t add up because they’d been added as text.
The solution to this is to use a feature previously called data parsing. What it does is to look at the data and convert it from one format to another. My only alternative would have been to select each cell, double-click on the cell to get the number on the screen, remove any characters that were causing issues such as any leading dollar signs or spaces and then press Enter to convert the text value into a number.
Luckily data parse does the work for you almost instantly. To do this, select the column of numbers that you’re working on. If you have a whole lot of columns to do, you still have to do each column one at a time. That’s the bad news; the rest of it is all good.
Select the column of numbers (if it includes some text entries that doesn’t matter), choose Data > Text to Columns and then select Delimited as the Original Data Type and click Next.
Click Next again and this is where you get to do the work. To convert text to numbers select the General option. If you have dates then select the Date option and select the date format that the data was created in. My values came from Australia so the date format used was dd-mmm-yy. Provided you select the date format that matches the dates you have, everything will convert just fine. Later if you want to show these in another format such as mm-dd-yy you do so using a date format. When you’re done, just click Finish.
The data will be instantly converted and you can move forward to do the same thing on the next column.
I estimate that this process took me about three minutes to do and on the data that I had it could have taken me half an hour or more to fix it all manually.
So next time you’ve imported data from an external source and when you need to convert text back into numbers check out the Data > Text in Columns option.
Labels: Excel, Parse data, parsing, Text to Columns
Friday, January 9th, 2009
Change spelling wavy underline color
Ok, so this post can happily be filed in the “Gee I really needed to know that – NOT!” category. It’s seriously fun but, unless you’re color blind, not something you absolutely HAVE to know.
It’s easy (if you’re a dab hand at changing registry entries) to change the color of the wavy underlines used for spelling and grammar errors in Word 2007. Choose Start > Run > Regedit and locate this key:
HKEY_CURRENT_USER\Software\Microsoft\Shared Tools\Proofing Tools
If the SpellingWavyUnderlineColor entry exists, double-click it and when the Edit DWORD value dialog appears, click Hexadecimal and type an eight digit hexadecimal number representing the RGB color value of the color to use (add two leading zeros to the value). So to use Blue, type 000000FF and click Ok. If the value isn’t in the list, choose Edit > New > DWORD value, type SpellingWavyUnderlineColor and then double-click it and change its DWORD value to the hexadecimal number you want to use.
To change the grammar underline color, change the GrammarWavyUnderlineColor value, and to change the contextual spelling error color change the ContextualSpellingWavyUnderlinecolor entry. If any entries don’t exist, just create them.
When you’re done, close the registry, restart the computer, and restart Word and the changes will be in place.
If you don’t know what hexadecimal color is what, visit http://www.patman.org/webdesign/hexcolors2.asp and find a color and its appropriate hexadecimal value here. Add two leading zeros and you’re done.
Of course, before you touch the Registry you should back it up in case everything goes pear shaped. Also – NEVER mess with anything you don’t understand!
Labels: grammar, spelling, wavy underline color, Word 2007
Sunday, December 28th, 2008
Don’t Spell Check This..

Often when you’re working on a document including one which contains code, or foreign language words you will want the document spell checked but you’d like the code or foreign language words omitted – so you’re not distracted by the red underlining everywhere.
To do this, in Word 2007, select the text you don’t want to be checked and double click the Language entry on the status bar – typically this will show English (United States) or similar. When the dialog appears, choose the Do not check spelling or grammar checkbox. This disables spell checking for this particular word or selection. The rest of the document is spell checked as usual but words you don’t want to be checked, won’t be.
Labels: Spell checking, Word 2007
Saturday, December 20th, 2008
Drawing Organic Shapes in Word
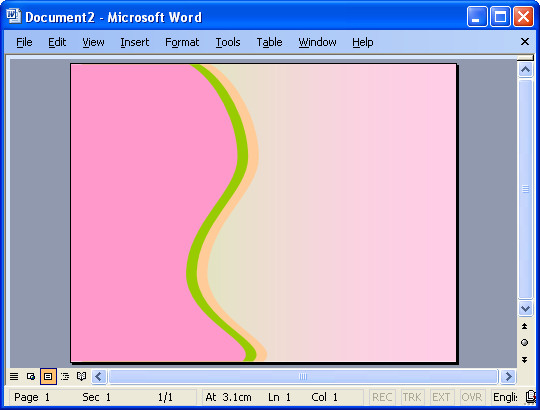
I needed something cute for a magazine sample the other day so I decided to create an organic shape. I needed three edges to be straight and one rounded.
Here’s how it’s done, it makes use of nodes and Bezier curves, fairly simple to do when you know how.
Start with a new Word document. Display the Drawing toolbar and choose AutoShapes > Lines > Freeform. Start in one corner and click once to begin. Click at each point around the shape so you’ll have a polygon shape. If you hold Shift as you click you’ll make a straight line and, if desired, it will be perpendicular to the previous one too. It’s important you get straight sides and square angles when you want your shape to butt up against a page edge.

Click the shape to select it, right click and choose Edit Points. Control + Click on a point to delete it if you don’t need it. Right click on a point that you want to be rounded and choose Smooth Point and then drag on the handles to shape it nicely.
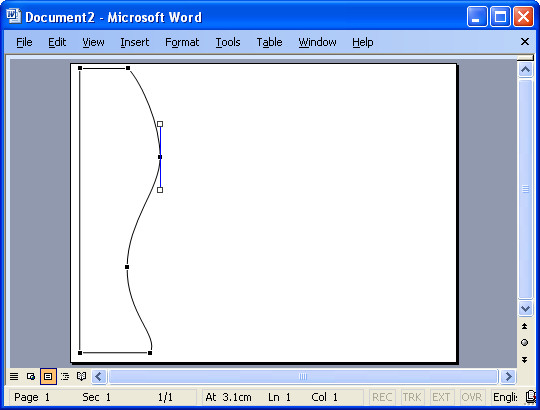
When you’re done, click outside the shape to deselect it. click it again and right click, choose Format AutoShape. Choose Line Color > No Line and choose your Fill Color. Hold Control as you click and drag on the shape to duplicate it and set the Fill Color of this one a different color. Repeat if desired.
To arrange the shapes, click one to select it, right click and choose Order > Send to Back to send it below the others. Choose Order > Send Behind Text to send it below the text. The second command is used to move the shape to the bottom layer of the document below the text. Use the first command to change the layer order of the shapes so they are stacked as you want them to be.
When you’re done you should have a page that looks something like this, I sized the shape to fill the page and moved it to the edge of the page. I also added a gradient filled rectangle under everything just to finish it all off.
Labels: bezier curves, Drawing, organic, shapes, Word
Wednesday, December 17th, 2008
Fix the Headings in your Excel 2007 tables
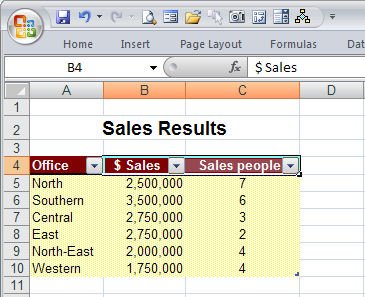
Excel 2007 has some great tools for working with and formatting tables (previously called Lists in earlier versions). To create a table, select the range that contains the table data and from the Home tab select Format As Table. Select a table format style and, when prompted to, confirm that the selected area contains all the data for your table, whether or not your table has headers and click Ok. When you do this you will see that each heading cell displays a dropdown arrow to the right of its contents.
Unfortunately, if your headers are right aligned, the table headings will run into the arrows and be partially hidden. I don’t know why Microsoft doesn’t create a fix for this because it looks awful. To avoid this happening, select the heading cells, right click and choose Format Cells. Click the Custom setting and type @ and four spaces and click Ok. This should add sufficient spaces to the right of a heading to move the headings a little to the left so the headings can be seen clearly. Now it all looks much nicer as you see above.
Labels: Custom, Excel 2007, Format Cells, Headings, Tables
Thursday, December 4th, 2008
Yes Master…

I love it when folks call me or email to pose questions. It’s hard when you work with apps every day to remember there are folk out there for whom Word and Excel are a daily challenge and not necessarily in a good way.
Today’s came from my partner, a PowerPoint file with a serious case of bloat. Now, if it were a cow, you’d do something rather disgusting with a knife between the ribs – no it doesn’t kill them, it cures them – lets all the nasty gasses out. In PowerPoint, the solutions are different. One cause in this file was the lack of use of a Slide Master. You see the person (not my partner, she’s better at PP than that) put a wonderful but very large image on all the slides – each one had its own version of the image – instant bloat.
The solution, next time would be to build the file properly and put that image on the background layer of the Slide Master – when you do this it automatically gets added to all slides – if you have 100 slides you still have only one image – instant slimming for your file.
If you need a plain slide – no image, you create two masters – one with an image and one without – use the master you need for the slide you’re creating. Pretty easy stuff and makes a presentation much easier to email – that was the problem here – at 7Mb it was too big for most folk’s email inbox so it bounced right back and something that big doesn’t bounce so much as go splat!
The solution I used on this file was different. I didn’t want to go rebuild someone else’s file at no charge – so I grabbed a great app called PowerPoint Minimizer – it shrinks PP files really really small so folks like me can look good by solving a problem that everyone else has spent hours on in a matter of minutes.
Find PowerPoint Minimizer here for download. Best thing is you can trial it and see how it works.
Labels: PowerPoint, PowerPoint Minimizer, slide master
Saturday, November 29th, 2008
Getting Vista’s Windows Media Player to play videos
Vista’s Windows Media Player will play audio and video files, only if it has the codecs for them. Codecs are like translation programs, without the codecs you get exactly zip, nada, zero on the screen. Sucks huh?
Unfortunately not all the codecs you need are included in Vista so you might try to play a video and find you have no visuals although the sound might play just fine, or vice versa. The solution is to download the codecs you need to play the range of media files you’re likely to encounter.
To locate the codecs you need, visit softpedia.com and search for the Vista Codec package. At the time of writing the latest version is 5.0.3 and it can be found here.
Download it and install it and you should be right to play just about any media file around.
This is the file which Microsoft should have provided. These codecs should be supplied with the player, after all, what use is a DVD or audio player if it doesn’t play disks? If you buy a physical DVD player you don’t expect to have to go out and buy something extra to make the player and your disks compatible. Just because the player is software doesn’t excuse the lack of compatibility.
So, yes, it sucks you have to go find and download this file, but kudos to the guy who did all the work so we don’t have to.
Labels: codecs, download, Vista, Windows Media Player 11