

Thursday, July 17th, 2008
Widening chart columns in Excel 2007
Colour me stupid. I am reeling from having single handedly wiped out all the images from my blogs – yep! 2 of them decimated by my stupidity. I’m now resorting to begging friends, family, neighbours and anyone I meet (ok I’m exaggerating, but I am desperate), to spend time helping me put it all back together. I have the images, they just aren’t on my server any more and my computers and Blogger have this love hate relationship, the more frustrated I get with how slow the connection is the slower they go – see! they say, if you think that was slow, try this.. seriously it is hours of work to get this all back. Hence no delicious new posts.
This happened over two weeks ago so I’m slowly resigning myself to putting it back over time, so here’s today’s tip – no image – sheesh – don’t talk to me about images!
To make the column widths on an Excel 2007 chart wider – or narrower if you think they aren’t awful enough when you have long X-axis values, right click a column choose Format Data Series. From the Series Options selection drag the Gap Width value close to the No Gap end of the slider for a larger column and the other direction for a smaller one. This increases the column width by decreasing the gap between the columns. Click Close and you’re done.
Now, back to uploading images one by one .. hell, even Noah got them in two by two!
Labels: chart, column widths., Excel 2007, gap width
Wednesday, July 2nd, 2008
Make cute WordArt buttons

Ok, so WordArt in Word 2007 is still the sucky leftover application as that in Word 2003 but that doesn’t mean you can’t get it to do some cool things. You just have to know how. Here’s how to create this smart looking button:
Step1
Choose Insert, Picture, WordArt and choose the first of the WordArt designs. Type the first and third lines of your design pressing Enter twice between each line. Click Ok. Click the WordArt shape button and choose Button as the shape. Size the shape so it is circular.
Step 2
Right click the shape and choose Format WordArt. From the Colors and Lines tab choose a Fill colour and set the line colour if desired or choose No Line (I chose No Line). Click the Layout tab and choose In Front of Text. Click Ok.
Step 3
Click outside this object to unselect it and then follow the same process to add a second WordArt object this time selecting the same design but adding only one line of text. You won’t need to alter its shape but you will need to choose your font colour and click the Layout tab and set the position to In Front of Text.
Step 4
Drag the second WordArt object over the first and size it to suit the space. Hold the Shift key as you click on each object in turn to select it and choose Grouping, Group. Now click the Rotation handle and drag to the right to rotate both shapes at the same time to around 20 degrees.
Step 5
Click outside the WordArt shapes and click the Oval tool on the Drawing toolbar. Draw a circle on the page by holding the Shift key as you drag to draw it. Right click and choose Format AutoShape. From the Layout tab choose In Front of Text. From the Colors and Lines tab choose a Fill colour and set the Line colour to a contrasting colour and a fancy style.
Step 6
Right click the circle shape and choose Order, Send Backward to place the circle on a layer below the WordArt. Move the circle into position under the WordArt group. Select both groups in turn (hold Shift as you do so), right click and choose Grouping, Group so they are fixed together and will move and resize as a group.
Labels: Uncategorized
Wednesday, June 18th, 2008
Pause a Word macro
Sometimes you need tp pause a macro and, when you do, try the Sleep function.
This involves a call to the Windows API – sounds much more difficult than it is.
In your macro, go to the General Declarations area (the top part of the module) and type this, verbatim:
Private Declare Sub Sleep Lib “kernel32” (ByVal dwMilliseconds As Long)
Now, in your routine, when you want to put a pause, type:
sleep n where n is the number of milliseconds to pause for.
So, this macro will beep, pause for 1000 milliseconds and beep again.. it does it twice just in case you missed it the first time:
sub testMyAPIcall()
beep
sleep 1000
beep
sleep 1000
beep
end sub
Easy when you know how!
Labels: Sleep Windows API VBA, word macro
Saturday, May 31st, 2008
Conditional formatting with Date ranges
One of the other handy features of the new conditional formatting tool in Excel 2007 is that it can handle date formatting. For example, if you have a worksheet with a series of dates in it you can highlight the dates that correspond to a period of time.
Choose Conditional Formatting > Highlight Cells Rules and choose the A Date Occurring option. You can then format cells using rules such as Yesterday, Today, in the last seven days, this month, next month, next week, etc.. When you do this cells containing dates which match this criteria will be coloured appropriately. Better still, when the date changes, the formatting on the worksheet will change accordingly.
Labels: conditional formatting, Dates, Excel 2007
Thursday, May 22nd, 2008
Play Flash movies in PowerPoint 2007
It is possible to play Flash videos from inside your PowerPoint presentations at run time. This gives you additional tools that you can use to add visual effects to your slide shows. To do this you must first display the Developer tab in PowerPoint by choosing the Office button > PowerPoint Options > Popular group and enable the Show Developer tab in the Ribbon checkbox. The Developer tab provides access to the objects that you need to use to insert and play the Flash videos.
To configure a slide to play a Flash video, select the slide so it is visible in the editing area. Click the Developer tab on the ribbon and locate and click the More Controls button. From the list, select the Shockwave Flash object entry and click Ok. Drag a shape onto your slide – this will be the box in which the Flash presentation will play. Right click the shape and choose Properties. You now need to configure certain properties regarding the Flash object. For example, set the Playing property to true and the Embed Movie property to true. To configure the Flash movie that will play in the slide, set the Movie property to the full file name and path of the Shockwave movie (swf) file that you want to play and click Ok. To see the Flash movie play you will need to preview the presentation.
Labels: Flash movies, PowerPoint 2007, swf
Friday, May 9th, 2008
Don’t tell them I told you how

.
I am not a big fan of all singing all dancing PowerPoint presentations. However, one of the questions I get a lot is how to make a sound track play across multiple slides in PowerPoint.
So, if you’re assaulted with bad music next time you attend a PowerPoint driven presentation, don’t blame me, I’m just the messenger.
Here’s how to do it. First add the sound clip to the slide by choosing Insert > Sound and choose your clip. Select whether the sound should play automatically or only when the icon is clicked. So far so good.
Your sound clip is now in place but it stops when you move to the next slide – not good.
To fix this, click the sound icon and in PowerPoint 2007 click the Sound > Options tab on the ribbon. Now locate the Play Sound entry and change it from Automatically to Play across slides.
This is far from being an intuitive alternative in my mind – since when did Automatically become an alternative to Play Across Slides? Frankly I want both, not either/or. Don’t stress over it though because you actually get both options.
< Note to self > – it’s Microsoft’s world, we just live in it.
Labels: play sound across slides., PowerPoint 2007
Sunday, May 4th, 2008
Excel – reuse chart formats
You’ve gone to all the trouble to format a chart nicely and you’d like to reuse the format again some time in the future. Instead of recreating the format each time, save it so you can apply it with a single click.
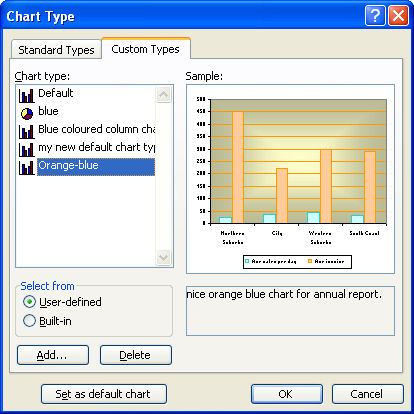
In Excel 2003, right click your chart and choose Chart Type > Custom Types tab and click the User-Defined button. When you do this an Add button appears – click it and type a name and description for your chart when prompted to do so. Click Ok twice when you are done.
Now, in future, when you create a chart you can select this format from the Chart Wizard options or apply it to an existing chart by selecting the chart, right click and choose Chart Type > Custom Types and click User-defined. Select your format and click OK to apply it to the chart.
One word of warning, for some reason, Excel includes chart titles as a format so you’ll lose your existing chart title if you have one when you apply the new format to it. It’s not a big deal but it helps to know that it’s going to happen.
Labels: chart format, chart template., chart type, Excel 2003
Wednesday, April 30th, 2008
Sorting data in Excel
Sometimes the data in your worksheet doesn’t appear in the order you want it to. You can reorder the data by sorting it.
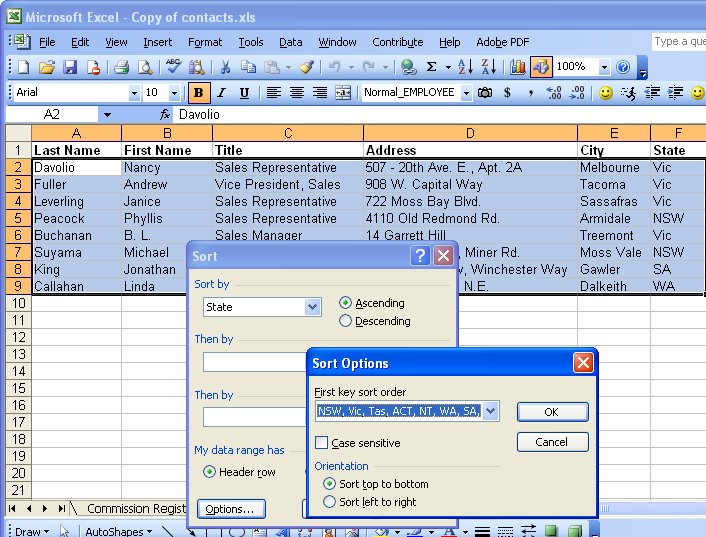
To sort data in a worksheet, select it using your mouse, or click inside the data area and press Control + Shift + * to select all the cells in the current block. In Excel 2003, choose Data, Sort and then choose the column which contains the data to sort from the Sort by: dropdown list. To sort on more than one column choose the second column from the dialog’s Then by: dropdown list. For example to produce a ‘phonebook’ type of sort, first Sort by the column containing the last name and Then by: the column containing the first name. If you do this, two people with the same last name will be grouped together but appear in alphabetical order by first name.
You can also sort in order of a custom list. So, for example, if you wanted all the people who live in Victoria to appear at the top of a list then those who live in NSW, etc.. create a custom list with the state names (or abbreviations) in the order you want to use for sorting. Then choose the State column in your data list as the Sort by: column and click Options. From the First key sort order dropdown list choose the custom list containing the state details and click Ok, and Ok again. The list will be sorted in order of the entries in your custom list and any entries which don’t match an item in the list will appear at the end, in alphabetical order.
Labels: custom list., Excel, sort
Saturday, April 19th, 2008
Kiosk Presentations
You’re not always going to be there when a presentation shows. Some PowerPoint presetations are shown on computers where not one is in attendance or you might want to send an autorunning slideshow to mum to show off your latest pix.
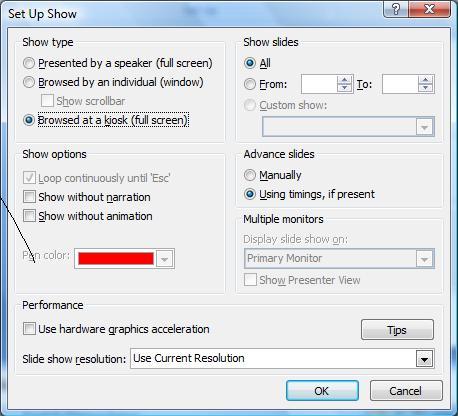
These work if they’re set up as Kiosk presentations. You need to set the presentation so the slides more forward after a period of time and not by mouse click. Do this on the PowerPoint 2007 Animation tab. Then choose the Slide Show tab and click Set Up Show. Choose Browsed at Kiosk and make sure the Advance slides option is set to Use Timings if present. The the show will run automatically without needing attention.
There you have it, hands free PowerPoint slide shows.
Labels: Kiosk., PowerPoint 2007
Friday, March 21st, 2008
What’s in a name? Auto_Open or AutoOpen
Sometimes you wonder if the folks up at Redmond are laughing at us behind our backs. Really, do they deliberately set out to confuse us or are they just that plain disorganised?
Today my quandary involves Auto_Open and AutoOpen. These are two special macro names. The first, Auto_Open is Excel’s special named macro that runs automatically when the workbook containing it is opened. AutoOpen is the Word equivalent. It makes no sense that one has an underscore and the other doesn’t – it just makes life for us VBA folk a little more confusing than it should be.
The other macros Auto_Close and AutoClose work the same way, Auto_Close is the Excel macro name – call a macro by this name and save it in your workbook and it will run whenever you close the workbook. In Word, the name is AutoClose.
To add to the confusion, PowerPoint doesn’t support either of the naming conventions, in fact, you can’t create auto running macros in PowerPoint the same way you do in Word and Excel. The workaround is cumbersome, you need to create a PowerPoint add-in that includes the Auto_Open subroutine. Load the Add-in and PowerPoint will run the code in Auto_Open it loads and ditto for subroutine called Auto_close – it runs when the add-in is unloaded – which happens automatically when you exit PowerPoint. Learn more about how to do this in this KnowledgeBase article.
Thanks Redmond, we are now officially confused!
Labels: Auto_Close, Auto_Open, AutoClose, AutoOpen, Excel, PowerPoint, VBA, Word
Thursday, March 13th, 2008
Zap those hyperlinks
When you copy and paste text from the web into a Word document, typically the hyperlinks come too. If you don’t want them – if blue underlined nonsense peppering your text offends your sensibilities (as it does mine) – here are some thoughts for removing hyperlink formatting from your text.
One option is to select the link and choose Insert > Hyperlink (or press Control + K) and click the Remove Link button in the dialog. That’s the hard way in my book.
Easier still is to select the text and just press Control + Spacebar. That strips the formatting from the text – leaving it as plain text. It also works to strip formatting from any text, a handy shortcut to know.
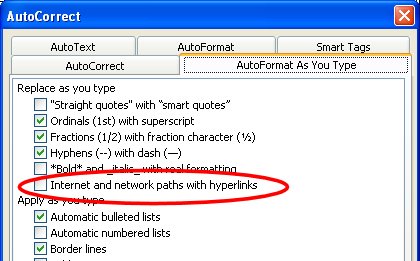
Now, if you get hyperlinks whenever you type a URL or email address you can stop this from happening by choosing Tools > AutoCorrect Options > AutoFormat as you Type tab and disable the Internet and network paths with hyperlinks option. Now you can type all you like and the AutoFormat won’t affect your text.
Labels: AutoCorrect, Hyperlinks, Word 2003
Wednesday, March 12th, 2008
PowerPoint to Go – on your mobile or iPod
You can put a PowerPoint presentation on almost any mobile device including your iPod.
Provided your mobile device supports JPEG format images – most will – open your presentation in PowerPoint and choose File, Save As and select the JPEG format, choose All Slides and PowerPoint will save the slides as JPEG format files that you can now upload to your mobile device as you do any other photos.
If your mobile lets you play images as a slideshow – voila! PowerPoint to go!
Labels: iPod, jpg, mobile device, PowerPoint, Windows CE
Saturday, March 8th, 2008
Microsoft offers free accounting
I found this recently and it’s a pretty smart offer for anyone who is used to using Microsoft products and who needs an accounting tool.
Microsoft Accounting 2008 Express Edition is free and you can download it here. It includes tools for creating quotes, invoices and receipts as well as tracking expenses and managing online bank accounts. It has two main attractions, one is that it’s free and second – with the look and feel of other Microsoft products its easy to get up and running.
Labels: ., free accounting software, Microsoft Accounting 2008
Saturday, March 8th, 2008
No new line in PowerPoint
When you are entering text on a PowerPoint slide if you want to create a new line but not apply a bullet to it press Shift + Enter at the end of the preceding line.
This creates a new line but does not start a new paragraph which is the trigger for the bullet to be created.
This also works in Word – you can create a new line in a numbered paragraph but without adding a new number by pressing Shift + Enter.
Labels: PowerPoint, Word new line