Wednesday, September 2nd, 2009

Sunbursts in Photoshop

Following on from the post on creating silhouettes in Photoshop, here is how to create fun sunburst images to put behind them.

Step 1
Start by adding a new layer to your image by choosing Layer > New > Layer.

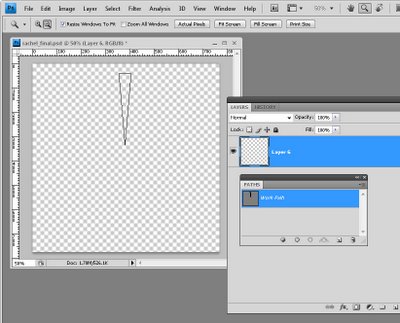
Click the Pen tool, ensure the Paths option is selected on the options bar and draw a single triangle.

Do this by clicking where the point will be at around the middle of the image, then click above this and slightly to the left to create the first of the sides, hold the Shift key and then click to the right to create the base and then click again over the original point to finish. You now have a triangle path.

Step 2
View the Paths palette; click the Load Path as a Selection button at the foot of the palette.

Set the foreground colour to your choice of fill colour and press Alt + Backspace to fill the shape with this colour.

Press Ctrl + D to turn the selection off.

Step 3
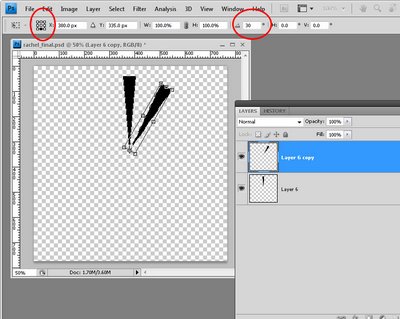
Click on the layer itself, choose Layer > New > Layer Via Copy then choose Edit > Transform > Rotate to display the rotation tool options.

In the Reference Point Location block select the bottom middle of the nine boxes. Set the angle to 15 degrees or some value that divides evenly into 360 and click the Commit Transform button.

Step 4
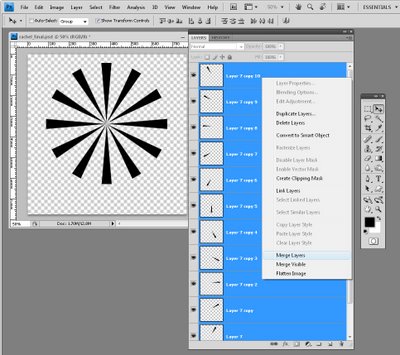
Select Layer > New > Layer Via Copy and then Edit > Transform > Again.

Repeating these two commands or pressing the shortcut keystrokes Ctrl + J and Ctrl + Shift + T lets you repeat the copy and transform task and, in a few keystrokes, you will have a piece of custom art. When you’re done, merge all the layers except the background layer.

Here is how I created my silhouette background:

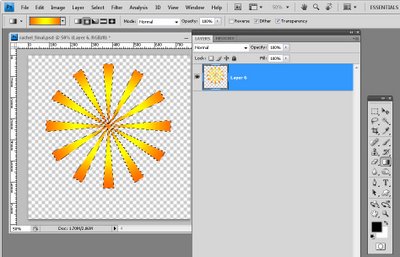
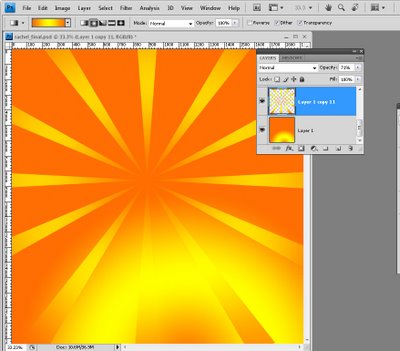
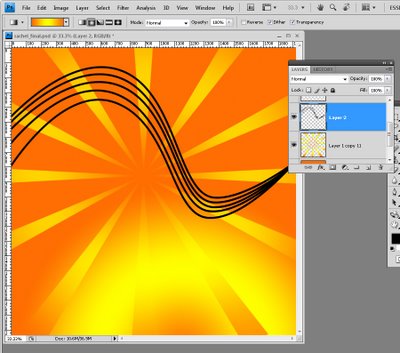
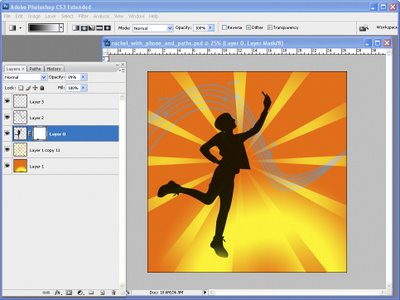
Control + Click on the flattened sunburst layer and select the Gradient tool. Select a yellow/orange radial gradient and fill the shape with it by dragging from the middle of the shape outwards.

Add a second new layer and drag it to the bottom of the layer stack. Fill it with the same gradient but this time drag from outside the image to the middle to reverse the gradient.

The music staff is created using a pen line – I drew a single wavy line using the pen tool with the Paths option selected.

Display the Paths palette and click on the Work Path layer.

Click the Brush tool, set it to a small hard brush, set the foreground colour to black and click the Stroke path with brush icon at the foot of the palette to add a brush stroke to the pen line.

Move the line using the Path Selection Tool and repeat the process to add a stroke to this path. Repeat until you have five lines in total.

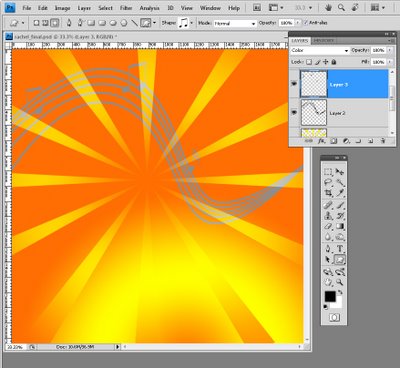
I finished by adding a few musical notes using shapes from my Photoshop shapes collection.

You can download free music shapes from http://myphotoshopbrushes.com/custom_shapes/id/2033 if desired.

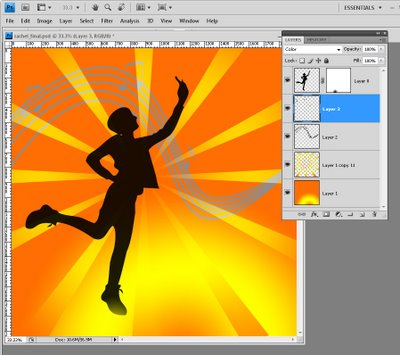
This time use the filled pixels option to fill the shapes as you draw them. I blended both drawing layers using the Color blend mode and then added the silhouette.

Helen Bradley

Friday, July 31st, 2009

Create Silhouettes in Photoshop

One feature you’ll see a lot in advertising is silhouetted images generally of people or recognisable buildings. Here’s how to capture and create a silhouette image:

To capture a photo to use as a silhouette place the subject so they are backlit. You can do this easily by positioning your subject between your camera and the sun.

You’ll need an area that is clear behind the subject so that you can cut the shape from the photo later on. You can do this on the beach in summer or find a location where you can get down low enough to shoot from and so you capture some clear sky behind the subject.

The cleaner the background the easier it will be to isolate the subject.
I shot my image from ground level looking upwards late in the afternoon with my model in shadow but with plenty of clear sky behind her.

To create the silhouette
Step 1
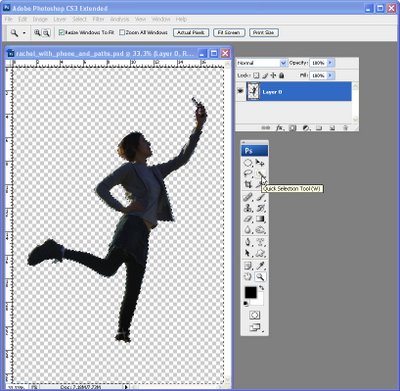
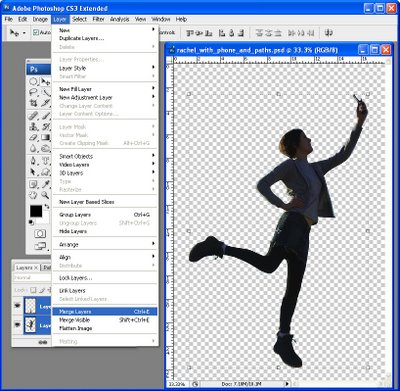
Open a duplicate of your image and double click the background layer to convert it to a regular layer.

Make a selection around your subject using your favourite selection tool such as the Magnetic Lasso or Quick Selection tool.

Choose Select > Invert to invert the selection and press Delete to remove it.
Step 2
Tidy up the selection by removing any remaining background or add missing elements by selecting, copying and pasting pieces in from elsewhere in the image.

Don’t worry about matching colours – just get the outline right.

Choose Layer > Merge Layers to merge the layers. Here I copied and pasted one leg to create the one I was missing.

Step 3
Control + Click on the layer that contains the shape that will become your silhouette.

Set the foreground colour to black and press Alt + Backspace to fill the silhouette shape with black. Add the extra details to finish your image.

In a future post I’ll explain how to create the sunburst shape.

Helen Bradley

Wednesday, February 4th, 2009

Photoshop: Extracting Lines from a photo


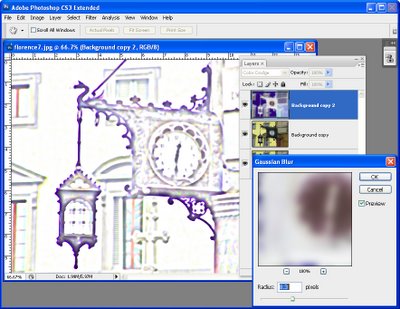
Here is a link to my latest post on the Digital Photography School blog. It is also a technique I used in my Photoshop presentation for CHA designers recently as it is a really cool way to get lines out of an image. I love step 4 – in the previous step everything goes to white. In step 4 the Gaussian blur brings out the lines like magic!

Enjoy!

Helen Bradley

Monday, October 27th, 2008

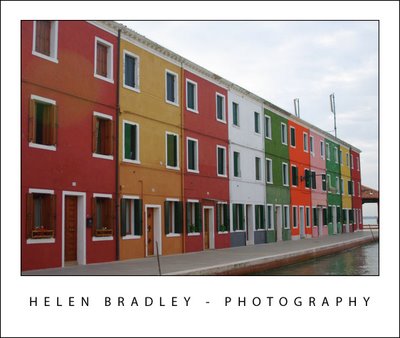
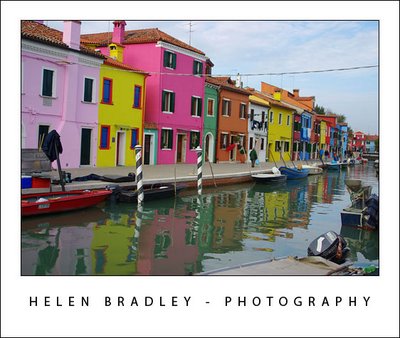
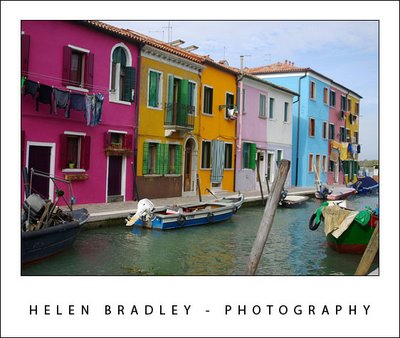
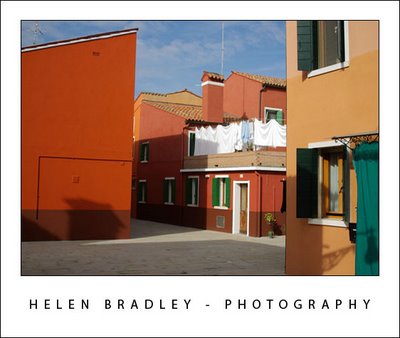
This post carries a warning – sensory overload ahead

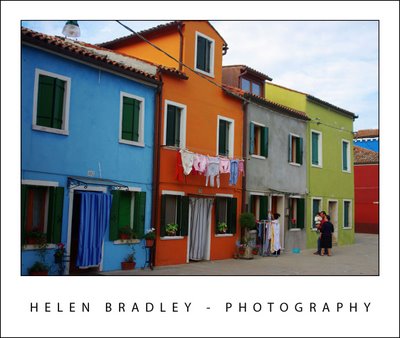
Burano is an island in Italy and it has to be one of the most colourful places in the world. It’s proof that what your mum told you about mixing colours was way wrong. You see, red and green “can be seen” and if pink and blue aren’t enough, go ahead, add orange and mauve – it’s ok!

I spent half a day photographing this wonderful place. I just put the map in my backpack and started walking. It’s an approach I took to discovering Venice – as soon as you leave the tourist areas, things get really interesting and, it’s an island – it’s not like you can get really lost.

So here, for your enjoyment is the first batch of Burano pix:


Helen Bradley

Wednesday, July 2nd, 2008

Make cute WordArt buttons

Ok, so WordArt in Word 2007 is still the sucky leftover application as that in Word 2003 but that doesn’t mean you can’t get it to do some cool things. You just have to know how. Here’s how to create this smart looking button:

Step1
Choose Insert, Picture, WordArt and choose the first of the WordArt designs. Type the first and third lines of your design pressing Enter twice between each line. Click Ok. Click the WordArt shape button and choose Button as the shape. Size the shape so it is circular.

Step 2
Right click the shape and choose Format WordArt. From the Colors and Lines tab choose a Fill colour and set the line colour if desired or choose No Line (I chose No Line). Click the Layout tab and choose In Front of Text. Click Ok.

Step 3
Click outside this object to unselect it and then follow the same process to add a second WordArt object this time selecting the same design but adding only one line of text. You won’t need to alter its shape but you will need to choose your font colour and click the Layout tab and set the position to In Front of Text.

Step 4
Drag the second WordArt object over the first and size it to suit the space. Hold the Shift key as you click on each object in turn to select it and choose Grouping, Group. Now click the Rotation handle and drag to the right to rotate both shapes at the same time to around 20 degrees.

Step 5
Click outside the WordArt shapes and click the Oval tool on the Drawing toolbar. Draw a circle on the page by holding the Shift key as you drag to draw it. Right click and choose Format AutoShape. From the Layout tab choose In Front of Text. From the Colors and Lines tab choose a Fill colour and set the Line colour to a contrasting colour and a fancy style.

Step 6
Right click the circle shape and choose Order, Send Backward to place the circle on a layer below the WordArt. Move the circle into position under the WordArt group. Select both groups in turn (hold Shift as you do so), right click and choose Grouping, Group so they are fixed together and will move and resize as a group.

Helen Bradley

Friday, November 2nd, 2007

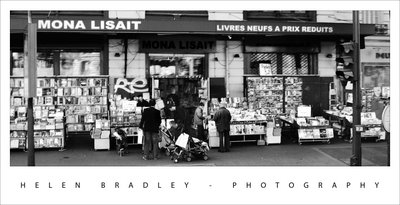
Mona Lisait, Paris

This bookshop in Paris is so wonderful jammed as it is with books and people browsing. It just begged to be converted to black and white. There’s even a small child in the foreground who is banging away at a book on the pavement. You can double click the image to enlarge it to see him.

Of course, you need to look closely too to see Mona Lisa herself in the photo.

Helen Bradley

Friday, October 19th, 2007

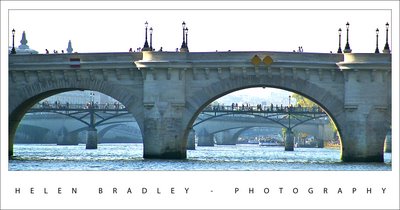
4 Bridges – Paris

This photo was taken during a trip on the Seine on a boat. The circumstances were about the worst you could imagine for photography. Four hundred people jammed into a boat which was enclosed mostly by glass and steaming into the sun on a very smoggy Paris afternoon. Great.. the temptation was to put the camera away and start drinking – the effort of trying to take any photo at all was almost too much. My only clear view was out the side of the boat, past a very active four year old and her long suffering mother. It wasn’t my ideal “boat ride for taking photos”, but it came included in the Paris Pass and who knew it would be this horrible?

Like the intrepid photographer I am, however, I persisted and I did get some usable photos, albeit ones that required a bit of help. Like this one taken out the front of the boat through about half an inch of scratched Perspex.

It is a view through four of the wonderful Paris bridges that we sailed through. The photo needed a lot of work. I gave the sky a miss – it just wasn’t there and, in the final analysis, I think the image is all the better for it not even being there. The biggest challenge was to extract some of the usable color and detail from the original image. It was autumn in Paris so there were hints of golden trees in the image which deserved to be brought out and the bridges were what it was all about. The mere fact that you could see all four bridges was spectacular.

I started the work by straightening the image – I find I can’t work on an image until I have it straight, it just bothers my eye when it’s out of square. To do this, I use the Photoshop Ruler tool to draw a line along the horizon or a vertical object that needs to be perpendicular. Then I choose Image, Rotate Canvas, Arbitrary. The exact angle from the Ruler is already there so all you have to do is click Ok. It’s simple and effective. For this image I used the top of the bridge as a ‘horizon’.

A few tricks with Levels and curves and the image gave up its magic and turned into what you see here. It’s one of my favourite shots – so far.

Helen Bradley

Thursday, October 11th, 2007

Set Outlook as your default email program

It’s handy to be able to click an email address on a web page and have your email software launch automatically with a new message ready for you to type. It’s a nuisance if you do this and the wrong email software opens.

It is, however, quite easy to set any email software to be the default program to use in these circumstances. To do this, choose Start, Control Panel, and then click Internet Options. Click the Programs tab and, from the Email list, select the email program to use as the default. Click Ok and you’re done.

Helen Bradley

Tuesday, October 2nd, 2007

Read the &%*^$# Manual!

The ins and outs of Camera Manuals

When your camera’s manual is inches thick and looks like it’s written in a foreign language, Helen Bradley has some sage advice.

When you first purchase a digital camera you’ll be anxious to open the box and get started. If you’re like many people you’ll be putting the camera manual to one side because it’s just too thick and too complicated to deal with. However, the manual contains lots of valuable information and, when you’re able to sift out the useable details from the information you don’t currently need, it can be a good resource for taking better pictures. So what’s important information to look out for and what can you skip for now? I’ll show you what’s what and why you need it.

Configuring Image Size and Quality
When you purchase a digital camera one of the key selling points will been the number of Megapixels that the camera is capable of capturing. The larger the number of megapixels, the larger the images can potentially be – they will be wider and higher than images from a camera that has a lower megapixel value. Depending on what you intend to use your photos for, you may not need to use your camera at the maximum possible image size.

In fact, you may prefer to reduce the size to make handling the photographs easier and so you can store more photos on your camera card. So, if your camera can capture more than 4 Megapixels of data and, if the main purpose of your photography is to print 4 x 6 or 5 x 7 images and to be able to email and share them with friends, consider reducing the size of the images. Check your camera manual to see what size options it offers and how to set the camera to a smaller size image.

Another issue to consider is image quality. Because captured images take up so much room, most cameras will compress the image data so that more images can be stored on the camera’s card. While it may makes good sense to reduce the overall size of the images that you capture if you don’t need them to be very large, selecting a lower quality of image is not generally advisable – you’ll still want high quality images even if they are smaller. Check the camera’s manual to see what compression alternatives are available and configure the camera so that the highest possible quality (the lowest possible compression) is used. Now, even if you are shooting smaller images, you will still maintain the highest possible quality in those images.

If your camera has the option to capture Camera Raw format images, consider whether you really want to be processing Camera Raw images. Unless you have a graphics program capable of handling Camera Raw images and unless you understand the implications – for example that these images cannot be shared easily with others or displayed on the web without being converted to another format – it may be preferable to shoot and store images in another format for example JPG which is more easily managed.

Configure White Balance

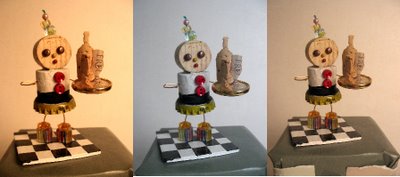
This object has been photographed with a range of white balance settings. As you can see the different settings result some strong color casts being present.

Most digital cameras have configuration settings available for White Balance. The white balance adjustment is required because light is different in color in different circumstances and the white balance adjustment allows you to compensate for this color change. For example, sunlight is much warmer and bluer than the light that you will see when the sky is cloudy or overcast. In addition, indoor light from incandescent globes is a different and more yellow color than either sunlight or the blue/white color that is given off by fluorescent tubes. Configuring your camera’s white balance to the type of light that you are shooting in will ensure that your images do not have a distinct color cast that you’ll have to fix later on.

Setting the ISO
When you shoot with film camera you may have been aware that there are different film speeds which are indicated by the film’s ISO number. Typically you will have used ISO 100 to 400 speed film in most point and shoot cameras. ISO 400 film is fast and can freeze action easily but the downside is that it is grainer so the images have a more distinct film grain. ISO 100 is slow film so the images are less grainy but the camera will need to let in more light to capture the shot so this film is not as good for shooting fast action on a cloudy day or shooting in low light.

Most digital cameras have ISO equivalent settings allowing you to choose an ISO equivalent speed when you’re shooting using manual settings. Check your camera’s manual and, when you are shooting on a bright sunny day, use ISO 50, 100, or 200 equivalency on your camera. In low light or on cloudy days, you can set the value to 400 or higher. If you are using the automatic setting on your camera, your camera will probably make an ISO choice when taking the shot, but when you set the aperture and speed yourself using the manual settings on the camera, this ISO equivalency setting will impact shot you take.

Understand Fill Flash
When shooting a person in front of a landscape or seascape on a bright sunny day, you are well advised to use the fill flash. This lights the subject, ensuring that they are captured clearly as well as the lighter background.

Your camera will, most likely, have a variety of flash settings and it’s important you know how to identify and use them. Look for Automatic flash which leaves the choice to the camera to determine whether the flash should fire or not; No Flash where the camera is prevented from firing the flash even in circumstances where it is required, and Fill or Forced Flash which forces the camera into firing the flash.

Adjusting Exposure
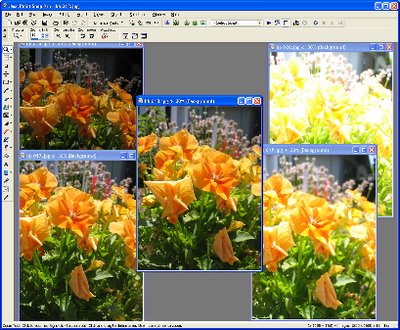
The central photo is taking using the standard exposure, those on the right are reduced 1 & 2 stops and those on the left increased 1 & 2 stops.

Most digital cameras have an exposure control which allows you to override the calculated exposure and to increase or decrease the exposure by one or two stops. Increasing the exposure will lighten the subject giving an overall lighter image. If the images you are capturing are too bright, then decrease the exposure by a stop or a fraction of a stop and the image captured will be a little darker than usual. In general, these exposure controls can be used in conjunction with the automatic focusing and shooting features of the camera.

Other Camera features
There are many other things that your camera manual can tell you about your camera. For example, your camera may be able to shoot in black and white or in sepia mode – this saves you having to convert the image in your graphics software – but remember it’s not reversible so you can’t put the color back in.

You may also find that your camera includes a video option for shooting short video clips. Don’t count on this feature as an alternative to shooting still shots or as an alternative to using a camcorder, but it is a fun tool to use for short clips. It is also possible using some software to extract still images from the video clips – although the quality won’t usually be as good as taking still images.

Look also for an explanation of the built in modes that your camera offers for shooting in a variety of situations. Learn how to set up and use night shooting mode, sports mode, landscape and portrait modes. If your camera has manual settings for aperture and speed, read how to set these up to get better control of your shots.

Other options to look for are for the ability to display a slide show with the contents of your camera card on a television. In this case, you will need to configure the camera for NTSC output to match the format of your TV.

Some cameras can help you shoot shots to make a panorama and can even stitch the images for you. You may also find options for automatically rotating images inside the camera (handy if you’re planning to play a slide show on the TV), for adjusting the strength of the flash output, configuring file names, locking photos so you can’t accidentally delete them etc..

When to study the manual
Your camera’s manual is a tool that is worthwhile reading when you first buy your camera to establish how to configure it for your basic needs – on/off, inserting and removing cards and batteries. Revisit the camera manual in a month’s time and you’ll be ready to learn more about what the camera offers. Again after a few months more, have another look at the camera manual. The basics will now be familiar to you and you’ll be ready to delve into some of the camera’s more advanced features. Practice your new found skills and knowledge to ensure that you are getting the maximum value from your purchase.

Helen Bradley
Tuesday, August 7th, 2007

Smart Art in Office 2007

Today I’m indulging in shameless self promotion. This is an article I wrote recently which discusses a how to work with SmartArt in Office 2007.

Exploring Office 2007: Using SmartArt Graphics

Anything that helps your audience connect with your message will help you in your communications with them. You probably already know how useful charts are for presenting numbers in an easy to read format and how helpful tables are for organizing data.

Microsoft Office 2007 offers a handy new feature called SmartArt that makes it easy to create business diagrams that display textual information in an easy to read and understand format. The SmartArt graphics tool is great for creating everything from simple diagrams to cutting-edge business graphics… more

Helen Bradley

Page 1 of 212