

Wednesday, November 28th, 2007
Do You Undo?
This post is subtitled Undos that Do and Those that Don’t
If you’re using Excel 2003 or earlier, you have a big problem with the Undo command, you see much of the time, it plain doesn’t work.
Curious? Try this: open an Excel file, make some changes to it (minor however, you won’t be able to undo these however much you think you can). Check the Undo button – it is enabled. Save the file. Now check the Undo button again. Yikes, it’s now disabled. You see, after you save a file in Excel 2003, all the Undo steps are removed – no more Undo. It pays to know this is how it works.
In Excel 2007, things are much better, and the Undo retains the changes even after you have saved the file. Much nicer behavior.
Labels: Excel 2003, Excel 2007, Undo
Tuesday, November 27th, 2007
Preview image in Word
You’ll have seen preview images when you open a file in Word. If you choose File > Open and, from the Views option list you choose Preview, you will see either a small image of the full page or some of the text on the page. All this begs the question of what determines what you see?
The full page preview is an option when you save a file in Word. To configure it, choose File > Properties > Summary tab and enable the Save Preview Picture checkbox. Now, when you save the file it will have a preview image saved with it which will show in the preview area.
To ensure the Properties dialog appears everytime you save a file the first time so you can configure the Save Preview Picture option, choose Tools > Options > Save tab and enable the checkbox for Prompt for Document Properties.
Labels: Document properties, Microsoft Word, preview image
Tuesday, November 27th, 2007
Remove spaces – Microsoft Word
I’m sure it’s happened to you just as it has to me. You copy and paste some text in from the web or an email message and it comes in with leading spaces – on evey line. There are lots of ways to remove the problem starting with hitting the delete key way too many times. Stop already!
There is, however one very smart way to do it without getting a repetitive strain injury. Select the lines of text and press Control + E to center the text. With the text still selected press Control + L to left align it and voila! the spaces are gone.
Labels: Microsoft Word, Removing leading spaces, web text
Wednesday, November 21st, 2007
Sticky spaces in Word
Picture this, you have a line of type in Word with a phone number in it. But… when ever you type it the first part of the phone number goes on one line and the next part scrolls around to the next line. It just won’t ‘stick’ all together.
What you need is a hard space. This is some thing that looks like a space, prints like a space but sticks things together. To use it, remove the space that is between the two pieces you want to stick together then press Control + Shift + Space Bar and you have your hard space.
Word also has a sticky/hard hyphen. It shows between two words but never splits words across the end of a line. Same thing – Control + Shift + Hyphen.
Labels: hard hyphen, hard space, Microsoft Word
Monday, November 19th, 2007
Excel charts – create an overlapping series
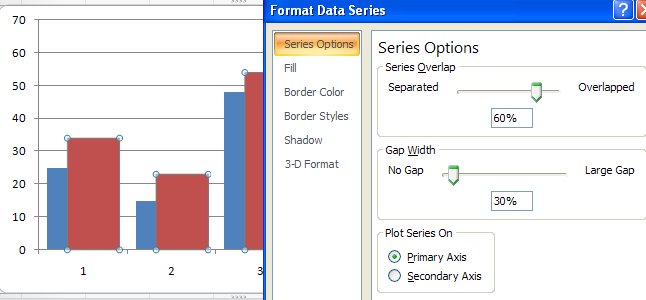
Sometimes an Excel chart will look better if your series overlap – this might be the case when you are comparing data from two years and where you want to show how the values have increased from one year to the next.
To make your series overlap in Excel 2007, select one series, right click and choose Format Data Series. Click the Series Options and decrease the Gap Width (it closes the chart up nicely) and incease the Series Overlap. Set the Series Overlap to around 60% and the Gap Width to around 30% for a good result. This is particularly useful when you are using images in place of colors for the bars of your chart but works in almost any situation.
Labels: charts, Excel 2007, gap width, overlap, series
Saturday, November 17th, 2007
Paste to a layer mask
Ok, here’s the dilemna. You have two images open in Photoshop and you want to add one image as a layer mask into the other.
One solution is to copy the first image, then switch to the second. Click the layer mask and switch to the Channels palette. The layer mask appears as a channel. Select the channel’s visibility icon to make it visible, select the channel to make it active, and click Edit, Paste. Deselect its visiblity, reselect the RGB channel to make that one active, switch back to your Layers palette and the pasted selection is in your layer mask. This solution has the advantage that the copied/pasted piece doesn’t have to be the same size as the layer mask.
The alternate solution if the two images are the same size, is to use Apply Image. Select the target layer mask, choose Image, Apply Image and, as the Source, select the image to copy from, the layer to copy and click Ok. Now the selected layer (or the merged source) is pasted into the Layer Mask.
Two alternatives, the second is easier to use but it does require two same size images.
Labels: Apply Image, layer mask, Phtoshop CS3
Wednesday, November 7th, 2007
In-cell charting in Excel 2007
For a long time Excel users have wanted a way to plot a bar showing the relative magnitude of a range of numbers without having to resort to a chart or complex formulas to do this.
Now, with Excel 2007 this feature is now built in and dead easy to use. To try it out, first type a series of numbers in a column, then select the series. Click the Home tab and click the Conditional Formatting button.
Select Data Bars and then select the color of the bar to use. The relative length of each colored bar indicates the relative value of the number in that cell.
There is one caution, however. All values – even very small values will be given a minimum bar length of 10% so they can be seen – so, use this feature as a guide and not an accurate measure.
Labels: charts, conditional formatting, Excel 2007
Monday, November 5th, 2007
Viewing Long Formulas – Excel 2007
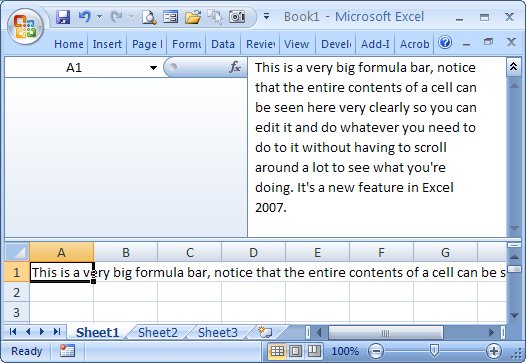
If you’ve ever created a very long formula in Excel 2003 you’ll know that it is difficult to see and to edit it – it simply is too big for the formula bar.
In Excel 2007 the problem is resolved, you can make the formula bar as big as you need it to be. Simply drag down on the bottom edge of the formula bar using your mouse, and it becomes as large as you need it to be.
Labels: Excel 2007, formula bar resizing.
Friday, November 2nd, 2007
Any Justification, Any Line
When Microsoft Word first included the Click and Type option it helped a lot of new users who couldn’t work out how to type anywhere on the page.
For those of us used to using WordPerfect 5.1 it solved another problem entirely. It lets you include left and right aligned text on the same line. Double click at the left margin of one line and type a word – it aligns to the left. Now, on the same line, double click at the right margin and type a word – it is right aligned – both pieces of text align and work independently of each other. It’s something you couldn’t do easily without this tool.
Labels: Click and type, left align, Microsoft Word, right align
Tuesday, October 30th, 2007
Making Columns in Word
There are lots of ways to create text in columns in Word but the easiest is to type the text (or at least some of it) and select it or position the cursor where the columns should begin. Then choose Format, Columns and select the number and spacing of columns.
From the Apply To dropdown list choose what to apply the columns to. If you have text selected, you’ll typically select Selected text. If you haven’t selected text you can apply them to the Whole Document or This Point Forward. Using This Point Forward lets you create a heading on the page with the text in columns under it.
Friday, October 26th, 2007
Plotting little and big data
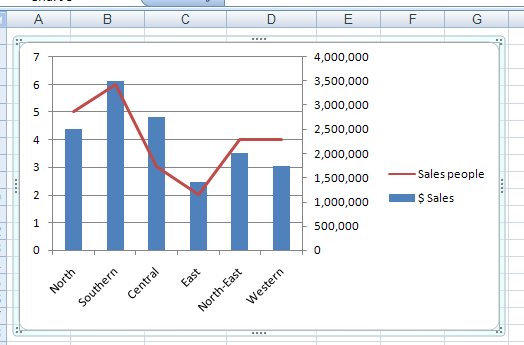
Disaster will strike your Excel charts if you try to plot very large data values and very small values on the one chart. You’ll see the big values but the little ones will blend into the x-axis of the chart so you won’t even see them.
To include both sets of data on the one chart, add a second axis and plot the smaller values against it. Now you’ll be able to see them alongside the very large values.
To add your second axis, select the chart, select the series you can’t see (click on one you can see and use the tab key to move until you have it selected). Right click and choose Format Data Series. Select Series Options, Secondary Y Axis. With the data series that should be plotted against the secondary axis still selected, right click and choose Change Series Chart Type and select a different chart type such as Line.
Labels: chart, Excel 2007, secondary axis
Wednesday, October 24th, 2007
Reduce the size of your PowerPoint 2007 images
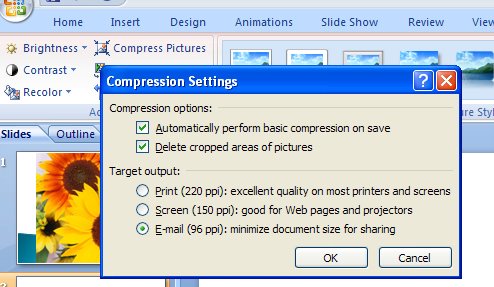
When you’re emailing PowerPoint presentations or displaying them on a computer screen you don’t need or want overly large images. To avoid this, compress the images in your presentation.
Click any picture in your presentation and then, from the Ribbon choose the Picture tools tab and then the Format tab. Locate the Adjust group and click the Compress Pictures button. Disable the Apply to selected pictures only checkbox (you want to resize all of them), and click Options and select 96dpi (the smallest resolution on offer) and click Ok and Ok again to compress them.
Labels: compress., images, PowerPoint 2007
Wednesday, October 24th, 2007
Burn baby burn – troubleshooting burning audio CDs
If you’ve never had problems burning CDs, please feel free to continue surfing past this blog entry and go somewhere else. Also buy a lottery ticket because you are a very lucky person.
To those still here and struggling, here’s a link to a list of troubleshooting tips that might help solve the problems. While it says Apple and Mac all the way through the list, the solutions are equally as valid for working on the PC.
The biggest gottchas I have found is buying the wrong disk type for your drive and trying to burn too fast. I crank down my writing speed to a slow crawl. It takes a lot longer but I have a lot fewer drink coasters around the house. Also, if you’re prompted, always specify Audio CD for playing in an audio player if that’s what you want to do with the disk. And, if closing the disk is an option – select it – most players won’t play disks that aren’t closed.
I’ve also had problems with Vista burning a DVD of photos which is a data DVD. I haven’t solved the problem in its entirety but I have found Windows Media Player is the best burning tool to use for the task. Simply create a burnlist of photos to burn to the disk. You will have to close the DVD if you plan to read it in a Windows XP machine but it does work.
Sunday, October 21st, 2007
Image Autoentry – Word 2003
If there is an image that you typically use in a document such as your company logo you can create it so that it can be automatically inserted into your documents.
To start, first place the image into the document and size it and format it to suit your needs – this will include setting its Text Wrapping properties.
Now select the image and choose Insert > AutoText > New and type a descriptive word to describe the image such as logo. Click Ok.
In future, type the word logo and press F3 and the image will automatically appear in the document. This saves you from having to insert it and format it manually each time you need it. It’s a big time saver.
Labels: AutoText., inserting images, Word 2003
Friday, October 19th, 2007
Word 2007 – Tracking Moving changes
The new Office 2007 is packed full of great features and I’m finding that the more I work with it the more I like it.
Take Tracked Changes, for example. The Reviewing pane can now be placed vertically along the edge of the page (or horizontally, if you insist). I just find the vertical arrangement so much easier to work with.
Also Word now tracks moved text! Yes, you can grab a sentence or paragraph or more and move it from A to B in your document and Word knows you’ve done it and marks it with double strikethrough (where it has been removed from) and double underlining in the position it has been moved to. Neat stuff!
If you later Reject the move step Word checks to see if the moved text has been altered, and if it has it tells you this and asks you what version of the text you want to undo to. It’s smart and a much better solution than marking the text as being cut and inserted.
To use the feature, make sure you’re in Word 2007 mode and not Compatibility mode where you’re working on an older 2003 format document.
Labels: Blog in Word 2007, moving text, reviewing pane, track changes