

Monday, September 10th, 2007
MIA – Word 2007 commands
It happens for the first few months of using any significant program update like Microsoft Word 2007 – you go looking for something and it’s not where you expect it to be. It can take time to find it and sometimes, it was there in front of your nose all the time.
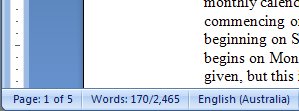
Take the Word Count tool in Word. It got it’s own toolbar in Word 2003 but in 2007, of course, we have the Ribbon and try as you might you won’t find any Word Count icon on the Ribbon. The reason is that it’s there, under your nose! Check the bottom left corner of the screen and Word is counting your words as you type them. Need a quick count of the words in a paragraph? Too easy, select the paragraph (tip in a tip: Click it 3 times with your mouse) and then read off the results in the same place.
Easy when you know how.
Labels: Word 2007, word count.
Wednesday, September 5th, 2007
Word 2007 – Help, my SmartArt disappeared
Open a Word 2003 document in Microsoft Office 2007 and click Insert SmartArt. You might be surprised at what you see. The beautiful Word 2007 SmartArt dialog disappears and all you have is the old Word 2003 diagramming tool.
At this point you might wonder exactly what has happened. The answer is that Word is operating in compatibility mode as you can see by looking at the toolbar. To convert the Word 2003 document to 2007 format so that you can use Word 2007 features such as SmartArt and Themes, click the Office button and choose Convert. Once the document is converted you can then use all the lovely new features of Word 2007 even on your older Word documents.
Labels: convert document, smart art, Word 2007
Monday, September 3rd, 2007
Random text in Word 2007
In olders versions of Word, you could enter random text into a document using something like this typed in at the beginning of a new line and press Enter:
=rand(2,3)
This gives you 2 paragraphs each of 3 sentences of the text “The quick brown fox jumped over the lazy dog.” It was not particularly original but it was handy for filler text.
In Word 2007, the news is better still. There are two options:
type
=rand(3)
To get three paragraphs of random text, this time it actaully makes sense and looks like real text.
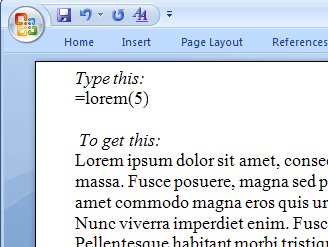
The best news is, however, that Lorem ipsum can be entered automatically. Now I can remove the AutoText entry I always use to insert this Latin text and do it anywhere, anytime in Word 2007. Here’s what you type:
=lorem()
this gives you a little sampler of text. Type:
=lorem(10)
to get 10 paragraphs of it.
It’s easy to remember and easy to use and, well – thank you Microsoft, I’m impressed!
Labels: Lorem Ipsum, Random text, Word 2007
Thursday, August 30th, 2007
Word 2007 – where’d typeover go?
Typeover mode got axed in Word 2007 – thousands upon thousands of users are celebrating the event – no more gobbled up words when you hit the Insert key by mistake. Some users, however, are crying into their morning coffee – if you used it and understood it, typeover mode was great – the keyword being “was”.
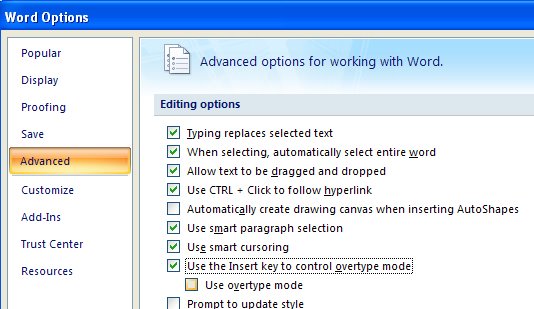
So, if you’re bemoaning the loss of Typeover, be glad you stopped by to sample today’s tip. Here’s the way to put typeover back where you wanted it to be. Click the Office button and choose Word Options. Click the Advanced group and scroll down to find the Use Insert the key to control overtype mode option and check it. To always start in Overtype mode check the Use overtype mode checkbox too. Click Ok and you’re done.
Now the Insert key performs like you expect it to, but don’t come complaining to me if Word eats your words, remember – you asked for it.
Labels: Blog in Word 2007, overtype, typeover, word options
Wednesday, August 29th, 2007
What personal information are you sharing?
Word has been a problem in the past – it buries information in your Word documents that interested people can find and use.
Talk to those politicians, for example, who have used Track Changes to make changes to a document then mistakenly sent off the document complete with original text. Any one in the know takes around 2 seconds to find the deleted information and then another 2 seconds to tell every man and his dog exactly what that politician didn’t want them to know.
So, in Word 2007, life is better, and you can remove personal and hidden information from your Word documents quite easily – if you know how to make it so.
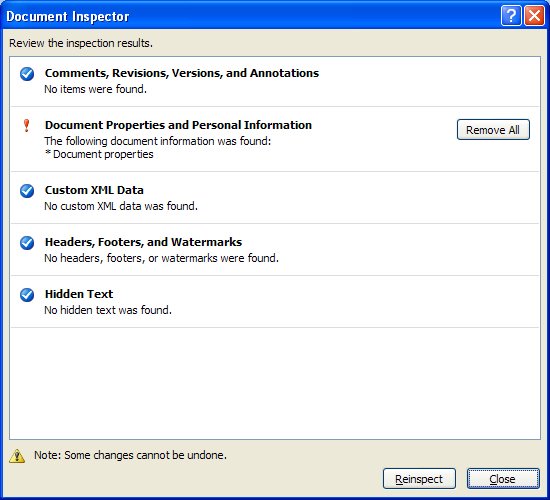
To see what is buried deep in your Word documents for everyone to see, save your document then click the Office button. Choose Prepare, then Inspect Document to launch the Document Inspector. A dialog opens to show options describing you might want to check – I can’t see any reason for not checking all the checkboxes. Now click Inspect and you’ll see a list of personal and hidden stuff that is lurking in your document. Click any option to remove what you don’t want others to see and then click Reinspect to check it’s all gone.
Now you’ll never send out anything that will be embarassing – and you know how to easily find the hidden stuff in Word files you receive from others 😉
Monday, August 27th, 2007
PowerPoint Speaker Notes: PowerPoint 2007
It’s sad but true, Speaker notes have changed functionality in PowerPoint 2007. It makes good sense but it’s a feature to be missed by some.
In PowerPoint 2003 you could configure Speaker Notes to show on the screen at presentation time. This meant that even if you had only one monitor you could see the notes. Some folk used this tool – even though Speaker Notes weren’t technically designed to be viewed by the audience.
In PowerPoint 2007 the feature has been disabled. Now you can only see Speaker Notes if you have two montiors. One for the presenter and one for the audience. The Speaker Notes apppear on the presenter’s view.
So, the moral of this is, if you’re using PowerPoint 2007 and you want your audience to see something – put it on the presentation itself, you can no longer bury good stuff in Speaker Notes and then expect to show it at presentation time.
Labels: PowerPoint 2007, Speaker Notes
Friday, August 24th, 2007
Excel 2007 – Now where to?
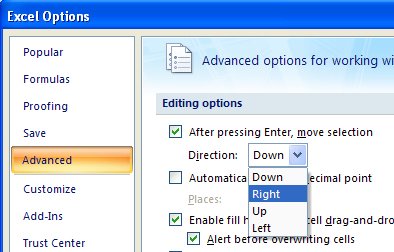
When I enter data across a row in Excel it is extremely annoying when the cell pointer moves down instead of across when I press the Enter key. Luckily I know how to make it work for me and in a couple or four steps, it’s doing what I want.
Click the Office Button, click Excel Options, Advanced and the first entry in the list is what you want. From the dropdown list select the movement option to use for the mouse and click Ok to end. Alternately disable the checkbox and the cell pointer won’t move at all.
It’s simple enough a process that you can change it whenever it suits you to do so.
Labels: cell pointer direction, Excel 2007
Wednesday, August 22nd, 2007
Rotated Text in Word 2007
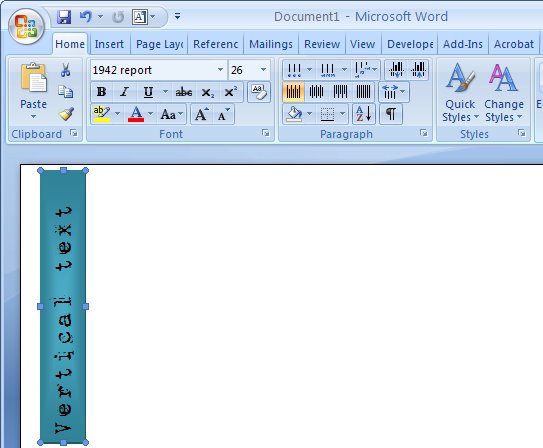
I love the look of page headings that appear down the side of the page – vertical text mixed with regular text just looks so cool.
Here’s how to create rotated text or vertical text on a page in Word 2007:
Start by creating a text box so choose Insert > Text Box and select either a text box style from the list (not the best idea), or click Draw Text Box to draw your own (much better).
Type your text in the text box then click Text Box Tools > Format and locate the Text Direction button. Click it to rotate the text to the desired orientation. Now simply size the text box to the desired size and move into position and apply one of Word’s new text box styles and you’re done. Simple and fun.
Labels: rotated text, text box, text direction, Word 2007
Tuesday, August 21st, 2007
Splitting data in Excel
Let’s set the scene. You have a column in an Excel worksheet which contains a list of names, first name and last name all together. You want to split these into two columns, one for First name and one for last. How do you do this? Well one way is to use the Excel Text to Columns option.
Start by inserting a couple of columns to the right of the column which contains the names. Select the column containing the names and, in Excel 2007, click the Data tab on the Ribbon and choose Text to Columns. Step through the Wizard. In the first step choose Delimited and in Step 2 choose Space. Click Finish and answer Yes to the prompt to overwrite data. You will now have the data in two columns. You’ll be able to remove the extra column you have there – it’s best to add too many blank columns and later remove those you don’t need because if you don’t, you’ll run the risk of losing the columns to the right of where you are working.
This is a simple and very fast solution for a name splitting problem.
Labels: Excel 2007, Parse data, parsing, Text to Columns
Tuesday, August 21st, 2007
Recycle your slide shows – PowerPoint 2007

I hate wasting time and doing things more than once, in my book, constitutes a major waste of time. In PowerPoint 2007, like earlier versions of PowerPoint you can reuse slides from another presentation. It’s just not so obvious how to do it in PowerPoint 2007. In case you really can’t find how to do it, here’s the low down:
On the Home tab click the down pointing arrow to the right of the New Slide option. At the foot of the dialog is a Reuse Slides option, click it and a Reuse Slides dialog appears on the right of the screen. Here you can choose a slide show to grab slides from, thumbnails of the slides in the file appear in the dialog and you can choose the ones to insert into this new presentation. You can also select if they should bring their formatting with them (not a good idea) or have the formatting of the present show applied to them (much better idea).
Labels: Insert slides, PowerPoint 2007
Friday, August 17th, 2007
Status bar functionality – Excel 2007
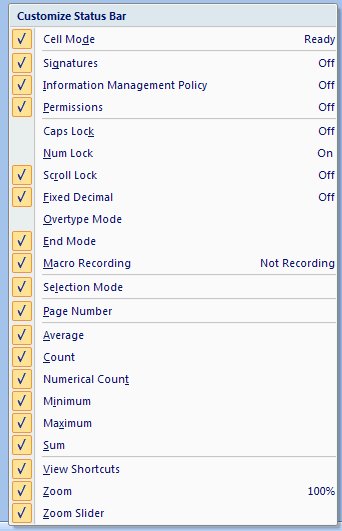
Right click the Status Bar in Excel 2007 and an entire grab bag of options open up for your choosing. You probably already knew that you could configure Excel in earlier versions to show you a single calculation on a selected range of cells – so you could select cells and then read the Sum of the values on the Status Bar (you did know that didn’t you?) but the functionality is even better in Excel 2007.
Here you can choose to view an entire range of calculations so, instead of being forced to choose between Sum and Average you can have both display and throw in Min, Max and Count for good measure too!
You can also add a Macro Record button to use to fire off the Macro recording tool without having to delve into the ribbon to do so.
It all adds to your very slim customization pickings in Excel 2007 – make the most of it, this and the Quick Access toolbar are about all you’ve got to play with.
Labels: calculations, Excel 2007, status bar
Wednesday, August 15th, 2007
View formulas in Excel
If you’ve ever wanted to view your formulas in an Excel worksheet, perhaps because you suspect one has been overwritten by data or you need to troubleshoot something press CONTROL + ~ to display formulas so you can troubleshoot or debug them. Press the same keystroke again to return to your regular view of your worksheet.
If you select a cell with a formula in it before you press CONTROL + ~ you will see not only the worksheet formulas but also all the precedents to the formula in the current cell.
Labels: cell formulas, Excel 2003, precedents
Thursday, August 9th, 2007
Shapes are different in Word 2007
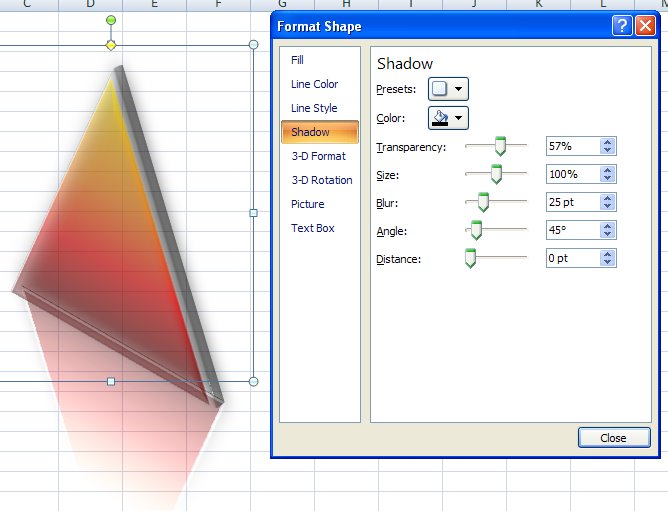
I’ve been working with shapes a lot in Office 2007 cause I’ve just written a huge article about them. It didn’t start out to be huge but that’s the way it ended up. You see there’s just so much to learn about them and it’s not all intuitive. The problem as I see it is that part of Office 2007 was just cobbled together (love that word cobbled!). Things aren’t consistent, far from it. One of the most interesting inconsistencies is how Shapes are implemented in Word and in Excel and PowerPoint.
In Excel and PowerPoint shapes work the same pretty much and, if you add a shape and right click it you can choose Format Shape and you get this snazzy new dialog to work with. Do the same in Word and life is very different indeed – there’s no new dialog just the old stuff.
What this means in practical terms is that you can’t fill a Word shape with an image from the clipboard or a clip art image – you can in Excel and PowerPoint and you can’t create your own custom multicolor gradient for a Word shape. The issue is that there’s a new graphics engine in Office 2007 called Escher graphics (presumably named after one of my favourite artists, MC Escher) which is implemented fully in Excel and PowerPoint but only partially in Word. So, don’t expect Shapes in Word to behave the same as they do in PowerPoint or Excel, cause they won’t – it’s that simple.
Labels: Escher graphics, Office 2007, shapes, Word 2007
Wednesday, August 8th, 2007
Office 2007 – DIY Keyboard shortcuts
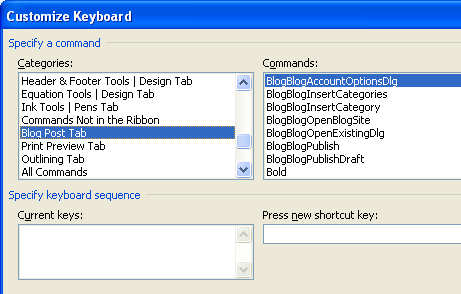
I use Control + S to save an Office document on the fly and it’s something that is so automatic that I just do it, hundreds of times a day.
There are other things I’d like to do as quicky but which have no shortcut key assigned to them. In Office 2007 this is an easy situation to rectify.
To create your own keyboard shortcut, click the Office Button at the top left of the window and choose Word Options, Customize. You’ll see a Customize button next to a Keyboard Shortcuts option, click it and you can create a shortcut for any Word command of your choice as well as for symbols, fonts and the like.
What is particularly useful is that there’s a list of items which aren’t included on the Ribbon that you can still access if you ycreate your own custom shortcut to do so.
Labels: Blog in Word 2007, Keyboard Shortcuts
Tuesday, August 7th, 2007
Smart Art in Office 2007
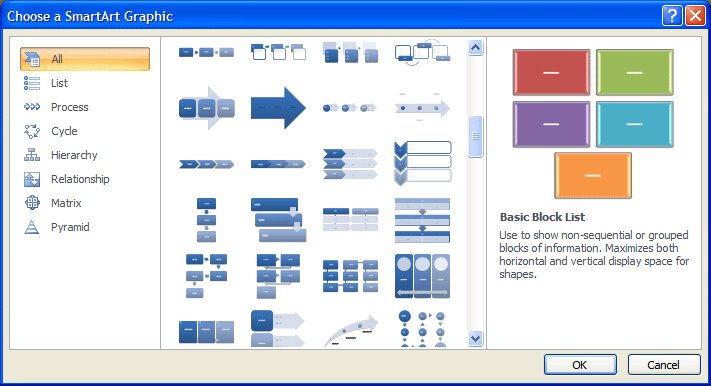
Today I’m indulging in shameless self promotion. This is an article I wrote recently which discusses a how to work with SmartArt in Office 2007.
Exploring Office 2007: Using SmartArt Graphics
Anything that helps your audience connect with your message will help you in your communications with them. You probably already know how useful charts are for presenting numbers in an easy to read format and how helpful tables are for organizing data.
Microsoft Office 2007 offers a handy new feature called SmartArt that makes it easy to create business diagrams that display textual information in an easy to read and understand format. The SmartArt graphics tool is great for creating everything from simple diagrams to cutting-edge business graphics… more
Labels: Uncategorized