

Wednesday, October 17th, 2007
Keep Outlook trim, taught and terrific!
To ensure your Outlook .pst file stays trim and doesn’t get bloated with old and outdated emails, configure its AutoArchive options so that older messages are automatically removed or filed away. To do this, right click the folder to archive (such as your InBox) and choose Properties, AutoArchive tab and select the Archive this folder using these settings option. Now enable the Clean out items older than and set the appropriate time period. Only select to Permanently delete old items if you really don’t want them saved. Enable, instead, Move old items to default archive folder and Click Apply.
If you haven’t got AutoArchive configured to run periodically, you’ll get a warning to this effect and Outlook will set it to 14 days by default. You can change the timing by choosing Tools, Options, Other, AutoArchive. Now, every 14 days (or when you specify), AutoArchive will run and the old items will be moved to your archive folder. Your archive file will appear in your folders list so you can drag and drop messages from it back into your regular Outlook folder if there are archived messages you need to refer to.
The reason you need to do this is two-fold. One is that Outlook stores everything in its PST file – emails, contacts, appointments and worst of all – email attachments. So the file can get very large indeed. At or near 2GB in size the file becomes unstable and you risk losing everything – permanently – can we just say “Don’t put all your eggs in one basket”? Archive now – before your computer does the deed for you – permanently and with little or no chance of recovery.
Labels: archive, Outlook 2003
Tuesday, October 16th, 2007
OOPS! I didn’t mean to send THAT!
If you too often send an email message and then think “Oh no! I forgot to say xyz” or “Oops, I shouldn’t have been that blunt”, then build a delay into Outlook so the messages aren’t sent right away. It just might save you having to write a second email or save you grovelling to your boss!
To do this use a rule to delay sending emails. Choose Tools, Rules and Alerts and click on New Rule. Choose the Start from blank rule option and then select Check messages after sending and click Next. Click Next as all messages will be delayed (but you can set an exception shortly) and click Next and Ok again to confirm the rule will apply to all sent messages. Choose Defer delivery by a number of minutes and set this to the number to wait – say 2 minutes and click Next.
Now, set an exception for messages that just have to be sent immediately, for example, select Except if it is marked as importance and set this to High. Click Next, type a name for the rule such as Delayed Send, enable the Turn on this rule checkbox and click Finish.
Now, whenever you click Send, your messages will be held for 2 minutes before being sent except if you make them High importance.
No more grovelling!
Labels: delayed send, Outlook 2003
Thursday, October 11th, 2007
Set Outlook as your default email program
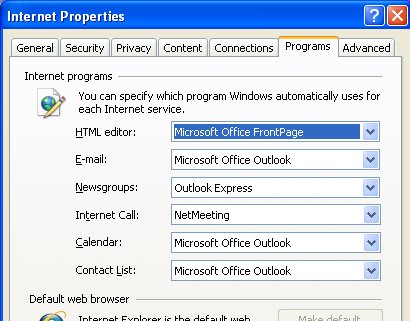
It’s handy to be able to click an email address on a web page and have your email software launch automatically with a new message ready for you to type. It’s a nuisance if you do this and the wrong email software opens.
It is, however, quite easy to set any email software to be the default program to use in these circumstances. To do this, choose Start, Control Panel,
Labels: Uncategorized
Tuesday, October 9th, 2007
Quickie calculations in Word 2003
Older versions of Word included a Calculate option on the Tools menu which let you make quick calculations.
If you’re using Word 2003 you can add the tool back by right clicking any toolbar and choose Customize. Select the Commands tab and, from the Categories list choose All Commands and scroll the Commands list to locate ToolsCalculate. Drag this onto the Tools menu and hold your mouse there until the menu opens and then drop the option into place. If desired, right click the new entry and remove the word Tools from its name so it simply reads Calculate.
Now test your new menu item by typing some values eg 24, 25 & 26 and select them. Choose Tools, Calculate and the status bar will display “The result of the calculation is 75”. If you later click Control + V you can paste the result of the calculation (75) into your document.
To sum a column of numbers, hold Alt as you drag over the column with your mouse then choose Tools, Calculate. It also works inside tables and you can type a more detailed calculations such as 25*25 and it will calculate the result for you (answer: 625)
So, put away the calculator and let Word to the work for you.
Labels: calculations, Word 2003
Wednesday, October 3rd, 2007
Smaller and better looking fonts
When you’re writing newsletters, company reports and other documents in Word you may find that they look more professional if you condense your font slightly. Even a reduction as small as .3 points changes the look of the font significantly and makes it look, well just a little more classy.
To do this, select the text to alter and choose Format, Font, Character Spacing tab and set the Spacing to Condensed and the By value to, say, .3 points.
If it’s too tight, loosen it up a bit, if not, try a little more compression until you get something you like.
Labels: compress., font spacing, Word 2003
Monday, October 1st, 2007
Take a snap – Excel 2003 and earlier.
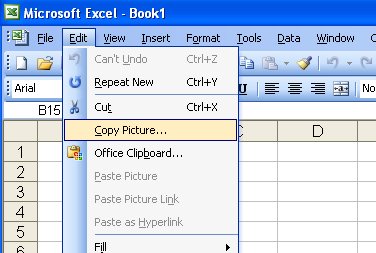
Need a copy of part of an Excel worksheet? Too easy!
You can take a picture of a range in Excel and, for example, insert into Word as a picture or place it an image in another area on a workbook. To do this, first select the area to snap and hold Shift as you open the Edit menu. Choose Copy Picture, select As shown on screen or As shown when printed and click Ok.
Now go ahead and paste the image wherever you desire. This Shift + Edit menu option also works for copying a clip art or other type of image inserted into an Excel workbook.
Labels: copy cells, Excel 2003, snap
Saturday, September 29th, 2007
Smarter Table Headings in Word
When you have a table in Word that extends beyond a single page in your document it can be hard to follow what the table is all about when you’re looking at page 2 because the headings are all back on page 1.
Solve this problem in Word by selecting the rows that contain the headings and, from the Table Tools tab on the toolbar, click the Layout option and then choose Repeat Header Rows. The contents of the header row will now appear on all pages where the table appears.
Labels: header row, table, Word 2007
Saturday, September 22nd, 2007
Windows Live Photo Gallery Beta is here
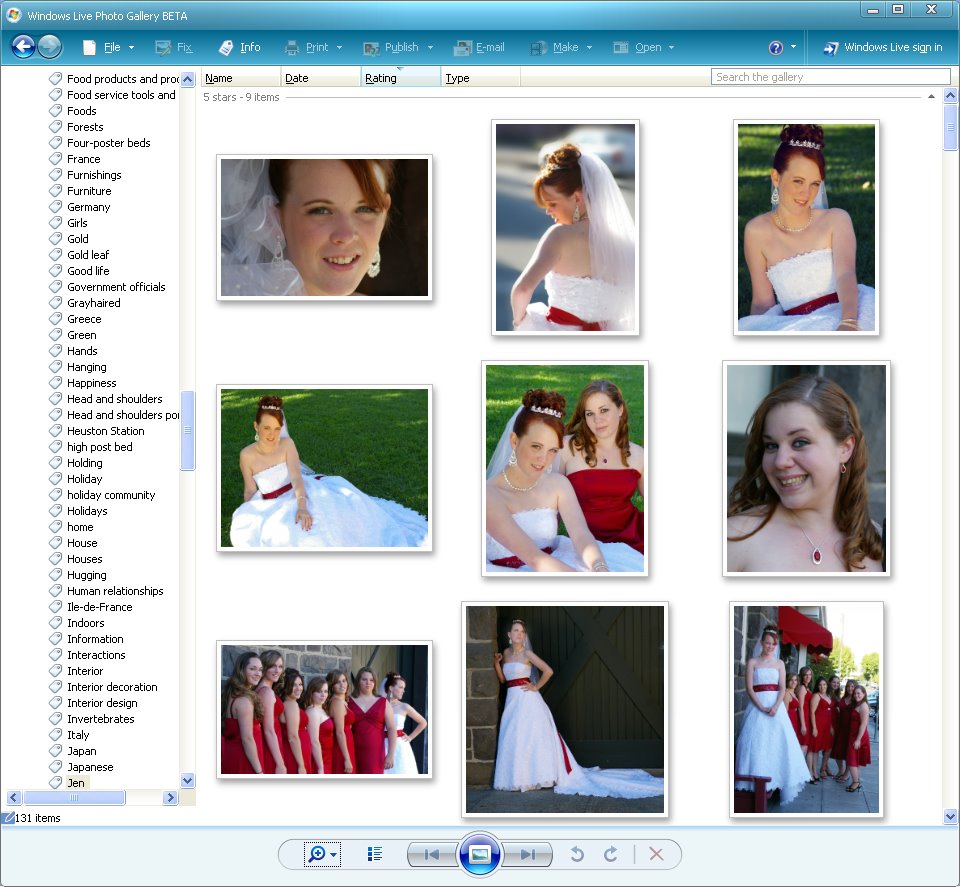
This cool new Photo Gallery tool from Windows Vista is at last available for Windows XP.
This was a Vista only program but, recently, it was released as a private beta, now it’s public. You can download it from here: http://get.live.com/betas/photogallery_betas.
To use it, you’ll need to have Windows XP SP2 installed and expect the download and installation process to take a while – actually, scrub that, it takes ages.
However, it looks great, it has the Vista look to it and it’s a worthy replacement for the Windows Picture and Fax Viewer.
It has a great panorama assembly tool under the Make menu – just select the panorama images first then click this option.
Overall the program is pretty good and probably the biggest missing omission is a good rotation tool. While it rotates in 90 degree increments it sorely needs a tool that rotates in tiny quantities like fractions of a degree.
Labels: download, Windows Live Photo Gallery Beta
Thursday, September 20th, 2007
Color your world in Word 2007
Let’s face it, plain old white backgrounds are, just that, plain old white backgrounds. If you’re like me, you’ll want to change the color of your page background.
To do this, choose the Page Layout tab from the Word 2007 Ribbon, and choose the Page Color dropdown list and choose a page color from it. If you choose a color from a Theme set then, later, when you change the Theme – the page color changes accordingly.
Labels: page color, theme, Word 2007
Wednesday, September 19th, 2007
Formatting table cells in Word
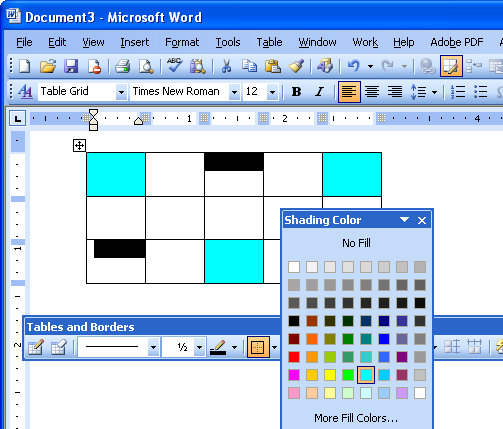
Since Microsoft Word 2002, it has been possible to format a series of cells in a table all at the one time, even if they are not contiguous (a lovely word that means not side-by-side).
To do this, select the first cell then Control + click on the other cells that you want to share the same formatting. Once all the cells are selected you can apply a formatting such as a shading to those cells. Note, that the Shading button on the Tables and Borders toolbar in Word 2002/2003 is the one to use, the one on the Drawing toolbar is the Fill button – it looks the same but doesn’t work the same!
Selecting and formatting non contiguous cells all at ones makes it a quicker process to format a table than it would be if you selected and formatted each cell individually.
However, of course, the F4 key still works in cells in a table so you can, for example, fill a cell with a shading color or a format option and then click in another cell and press the F4 key and have that format applied to this cell too. The F4 key is a repeat key which repeats the previous command and it’s a great key to learn to use anytime you’re working with Word.
Labels: formatting, table, Word 2003, Word 2007
Wednesday, September 19th, 2007
Wrap text around an image in Publisher
Text wrapping in Publisher works a little differently to how it works in Word. To configure how text wraps around an image in Publisher, click the picture and choose Text Wrapping from the Picture toolbar.
If you’re creating a Web publication this won’t be an option – it is only possible to do this with a Print publication. Choose a wrapping option from those shown. To configure text to wrap tightly around an image choose Tight and then choose Edit Wrap points option to create the exact shape for text to wrap around the image.
When you do, if you drag the wrap points inside the image, that part of the image will be cropped away – this is not the behaviour you might expect if you’re use to working in Word. You’ll need to do a workaround if you want text to wrap irregularly around an image but not so as the image is lost.
To do this, place the image below the text and set its wrapping to None. Draw an irregular shape over the image and set its wrapping to tight. This uses the shape to manage the text wrapping and thus avoids damaging the image. Format the shape by right clicking it and choose Format AutoShape, Colors and Lines tab, set the Line Color to No line and the Fill Color to No fill so you won’t see it in the final presentation.
Labels: Microsoft Publisher, word wrapping
Monday, September 17th, 2007
Error Checking in Excel

Chasing problems in Excel worksheets is a major pain. It helps to create them accurately in the first place but when you’re trying after the fact, to find problems, Excel has some tools that can help. One of these is the often overlooked Go To option.
Go To can find formulas that vary from those in the cells that surround them. This can help you find formula errors which would otherwise be difficult to locate.
So, for example, if you have a column of cells which should all contain the same formula you can check to make sure they are written the same way by selecting the cells and choose Edit, Go To, Special, Column Differences (in Excel 2007, from the Home tab select Find & Select, Go To Special and then click Column Differences). Any cells which contain a formula that relates to a different series of cells to those in the active cell will be selected so you can check them. The Row Differences option does the same thing for rows of cells.
Labels: Error checking, Excel 2003, Excel 2007, Go To
Friday, September 14th, 2007
How-To with Helen Bradley
I write for lots of wonderful publications across the globe and one of them is Internet.com’s Small Business Computing web site.
The great news is that I now have my own section and here it is: SmallBusinessComputing.com. Check a few sections down and you’ll see a link to all my small business columns. There are heaps of columns on all things Office including Office 2007 and lots of stuff for earlier versions too. It’s a great way to get down and dirty with some of the new features in Excel, PowerPoint and Word including Themes, SmartArt, Charts and lots of other handy tools.
Labels: Excel 2007, Office 2007, Small business computing, Word 2007
Wednesday, September 12th, 2007
Watch your language!
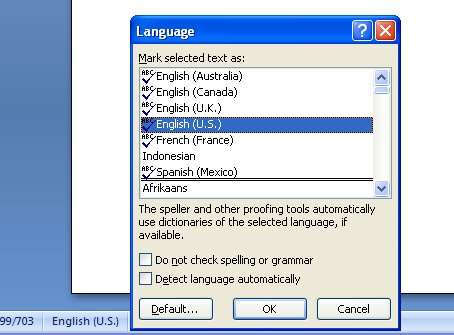
I write for magazines and online providers all across the world. One day, I’m typing a Canadian article, another an Australian one and later in the week my work gets sent off to the UK and the USA. I’m constantly juggling color/colour, labor/labour and tricky ones like jewelry/jewellery. It’s confusing to say the least and the last thing I want to do is to miss obvious misspellings. That’s why I rely on Word’s language tools.
Prior to Word 2007 I can set the language for a document by selecting it and choose Tools, Language, Set Language and choose the proofing language.
In Word 2007, of course, everything is different but it’s easy to find – thank you Microsoft!
In Word 2007, select your document (Control + A works just fine) and click the language indicator on the Status bar – the Language dialog appears and you can choose the language to use to proof the text.
Labels: Language settings, Word 2003, Word 2007