Saturday, July 6th, 2013
Explore the new Transitions in PowerPoint 2013
See the new transitions in PowerPoint 2013 including airplane and origami. There are some great new transitions and this video shows you what they are, what they look like and some of the settings for them.
Transcript:
Hello, I’m Helen Bradley.
Welcome to this video tutorial. In this tutorial I’m going to show you the new transitions in PowerPoint 2013. In this video I’m going to show you the transitions that are new in PowerPoint 2013 and we’re just going to run through them seeing them on this particular presentation. Now all of these have been in PowerPoint for some considerable time. The first of the new ones is fall over and it looks as if the slide is falling over to reveal the next slide. This is drape. Again, it’s a new transition. And curtains. This is wind.
Now with any of these transitions you can speed them up. You can see that the curtains transition takes quite a while to run but if I set it to 3 seconds then it’s going to occur a lot more quickly. Here are some more of the newer transitions, prestige. Then there’s fracture and crush and then peel off. Now like some of the other transitions this has different effect options so you can peel off from the left or the right. Then there’s page curl. And, again page curl has some different options. And airplane. The effect options for this allow you to change the direction in which the airplane flies out. And origami.
This also has effect options for the direction in which the bird flies. And finally there’s one additional transition and it’s called comb. So these are the new transitions in PowerPoint 2013.
I’m Helen Bradley.
Thank you for joining me for this video tutorial. Look out for more tutorials on this YouTube channel.
And visit my website at projectwoman.com for more tips, tricks and tutorials on various Office applications as well as for Photoshop, Lightroom, Illustrator and a whole lot more.
Labels: areoplane, Microsoft Office 2013, new, Office 365, origami, PowerPoint 2013, transitions
Wednesday, July 3rd, 2013
Word 2010 and 2013 Tip – Wrap Text Around a Table
Use a text box in Word to control text wrap around a table
In a previous tip I showed you how to place a table inside a text box so you could put two tables side by side. You can use the same process to make the text on your page wrap around a table.
Click here to learn how to place a table inside a text box
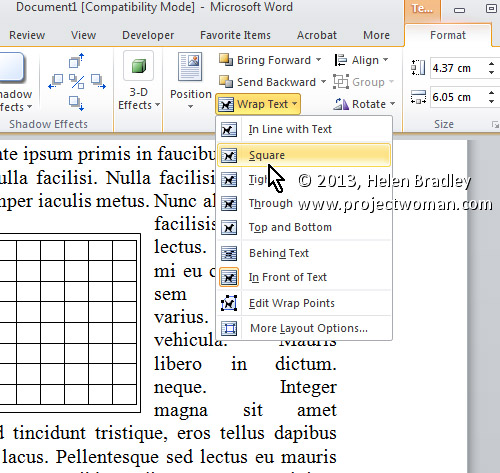
To control the way text wraps around a table, first create a text box and place a table inside it.
Then click to select the text box and, from the Ribbon, select the Format tab > Text Box Tools. Click the Wrap Text dropdown menu and choose the desired wrapping option from those in the list – typically you will use Square to wrap text round the text box with its inserted table.
Labels: 2010, 2013, format, insert, Microsoft Office, Microsoft Word, option, part 2, table, text, Text Box Tools, tip, trick, Tutorial, Word, Word 2010, Word 2013, wrap, Wrap text, wraparound
Wednesday, June 26th, 2013
Word 2010 and 2013 Tip – Create Side by Side Tables
Place tables side by side in a document using text boxes to keep them in place
If you add a table to a text box in Microsoft Word, you can position the text box wherever you want it to be on the screen.
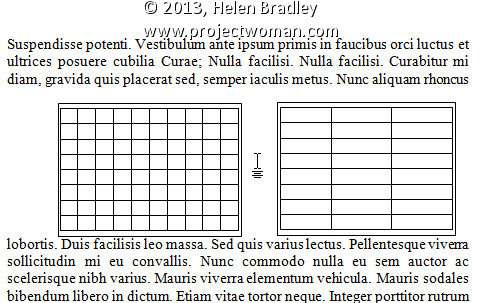
If you need two tables to be placed side by side in your document you can do so by placing each of them inside a text box and then arranging the text boxes side by side.
To do this, create a text box by selecting the Insert tab on the Ribbon, click Text Box and click Draw Text Box. Click and drag to create a text box and then click inside it and create a table by choosing Insert > Table. Repeat the process to create the second table in its text box then drag to position the text boxes side by side.
Labels: 1, 2010, 2013, insert, Microsoft Office, Microsoft Word, Page, Part 1, Ribbon, side, side by side, Simple Text Box, table, text box, tip, trick, Tutorial, Word, Word 2010, Word 2013
Tuesday, June 18th, 2013
Word 2010 and 2013 Tip – Colour Me Purple!
Modify a Style’s Font Color to help find missed formatting
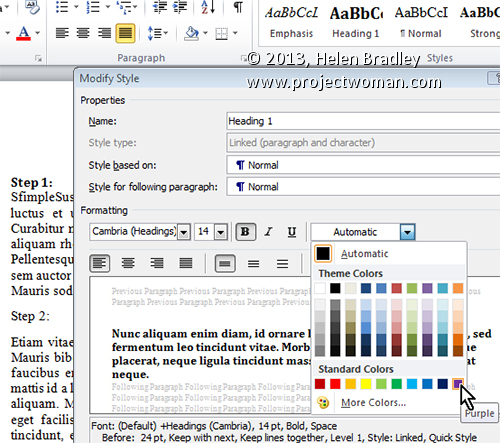
Quickly determine which paragraphs in a document have been formatted using one style, rather than another, by changing the colour of the formatted text.
To do this, click the Home tab on the Ribbon, hover over the style’s name you want to edit in the Styles gallery. Now, right click it and select Modify. In the Modify Style dialog, change the Font Color to something that will stand out on the page (such as purple) and click OK.
Now scroll through your document to see if the style has been applied everywhere you wanted it applied. Remember, if you don’t make any changes at this point, you can quickly undo the colour change by selecting Undo.
Otherwise, when you are done formatting the document, set the colour back to the original Font Color by repeating the above steps.
Labels: 2010, 2013, color, colour, font, Font Color, format, Home, Microsoft Office, Microsoft Word, miss, mistakes, modify, Modify Style, style, Styles Gallery, tip, trick, Tutorial, Word, Word 2010, Word 2013
Tuesday, June 11th, 2013
Word 2010 and 2013 Tip – Save documents for use with older Word versions
Learn to use ‘Save as type’ to format your document so users of older versions of Word can access them
You can easily exchange files with users of older versions of Word. This is because Word 2007, 2010, and 2013 essentially share the same file format. So it is pretty easy to open any Word document created using version 2007, 2010 or 2013 in any other of these three versions of Word. In addition, Word 2007, 2010, and 2013 will open files from any previous version of Word.
However, when you need to share a Word 2007, 2010, or 2013 file with someone using a much earlier version such as Word 2003 or a Mac version of Word, you must save the file using their particular Word file format. This is because the file formats are not the same and the older versions of Word cannot read the newer file formats.
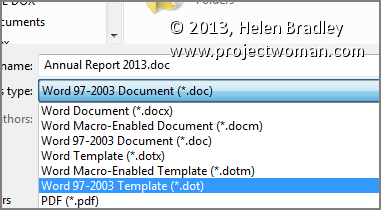
To save using the appropriate format, select the File tab on the Ribbon, and click Save As. In the Save As dialog, click the Save as type: dropdown list and select the word processing format that matches the software that your other user is using such as Word 97-2003 Document (*.doc). Then click Save to save it in that format.
Labels: 2003, 2007, 2010, 2013, convert, file, format, mac, Microsoft Office, Microsoft Word, old, open, Save As, save as type, share, software, tip, trick, Tutorial, Word, Word 2010, Word 2013
Thursday, May 30th, 2013
Word 2010 and 2013 Tip – Quick Accented Characters
A Quick Guide of Shortcut Keyboard Combinations to Accent Marks over Characters
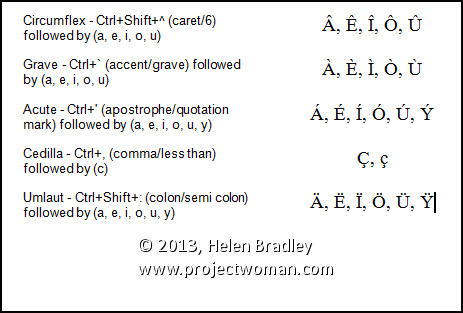
Word allows you to create accented letters quickly using its inbuilt accent shortcuts. To do this, press the accent shortcut key combination, then release, and follow it up with the letter to accent.
Some of the more commonly used shortcuts are:
Circumflex – Ctrl+Shift+^ (caret/6) followed by (a, e, i, o, u)
Grave – Ctrl+` (accent/grave) followed by (a, e, i, o, u)
Acute – Ctrl+’ (apostrophe/quotation mark) followed by (a, e, i, o, u, y)
Cedilla – Ctrl+, (comma/less than) followed by (c)
Umlaut – Ctrl+Shift+: (colon/semi colon) followed by (a, e, i, o, u, y)
Labels: ^, ;, :, ', ", <, 2010, 2013, 6, a, accent, Acute, c, Cedilla, character, Circumflex, Combination, CTRL, e, follow, following, Grave, i, inbuilt, key, keyboard, letter, Microsoft Office, Microsoft Word, o, shift, shortcut, tip, trick, u, Umlaut, Word, y
Wednesday, May 29th, 2013
Stop Lync and Windows Messenger in Windows 8
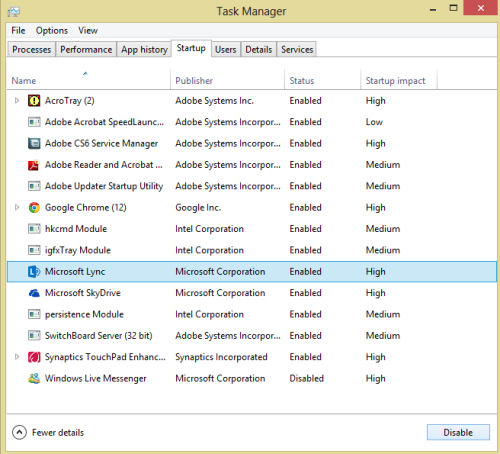
Ok. so I have Office 2013 installed but I don’t use Lync – but the damn program launches each time I start my Windows 8 machine and that doesn’t suit me. I shut down my computer every time I use it to save battery life when I travel and for airplane safety. For this reason, the fact that Lync starts up with Windows 8 is a major inconvenience. Not so much so Windows Live Messenger but I don’t want that either – Microsoft is phasing it out and I never use it to communicate – haven’t done so for years. So, the question is – how to remove these annoying startups in Windows 8. Turns out the solution is simple – much simpler in fact than in earlier Windows versions.
Press Ctrl + Alt + Del once and click Task Manager. This is now not only the way you stop a program from running once but also how you axe it permanently. Click the Startup tab in the list and locate the application to stop – in my case, it is Lync. Then click the Disable button in the bottom right of the dialog. Repeat for any other program you want to stop running – of course never stop anything from running that you don’t understand the purpose of – you never know just how vital that program might be – but Windows Live Messenger and Lync are not needed.
When you’re done, click the close button and next time you start up your machine these programs won’t run. Yeah! No more annoyance – well, there are plenty of annoyances but these no longer count!
Labels: disable, Microsoft Lync, remove, startup, task manager, Windows 8, Windows Live Messenger, windows messenger
Tuesday, May 21st, 2013
Word 2010 & 2013 Tip – What Format is THAT?!
Learn more about the formatting applied to text in your document with this handy Keyboard Shortcut
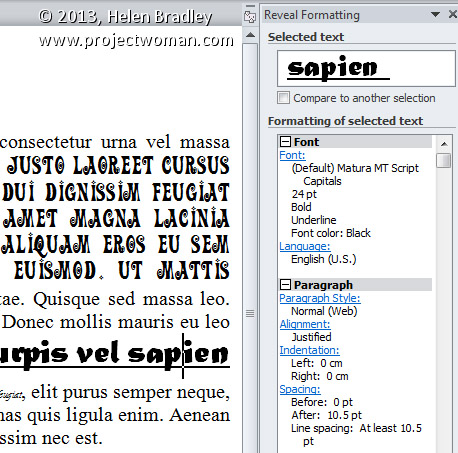
If you want to quickly find out what formatting has been applied to any piece of text, click in the text and press Shift + F1. A task pane will open in the right of Word window. This Reveal Formatting task pane displays details about the text format being used for the word that your insertion point is closest to.
With this task pane open you can click on any piece if text to learn more about its formatting.
Labels: 2010, 2013, Combination, F1, format, formatting, insertion, key, keyboard, Microsoft Office, Microsoft Word, pane, point, Reveal, Reveal Formatting, right, shift, shortcut, task, text, tip, trick, Word
Wednesday, May 15th, 2013
Use More Templates in Google Docs
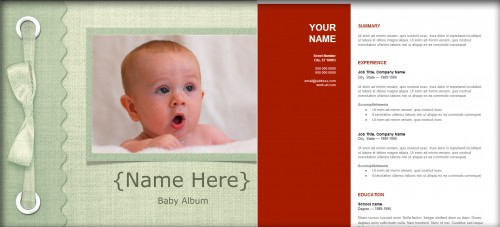
When creating a new presentation or document in Google Docs, you might find that the default templates don’t provide the theme you want. Fortunately, Google provides an easy way to find the perfect template for your situation, from baby photo albums to résumés. To find a template suitable for you, simply visit https://drive.google.com/templates?view=public. You can search by name, category, and popularity to quickly find whatever you need.
Once you’ve selected a template you like, simply click the Use this template button and a new document will automatically open with the chosen template, ready for use.
Labels: google docs, new, resume, search, templates
Monday, May 13th, 2013
Max Out Editing Space in Google Docs
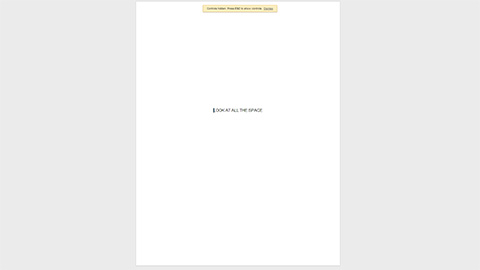
If you like working with the cleanest view possible, Google Docs makes it easy for you. First select View > Full screen. This will remove all menus from the screen, so make sure you don’t need to access any buttons while using this view. Now you can make your browser itself full screen. In most browsers you can accomplish this by pressing F11. With these options you will see absolutely nothing but the page you are typing on.
To undo these options, press F11 again to eliminate the browser full screen, then esc to eliminate Google Doc’s full screen mode.
Labels: full screen, google docs, maximum, space
Sunday, May 5th, 2013
Word 2010 and 2013 Tip – Back to Where You Were
Get to Your Previous Insertion Point with This Shortcut
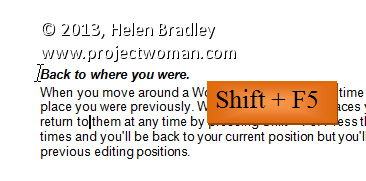
When you move around a Word document it can be time consuming to find the place you were previously. Word records the last places you worked and you can return to them at any time by pressing Shift + F5. Press this combination four times and you’ll be back to your current position and along the way you’ll have visited three previous editing positions.
Labels: 2010, 2013, F5, insertion, key, key combination, Keyboard Shortcuts, place, point, previous, record, Return, saver, shift, time, tip, trick, Word
Tuesday, April 30th, 2013
Word 2010 and 2013 Tip – Quickly Move Paragraphs
Move a Paragraph, at Any Time, with Ease!
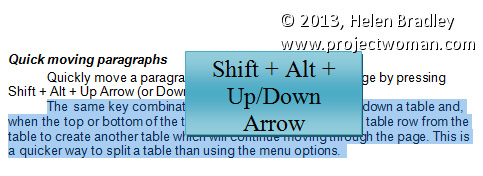
To quickly move a whole paragraph up or down a Word document, click in the paragraph and press Shift + Alt + Up Arrow (or Down Arrow).
The same key combination will move an entire table row up or down a table and, when the top or bottom of the table is reached, it detaches the table row from the table to create another table which will continue moving through the page. This is a quicker and simpler way to split a table.
This tip works in just about any version of Word.
Labels: 2010, 2013, Alt, bottom, down, down arrow, key, key combination, Keyboard Shortcuts, Microsoft Office, Microsoft Word, move, moving, Paragraph, quick, row, shift, split, table, tip, top, up, Up Arrow, Word
Wednesday, April 24th, 2013
Word 2010 and 2013 Tip – Creating a New Page… Instantly
How to make a New Page (or Page Break) When and Where you Want
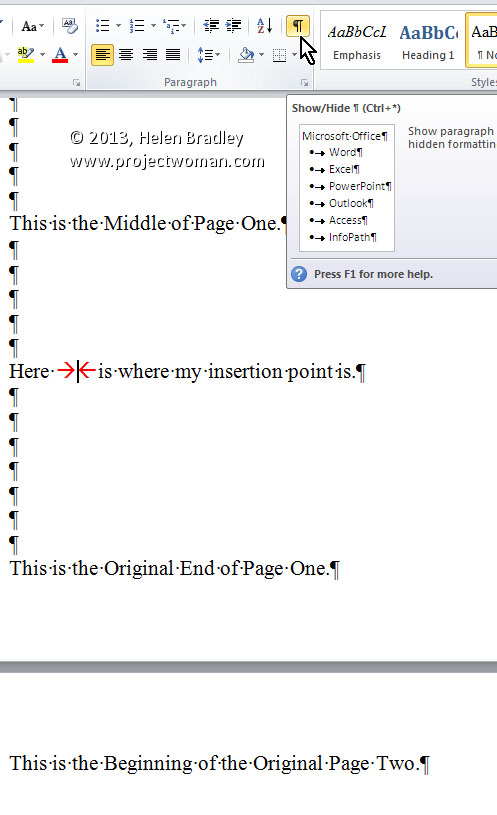
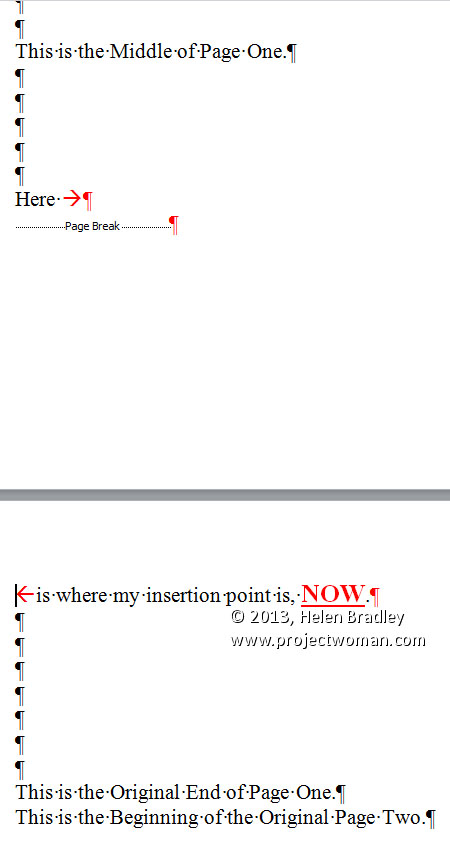
To create a new page in a Word 2010 and 2013 document before you’ve reached the end of your current page, simply press CTRL + ENTER. This places a ‘…Page Break…’ in your document exactly where your insertion point was. It also moves the insertion point onto the top of the next page. You can see the page break marker if you select the ‘¶’ button on the Home tab of the Ribbon.
Lastly, if you need to, you can delete the page break by positioning the insertion point immediately in front of it and pressing Delete.
Labels: 2010, 2013, create, CTRL, ENTER, instantly, Microsoft Office, Microsoft Word, new, Page, Page Break, tip, Word


