While there are lots of ways that you can convert an image into black and white in Photoshop sometimes you want to remove some of the color but not all of it.
One method to do this, is to use a tool such as an adjustment layer to remove the saturation from the image or to apply a black to white gradient map adjustment. This removes all the color and you can then recover some of it by reducing the opacity of the adjustment layer to show some of color from the image layer underneath. However, when you adjust opacity, the setting is applied to every pixel in the image so light and dark pixels are treated equally.
You can achieve a richer effect by using the image as its own mask so that the desaturation effect is applied with different strengths to pixels in the image depending on their relative lightness or darkness.
To see how this effect can be achieved:
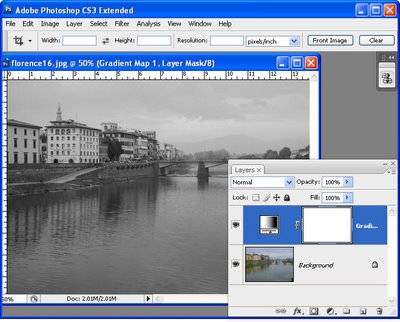
Step 1
Open a new image and add an adjustment layer to convert it to black and white. I used Layer > New Adjustment Layer > Gradient Map and used the Black, White gradient from the basic set of gradients.
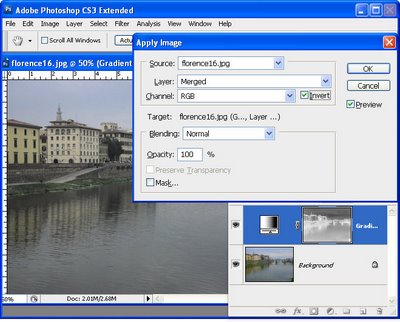
Step 2
Click the Adjustment Layer’s layer mask to select it – this is the white box in the Layer palette to the right of the Adjustment layer thumbnail. Choose Image > Apply Image. This tool lets you apply the image to itself as a layer mask. The current image name should appear in the Source Image area and you need to apply it to the Merged layer. Experiment with selecting and deselecting the Invert checkbox, if you have Preview selected you’ll see how each setting affects the image. Choosing Invert typically gives the best looking results and it’s the option I chose. Click Ok to add the image as its own layer mask.
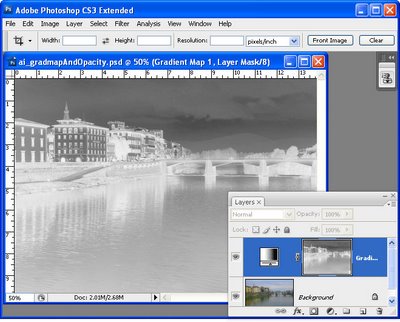
Step 3
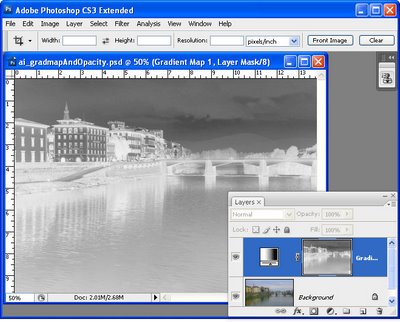
Inspect the image and let’s talk about what’s happening. The screenshot here shows the mask (not the resulting image). You can toggle the mask’s visibility on and off by Alt + Click (Option + Click on the Mac) on the Layer Mask thumbnail in the Layers palette.
Masks are grayscale so they’re always black, white or shades of gray. They work like this: where they are white, the current layer is shown – that’s the black and white conversion in this example. Where the mask is black, we are seeing through the current layer to the colored layer below. Where the mask is grey we’re seeing some partial transparency in the black and white layer so some color is showing.
Here the mask is dark in the sky area and around two of the buildings on the left so you’re seeing some blue in the sky and color in the buildings in this area. Where the mask is white, the image is almost all desaturated.
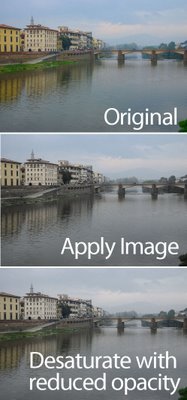
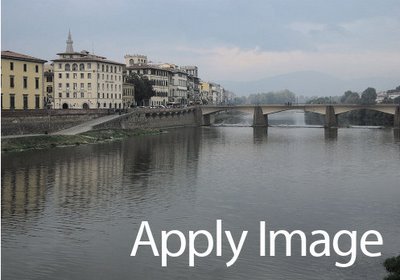
So you can see how subtly different the results are using this method, here’s the original image, the version we just created using the Apply Image command and another version showing the result with the same Gradient Map adjustment layer but this time with a reduced opacity and no layer mask. The significant differences are in the sky which is bluer and the grass which is more desaturated in our example – a result you cannot achieve by simply adjusting the opacity.
Tip
Masks can be adjusted just like regular layers. So, you can create more variety in the mask by clicking on it, and choose Image > Adjustments > Levels. Adjust the levels to suit – if you lighten the mask you’ll make it whiter overall which means the image will become more black and white and less colorful. If you darken the mask then you will see more of the colored image below.
I contribute to the post production blog at Digital Photography School and this post first appeared there.


Post a Comment
Please feel free to add your comment here. Thank you!