Create a button in Excel to move the user to another worksheet
It is easy in Excel to create a button on a worksheet that you can click to go to another sheet in the workbook. It is also a fun way to get started with macros in Excel if you have never made one before.
To do this, first decide which sheet will contain the button and which sheet you will select when you click, the button. We’ll add a button to sheet1 to take us to sheet3. So, click in Sheet 1 and, from the Developer tab on the Ribbon, choose Record Macro. If the Developer tab is not visible click here to find out how to display it.
Type the Name GoToSheet3 (a macro name must be all one word) and from the Store Macro in List choose to store the macro in This Workbook and click Ok.
Click the tab for Sheet 3 and then click Stop Recording on the Developer tab. The macro will be recorded and stored automatically for you.
To add a button to Sheet 1 that will run the macro, first return to Sheet 1 and from the Developer tab on the Ribbon select the Insert option and click the Button (Form Control) option at the top of the drop down list. You must choose the Form Controls and not the Active X Controls.
Drag a button onto the worksheet and when the Assign Macro dialog appears, click the GoToSheet3 macro and click Ok.
Select the text on the button and type Click to go to Sheet 3.
Click outside the button to unselect it and then click on the button to see it at work. When you click it you will be taken automatically to sheet 3.
If you need to make changes to the text on the button right-click on it to get access to the text. You can’t click it to select it because clicking it runs the macro attached to it.
In the top left corner of the Library and Develop modules you’ll see the Navigator. Hover your mouse over an area of the image in the Navigator – it will look like a magnifying glass – click to view that portion of the image in the main preview.
In addition, whenever you see a rectangle in the Navigator you can drag on it to move the area of the image being viewed.
Learn how to make an image its own mask using Apply Image in Photoshop.
Here we use an image of a cast iron grill and apply it to itself to show another image through it.
Transcript:
Hello I’m Helen Bradley. Welcome to this video tutorial. In this tutorial we’re going to look at using an image as its own mask in Photoshop. And we’re going to do this using the Apply Image tool.
Before we get started with this tutorial let’s have a look and see what it is that we’re trying to achieve. I have an image here that’s just some oranges and then I have another image here of a grate. And what I want to do is to put the grate over the oranges just as I’ve done here. And I’ve actually got a drop shadow behind it to give it some dimension. And what we’re going to do in this tutorial is see how we can use an image and use itself as its own mask to mask that image and how we can also adjust the mask so that we get this effect that we’re looking for and adding a drop shadow to it. So if you’re ready let’s just get rid of the bits that we don’t want. I’ve now got my orange image and let’s get started.
The first thing I’m going to do is bring in my grill image. So I’ve got these images just floating loose because I find that the easiest way of doing it. And I’m just going to drag this image’s background layer away from it, hold the Shift key and just drop it over the top of this image. Now of course it hasn’t disappeared from its original image. I’ve just dragged a copy away. And I don’t need that any longer so I can just get rid of it. With this image it’s a little bit on the small side, so I’m going to press Ctrl T and Ctrl 0 (zero) to see my handles and to set transform on. I’m also going to enabled this lock so that the ratio between the height and width is fixed. This means that the image is not going to be skewed out of proportion. And now I’m just going to drag it into position and I can place it anywhere I want. So I think this is a pretty good arrangement so I’ll click the checkmark here.
Now right now we’re not seeing through this image because of course it brought its own background with it and it’s got a sort of dark background with some light aspects. We’re going to need to do some work to fix this image up. And in actual fact the work that we’re going to do is in masking so I’m just going to drag this up a little bit. What I want to do is I really want to turn this image into its own mask.
So once I’ve got it in position it’s fairly critical that I actually get it in the right position before I start because I want the mask and the layer to be in the same place. I’m going to add a layer mask to this layer by just clicking the Add Layer Mask icon. But what I want to do is put this image in this mask. And an easy way to do that is to click the mask itself and use Apply Image. It’s up here, Image, Apply Image. And what it lets us do is to apply an image as a mask. So for example layer zero is the oranges themselves so that in this case we would be applying the oranges as a mask. But we can also select layer 1 which is applying this particular grill as its own mask. Now it’s not looking good right now but it is certainly masking it. I could invert it if I wanted to but that’s only going to give me the orange images over the grill work not where I want it. I want it in the bits in between the grill work so I’m going to disabled invert because I don’t want it inverted. If I’ve got that right I’m just going to click Ok.
Now the problem with this mask is that this particular image is not black and white. It’s not. Let’s just turn everything off here. You can see that this is actually really quite gray. And for the mask to really be doing its work it needs to be almost black and white. So I need to boost the contrast up on the mask alone. So I’m going to click the mask to target it so any changes I’m making now are to that mask alone. And I’m going to choose Image Adjustments and Curves because curves will allow me to adjust the mask and have a look here on the mask itself as I work. What I’m doing here is I’m increasing the whiteness of the mask and then I’m increasing the black areas. The whiter and lightest areas are going to ensure that we can see the grill in these places. And the black the darker black areas are going to cope with the areas that we’re seeing through. So I need a fairly sharp change from black to white and I also need to make sure that my sharp change from black to white copes with the fact that there’s a sort of darker gray bar behind the image. And I want to make sure that that dark gray bar goes to the right color. It needs to go to black and not to white. And what I’m looking for here is to make sure that I can really see the image through this grill, and when I’ve got it I’ll click Ok.
Now if I wanted to I can lighten my grill. That’s fine. I need to make sure that my mask is black and white so that the image behind is being shown through and then if I want to change the actual grill itself well then I can add an image adjustment to that. But the two are very different adjustments. One is adjusting the grill color itself and the other is changing it as it appears as a mask over that original grill image. So if I want to make that a bit more light I can do so just to add that extra contrast. And now to add a drop shadow to push the orange image behind that grill I’m just going to click on the grill layer and choose Drop Shadow. And here’s the default drop shadow. Well that’s what you would see as a default drop shadow. And I can add as much or as little drop shadow as I want to push that behind and gave us the sense that there is a dimension or a distance between the grill and the actual orange image itself. And we can make that deeper or less deep as we want to and then click Ok.
So here we’ve used an original image of some oranges. We’ve added an image of a grill and we want to see through the holes in the grill to the image of the oranges behind. And we’ve done that using the image as its own mask so it’s showing us where we want to see through. We’ve added a lot of contrast to this so this mask is almost pure black and white. The image itself can be anything. We just gave it a little bit more of a pop by making it a little bit brighter but it could be anything. And we’ve finished with a drop shadow to add some dimension to the entire scene.
I’m Helen Bradley. Thank you for joining me for that this tutorial. Look out for more tutorials on projectwoman.com and on this YouTube channel. And please if you liked the video click to like it and consider subscribing to this YouTube channel.
Learn to use recursivedrawing.com to create a fractal tree that you can then use in a Photoshop collage. This video shows you step by step how to create the fractal tree and then how to copy and paste it into a Photoshop collage. Also, how to blend it seamlessly into the collage document.
Transcript:
Hello, I’m Helen Bradley. Welcome to this video tutorial. In this tutorial I’m going to show you how you can create fractal trees online that you can then use in collages and other images in Photoshop. This is the kind of recursive tree that we’re going to draw. And one of the benefits of this is that we can grab it and use it in a Photoshop image.
So let’s have a look and see how it’s put together. It’s put together with a single rectangle that’s a long rectangle and then we’re just going to draw it as a fractal tree. So I’m just going to click down here, this plus sign, to get started with a new image and let’s start with our first tree.
To create a tree we’re going to start with a rectangle or square and drag it to make a nice long thin rectangle which is going to be the trunk of the tree. And I’ll just place it in position at the bottom here. Then I’m going to go and drag this element which is the element I just created but this time I’ve got multiple versions of it. I’m going to push it so that I make this sort of recursive element.
Now it is really easy for this tree to get away from you. And if it does just stop it and just go and start again until you get really used to the tool and what it’s going to do it because it can behave really, really recursive and go everywhere really, really quickly. So I’ve now got that part of the tree. Now I’m going to go and grab the tree back again because I want it in here. And this is usually where if I’m going to lose it I’ll lose it at this point. But let’s call that good for our tree because that actually is quite a good tree. You’ll watch it until it’s finished drawing and when it’s finished drawing you won’t see any more changes around the edges.
So this is looking pretty good to me so I’m going to press the Print Screen key to take a screen print of it. And now I’m going to launch Photoshop. In Photoshop you can see I’ve already got a few trees hanging around. I’m going to choose File and then New and then click Ok because that is an image now the size of my clipboard. So all I have to do is do Edit Paste. And here is my tree.
So the first thing I’m going to do is make a selection around the tree itself and then I’m going to choose Select Inverse so the rest of the image is selected and I’m going to delete it just to get rid of it. I’m also going to get rid of the background layer so all I have right now is the tree itself. I’m going to select the magic wand tool and I can just click on the white and just press Delete and that will get rid of all the elements except the tree itself. And at this point I can just crop it down to size.
Now I would save it at this point because that means I’ve got a tree then I can use in anything in future. Now I have a texture image here and it’s a pretty big texture. And this image is pretty small so I’m probably just going to reduce the size of this down say 50 percent so that our tree is going to look a little bit better on it. With the texture image and the tree image both visible I’m just going to drag the layer of my tree image onto my texture. And here it is. I’m just going to make sure that I move the tree and not the background.
Now if you find that there’s a little bit of haloing around the edges of your tree so if you brought in a little bit of white that you want to get rid of you can do so. And the easiest thing probably is just to set this blend mode to darken because what that does is the white pieces on the tree anything that was a sort of legacy piece of white isn’t going to be brought in because it’s going to be lighter than the background.
So there are all sorts of trees that you can create using that tool. You can be successful and less successful depending on how you go. You can see I’ve got some really nice trees and I’ve got some pretty horrible ones as well. But that tool can be used to create fractal trees that you can then access to use in your images in Photoshop this way.
I’m Helen Bradley. Thank you for joining me for this video tutorial. I hope you enjoy the recursive drawing tool. Look out for more videos on my YouTube channel here and visit projectwoman.com for more tips, tricks and tutorials on Photoshop, Photoshop Elements, Illustrator, Lightroom and lots of other handy graphics techniques.
Learn how to counteract bright sunlight buy using a Diffuser
One option if you are shooting in bright sunlight and which works well if you have someone to help you is to use a diffuser.
A diffuser is a semitransparent piece of fabric which is typically one of the options you get when you buy a reflector.
Your assistant holds this between the sun and your subject and as the light passes through it is softened and the contrast between light and shadow is reduced.
A diffuser makes it easy to capture great portraits in even the harshest light.
This image was shot in full sun, notice the contrast between the harsh shadows and bright light.
This image was shot with a diffuser.
This is how the diffuser is used between the sun and the model to diffuse the light.
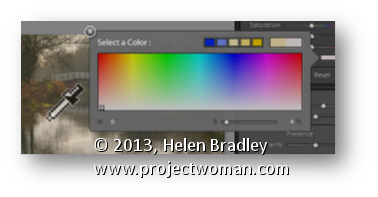
Sometimes when you need to grab a color in Lightroom you’d really like to use a color sampled from your image. This is easy to do.
In any situation where you have access to the Color Picker, click on the color swatch to open the Color Picker and hold your mouse over it. Press the left mouse button to get the Eyedropper but don’t let go – instead move out of the dialog and over the image and sample your color from there.
When Excel won’t total a PivotTable there is a reason why – and a workaround
When you are working with a PivotTable in Excel and if the data you are looking at comes from two different columns in the original worksheet you won’t be able to create automatic totals for it in the PivotTable.
So, as much as you ask Excel for totals, you’ll be disappointed.
However, you can create manual totals. To do this, click in the table and from the Options tab choose Fields, Items & Sets > Calculated Field. In the dialog, click in the Name box and type the name Overall Total. Click in the Formula box and write a formula that totals the fields you want to total. In our example it will be Net Hardware Sales plus Consulting.
To write the formula click next to the = symbol in the Formula box. Click Net Hardware Sales in the Fields box and click Insert Field. Add a + symbol to the formula, then click Consulting in the Fields box and click Insert Field.
The resulting formula will read: = ‘Net Hardware sales’ + ‘Consulting ‘
When you are done, click Ok and the calculated field will be added to the table and it will be visible alongside the other fields in the PivotTable.
Learn to use Masks in Photoshop. Here we look at how to collage a series of images together, using masks in Photoshop.
Transcript:
Hello, I’m Helen Bradley. Welcome to this video tutorial. In this tutorial we’re going to look at Masking 101. So we’re going to get you started with masks in Photoshop.
In this introduction to masks I’m going to show you how you can use masks to create images like this collage image. This collage image has been built up from a number of images and they’ve all been masked so that everything can appear nicely on top of each other.
The first image was the tail end of some cows and then I added an image of a tree. And this image has been masked so that we can see part of the cows’ tails behind it. But you can see that these two images are sort of blending into each other with this mask effect. Then we have the cow by herself and again we’ve masked her so that we can see the image of the tree behind her. And then we’ve added an image of some hay over here, and again added a mask to the hay image around the edge of the cow so that we’re getting this sort of almost seamless blended effect all the way across the image. And then we’ve got some milk cans and then finally we had some different effects that sort of tied the whole thing in together. But we’re going to have a look at masks and we’re going to have a look at it doing the last three images in this particular collage, just seeing how that would have been put together.
So I’m going to open the images. I’ve got a couple here open already. I’ve got the milk cans and the hay and let’s just go and get the cow. And I’m going to create an image that these will all going into. I think a thousand pixels is a bit too big so let’s try 800. And to start off with I’ll just drag and drop these images in. But this cow needs to be flipped first of all because I had her flipped in the original. So I’m going to flip her there and then just drag her in here. I’m just dragging on the layers and then just pressing V for the move tool so that I can move her into position. I’m holding Shift as I scale her up to full size. I don’t want to save the cow image. I want the hay image now so I’m going to drag and drop it into position. And I’m going to make sure I’ve got a fairly hefty overlap here because the overlap is going to allow me to blend these images together. And finally the milk cans and drag and drop them into position. And that’s a pretty big image too. I think actually it’s much bigger than the others. I’m pressing Ctrl T and then Ctrl 0, that’s Command T, Command 0 on the Mac, to just re-size these milk cans and just drag them into position.
So I’ll start off with a collage like this by just grabbing my images and just pulling them into position with a nice hefty overlap. And in this case I’m going to crop these images so that we don’t have anything extra hanging around. And now let’s go ahead and do the blending. And I’m going to do this by first looking at this layer here the cow and the hay. So I’m going to zoom into this area so that I can see what I’m doing, move the image across, and I need to mask this hay layer.
So to do that I’m going to click the Add Layer Mask icon here and that adds a mask to the hay layer. I need to have that mask selected. I need to select a brush to use. I’m just going to make sure that I have a brush here. I’m looking for a sort of solid-ish brush. This is a hard mechanical 38 pixels. Now it’s too hard but I can soften it by just taking down its hardness to make it nice and soft. And then I’m going to make sure that my mask layer is targeted and I’m going to set these colors here to their defaults by pressing the letter D.
Now we can already see that if this mask is white we’re seeing the hay. So that means if I want to see the cow I need to paint on it with black. So I’ve got black paint now. I’ve got the mask targeted and I’m painting on the mask where the cow is to bring the cow back in through the grass. Now I’m not going to be a 100 percent fussy at this stage because one of the benefits of using masks is that we can come back later on and edit it. So I’m looking for the edges of the cow but I’m not worried that I’m getting a bit of extra green here because I want to know where her edges are so then I can get a little bit closer to her in a minute. So I’ve got her pretty much there.
Now I just need to neaten it up. And to neaten it up I’m going to switch to white being my foreground color. I’m going to get a much, much smaller brush, make sure I’ve got my mask targeted and I’m going in close to the cow’s face here to make sure that I get an edge that gives me none of this green because it’s a really, really bright green that she’s standing on. And it’s not really doing a lot. The hay image I think is the prettier image. So again I’m just going to get close in to her here. Now this might take me half an hour to do to get a really nice result and the sort of result that I want. And I can also start working with a larger softer brush so I can make sure that I have it even softer. And I can work with a lower opacity if I want to and I can even paint in mid gray because with masks you can paint in black or white or any shade of gray because a mask is a gray-scale image. Now I’m just having a look at these milk cans. And I think that probably there’s one too many. So before I go much further I’m going to select the milk can layer and get rid of this first one because I don’t really like it that much. Now I’m going to grab the next three, I’m just going to move them over a bit.
There’s a bit of excess image hanging around but I’m not too worried about that. I’m going to add a layer mask to this layer. So now we have the overlap. And I want to bring the grass through the milk can so I’m going to paint on this layer again in black and white. So again a nice big brush, I’m going to switch colors by pressing the X key because I want to blend these images in together. I want to sort of suggest that there’s a seamless transition from one image to the other. And I’ll do that with a very soft edge so we almost can’t see where the grass image ends and the milk cans begin. And with this particular image I found that there was enough shine on the milk cans that we could perhaps even suggest that the grass image was showing through the milk cans. And I’m doing that by just adjusting down the opacity of the brush. So I’m not painting it full opacity and I’m just tapping where I want perhaps a little bit of the grass image to appear, again to really blend these images together. And if I’ve made a mistake and if I want to go back then all I need to do is change my paint colors and I can go back and paint out the effect that I’ve just painted in. And I can do this over and over again until I get the exact effect that I’m looking for.
Masks are a handy way of blending images in a way that allows you to come back later on and make changes to it. If I were saving this masked image because I want to make changes to it later, I want to come back and work on it a little bit later, I would do so by saving this as a PSD file. So I’d choose File and then Save As and make sure that when I’m saving it, it’s being saved as a PSD image. That will ensure that the masks and the layers are all there when I come back next time. The biggest mistake you’re going to make when you’re working with masks is when you actually work on the image instead of the mask itself. So if you start seeing that you’re painting in black, that’s telling you that you have the image layer selected not the mask layer. If you’re working on a mask you really need to have that mask layer selected.
I’m Helen Bradley. Thank you for joining me for this video tutorial. Look out for more video tutorials on this YouTube channel and visit my website at projectwoman.com for more tips, tricks and techniques with Photoshop, Photoshop Elements, Lightroom, Illustrator and lots more.
Learn how to download photos from your iPad or iPhone to your Mac
I’ve been using iCloud on the PC for a while now to sync photos from my iPad to my PC and it works well. On my new Mac, however, I had a problem, you see the feature is built in so you don’t have to install it – but you do have to find it! Here’s how:
1. Assuming you already have an iPad or iPhone and you have been taking photos with it, then you want to get them to your Mac. Start on your iPad and make sure it is set to sync. Do this in Settings – scroll to find Photos & Camera and make sure that My Photo Stream is turned on. This means that when you are on a wifi connection your photo stream will be synced with iCloud.
Note:
The photo stream has some limits. One is that iCloud itself only stores images for 30 days so after that they disappear. However provided you are connected via wifi on a regular basis these will be synced frequently so that won’t be a big issue.
On a device like the iPad and iPhone the photo stream will only contain those most recent 1,000 images – older ones are removed. This is because you have less space on your iPad and iPhone than on a Mac or PC. Remember too that the photo stream contains images from the iPad/iPhone and from your Mac or PC so this 1,000 image limitation is for images from all devices in total, so it’s not as big as it might seem.
On the PC that is less of a problem because you have a special Photo stream folder that you put images into to sync them, so you know how many you are putting there. It is more of an issue on the Mac because the process is more automated so you have to be mindful of what is happening. On your Mac or PC all the images from your Photo stream are stored – because there is more storage available on them.
2. To set up the Mac. You need to click iPhoto to launch it and then click Web: Photo Stream and turn this on.
3. Now, if you are connected via wifi you can wait as your photo stream downloads automatically for you otherwise this will happen automatically next time you are connected.
Once images are downloaded to iPhoto they will be added to the Photos folder so even if you turn off Photo Stream at some time the images that are already downloaded will have be stored there permanently.
Here are some fun and interesting techniques for capturing great images in full sun
If you ask any photographer the worst possible time to take photos, it’s undoubtedly when the sun is at its highest – in the hours around midday. So should you simply pack up the camera and go home or is there a way to capture good images even when the light is far from ideal? Luckily, you can capture great images any time if you know how to make the most of the situation. In this column I’ll show you how to avoid the worst features of harsh sun still capture great images.
What is wrong with full sun?
Around the middle of the day the sun is overhead and it is quite bright and the light it throws is harsh and not soft or full of color as it is at sunrise and sunset. When it is overhead the sun throws strong shadows so if somebody is standing in full sun it is the top of their head that is well lit and their face will be in shadow. This is not an ideal time to take a person’s portrait but it can be done, and I’ll show you how.
You will face a similar problem if you are travelling and if your once in a lifetime opportunity to photograph something like the Eiffel Tower is at midday. If you’re to get a shot that you’ll be proud of you’ll need to be a little creative in how you capture the image. The good news is that with a little imagination and effort you might just go home with photos that are far superior to those that you might get in other circumstances.
Counteract the light – Find Some Shade
When you’re shooting a portrait in full sun there are a few things you can do to soften the light. One is to move the person into a shady situation – this removes them from the harsh light so you reduce the high contrast between light and shadow to something more subtle.
If you do this, make sure that the person is in full shadow and set your camera’s white balance mode to Shade if you are under trees or to Cloudy if you are in the shade of a building to give the portrait a warmer look. In fact, even when you are shooting your subject in full sun you will find the light will be quite cool and blue and your photos will benefit from being warmed up. The easiest way to do this is to select Cloudy as your White Balance setting. If you are capturing in a raw format you can adjust this in post processing, if desired.
Counteract the light – Use The Fill Flash
A second option is to fire the flash or fill flash on your camera to add light to the person’s face so you are lighting the areas that are in deep shadow. If you are doing this, make sure to check the image after you have captured it to make sure that you haven’t positioned yourself so close to your subject that the flash is over brightening their face.
There is a sweet spot between too much flash – which will bounce off your subject’s face leaving it bright and over lit – and too little flash which will leave the shadows too dark. If the flash is too much, take a few steps backwards and try again – if it is too little, then move a little closer to your subject.
You may also find that your camera has a feature for adjusting the flash so it fires at less than 100 percent intensity which can help reduce the over-brightening effect of too much flash.