Monday, August 3rd, 2015

Copy Excel Formulas Without Updating References

Copy formulas without the cells updating to their new location

I have had an ongoing problem with a worksheet I use to track data by date. Each month I need to copy a range of cells to start the data comparison for the next month. Problem is that you can’t copy cells in Excel without the cell references updating to their new location. And, guess what? That’s exactly what I need to do – copy cells, paste them into their new location without the formulas changing – at all.

One way you can do this is to copy each formula manually by double clicking the cell, copy the text in the Formula Bar, press Esc and then go to the cell to copy it to and paste it in. It works, but you can only do it one cell at a time. I have ten or more cells so that’s just a plain waste of time.

I could write a macro – and in future, I will – but there is a super neat solution that I am using for now.

First of all, press Control + ` (grave) to show formulas in cells (or choose to Show Formulas from the ribbon).

Next select and copy the cells containing the formulas.

Paste these as text into a document. I use Paste Special > Unformatted Text in Word but you can paste into any text editor.

Return to Excel and hide the formulas using Control + ` again.

Now select the text of the formulas from your document and copy it, then paste it into the appropriate cells in the worksheet. The Data Parse feature in Excel will automatically split the text containing the formulas and paste one formula into each of the cells.

It might sound complex, but you can do this really quickly, and it’s accurate and effective.


Friday, May 29th, 2015

Print a List of Files in a Windows Folder

Learn how to quickly make a printable list of files in a folder (and how to import it into Excel)

Sometimes I need to get a list of files or folders inside another folder in Windows. I like to either print the results or take them to Excel to work on them. However, it isn’t self evident how to do this – there’s no print command in Windows Explorer that can do it for you. However, once you know how to do it, it’s easy to do.

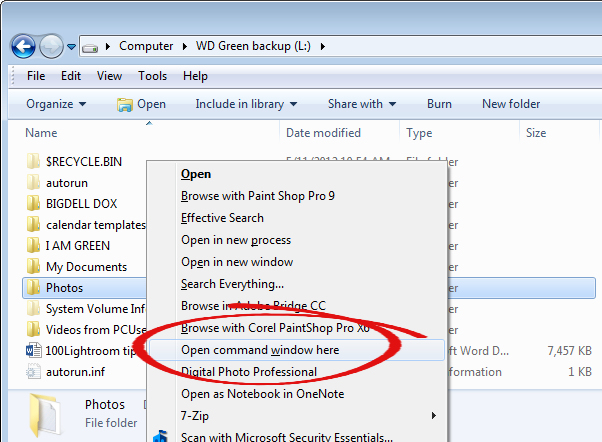
Start by navigating to the folder whose contents you want to print. You want to have this folder visible in the right hand pane in Windows Explorer. Hold the Shift key as you right click this folder. A shortcut menu will appear, from it choose the Open Command Window here option.

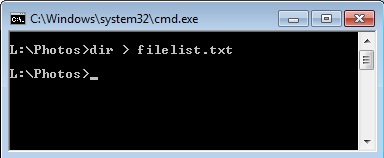
This opens a MSDOS window inside the folder.

Now type this DOS command at the prompt and press Enter:

dir > filelist.txt

The name filelist.txt can really be any file name of your choice, I just like to use the .txt extension since its contents are plain text.

When the prompt reappears close the window.

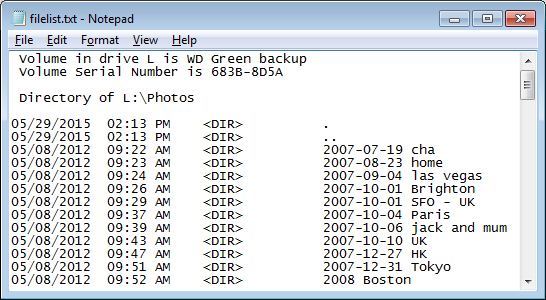
If you now look inside this folder you will see a text file called filelist.txt. You can now print it by right clicking it and choose Print or double click to open it in Notepad and print it from there.


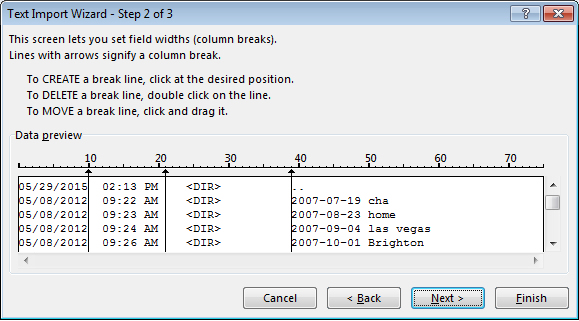
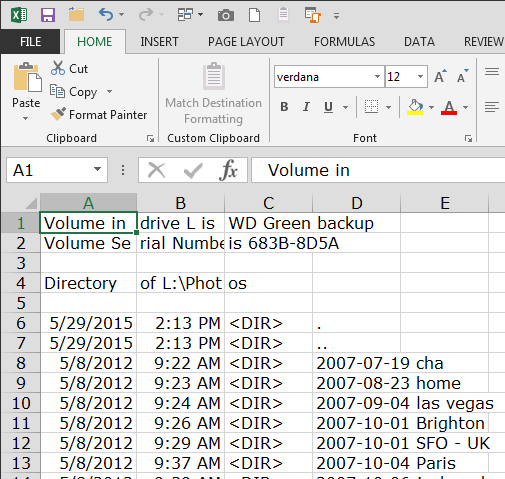
You can also open it in Excel and convert it to columns of text using the Text Import Wizard. The file is a fixed width file so it converts pretty easily into columns of text – you simply need to drag the lines in the preview to mark out how the text will convert to columns.


Then, when you are done, click Finish and you have the data in Excel – save it as an .xlsx file and you’re good to go.


Friday, March 27th, 2015

Help! Excel Shows Columns as Numbers not Letters


What to do when Excel shows Column 1 not Column A

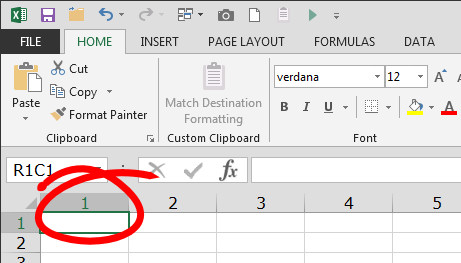
My Excel has been behaving stupidly lately. Instead of Column letters – A, B & C etc, the columns are numbered 1, 2, 3 and so on.

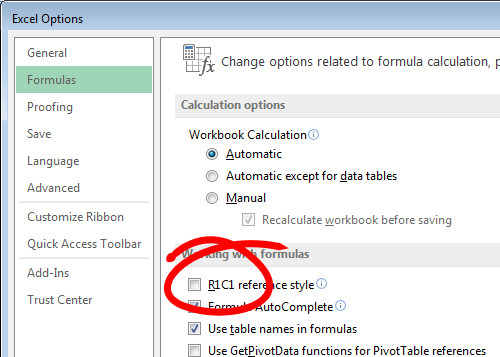
While I haven’t solved the fundamental problem I do have a short term solution. It all has to do with the Excel options. To change the column numbers back to letters chose File (the Office Button in Excel 2007) and choose Options > Formulas and disable the checkbox for R1C1 Reference Style.

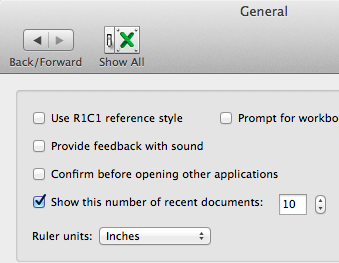
On the Mac click Excel > Preferences > General and deselect the Use R1C1 Reference Style checkbox.

This setting kicks Excel back into the correct mode – much more to my taste!

Of course, if you prefer seeing numbers and not letters all you need to do is to click the checkbox and you are good to go!

Wednesday, August 20th, 2014

A Great Microsoft Office Tutorial Resource

Great find! A list of good quality Microsoft Office tutorial resources

I’ve recently discovered an enormous list of Microsoft Office tutorials that may be worth checking out. Each piece of Office software has several listed tutorials ranging from beginner to advanced difficulty and general to specific usage.

Best of all, each tutorial has a brief summary of its contents so you can quickly decide if its new and interesting information. Hopefully every Office user will find something of use. You can visit the page here.

Thursday, July 31st, 2014

Force Excel to Recalculate a Worksheet

Help! My Excel formulas aren’t updating – how can I make Excel recalculate everything?

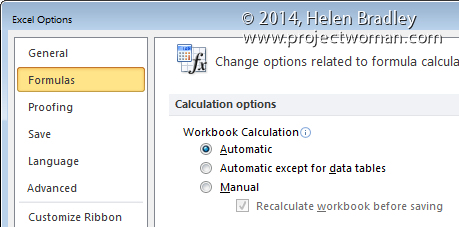
I have been working on a very large and very complex worksheet today. It uses a lot of custom functions to manage the calculations and as I was working on the functions I was plagued with a problem. You see Excel refused to update the cells that contained formulas based on my functions. It meant I was continually thinking that the problem was with my code. Sometimes the code was a problem but when formulas don’t update you just don’t get any visual feedback as to what is going on. I checked the Options to make sure that Calculation was set to be done automatically and it was.

Turns out the problem is a known one and can happen in Excel. How horrible is that? Excel won’t recalculate? Wow! That’s like Word not spell checking or not letting you type the letter e!

Anyway the solution is to press Control + Alt + F9 to force every formula in the worksheet to recalculate. When you do this, it might take a while for it all to recalculate but at least the data will now be accurate!

Monday, June 16th, 2014

Resize and Position Photos in SmartArt Placeholders


Yikes! Just how do you resize a photo inside a PowerPoint or Word SmartArt placeholder

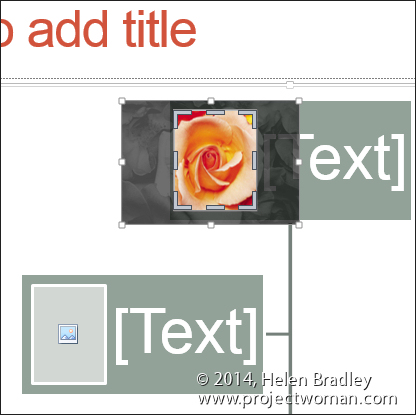
I got an email from a reader this morning. He has a PowerPoint slide (but it could as easily be a Word document or an Excel worksheet) and he wants to size a photo inside a placeholder. You see he was making an organization chart and he was dealing with lots of different head shots – all photographed differently. He wanted to make the faces the same relative size inside the placeholders – but to do this he had to get access to the photos inside the placeholders.

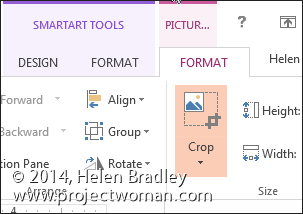
You see that’s the problem, every time you right click the placeholder and choose Size and Position you’re affecting the placeholder not the thing inside it! The solution is to use the Crop tool – so click on the placeholder and choose Picture Tools > Format tab and click the Crop tool.

Now you get handles around your photo and you can drag the handles to resize the image and you can move it to change its position inside the placeholder. When you’re done, click Crop again to finish. Easy when you know how.

Sunday, March 23rd, 2014

Easily Paste Web Content into Excel with Destination Formatting

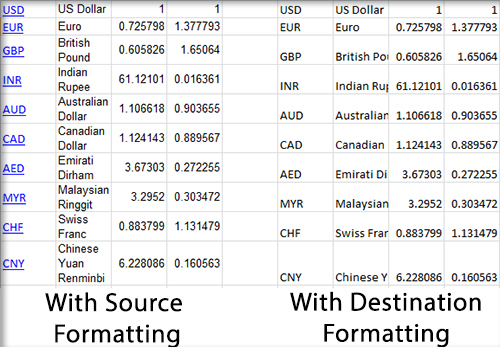
When pasting large data tables from your web browser into an Excel file you’ll probably be displeased to find that they do not match the formatting of the worksheet.

By default Excel will paste the data with the formatting it used on the source web page instead. This is rarely useful, since it’s very unlikely the web page had formatting that is compatible with your document. As you can see in the image above, using the source formatting can result in the inclusion of links, improper font and font size, and a number of other formatting issues.

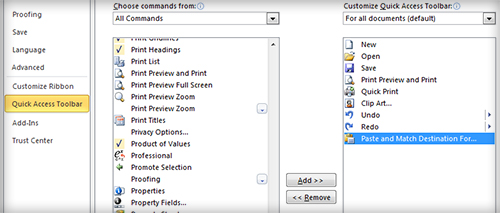
To make Excel paste the data with destination formatting (i.e. the formatting of the destination Excel worksheet), you’ll need to add a special command to your quick access toolbar. To do this, select File > Options > Quick Access Toolbar. Above the left column, select the Choose commands from dropdown and choose All Commands. Scroll down the list and find Paste and Match Destination Formatting. Select it and click Add, then OK.

Now whenever you wish to paste web data into Excel, click the Paste and Match Destination Formatting button in the Quick Access Toolbar instead of using the standard paste tool. This will result in the data being automatically formatted to match the look of the rest of your worksheet.

Helen Bradley

Helen Bradley

Friday, March 21st, 2014

How to Fix Excel Printing a Workbook to Multiple PDF Files

Learn how to  make sure that printing multiple sheets to a pdf gives one pdf and not many

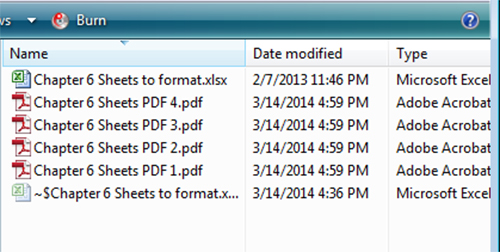
If you have ever tried to print a large Excel workbook to a PDF file, you’ve probably run into this issue. You press print, Excel asks you to name the PDF, and then it begins to print. Everything seems fine, but then Excel asks you to name another PDF, then another, then another, ad infinitum. When the operation finally finishes, Excel has properly printed the workbook to a PDF format, but your worksheets have been split into several different PDF files. Some PDFs contain multiple worksheets, others only a single one, but all you really wanted was one PDF file with the entire workbook.

It turns out this issue is caused by having different Page Setup options on each worksheet. For example, Excel can’t print two pages with different paper sizes to the same “piece of paper” (actually a PDF in this case). Instead, it insists on having two different PDFs to print to, one for each paper size. So, to resolve this issue, you must make sure each worksheet’s page setup agrees with the others.

Fortunately, doing this is very simple. To begin, in your Excel workbook, right click one of your worksheet tabs at the bottom of the window and choose Select All Sheets. Any changes to the Page Setup options will now be applied to every worksheet.

This means we don’t have to check each worksheet to make sure it has the same settings as the others; we simply choose which settings we want and all the worksheets will automatically match. To do this, go to the Page Layout tab in the ribbon. In the Page Setup section, click the small arrow in the bottom right corner to open the Page Setup dialog.

The Page tab of the dialog contains the critical options that can lead to this issue, namely the paper size and print quality settings. Change these to whatever you wish, typically something like letter paper at 300 dpi. Other settings, such as orientation and scaling, do not cause the multiple PDFs issue so if you wish you can change them for individual worksheets. Still, it’s best to have all worksheets print with the same settings. Once you have chosen your desired settings click OK and they will be applied to every worksheet.

You can now print your workbook to a single PDF file.

Helen Bradley

Helen Bradley

Wednesday, February 26th, 2014

Excel – Replace charts with pictures

Enhance your Charts with Visuals

by Helen Bradley
Why have boring old column and bar charts when you can have picture charts instead?

Learn how to replace bars and columns in Excel charts with small images stacked up to show the values being compared.

Image charts like this are one of Excel’s secrets so let me show you how to make them.

In the video you will learn how to replace columns and bars in Excel charts with images. You will see how to find images to use and how to stack and resize the images to fit the chart’s columns and bars.

Helen Bradley

Monday, November 25th, 2013

Cometdocs – A smarter file converting tool

Learn how to convert files directly from Dropbox and Google Drive

Needing to converted a document from one file type into another is very common today, which is why online file conversion services have become so popular. One service that has made a name for itself by offering free high-quality file conversion capabilities is Cometdocs. Cometdocs is a document management service that also offers cloud storage and file transfer options, the website is still primarily used by people who need fast and accurate file conversion online.

The service has unveiled a bunch of updates recently, one of them being integration with popular cloud storage services such as Dropbox and Google Drive. Even though Cometdocs offers free storage to its users (2GB worth), there is no denying that there are many much more popular cloud storage competitors out there.

Thanks to this new update, Cometdocs users can convert files directly from their Google Drive or Dropbox accounts in two different ways – via their browser or using Cometdocs’ new desktop app.

Of course, in both instances you need to sign up for a free Cometdocs account first. Once you have signed up and logged in, here’s how to integrate Google Drive and Dropbox with the online service.

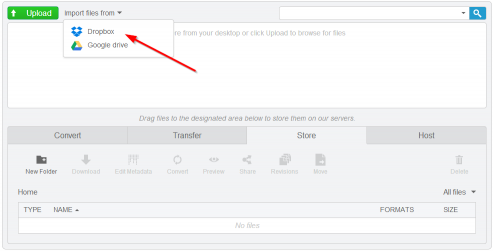
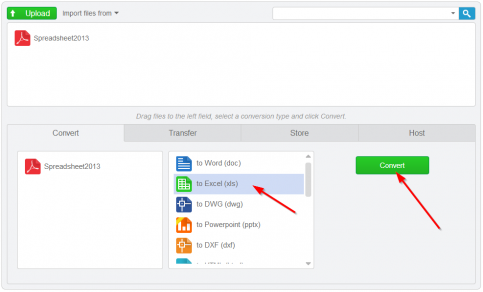
Right at the top of Cometdocs’ online interface, you will see a button that says “Import file from.” Click on that button and choose to synch either Dropbox or Google Drive with Cometdocs.


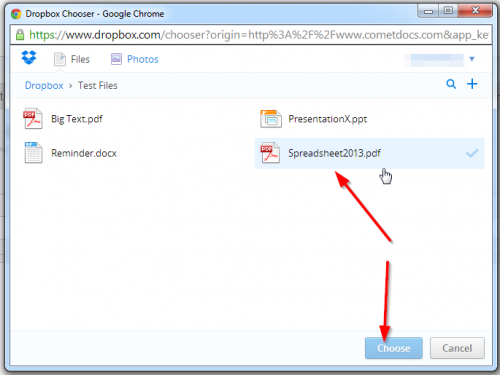
Once the synch has been completed, a window will open up listing all of your Dropbox or Drive files. Click on the file you want converted and then click “Choose.”

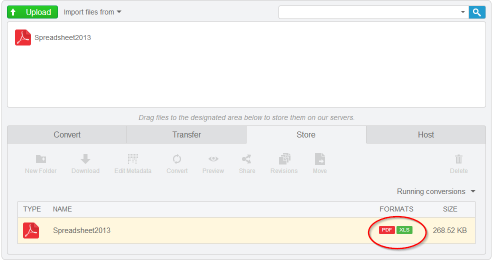
The file is now sent to your Cometdocs clipboard from where you can drag it to the Convert tab and choose your conversion option. Cometdocs allows users to convert PDFs into a large number of different file formats including MS Excel, Word, PowerPoint, HTML, Text, AutoCAD formats and more. You can also convert these files types and more into PDF with Cometdocs. It’s safe to say that the conversion options are plentiful.


Integrating Cometdocs with your favorite cloud storage service is even easier when using the desktop app. Once you have downloaded and installed the app and you have signed in to your Cometdocs account through it, the conversion process can be completed in just one step.

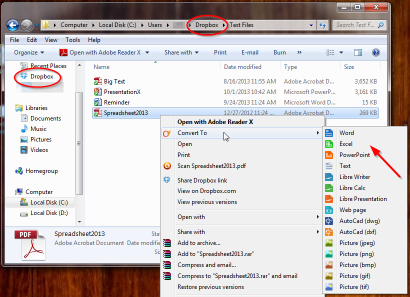
Simple open your cloud storage folder of choice. When using the desktop app, you are no longer limited to Google Drive and Dropbox integration. You can open up the folder of any cloud service you prefer to use.

Now simply right-click on the file that you want to convert. Find the Cometdocs logo in the menu and select your conversion type.

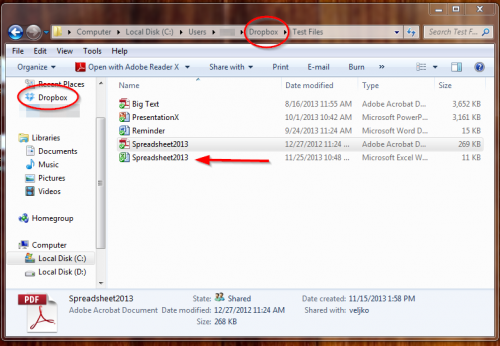
And that’s all there is to it. The app sends the file off to Cometdocs’ server for conversion, and once the process is complete, the newly converted file is downloaded automatically into your cloud storage folder and synched.

If you are looking for a faster and easier way to convert files from within your cloud storage conveniently, Cometdocs’ integration features are hard to beat.

Go to: http://www.cometdocs.com/  or http://www.cometdocs.com/desktopApp


Helen Bradley

Page 1 of 41234