Sunday, December 1st, 2013

Google Kills Spreadsheet Gadgets

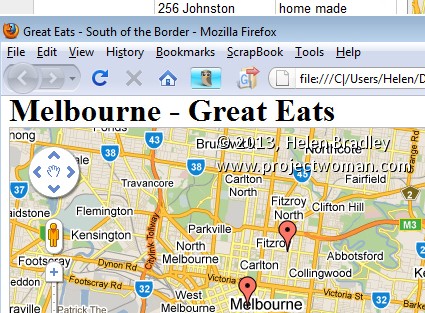
This is the old map gadget from Google – it doesn’t exist any more and the maps created using it won’t exist soon either.

If you’re asking yourself: What happened to Google Docs Gadgets? – the answer isn’t anything you want to hear

I loved Google Drive (formerly Google Docs) gadgets. These were advanced options you could use with Google spreadsheets.

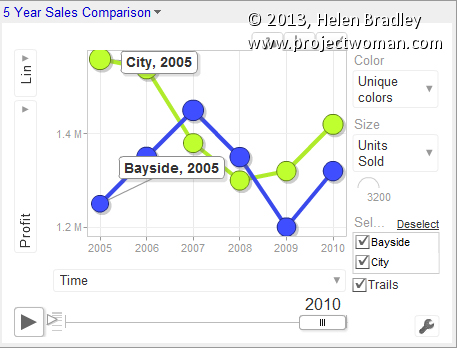
There was a Motion Chart gadget which helped you to create a great looking motion chart. You could set it up the way you wanted it to look and save those settings to the defaults. Click Publish and you’d get the code for the chart and you could embed it into a blog or website. Now it’s gone and the alternative is pretty awful by comparison. You can’t preset the motion chart settings – well you can try – but they aren’t saved with the worksheet and you can’t configure it and then put it on your website or blog. The chart keeps reverting to the default settings making it a whole lot less useful than it used to be.

 This and other old Gadgets either don’t exist in Google Drive or they have a really reduced functionality. 

Don’t get me started on the Map Gadget

Please don’t ask me about this one. This is so totally totally sad! The map gadget let you type a series of addresses into a Google Drive spreadsheet and you could select them and add the map gadget and it would plot the locations on a map.

It was A W E S O M E. And you know what? Google killed it – D E A D.

There is no map gadget – not even one which works horribly(like the other charts that replace deprecated gadgets) – it’s all gone. The only saving grace is that some folks have created apps to fill the gap and MapAList.com does a good job of taking the data from a Google Drive spreadsheet and plotting it on a map. Only I wish I didn’t have to use it – the old Google Gadget was a heap easier to use. To help you get started with MapAList I created a Youtube video that goes through the process.

This is why I hate the cloud

Yep.. there are things I hate about the cloud. Before the cloud took over our lives we bought software and it worked. If a developer made a new version of the software with new features – of if they removed old ones, we  could decide to upgrade or not.

The  cloud changed all that. Now Google makes changes and not only can we not do what we want to do but things we made don’t work anymore. The map gadget is being deprecated – for that read folks who used it in the past will find their published maps won’t work in the future. Don’t you hate that?

So what other bad news is there?

Sadly there is a lot. Google not only killed gadgets but it made a half hearted attempt at mollifying us with some new charts. Problem is that they suck – really, in contrast to what we had, they are pretty awful. They don’t have headings – so you can’t add a heading to charts like the motion chart, table chart, organization chart etc.  So, if you post a chart to your blog you’ll have to find another way to title it – really! Table charts used to be able to filter data – now they can’t – the list goes on.
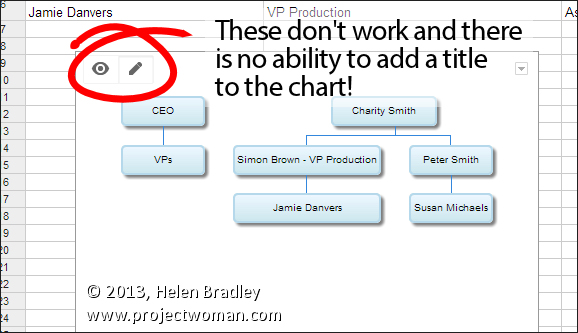

This is the new Organization chart – it is horrible, no title, buttons that don’t work and limited customization options – Shame Google Shame!

So, what can you do?

Bellyache about them – like I am.

Realize that all those blog posts out there that talk about Google Docs Gadgets are now wildly out of date – they are mostly useless as the charts don’t work like they use to.

Learn JavaScript – Google has a developer tool that you can use to make charts for web pages – but it is all done using JavaScript and the instructions and the examples on the Google site lack any real detail so, unless you really know what you are doing – they are hard to follow. Expect to put in a lot of trial and error to get it all working – and, to add insult to injury, you have to test your code online – the scripts won’t work on a local machine.

Hope someone creates better solutions. The folks at MapAList.com have done a good job of simplifying map creation. Hopefully other developers will create solutions that give us the functionality that Google saw fit to remove.

Stop talking about the cloud as being the panacea of all ills – it too often sucks and it disadvantages users when companies like Google take away functionality from their products.

OK.. rant over..


… for now  😉


Helen Bradley

Monday, November 25th, 2013

Cometdocs – A smarter file converting tool

Learn how to convert files directly from Dropbox and Google Drive

Needing to converted a document from one file type into another is very common today, which is why online file conversion services have become so popular. One service that has made a name for itself by offering free high-quality file conversion capabilities is Cometdocs. Cometdocs is a document management service that also offers cloud storage and file transfer options, the website is still primarily used by people who need fast and accurate file conversion online.

The service has unveiled a bunch of updates recently, one of them being integration with popular cloud storage services such as Dropbox and Google Drive. Even though Cometdocs offers free storage to its users (2GB worth), there is no denying that there are many much more popular cloud storage competitors out there.

Thanks to this new update, Cometdocs users can convert files directly from their Google Drive or Dropbox accounts in two different ways – via their browser or using Cometdocs’ new desktop app.

Of course, in both instances you need to sign up for a free Cometdocs account first. Once you have signed up and logged in, here’s how to integrate Google Drive and Dropbox with the online service.

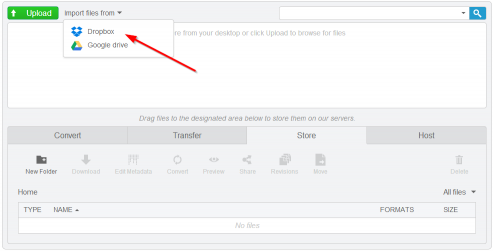
Right at the top of Cometdocs’ online interface, you will see a button that says “Import file from.” Click on that button and choose to synch either Dropbox or Google Drive with Cometdocs.


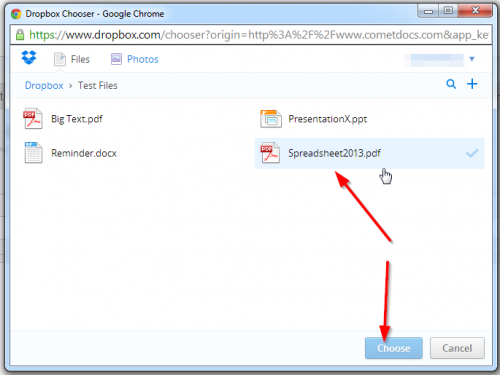
Once the synch has been completed, a window will open up listing all of your Dropbox or Drive files. Click on the file you want converted and then click “Choose.”

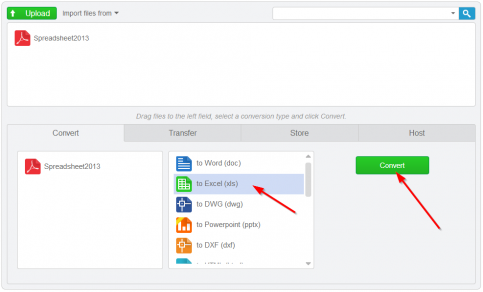
The file is now sent to your Cometdocs clipboard from where you can drag it to the Convert tab and choose your conversion option. Cometdocs allows users to convert PDFs into a large number of different file formats including MS Excel, Word, PowerPoint, HTML, Text, AutoCAD formats and more. You can also convert these files types and more into PDF with Cometdocs. It’s safe to say that the conversion options are plentiful.


Integrating Cometdocs with your favorite cloud storage service is even easier when using the desktop app. Once you have downloaded and installed the app and you have signed in to your Cometdocs account through it, the conversion process can be completed in just one step.

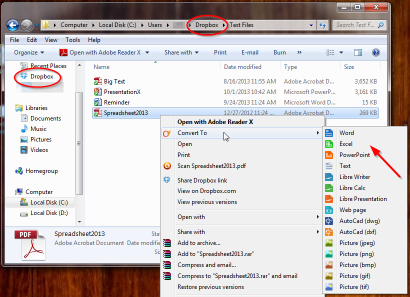
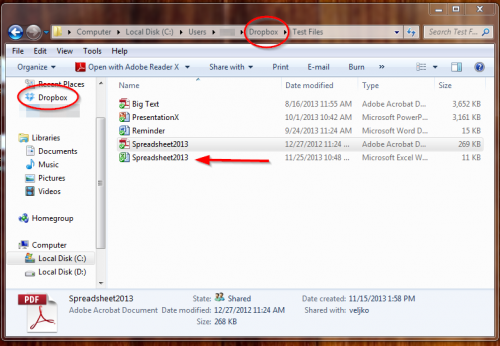
Simple open your cloud storage folder of choice. When using the desktop app, you are no longer limited to Google Drive and Dropbox integration. You can open up the folder of any cloud service you prefer to use.

Now simply right-click on the file that you want to convert. Find the Cometdocs logo in the menu and select your conversion type.

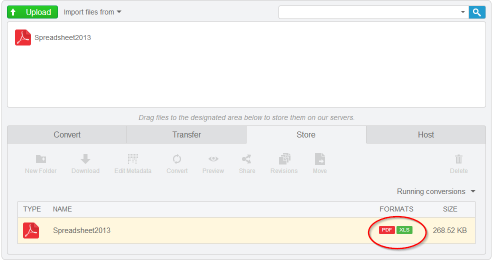
And that’s all there is to it. The app sends the file off to Cometdocs’ server for conversion, and once the process is complete, the newly converted file is downloaded automatically into your cloud storage folder and synched.

If you are looking for a faster and easier way to convert files from within your cloud storage conveniently, Cometdocs’ integration features are hard to beat.

Go to: http://www.cometdocs.com/  or http://www.cometdocs.com/desktopApp


Helen Bradley

Friday, November 15th, 2013

Google Drive Spreadsheet Notifications

Google Drive’s spreadsheets are liable to be shared and edited by many people.

This can potentially compromise the integrity of their data, so it’s a good idea to keep track of the changes made. Fortunately, Google provides a notifications service so the spreadsheet’s owner can do just that.

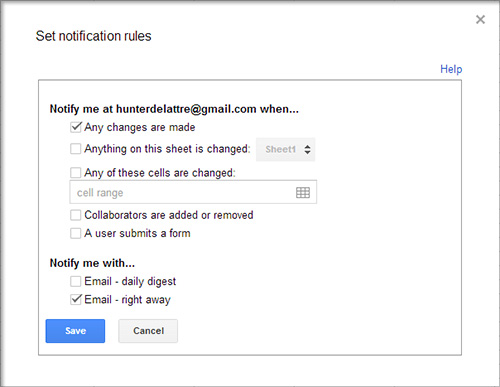
To access the notification rules, open the spreadsheet you want to track and select Tools > Notification Rules…. The resulting dialogue allows you to choose what changes to track. If only some data is critical, you can choose to only track a specific sheet or cell range. If you’ve set up a form to feed its result into your spreadsheet, you can choose to be notified whenever somebody submits the form. Choosing email – daily digest will add the notification to a daily email that contains all of your notifications that have this rule selected. Email right away immediately sends the specific notification to you.

Click Save when you are done. Your new notification rule will be the first on a list of all the notification rules for that spreadsheet. From the list you can add new rules, or edit or delete an existing one.

Helen Bradley

Sunday, November 10th, 2013

Google Docs Search the Menus

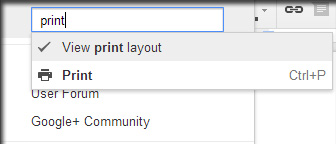
Sometimes you know what you want but you don’t know where to find it. Google Docs’ menus are pretty simple, but the Search the menus tool can make menus entirely obsolete. You can find this search tool under the Help menu, but it can be more easily reached by pressing Alt + /.

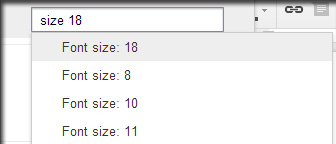
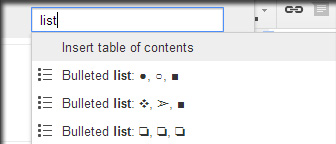
This search tool is extremely powerful. Type anything related to what you want and it’s almost guaranteed to appear, from basic settings to specific font settings. Search “math” and you’ll see the option to insert a new a equation, “double” will yield the double line space setting, “list” will provide many different types of lists you can insert.

Almost every setting can be tweaked from this search menu. Next time you’re lost in the settings menus, just pressing Alt + / and find what you want in seconds.

Helen Bradley

Wednesday, October 30th, 2013

Paint Text Formats in Google Docs

You’ll often discover that copy-pasted text from other parts of the web does not match the font styling of your document.

For example, you may copy a quote from an article and find it in 10 pt and a different font or color. Google Doc’s new paint format tool solves this problem by letting you instantly match foreign text’s style to your own by copying the formatting from one set of text to another.

To use it, select any of the text from your own document and select the paint roller icon from the left side of the toolbar. The selected text’s styling will be saved in the paint tool, and the next body of text you select will have the styling “pasted” onto it such that the foreign text now matches your own. So, with the template text and paint tool selected, select the text with incorrect styling and it will be fixed instantly.

Helen Bradley

Sunday, October 27th, 2013

Create an Archive of Your Entire Google Account

If you rely on many of Google’s products, you may have stored a lot of important data on your account.

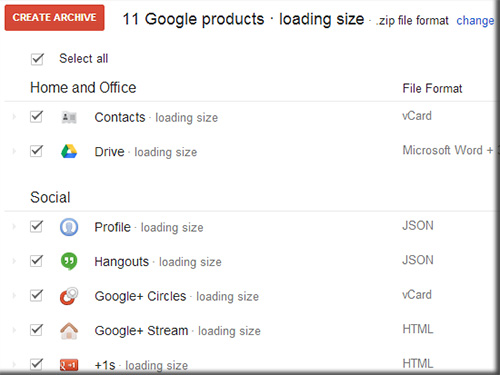
Even though Google’s servers are very reliable, it’s still a good idea to backup your critical documents, photos, messages, etc. Fortunately, Google provides a service called Google Takeout which provides a quick and easy way to backup everything on your Google account, even your Google+ circles and pages. The service can be found under your account settings, labeled download your data. You can also find it at this link.

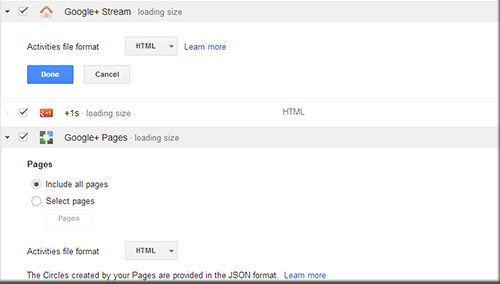
At the Takeout page you’ll find a full list of what is being archived. You can uncheck anything you don’t need to save. If you click on a category, a list of settings will appear for that category. Sometimes no changes can be made, but some categories allow you to change their archive’s file format. Others allow you to filter what you want to save, so that only specific data—such as a certain folder in your documents library—will be archived.

Once you have selected your desired settings, click “Create Archive.” If your account includes a lot of data, it may take a while to finish generating the archive. You can leave the page, however, and Google will email you when the archive is ready for download so you don’t have to wait around for it. To finish the process simply follow the provided download link to download your Google profile archive.

Helen Bradley

Sunday, October 20th, 2013

Hanging Indents in Google Docs

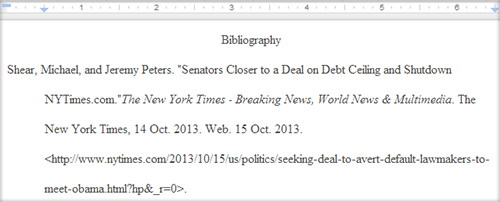
If you’re writing a paper with a bibliography or works cited page in Google Docs, you may be frustrated to find there’s no formatting button for hanging indents.

You can create these manually, however, using Doc’s ruler tool. If the ruler is not already visible, select View > Show Ruler. It will appear across the top of your document.

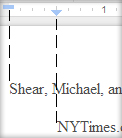
To create your hanging indent, first select the text you wish to add the indent to. Notice two small blue shapes on the left side of the ruler, a triangle and rectangle.

The rectangle represents your left margin, the triangle your indent. There is also a grey section of the ruler that shows you the standard 1 inch margin. Move the triangle to 1/2 inch right of the left margin. Keep in mind that while a 1/2 inch indent is standard, you should adjust this if a different sized indent is required. Now pull the rectangle back to the original left margin. You should see your text move with these shapes such that the text’s margin aligns to the rectangle and the hanging indent aligns with the triangle.Keep in mind that just like any other formatting choice, this indent will only be applied to text you’ve selected or text written following the change.

Helen Bradley

Monday, September 30th, 2013

Automatic Table of Contents in Google Docs

When creating a long document with many different sections, it’s often necessary to create a table of contents to make navigation easy. Fortunately, Google Docs can generate a table for you almost entirely automatically.

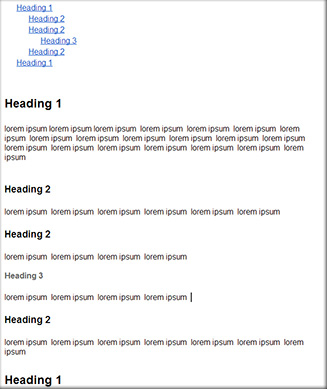
To do this, you must first create section headers using the list under Format > Paragraph Styles. Simply highlight a section title and apply an appropriate heading style for it. Each style grows progressively smaller from 1 to 6. Major sections, such as chapters, should use the largest headings while smaller subsections should use progressively smaller headings.

Once you have created all of your headings, select where you want the table of contents to be in your document and choose Insert > Table of Contents. The table will automatically fill with links to each heading and arrange itself according to the heading styles chosen. Smaller headings will be indented beneath larger headings in the table, indicating that they are subsections.

Helen Bradley

Saturday, May 18th, 2013

View Offline in Google Docs


You can easily enable offline viewing of any Google Docs documents. By default this ability is turned off, so you may want to enable it for emergency situations if you rely on Google Docs for viewing and editing important files. Keep in mind that you must be using Google’s Chrome web browser to do this. Chrome can be downloaded here. Also note spreadsheets can only be viewed, not edited, using this method.

To do this, go to your Google Drive and click the More button along the left side, under the Create button. This will open a small dropdown menu that includes the Offline option. Select this, and then follow the simple instructions to enable offline mode. This really involves just two clicks and some waiting. Once you have selected the Enable Offline button, you’ll have to wait some time so that all of your documents can be downloaded to your computer for offline storage. All offline documents will be listed in the Offline section once this is done.

If you want to disable offline editing for any reason, simply click the gear icon toward the top right of Google Drive and select Disable offline.


Helen Bradley

Wednesday, May 15th, 2013

Use More Templates in Google Docs

When creating a new presentation or document in Google Docs, you might find that the default templates don’t provide the theme you want. Fortunately, Google provides an easy way to find the perfect template for your situation, from baby photo albums to résumés. To find a template suitable for you, simply visit https://drive.google.com/templates?view=public. You can search by name, category, and popularity to quickly find whatever you need.

Once you’ve selected a template you like, simply click the Use this template button and a new document will automatically open with the chosen template, ready for use.

Helen Bradley

Page 1 of 3123