If you’re writing a paper with a bibliography or works cited page in Google Docs, you may be frustrated to find there’s no formatting button for hanging indents.
You can create these manually, however, using Doc’s ruler tool. If the ruler is not already visible, select View > Show Ruler. It will appear across the top of your document.
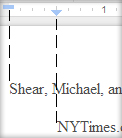
To create your hanging indent, first select the text you wish to add the indent to. Notice two small blue shapes on the left side of the ruler, a triangle and rectangle.

The rectangle represents your left margin, the triangle your indent. There is also a grey section of the ruler that shows you the standard 1 inch margin. Move the triangle to 1/2 inch right of the left margin. Keep in mind that while a 1/2 inch indent is standard, you should adjust this if a different sized indent is required. Now pull the rectangle back to the original left margin. You should see your text move with these shapes such that the text’s margin aligns to the rectangle and the hanging indent aligns with the triangle.Keep in mind that just like any other formatting choice, this indent will only be applied to text you’ve selected or text written following the change.

The rectangle represents your left margin, the triangle your indent. There is also a grey section of the ruler that shows you the standard 1 inch margin. Move the triangle to 1/2 inch right of the left margin. Keep in mind that while a 1/2 inch indent is standard, you should adjust this if a different sized indent is required. Now pull the rectangle back to the original left margin. You should see your text move with these shapes such that the text’s margin aligns to the rectangle and the hanging indent aligns with the triangle.Keep in mind that just like any other formatting choice, this indent will only be applied to text you’ve selected or text written following the change.


