Friday, March 21st, 2014

How to Fix Excel Printing a Workbook to Multiple PDF Files

Learn how to  make sure that printing multiple sheets to a pdf gives one pdf and not many

If you have ever tried to print a large Excel workbook to a PDF file, you’ve probably run into this issue. You press print, Excel asks you to name the PDF, and then it begins to print. Everything seems fine, but then Excel asks you to name another PDF, then another, then another, ad infinitum. When the operation finally finishes, Excel has properly printed the workbook to a PDF format, but your worksheets have been split into several different PDF files. Some PDFs contain multiple worksheets, others only a single one, but all you really wanted was one PDF file with the entire workbook.

It turns out this issue is caused by having different Page Setup options on each worksheet. For example, Excel can’t print two pages with different paper sizes to the same “piece of paper” (actually a PDF in this case). Instead, it insists on having two different PDFs to print to, one for each paper size. So, to resolve this issue, you must make sure each worksheet’s page setup agrees with the others.

Fortunately, doing this is very simple. To begin, in your Excel workbook, right click one of your worksheet tabs at the bottom of the window and choose Select All Sheets. Any changes to the Page Setup options will now be applied to every worksheet.

This means we don’t have to check each worksheet to make sure it has the same settings as the others; we simply choose which settings we want and all the worksheets will automatically match. To do this, go to the Page Layout tab in the ribbon. In the Page Setup section, click the small arrow in the bottom right corner to open the Page Setup dialog.

The Page tab of the dialog contains the critical options that can lead to this issue, namely the paper size and print quality settings. Change these to whatever you wish, typically something like letter paper at 300 dpi. Other settings, such as orientation and scaling, do not cause the multiple PDFs issue so if you wish you can change them for individual worksheets. Still, it’s best to have all worksheets print with the same settings. Once you have chosen your desired settings click OK and they will be applied to every worksheet.

You can now print your workbook to a single PDF file.

Helen Bradley

Helen Bradley

Monday, November 25th, 2013

Cometdocs – A smarter file converting tool

Learn how to convert files directly from Dropbox and Google Drive

Needing to converted a document from one file type into another is very common today, which is why online file conversion services have become so popular. One service that has made a name for itself by offering free high-quality file conversion capabilities is Cometdocs. Cometdocs is a document management service that also offers cloud storage and file transfer options, the website is still primarily used by people who need fast and accurate file conversion online.

The service has unveiled a bunch of updates recently, one of them being integration with popular cloud storage services such as Dropbox and Google Drive. Even though Cometdocs offers free storage to its users (2GB worth), there is no denying that there are many much more popular cloud storage competitors out there.

Thanks to this new update, Cometdocs users can convert files directly from their Google Drive or Dropbox accounts in two different ways – via their browser or using Cometdocs’ new desktop app.

Of course, in both instances you need to sign up for a free Cometdocs account first. Once you have signed up and logged in, here’s how to integrate Google Drive and Dropbox with the online service.

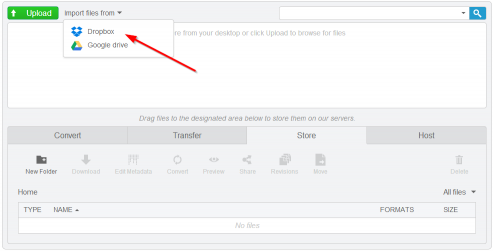
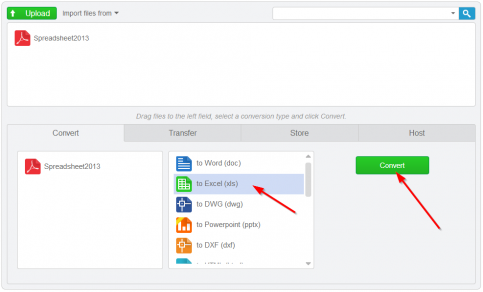
Right at the top of Cometdocs’ online interface, you will see a button that says “Import file from.” Click on that button and choose to synch either Dropbox or Google Drive with Cometdocs.


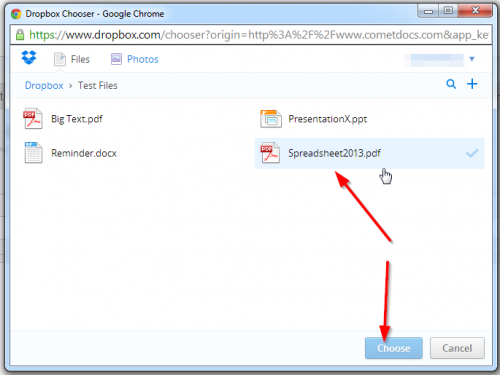
Once the synch has been completed, a window will open up listing all of your Dropbox or Drive files. Click on the file you want converted and then click “Choose.”

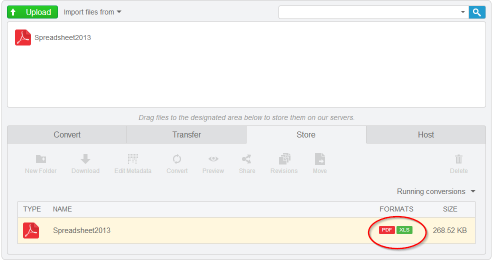
The file is now sent to your Cometdocs clipboard from where you can drag it to the Convert tab and choose your conversion option. Cometdocs allows users to convert PDFs into a large number of different file formats including MS Excel, Word, PowerPoint, HTML, Text, AutoCAD formats and more. You can also convert these files types and more into PDF with Cometdocs. It’s safe to say that the conversion options are plentiful.


Integrating Cometdocs with your favorite cloud storage service is even easier when using the desktop app. Once you have downloaded and installed the app and you have signed in to your Cometdocs account through it, the conversion process can be completed in just one step.

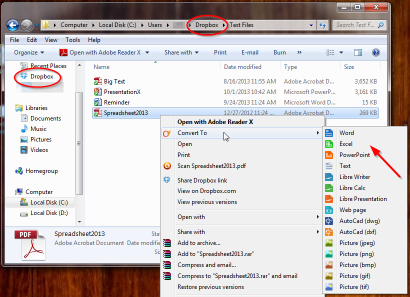
Simple open your cloud storage folder of choice. When using the desktop app, you are no longer limited to Google Drive and Dropbox integration. You can open up the folder of any cloud service you prefer to use.

Now simply right-click on the file that you want to convert. Find the Cometdocs logo in the menu and select your conversion type.

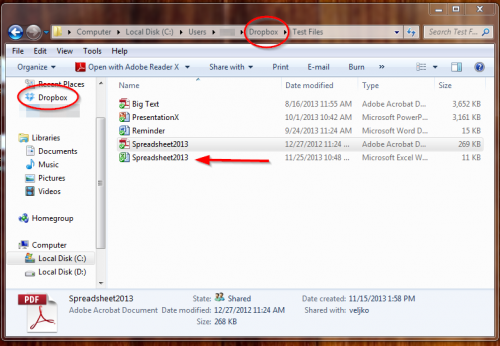
And that’s all there is to it. The app sends the file off to Cometdocs’ server for conversion, and once the process is complete, the newly converted file is downloaded automatically into your cloud storage folder and synched.

If you are looking for a faster and easier way to convert files from within your cloud storage conveniently, Cometdocs’ integration features are hard to beat.

Go to: http://www.cometdocs.com/  or http://www.cometdocs.com/desktopApp


Helen Bradley

Wednesday, October 31st, 2012

Word 2013 – What’s new

Learn what is new in Word 2013 and how you can put it to work in your day. Features include new Design tab, start screen, Layout Options, PDF editing, Table border painting, styles and sampler, Read Mode options, Present Online, Save to skydrive, insert images and video from the web.

Transcript:

Hello, I’m Helen Bradley. Welcome to this video tutorial. Today we’re going to look at what’s new in the new Word 2013. This is the new start screen that you’ll see when you start Word 2013. And it’s similar to that in Excel and PowerPoint and Publisher. You’ll see the recent documents that you’ve had open down the side of the screen here, and you’ll be given the option to open other documents for example from SkyDrive or your local computer. There are templates here and these are current so at the moment it’s sort of October so we’re seeing Thanksgiving and Halloween templates. They will change with the seasons. If there is a template that you like you can click on it and you can pin it to your start screen. You can also click to have a look at it in more detail. If there are multiple images you can look through it here. If you want to use it click Create, otherwise just close it down, and you can go and have a look at another template. You can search online for templates and there are some suggested searches here. If you have your own templates you can click Personal and view the templates that you’ve created for yourself. Up here in the top corner are details of the account that you’re currently logged into. So this tells me I’m logged in to this particular SkyDrive account. Let’s open a document and we’ll start working inside the new 2013.

Here I have a document open inside the new Word 2013. You’ll see that the screen is very clean. It’s got that sort of metro style interface that is typical of the new Office 2013 suite. Everything is very flat and your documents sort of take center stage. So let’s have a look at a couple of the new features. The first one is the new read mode. I’m going to View and then Read mode because a lot of people actually use Word as a reader. So I’m just going to set this back to the layout that you will see by default. This is this sort of two column layout which allows you to work through the document and read it and particularly appropriate for using on a tablet. You can change this to the regular page layout if you want to by choosing Paper Layout. There are paper colors that you can choose. We’re obviously using sepia at the moment. And you can set it to the default which is two columns, narrow or wide as you choose.

There are some other features here. If you right click a word you can click Define and it will be defined on the screen for you. I don’t have a word that’s actually going to be definable to show you that, but it works just fine. The other thing in this read mode is that you can look at things more closely. For example we might look at this chart and double click it. And it will now open over the top of the document so that we can look at it in more detail. And that happens as well with smart art. Now this read mode is not looking at the document the way it would be presented so things may overlap if they’re complex. The important thing about this read mode is that it’s for reading the document and not sort of previewing it the way it’s actually going to appear when it’s printed.

I’m just going to escape out of here to go back to the regular Word. Now one of the other changes to Word is in the review area so I’m going to open a different document. I have one here that has track changes in it. The track changes feature has been overhauled a little bit. Let’s go into review and I’m just going to show the new mode which is simple markup. In simple markup we’re going to see the document as it would be if all the changes were incorporated. So that’s text that is inserted is inserted and text that has been marked for deletion is deleted. And we can switch between these two modes either by choosing simple markup or all markup here on the tab, or we can click these lines. These are lines indicating that there are changes here, but we’re seeing it in simple mode at the moment. So we’re not seeing the changes. We’re just being warned that there are changes. Click again and now we can see what the changes are.

There are some changes too to comment. So for example if somebody adds a comment to a document, if you want to reply to that comment you can click this Reply button that allows you to now reply to that comment. The changes here are quite significant because in the past if you wanted to reply to a comment all you could do was add another comment. So conversations could become quite long and complex as they sort of scrolled down the page. Here now all the comments or all the conversation about a particular point can be isolated inside a single comment. And I’m just going to delete that comment. Let’s just get rid of it in its entirety and let’s go back to viewing this document in the new simple markup.

Now I’m going to get rid of all the changes in this document. I’m going to accept everything because I want to show you some of the new design features in the new Design tab. The new Design tab has put together some of the features that were really difficult to find in earlier versions of Word, in particular the sort of document formatting styles. Now you can see what the document formatting styles are. And if you like one you can click on it to apply it to your document. And there are lots of different styles here to choose from. This is the one that we were using previously, but they’re easy to find and to use. If you see one that you like, for example we might like this sort of gray look, we could change the color scheme that’s applied to it. So we could make it blue for example. There’s also the ability to choose different font combinations for our document if we like the look of it but prefer a different combination of fonts for example.

Now if we create a look that we like and we want to use it every time we open Word then we can set this as default. This is a new option on the Design tab. If we click this, this is now going to be the default look for all our documents in future. So this new Design tab has lots of features on it that make things more accessible than they were. Of course if we want to format individual elements on this page we’d back to the Home tab and selecting styles. But these styles are linked to the design or the document format that we’re using here from the Design tab.

Still in this document I’m just going to change its rotation back to normal and we’re going to have a look at the new layout options that we have for this. One of them is this layout options icon here which makes it more accessible to find the text wrapping options. In the past these were really quite difficult for people to find. And now they’ve been attached to the image itself. You can also opt to move the image with the text or fix its position on the page. If you click See More you’ll get the more traditional layout dialog. There are also alignment guides so watch as I move this image around the page. It becomes aligned or we can see when it is aligned to various objects on the page because we get this green alignment guide appearing. So we can see when it’s aligned with paragraphs, with margins of the page, perhaps the edge of the page itself. So this allows you to align things up more easily than you’ve been able to do in the past. Now still in this document we’re going to have a look at the new navigation pane. I’m choosing View and then Navigation Pane. This document has been set up using styles. So because it’s been set up using styles I can navigate the document by selecting the headings in this navigation pane. It just makes it easier to move around and particularly a long document. In addition, there are these new collapse icons. Again, because this document has been formatted using heading styles these collapse and expand icons appear and I can click on them to collapse the document down to just the heading. So imagine this in a really long document. If you had really large headings that had lots of text underneath then you could collapse your document so that you only work on the headings that you’re interested in working on at the time and then you can expand the other headings as you go through it. Now this is a feature that used to be available in outline mode but it’s been brought into print layout. So it’s accessible to any document that you create using heading styles, not only the ability to collapse and expand paragraphs but also this slightly smarter and more useful navigation pane.

Now as well as collapsing parts of the document you can now collapse the ribbon. So you can click here to collapse the Ribbon and it collapses to just the headings. And then you can click to open it. You can pin it or unpin it depending on what you want it to appear like. I’m going to pin it because I like to see the ribbon particularly on large screens.

Before we start looking at tables let’s just go to headers and footers. I’m going to choose Insert and then I’m going to just insert a plain old header into this document. One of the changes here to the header option is that there is access to document info. You can get access to the author, file name, pathname and document title from the Header tab and that’s new in this version of Word. So let’s just close out of there and let’s switch to a document that has a table in it. Here we have a document that has a table in it, and with the table selected we now have options for formatting that table. From the Design tab you’ll see that there are additional table styles here. And these are theme aware so they’re going to look like the theme itself. So I’ve just applied one of them here. Now I can go ahead and format this table a little bit better if I want to. I’m thinking that the text would be better white. So let’s just go and get some white text, and let’s make it a bit bolder.

Now there is a new feature with the design of this table in the border. So we’re going to the table, let’s just grab the table. I’m going to the Design tab and here are our new border styles. This allows us to bypass the old border option that was available inside Word and to paint borders on. Now I can click here for border styles, and I’ll get borders that are theme aware. So these are borders that look like the theme. So I’ll just select one, but I might make a slight change to it. I think I’ll add a slightly wider border. So I’m choosing the color I want from the styles, but I’m making it a bit wider. Now I’m going to click on the border painter and I’m going to start Painting this border onto my table. And wherever I click and paint it’s going to be painted on. So this allows me to paint borders on where I want them to appear and to remove them where I don’t want them. For example, I could just set a border to none and they would be removed. Now let’s say that I make a mistake down here and I paint this border on by mistake. I want to go back to the regular border. Then all I need to do is from the border styles option here is choose my border sampler. I can sample a border. It’s now attached to the border painter. So having sampled it, I can now paint it back onto the table. So this gives me a lot more flexibility in working with tables than I’ve ever had particularly with borders and tables because that’s really been a nightmare issue for a lot of users.

Now the other thing that I can do in tables that I haven’t been able to do easily in the past is to add a row or a column. All I need do is to position my cursor just where I want the row or column to be inserted and I get this new indicator. And I can click to insert a row. I’m just going to undo that. But let’s go and see that the same thing appears between columns so we could add an extra column to the document. Let’s just undo that. We could also add one at this edge if we want to. So there are some new features inside Word not only new table styles but the ability to paint on borders, to sample borders and to access border styles.

The new features in Word 2013 extend to images and video. If you click the Insert tab you get access to online pictures. So you can view images that are in the office.com clipart collection. You can search Bing or you can go and search your own SkyDrive account. So let’s just type cupcake here. You can see that our cupcake image came from there, but you can add additional images by just clicking on them to insert them into your document. The same thing happens with video content. You can click Online Video and access online video. The benefit of these insert video and online picture options is that you can insert content direct from the web without needing to download it and save it to your computer first.

Let’s have a look at some of the screens that are available here. The open screen gives you access to recent documents, and if you click Computer you’ll see access to your recently open folders. And you can pin folders here as well as pin documents here. You can also get access to your SkyDrive account. One of the new features is in this share Option because you can now present online. If you click this you can go into a present online feature that is presented through the Office presentation service which is a new service. And this is similar to presenting a PowerPoint presentation online. Your presentation or your Word document is uploaded and you’re given a link that you can then share with others and they can watch as you present the document to them. You also have the ability to publish blog posts and invite people also to share your document. This would be done via a SkyDrive location. Here are the account options. Here you can see what account you’re currently logged into. You can also add services. For example we could add a LinkedIn or Twitter service here. We’re already connected to Facebook and SkyDrive, and you can see your update options.

The other feature that I want to talk about is the ability to open and edit PDFs. So I have the open screen available here, and there is a PDF that I just downloaded. So I’m just going to click it to open it. Now you’ve never been able to do this before inside Word and that is to open a PDF for editing. Now the application is not perfect. In fact it’s far from perfect, particularly with complex documents like this one that actually has images and pieces in it. But if we go to the select pane here we’re able to actually locate the picture and the elements that are part of this document so I can actually find these shapes. And I’m just deleting them. So I’m getting rid of these shapes that made the image and now I have something more attune to the original PDF and I could make changes to it. I would probably need to reformat this table as tables aren’t particularly friendly. But you do get access to the internal contents of a PDF file which you couldn’t in the past.

So there’s a roundup of the features that are new in Word 2013. I’m Helen Bradley. Thank you for joining me for this video. Please subscribe to my YouTube channel so that you’re advised of new videos. You can also find more blog posts and information on my website at projectwoman.com.

Helen Bradley

Wednesday, June 20th, 2012

Print big images with Paint


Well, who knew the humble Microsoft Paint could do what just about no other program can easily do? Well it can. I recently assembled a very large image from a series of screenshots of a help screen. The help screen was really long so I captured screenshots of each portion of it, assembled them into one really narrow and long file and then got stuck – how the heck could I print this? Hmm… enter Microsoft Paint… but first, here’s the entire process from Print screen to Photoshop to Paint!

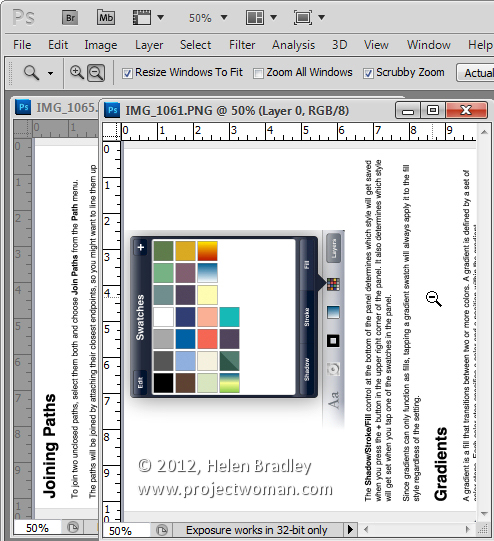
I brought all the screen capture images into Photoshop, cropped them using an action to do it very quickly, rotated them counterclockwise 90 degrees and then saved the images with sequential numbering. There was a bit of overlap in each image – you need this for the panorama merge to do its stuff and they need to be rotated or they won’t assemble properly.


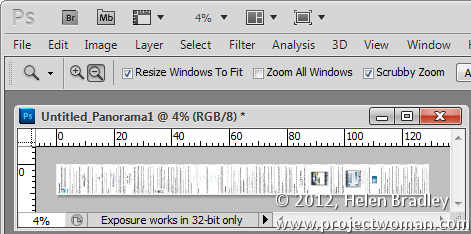
Having done that I then used the photo merge tool in Photoshop (File > Automate > Photomerge) to create a merged image from the individual images.


Then, once the merge was complete, I rotated the image back this time 90 degrees clockwise to get a vertical image that was 770 pixels wide and over 9,000 pixels long.

The problem with an image this size is that when you try to print it from Photoshop – it has to be squeezed down to a very small size to print on a single page and no other option is available so you can’t print it on multiple sheets.

The question then becomes how to print a very large image in lots of smaller pieces. The solution is nearer than you think and, curiously, it comes in the form of Windows Paint.


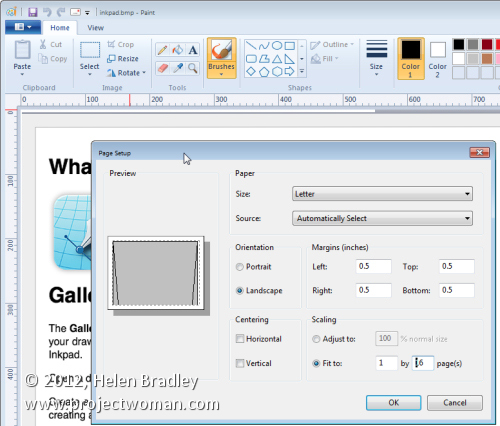
Launch Paint and open the image. Choose File > Print > Page Setup. Here you’ll find an option for sizing the printout to a fixed number of pages wide or long or you can shrink option to adjust the percentage scaling size. Wow! This is really very smart indeed.

When you do this, watch the boxes below as this will tell you how many pages tall and wide the image will be printed at. When you’re satisfied with the results, you can go ahead and click to print the document. If you have a PDF printer then you can print the document direct to a PDF file or if preferred, feed some paper into the printer and print the image. Then get out some sticky tape and stick it all together.

Helen Bradley

Friday, March 30th, 2012

Print Contact Sheets in Lightroom

By Helen Bradley

Historically a contact sheet was a page of images each printed at the same size as the film negative – they were used as a reference for the images on the film roll. They were called contact sheets because the film was placed in close contact with the paper when printing them.

These days the term contact sheet loosely means an arrangement of multiple, small, same size images on a single page usually with some identifying information such as the image filename placed under the image. The purpose is to provide reference to a larger number of images. You may print them to keep or give to a client as a catalog of the images from a shoot, for example.

You can create a contact sheet inside Lightroom and here’s how to do it:

Select a template

Start by selecting the folder or the collection that contains the images that you want to add to the contact sheet.

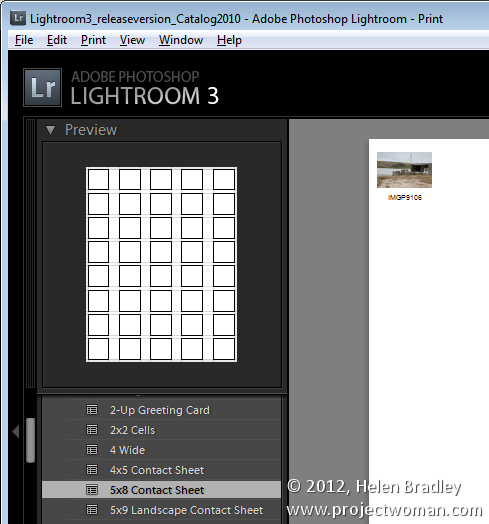
Launch the Print module and, from the Template Browser, select one of the contact sheet options. There are a few grid layouts including two with square image cells – a 4 x 8, and a 5 x 8. There are two with landscape orientation cells – one 5 x 9, and one 5 x 11.

I chose the 5 x  8 one.
Set up the print job

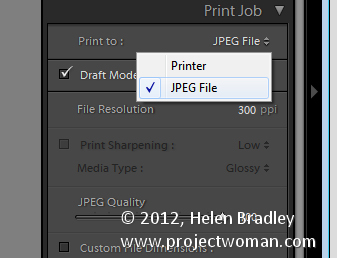
If you plan to ‘print’ the contact sheet to a jpg file, from the Print Job panel on the right of the screen, choose Print to JPG File. As contact sheets are just that – a contact sheet and not full scale images – select to use Draft Mode Printing to speed up their creation.

The page dimensions will be preset for 8.5 x 11in. You can set your own Custom File Dimensions but increasing the size of the page simply changes the page size not the size of the cells – you have to adjust them separately.
Adding images

If you have only one image selected in the Filmstrip then the contact sheet will only display one image.

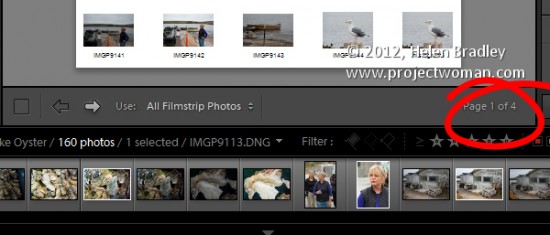
You’ll need to select all the images on the filmstrip to add them to the contact sheet. To do this, either click on the first image and Shift + Click on the last or select All Filmstrip Photos from the Use: list on the toolbar. If the Toolbar is not visible, press T to display it. You can also select Flagged photos, if desired.

The Toolbar shows you how many pages you will use and you can click the arrow keys on the toolbar to navigate the pages.
Add image captions

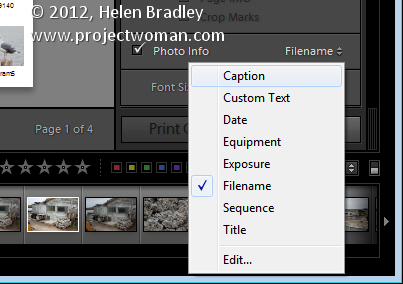
To add information below the images, from the Page panel on the right, select the Photo Info checkbox and choose the field to display. You can use one of the preset options such as Caption, Date, or Filename or click Edit to create your own field.
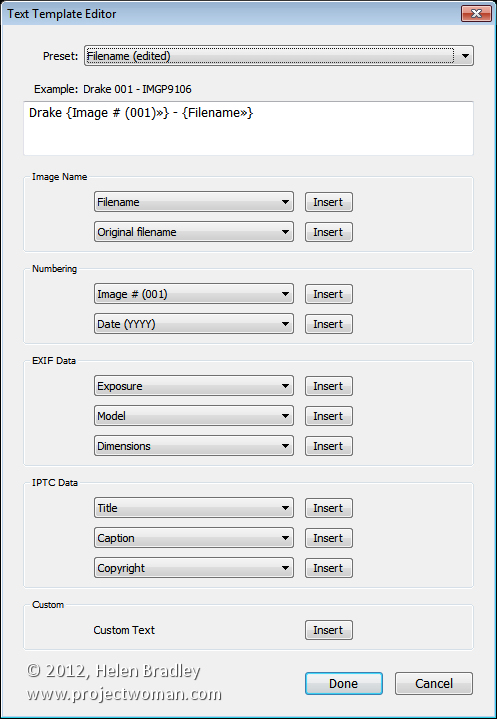
In the Text Template Editor, you can access to fields such as the filename, a sequential numbering or date as well as EXIF and IPTC data. You can also type your own custom text to create detailed photo info to add to the contact sheet. Here I typed some text, added a sequential number and the filename.
Customize the Contact Sheet

The template contact sheets are a starting point but you do not need to strictly adhere to their design if you don’t want to and they can be easily customized.

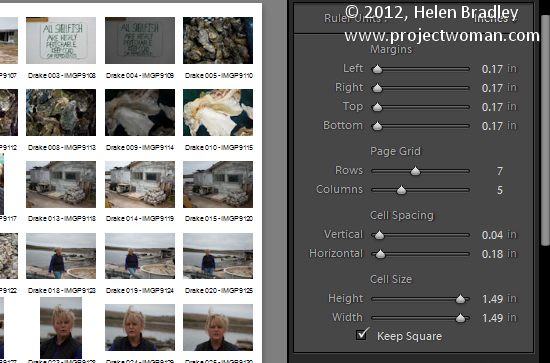
For example, from the layout panel if you click the Keep Square checkbox you will find that in some layouts your images may change orientation so the page will be a mix of portrait and landscape images.

You can adjust the maximum cell size and width using the Cell Size Height and Width sliders in the Layout panel. As you adjust the cell size, notice that the Cell Spacing values will change.

You can decrease the number of rows and/or columns using the Page Grid options. By decreasing the number of rows or columns, you can increase the cell size.
Adjusting margins

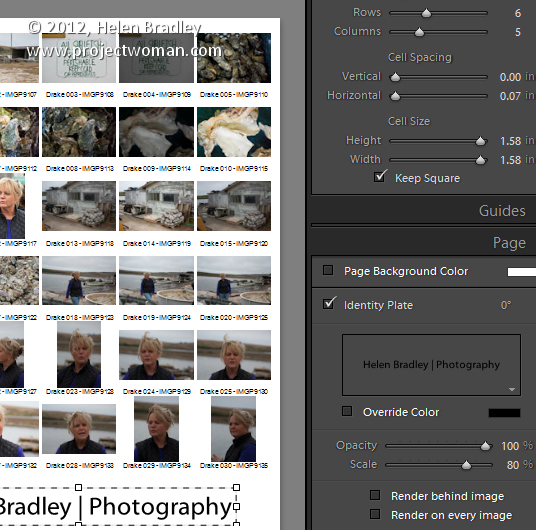
If you increase the Bottom or Top margin you can give yourself room to, for example, place an Identity Plate on the page.

Here I’ve reduced the number of rows and increased the bottom margin and added an Identity Plate from the Page panel options. In the Page panel, select the Identity Plate checkbox and then select the Identity Plate to use.

The Identity Plate will appear, by default, in the middle of the page so drag it into position on the page. Adjust its scale by dragging on the Scale slider.

You can adjust its Opacity if desired and, if it is a text identity plate (rather than a graphic), you can also select Override Color to make it any color you like.
Print the result

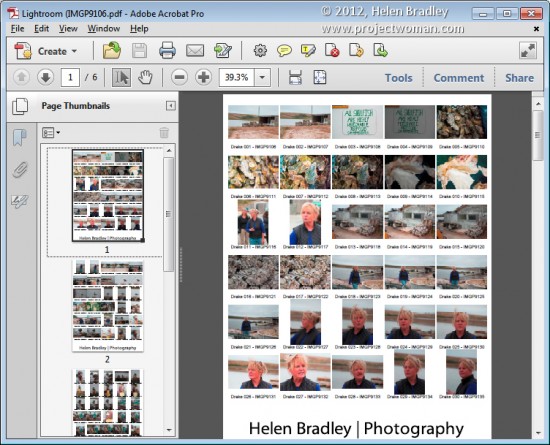
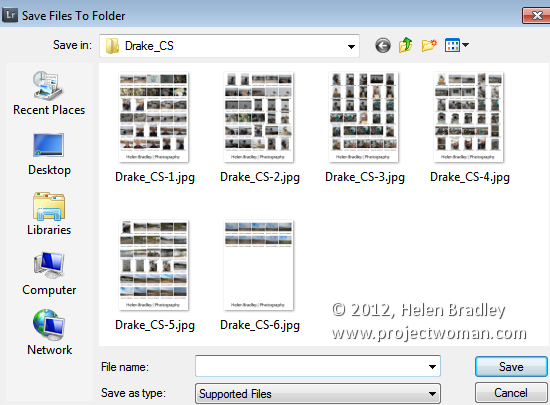
When you’re done, you’re ready to output the result. If you selected to print to a JPG file click Print to File and type a name for the file and select a location for them. The pages will be printed to a JPG file and if there are more than one they will be sequentially numbered.
Print to PDF

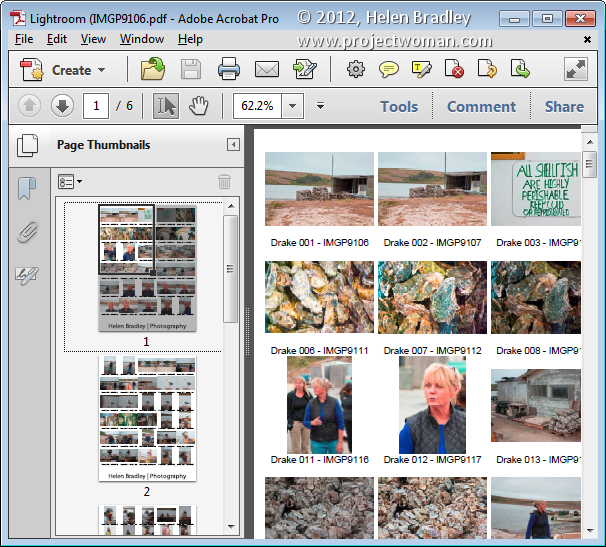
If you want to print to a PDF on a Windows machine you will need to have a PDF printer driver installed such as Adobe PDF or one you have downloaded from the web.

Select Page Setup, select the pdf printer driver and configure the page size so it matches the template size – such as letter paper portrait orientation. Then set the Print to: option in the Print Job panel to printer and click Print to print to a pdf.
Save the Template

If you have customized a template and want to be able to use it again in future, save the design as a new template.

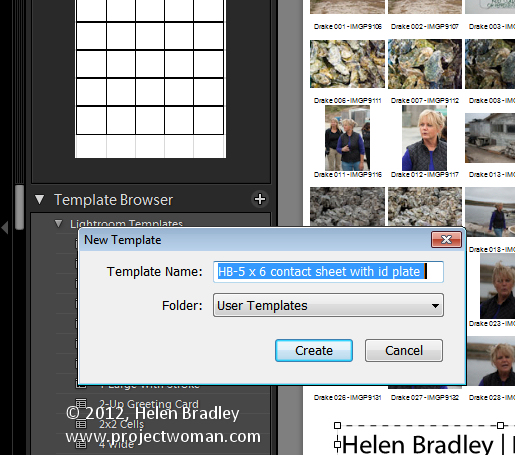
Click the plus symbol opposite the Template Browser panel header and type a name for your template. You can store it in User Templates or create a new folder for it. Click to create it.

In future you can save yourself the time setting up the template by starting with your customized version.
Helen Bradley

Wednesday, May 18th, 2011

Converting PDF to JPG

pdf to jpeg jpg online conversion free

If you’re a follower of my blog, you’ll know that I often need to convert a PDF file to some other format. I’ve showed you in the past how to extract data from a PDF file direct to Word but today my problem was that I wanted a well laid out pdf document to retain its look.

Unfortunately, the way it was created I couldn’t edit it to add my signature but I could do this in Word if I could get it there.

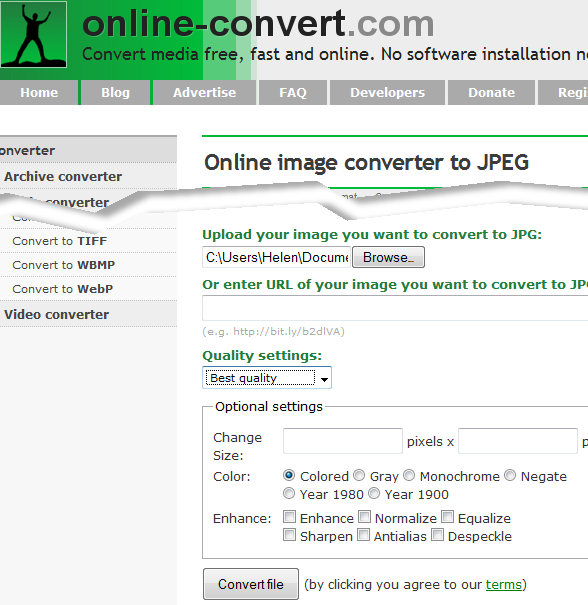
The solution was to convert it online using http://image.online-convert.com/convert-to-jpg. This easy to use site converts from 120 or more formats to JPG which is exactly what I wanted. It even allows you to upload a hefty file – up to 100 MB which means that it’s pretty damn big.

All you need do is to either enter a URL of the file to convert or click Browse and grab a file from your computer. You can set the quality settings – I selected Best Quality, and then optionally set the final image size, color and even apply some enhancements such as sharpening, anti-alias, despeckle and so on.

For a simple PDF to JPEG conversion, I left everything as it was and clicked Convert File. In less than a minute I had a zip file ready for download.

I could also have opted to have it emailed to me. You can, once you’ve downloaded your file, select to delete it or download it up to ten times within a 24-hour period. I opted to delete my file which is a nice option when a file may contain sensitive information,

If you visit the home page at http://image.online-convert.com you’ll have lots more options for converting to and from different formats.

This site is dead easy to use and it does the job – you simply can’t ask for more than that.

Helen Bradley

Monday, October 25th, 2010

Quick and easy PDF to Word


While these days it’s easy enough to get data from programs like Excel and Word into a PDF file, sometimes it’s just a little bit difficult to get it back out again.

Often all I need is a picture from a PDF file that I can drop into a Word document add a signature or some text, and then re-bundle it as a PDF and distribute.

Not everyone sets up PDF files so that they can be edited and in most cases I’ll need to do the editing myself – so for that I use Word as I can drop in a signature or a text box really easily.

The problem then becomes how do you get the data out of the PDF and into Word. Luckily the Adobe Acrobat Reader has a tool for this built in.

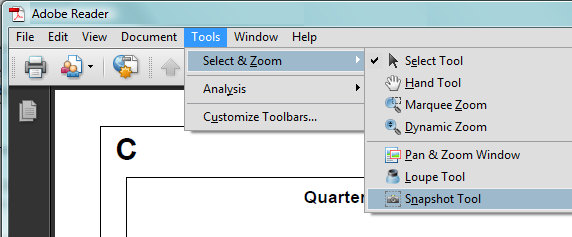
From the menu select Tools > Select & Zoom > Snapshot Tool. Now position yourself in the file where you want to grab the data from and drag over the area to capture.

A picture of the area is captured to the Windows clipboard which you can now paste into another program such as a Word document. It’s not the world’s prettiest solution but it is quick and easy and that works for me.

Helen Bradley

Sunday, February 11th, 2007

Viewer for Publisher Files

I wish! You wish! We wish.. but no go..

We’d all love to see one of these but, unfortunately Microsoft hasn’t deigned to give us one. There are, however some options you can use. If you can ask the person who created the PUB file to open and save it in a different format you can then view that – for example it can be saved as a Tiff format file.

If you have a PUB file but no access to Publisher, try one of the free online PDF file conversion tools that can handle Publisher files. I like PDFOnline, it handles PUB files up to 2Mb in size and all you need to do is to browse to upload the file to their server, type a name for the PDF file they’ll send you in return and type your email address. In minutes you’ll have a PDF version that you can read using Adobe’s free Acrobat Reader software.

If you’re wanting to share your Publisher files with others who don’t own publisher then try a program like the free PDF converter PrimoPDF which installs as a printer driver allowing you to create your own PDFs as easily as printing from Publisher.

Perhaps best of all is your option to download and install the trial version of Microsoft Publisher 2007. It works for a limited time to allow you to open, read and edit Publisher documents. After the trial period is over, you can only open, view and print existing Publisher documents – pretty much what a viewer program would do in my book!

Helen Bradley