Monday, July 22nd, 2013

Photoshop Tip – 5 Things to Know About Photoshop Brushes

Five Must Know Features of the Photoshop Brush Tool

Brushes are used a lot in photo editing from removing blemishes and smoothing skin to dodging and burning and painting on masks. Here are five important features of the brush tool in Photoshop.

1. Adjust Size, Opacity and Hardness from the Keyboard
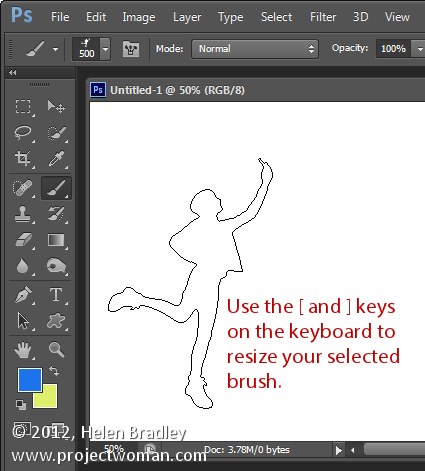
When a brush is selected you can adjust its size without having to open the Brushes palette by clicking the [ and ] keys on your keyboard.

Provided a brush is selected you can change its Opacity by typing a number. For example, type 5 to set Opacity to 50%, type 1 for 10% and 0 for 100%.

To adjust the hardness of the brush hold the Shift key as you tap either the [ or ] keys on the keyboard. Each tap increases or decreases the hardness by 25% in the range 0%-100%. The results of doing this are harder to see as there is no hardness indicator on the tool options bar. However, if you have the Painting Cursor set to Normal Brush Tip in preferences you will see a difference in the brush size as you do so

2. Save the Brush
When you have a brush configured with your preferred settings, save it as a Tool preset. To do this from the Brush Preset list in the top left of the screen click the Create New Tool Preset button and type a name for the preset. Click Ok.

In future you can select this saved preset from the list and just start painting with it.

3. Disappearing Brushes
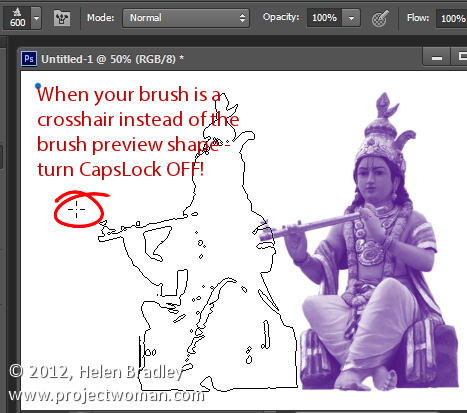
One of the very annoying things that will happen to most of us at one time or another is to have the brush appear to disappear. Instead of the regular brush cursor which shows the size and style of the brush you will see a crosshair cursor.

The issue is not with the brushes themselves but is with the Caps Lock key. If you disable Caps Lock on your keyboard the more visual brush cursor will reappear.

4. Paint a Straight Line
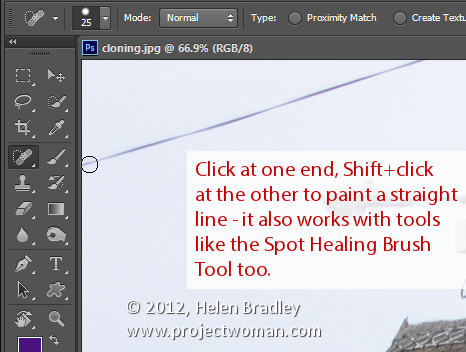
To paint in a straight line, click at one end of the line, hold the Shift key and click at the other end of the line. This draws a continuous brushstroke between both points.

If you adjust the spacing of your brush by using the Brush panel Spacing option to make it more than 100% you can create a line of dots this way.

This can also be used to remove power lines with the Spot Healing Brush Tool. Click at one end of the power line, Shift + Click at the other end to paint a straight line over the power line and it will be removed automatically.

5. Quickly Show the Brush Panel
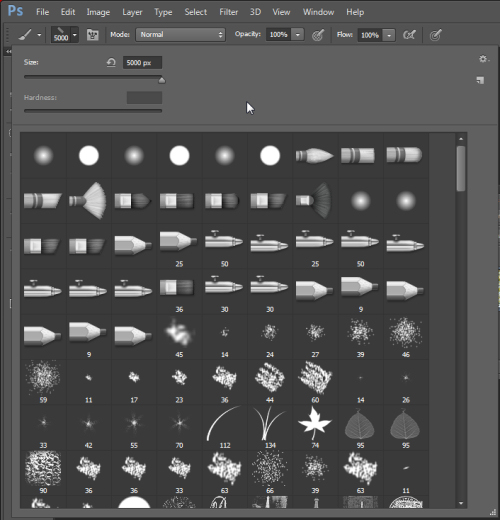
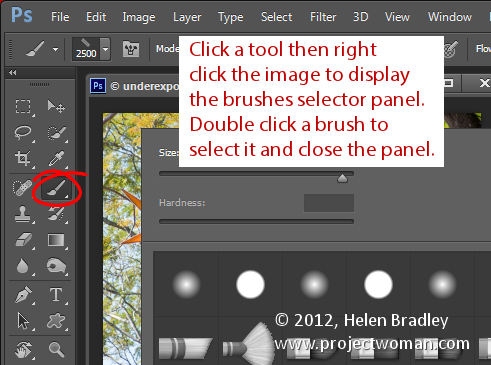
You can quickly show the Brush panel so you can choose a brush to use by first selecting a tool that uses a brush such as the Brush Tool, Dodge, Burn, Eraser tool and so on.

Then right click on the image and the brush panel appears automatically. To select a brush and exit the panel in one step, double click the brush to use.

And now it is over to you. What other features of Brushes do you think are valuable for photographers to know?

Helen Bradley

Thursday, July 11th, 2013

Word 2010 and 2013 Tip – Preview and Save a web page document

See your document as a web page and keep it looking that way

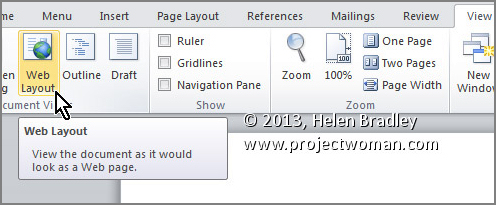
To see how any of your Word 2010 and 2013 documents will look when they are saved as web pages, select the View tab on the Ribbon, then click Web Layout.

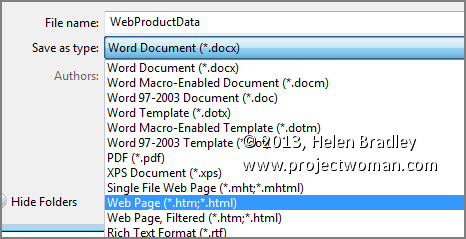
Now, to save a document as a web page, select File > Save As. In the Save As dialog, under click the Save as type: dropdown list and choose Web Page (*.htm;*.html).


Make sure to choose a location to save the document in, give it a name (it should have the .htm extension), and click Save.

Helen Bradley

Tuesday, April 16th, 2013

Help! My images disappeared from my iPad and iPhone

Understand the limits of the Photo Stream and how to save images from it so they aren’t removed from your iPad or iPhone

Sometimes you may know that you had some images on your iPad or iPhone but suddenly you find that they’ve gone.

This happens to me when I drop some images into my Photo Stream on my Windows PC that I want to use on my iPad. I drop images into the Uploads folder on my PC and, via the iCloud, they are synced automatically to my iPad. I know the images got there safely – I put them there months ago and I know that I saw them on my iPad but suddenly today they aren’t there. Confusing? Happened to you? It probably has and here is the explanation as to why they disappear and how to stop them from doing so.

The issue is the Photo Stream. The photo stream on the iPad and iPhone only store the last one thousand images – if you shoot lots of images and, say have your iPhone and iPad synced then you’ll run out of space pretty quickly. When you do then images are knocked out of the Photo Stream to make room for more recent ones.

The issue doesn’t happen on your Mac or PC because they have plenty of space so photos in your Photo Stream folders there are always there – it is just a protection against junking up your iPhone or iPad with ‘stuff’.

So, what do you do when you want to keep some of the images from your Photo Stream permanently and you don’t want to lose them? The answer is to move them to an album or to your Camera Roll. The images in your camera roll and in albums are there to stay. And just to clarify, you don’t have to move images from the Photo stream that you captured with that device – because images you capture on the iPad for example are in the Camera Roll and stay there. The images you want to save are those that get synced to the iPad via iCloud from other devices such as your iPhone or PC or Mac – they are the ones that only hang around for a short time.

How to move images from your Photo Stream to an album

So, to move a lot of images to an album (an easy solution for lots of images that you want to save to somewhere that isolates them from all your other images), tap Photos, tap Photo Stream, tap My Photo Stream.

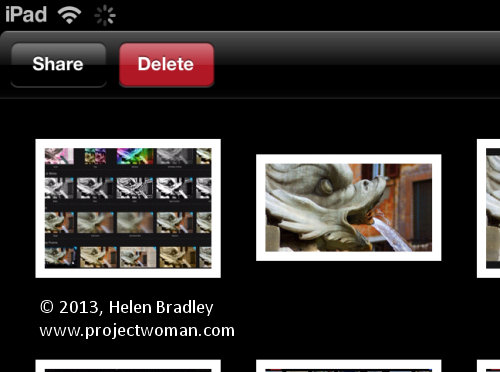
You should now see all the thumbnails of images in your photo stream. Then tap Edit.

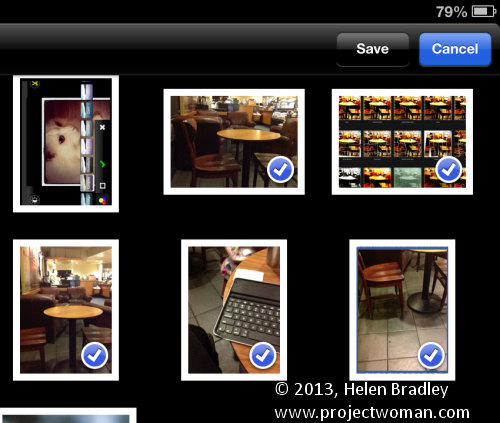
In this mode you can now tap the images that you want to save – each of them should have a blue checkmark on them. Now tap Save and choose to Save to an Existing Album or Save to New Album.

I have an album for images I want to edit and play with on the iPad called Editable Pix so I typically tap that to select it. This lets me store those images so they are isolated from all the other images in my Camera Roll.

How to move images from your Photo Stream to your Camera Roll

It is also possible to save photos from the Photo Stream to the Camera Roll. The advantage of this is that they are in the Camera Roll itself and in some situations that might work best for you.

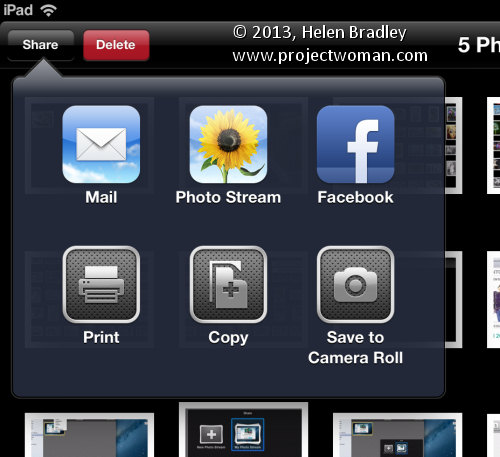
To do this, again tap Photos, tap Photo Stream, tap My Photo Stream so you see all the thumbnails of images in your photo stream. Again tap Edit. In this mode you can now tap the images that you want to save – each of them should have a blue checkmark on them. Now, tap the Share button in the top left of the screen:

And choose Save to Camera Roll. (It is very confusing that these two processes that really are so similar are handled so differently in iOS6).

How to save one image from your Photo Stream to your Camera Roll

Now, if you just want to save one image from the Photo Stream to the Camera Roll, tap Photos, tap Photo Stream, tap My Photo Stream so you see all the thumbnails of images in your photo stream. Tap the one image that you want to copy to the Camera Roll so it is showing full screen. Now tap the Send to button that is a box with an arrow coming out of it in the top right of the screen and choose Save to Camera Roll from the menu.

Now you will never again lose images off your iPhone or iPad that you really want to keep.

Helen Bradley

Friday, March 15th, 2013

Motion charts in Google Docs

Gadgets allow you to do things with Google Docs that would be time consuming if not beyond most people’s skills to create in a program like Excel. In this article I’ll demonstrate how to create a motion chart in Google Docs spreadsheet.

Prepare the data
In the first column of a new worksheet type the name of the item you’re charting such as office locations – we’ll use City and Bayside. In the next column, type the period that the data is for – this needs to be a time field such as year, week or quarter. The data needs to conform to ISO8601 so use 2011 for a year, 2011W08 to enter week eight of 2011 or 2011Q2 for second quarter 2011.

In the next column, type the data to plot such as Profit. The next columns are optional but we’ll add one which records units sold. To have some data to work with, add at least five years of data for the two offices.

Add the Gadget
Select over the entire range (including headings), and choose Insert > Gadget > Charts and scroll to find the Motion Chart and click Add to Spreadsheet. In the dialog which appears, the range should already cover the selected range, leave the Default State empty for now and type a title for your chart such as 5 Year Office Comparison and click Apply & Close.

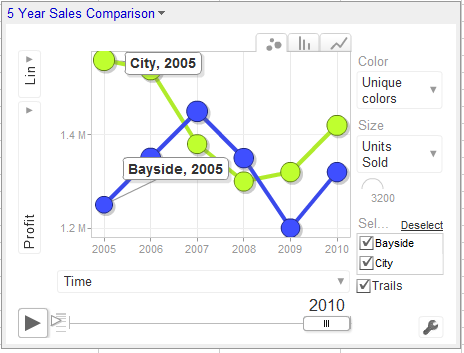
The chart appears on the screen but requires some customisation to  work. From the fly out menu of Y axis options on the left select Profit and then from the X axis dropdown list select Time so you plot Profit against Time.

From the Color dropdown list, select Unique Colors and from the Size dropdown list, select Units Sold.

Click the Play button and the chart will play showing the change in your data over time. The Y axis movement shows movement in Profit and the size of the bubble shows change in Units Sold.

The tabs change the chart from a Bubble to a Column or Line (this is not a motion chart).

If you click the office checkboxes and Trails you will see additional labels on your data and to the right of the Play button is a slider which controls playback speed.

Save the default
Wind the play button back to the beginning. Click the Settings button and click Advanced and Advanced again. Double click the state string to select it, right click and choose Copy. Click the chart title to display the chart menu, click Edit Gadget and paste the string into the Default State textbox. Save the worksheet and the chart will appear whenever the worksheet is viewed and it will be configured as you set it up to look.


Helen Bradley

Tuesday, January 15th, 2013

Five Photoshop setup tips

When you install a new version of Photoshop the first thing you’ll need to do is to set things up so that they work properly for you. Here are settings I make in the Preferences panel every time I upgrade.

1. Set your History States

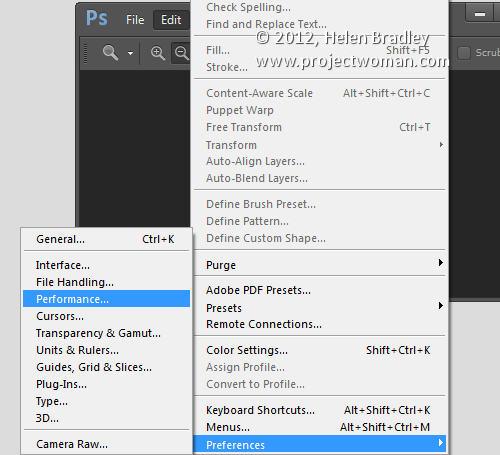
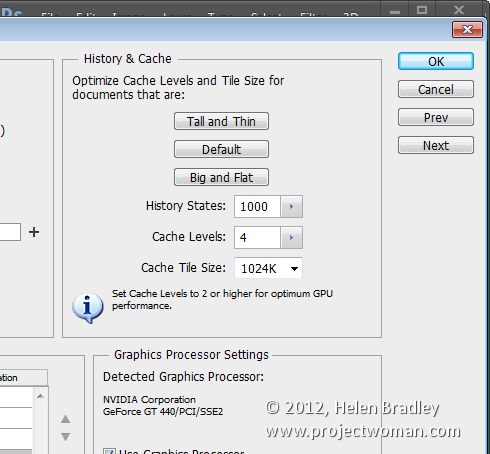
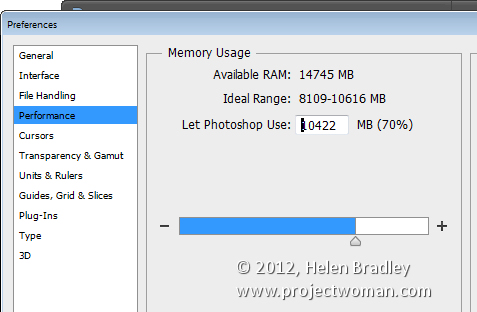
Choose Edit > Preferences > Performance or Photoshop Preferences > Performance on a Mac and set the number of History States. Having a high setting for History States ensures that you can undo changes that you make to your image. By default it’s set to a paltry 20 so this is the first change to make.

I set my History States to the maximum value 1,000 – but even a quarter of this would be a good setting.

Here too I ensure that Photoshop can use plenty of the available RAM so I’ll crank that up to a large value – what you use will be dependent on the amount of memory you have installed.

2. Set Cursor Shape and Size

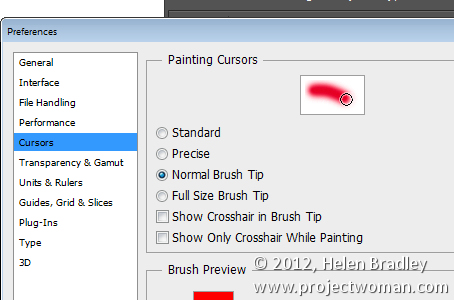
Still in the Preferences panel I like to use a Normal Brush Tip for my Painting Cursor and Precise for my Other Cursors. This can be set in the Cursors area.

You may want to use something different but it pays to look at these options and decide how you want your cursors to look as you work with them.

3. Opening Files My Way!

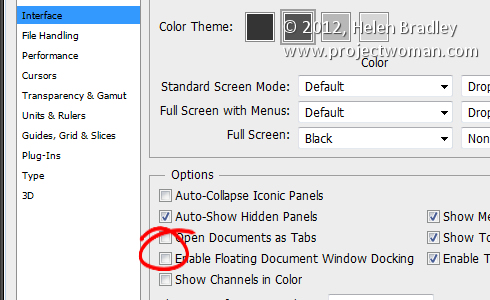
I dislike that Photoshop opens documents as tabs and that they are docked to the toolbar. This behavior really grates on me. If you’re like me and you prefer your documents to float you can set this in the Preferences Panel.

Choose Interface and disable Enable Floating Document Window Docking and disable Open Documents as Tabs.

In this panel you will also find the new Photoshop Color Themes in Photoshop CS6 so if

the dark gray look is not to your liking you can return to a more “CS5” look by selecting the lighter gray color.

4. Control Where Files are Saved to

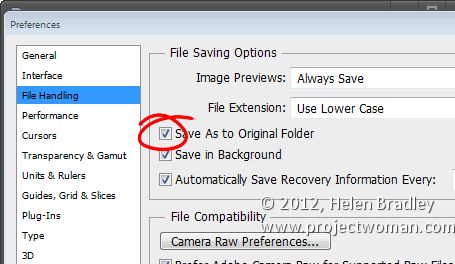
Photoshop can be set either to save images back into the original folder when you choose File, Save As or to the folder that was last used for saving files. You can choose which of these behaviors you prefer Photoshop to default to in the File Handling area of the Preferences panel.

To save back to the original folder, enable the Save As to Original Folder option. To default to the last folder you saved to disable this checkbox.

5. Write your own History

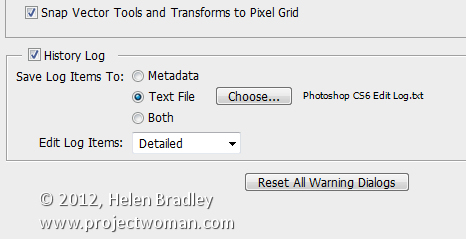
So I can go back and retrace my steps in a large project I like to store a History of all that I do in Photoshop. To do this, click the General tab and enable the History Log checkbox. I save to a Text file (rather than inside the file itself) and I save a Detailed history as that stores the richest data. Choose a filename and place to save it and Photoshop will keep a log file of everything you do to every file.

So, now it is over to you. What preferences do you set up when you first install a new version of Photoshop?

Helen Bradley

Wednesday, October 10th, 2012

Trevor’s Photoshop tip of the Week – Save for the Web

(photo by: roxinasz via www.sxc.hu )
Want to share your image with the world? To save an image for the web, choose File > Save for Web & Devices… , choose the file type, set the quality level, set the image size and save it. Your image will look great and it won’t slow down your website.

Helen Bradley

Friday, March 30th, 2012

Print Contact Sheets in Lightroom

By Helen Bradley

Historically a contact sheet was a page of images each printed at the same size as the film negative – they were used as a reference for the images on the film roll. They were called contact sheets because the film was placed in close contact with the paper when printing them.

These days the term contact sheet loosely means an arrangement of multiple, small, same size images on a single page usually with some identifying information such as the image filename placed under the image. The purpose is to provide reference to a larger number of images. You may print them to keep or give to a client as a catalog of the images from a shoot, for example.

You can create a contact sheet inside Lightroom and here’s how to do it:

Select a template

Start by selecting the folder or the collection that contains the images that you want to add to the contact sheet.

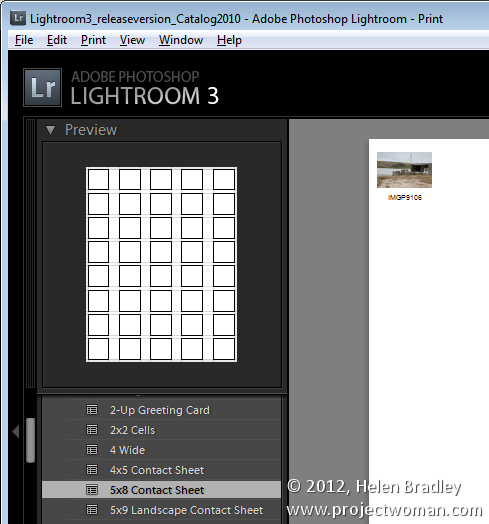
Launch the Print module and, from the Template Browser, select one of the contact sheet options. There are a few grid layouts including two with square image cells – a 4 x 8, and a 5 x 8. There are two with landscape orientation cells – one 5 x 9, and one 5 x 11.

I chose the 5 x  8 one.

Set up the print job

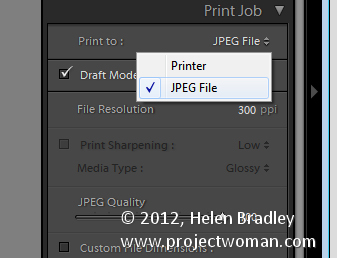
If you plan to ‘print’ the contact sheet to a jpg file, from the Print Job panel on the right of the screen, choose Print to JPG File. As contact sheets are just that – a contact sheet and not full scale images – select to use Draft Mode Printing to speed up their creation.

The page dimensions will be preset for 8.5 x 11in. You can set your own Custom File Dimensions but increasing the size of the page simply changes the page size not the size of the cells – you have to adjust them separately.

Adding images

If you have only one image selected in the Filmstrip then the contact sheet will only display one image.

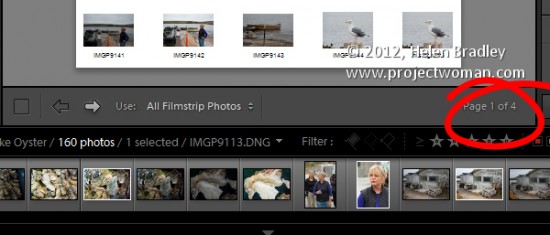
You’ll need to select all the images on the filmstrip to add them to the contact sheet. To do this, either click on the first image and Shift + Click on the last or select All Filmstrip Photos from the Use: list on the toolbar. If the Toolbar is not visible, press T to display it. You can also select Flagged photos, if desired.

The Toolbar shows you how many pages you will use and you can click the arrow keys on the toolbar to navigate the pages.

Add image captions

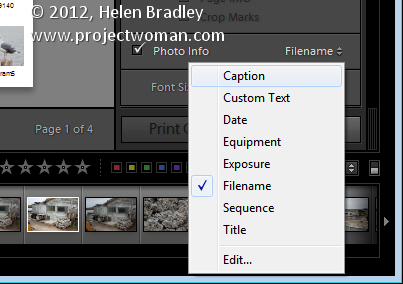
To add information below the images, from the Page panel on the right, select the Photo Info checkbox and choose the field to display. You can use one of the preset options such as Caption, Date, or Filename or click Edit to create your own field.

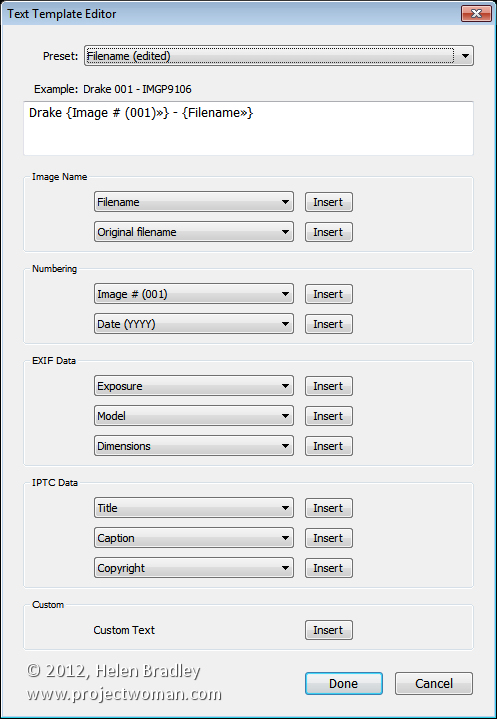
In the Text Template Editor, you can access to fields such as the filename, a sequential numbering or date as well as EXIF and IPTC data. You can also type your own custom text to create detailed photo info to add to the contact sheet. Here I typed some text, added a sequential number and the filename.

Customize the Contact Sheet

The template contact sheets are a starting point but you do not need to strictly adhere to their design if you don’t want to and they can be easily customized.

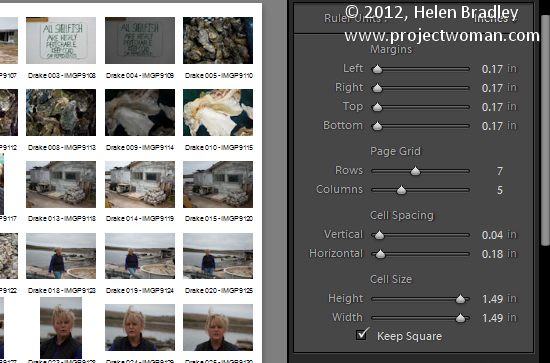
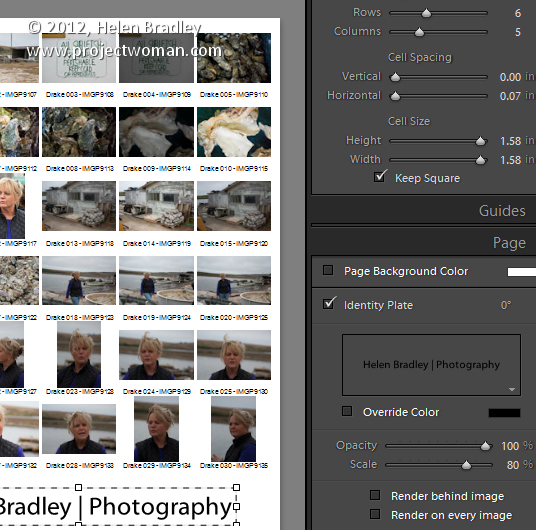
For example, from the layout panel if you click the Keep Square checkbox you will find that in some layouts your images may change orientation so the page will be a mix of portrait and landscape images.

You can adjust the maximum cell size and width using the Cell Size Height and Width sliders in the Layout panel. As you adjust the cell size, notice that the Cell Spacing values will change.

You can decrease the number of rows and/or columns using the Page Grid options. By decreasing the number of rows or columns, you can increase the cell size.

Adjusting margins

If you increase the Bottom or Top margin you can give yourself room to, for example, place an Identity Plate on the page.

Here I’ve reduced the number of rows and increased the bottom margin and added an Identity Plate from the Page panel options. In the Page panel, select the Identity Plate checkbox and then select the Identity Plate to use.

The Identity Plate will appear, by default, in the middle of the page so drag it into position on the page. Adjust its scale by dragging on the Scale slider.

You can adjust its Opacity if desired and, if it is a text identity plate (rather than a graphic), you can also select Override Color to make it any color you like.

Print the result

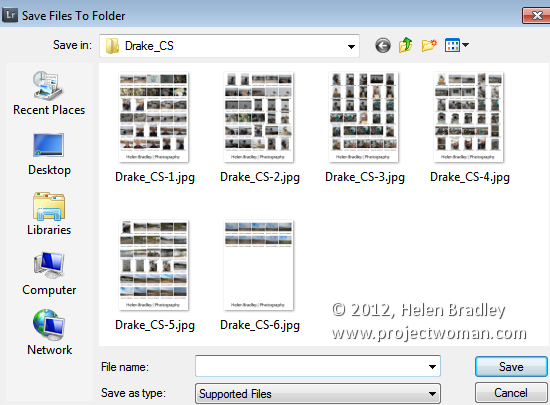
When you’re done, you’re ready to output the result. If you selected to print to a JPG file click Print to File and type a name for the file and select a location for them. The pages will be printed to a JPG file and if there are more than one they will be sequentially numbered.

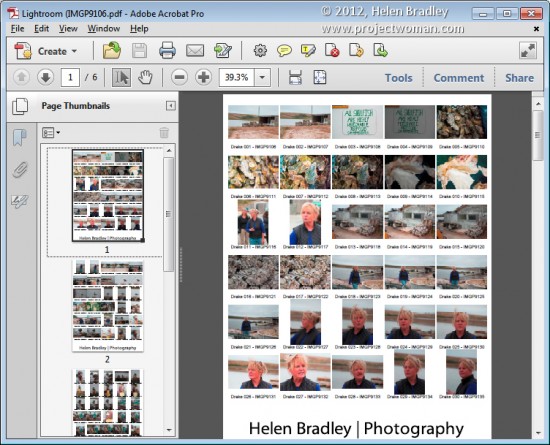
Print to PDF

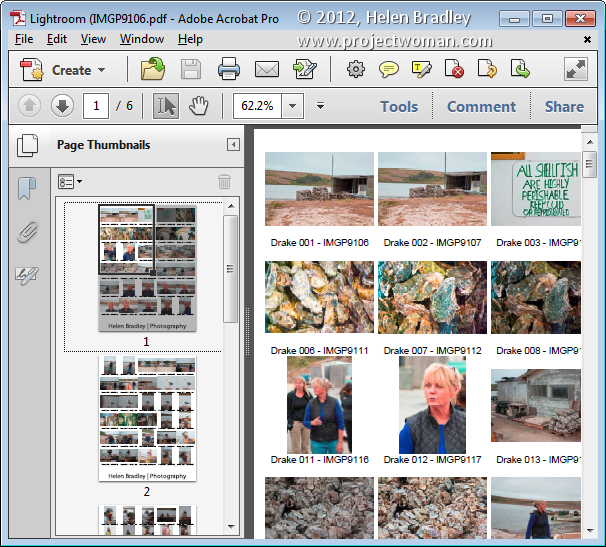
If you want to print to a PDF on a Windows machine you will need to have a PDF printer driver installed such as Adobe PDF or one you have downloaded from the web.

Select Page Setup, select the pdf printer driver and configure the page size so it matches the template size – such as letter paper portrait orientation. Then set the Print to: option in the Print Job panel to printer and click Print to print to a pdf.

Save the Template

If you have customized a template and want to be able to use it again in future, save the design as a new template.

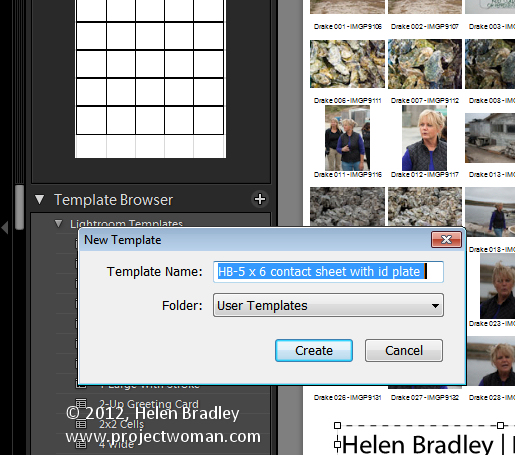
Click the plus symbol opposite the Template Browser panel header and type a name for your template. You can store it in User Templates or create a new folder for it. Click to create it.

In future you can save yourself the time setting up the template by starting with your customized version.

Helen Bradley

Friday, May 11th, 2007

Working between Office 2007 & 2003

If you’re using Office 2007 in a workgroup with others who are 2003 users, then you’ll encounter problems with them not being able to read your 2007 documents.

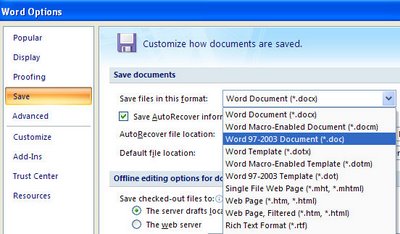
The simple solution is to change the default save format in the Office 2007 applications so they save automatically in the older formats. To do this, click the Office button and choose the Word Options button (for example), and click the Save option. In the dropdown list, Configure the Save files in this format option to the 97-2003 format.

You’ll need to do this separately for each application you want to change the default save format for.

Of course, this doesn’t stop you from saving in the new format or any other supported format. It just ensures that the default save format is backwardly compatible with other users.

Helen Bradley

Friday, February 2nd, 2007

Save an Outlook message as a file

When you need to save a copy of an Outlook message simply hold the Control key as you drag it out of your Inbox and drop it into a folder in an open Windows Explorer window or onto the desktop.

The message is saved as a .msg format file that you can open again at any time by double clicking it in Windows Explorer. When you do this, the email itself opens and can be read, even if Outlook is not open.

To save a message as an .html file, open it and choose File, Save As and type a name for it and choose a location for it.

Helen Bradley