Sunday, July 22nd, 2018

USB Drive that works on Mac and PC

Format a drive for PC and Mac – Quick & Foolproof

In the last couple of years Apple broke the system that let you take a USB from a Mac to a PC and visa versa seamlessly. Now, it’s perilously easy to have a regular drive or a Flash drive that works fine on a PC but which isn’t recognized by a Mac. It’s also possible to happen the other way. So, if you’re faced with the issue of needing a drive that works on both, here’s what to do.

Firstly backup everything that was on the drive (you’re about to lose it all!).

Did you get that last step? Yup. Seriously. BACK IT UP!

Now, put the drive in your Mac. The Mac is fussier than the PC so get it to do the work. It doesn’t matter if your drive is recognized by the Mac or not. Choose Applications > Utilities > Disk Utility.
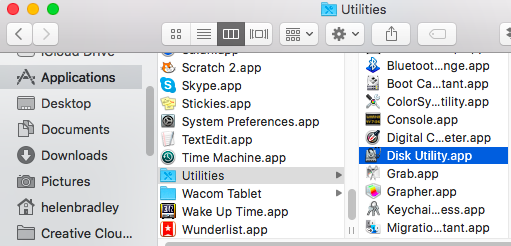
Format USB drive for Mac and PC

Wait until your drive appears in the External list (don’t touch the Internal drives).

Select your drive and click Erase.

Type a name for your Disk, from the Format dropdown list choose ExFAT and set the Scheme to Master Boot Record (if that is an option), and click Erase.
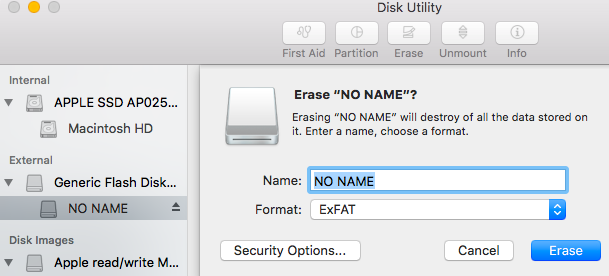
Make USB drive compatible with PC and OSX Mac

This erases and then formats the drive in a format that the PC can read.

Once it’s finished. Eject the drive and test it in your PC. I typically place a file on the drive using both the PC and the Mac (to check it writes ok) and then I open it on the other machine (to check it reads ok). If it works, you’re good to go!

NOTE: This is also the way you can erase everything from a USB drive on the Mac – often I find I have a drive that shows there is ‘nothing’ on it but which has part of the available space used up. Erase/format the drive fixes this quickly.

Friday, July 31st, 2015

Left Arrow to Get to the Bottom of a Word Document – Mac Only Stupidity

Move to the top or bottom of a Word Document on a Mac

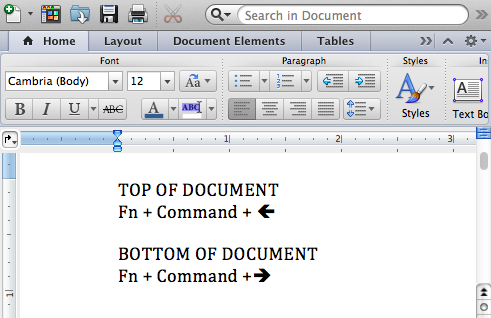
From a file labelled stupid commands comes this one for getting to the top or bottom of a Word document on the Mac. You see simple commands like Page Up and Page Down which work on a PC fail spectacularly on a Mac so most hapless users just use the arrow key (a lot) or scroll bars to get around a Word document.

Smart users know there is a key combination that will do it, but it uses the Left Arrow and Right Arrow keys – I kid you not! How stupid is that? However, since it is useful (albeit stupid), I’ll tell you how. To get to the top of the document use Fn + Command + Left Arrow and to get to the bottom of the document use Fn + Command + Right Arrow.

So, now you know and you can move faster around your documents. Just try explaining that key combination to a friend and hold your tongue as they look at you like you’re nuts.

Wednesday, April 15th, 2015

Add Mac Keyboard Icons to Word documents (and other things)

Find the Mac keyboard icons for the Control & Command keys

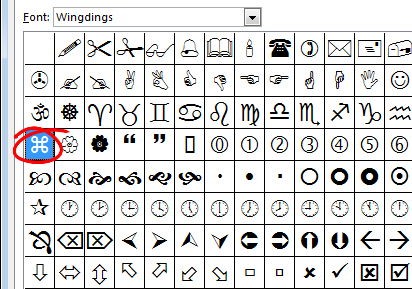
I had a problem today in that I was writing about the Mac but using a PC. I needed to type the character for the Command key on the Mac keyboard which, as you might know, is this cute twirly shape. But since I was working on a PC I didn’t have fonts which contained the character. After an hour or so of research, I found the character.

As luck would have it, it was where I should have looked to begin with, in my Wingdings font. To get it, in any document or any application that supports fonts, click to use the Wingdings font and type the lowercase z – voila – the Command key character.

So far, so good. But what about the other keys, like the Apple key and the Alt key on older keyboards? In the interests of helping you get everything you need in one post, if not in one font, here’s how to get hold of the characters for the Apple key and the Alt key:

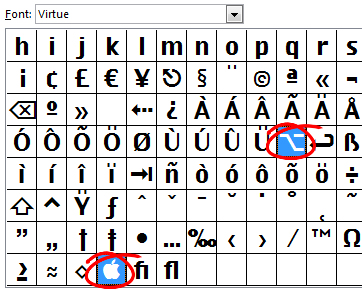
Turns out the Alt key symbol isn’t as easy to find as it might be. Probably the quickest way to locate it is to download the free font Virtue from the ScooterGraphics site.

Once installed the font contains a range of characters including the Mac Alt key symbol and the Apple icon. To get the Alt key select the Virtue font and type Alt + 0221 on the keyboard. The Apple symbol is a little more difficult as it is a hex value so, switch to Virtue font, type F000 into a Word document and immediately (don’t press space) press Alt + X. This little bit of keyboard magic creates the little Apple logo for you. If you need it elsewhere, make it in Word and copy and paste it to the application you need to use it in.

Saturday, January 17th, 2015

Open Recent Files Missing from Word (Mac)

If your Recent files list disappears from your Mac, here’s how to put it back

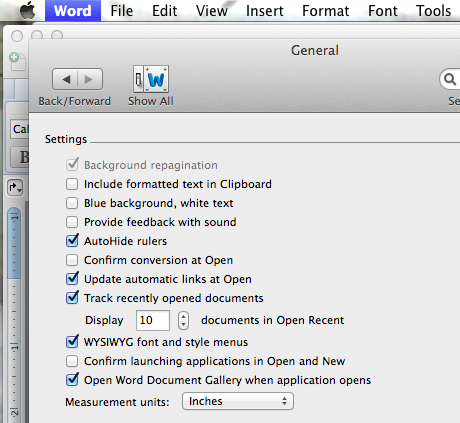
Word on my Mac doesn’t have a recently opened files list but Excel does. Turns out the feature was disabled (or perhaps it was never enabled). Whatever the reason, it wasn’t there and I wanted it to be accessible.

Lucky for me it is just a preference setting. Click the Word button, click Preferences and then General. Look for the Track Recently Opened Documents option and enable it. Set the number of documents to track and click Ok. Yeah! Now you can open a recently opened file like you expect to be able to do.

Tuesday, September 9th, 2014

Find Your templates in Microsoft Office – Mac

Need to manage your Microsoft Office templates but can’t find them?

It’s not easy to find the templates folder on your Mac. You might know it is My Templates but a typical search in Finder won’t turn it up.

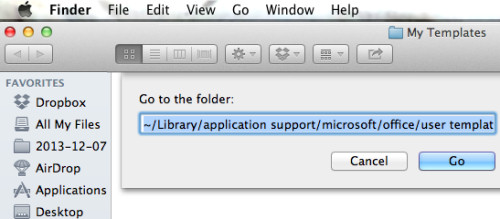
Luckily help is at hand. Launch Finder and choose Go > Go to Folder. Now paste this folder name into the search box to go to your My Templates folder where you can now see and manage your templates!

~/Library/Application Support/Microsoft/Office/User Templates/My Templates


Sunday, April 20th, 2014

Create a new Default Custom Swatch in Illustrator CC

Learn how to quick start a new document with your preferred swatches in place automatically

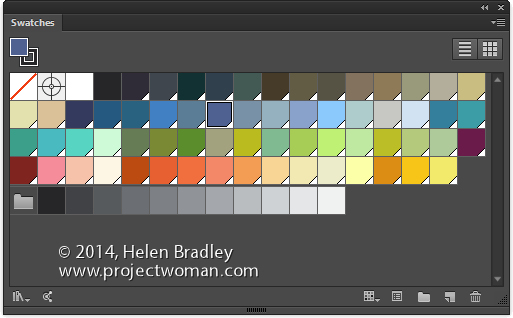
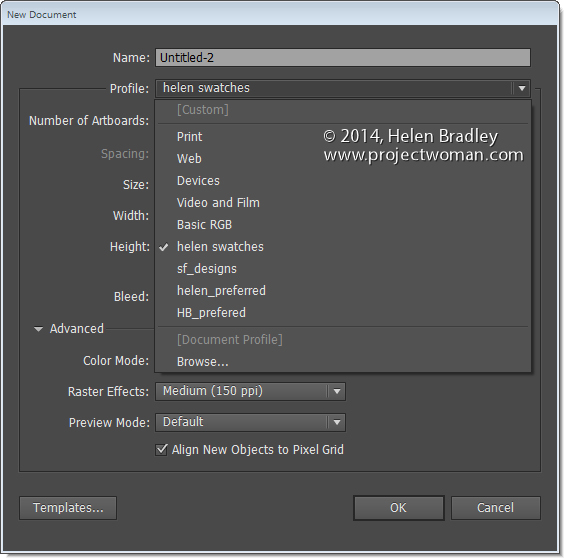
By default Illustrator starts all new documents with a preset set of swatches in the Swatches palette. If you prefer, you can create your own custom set of default swatches, save them and have them show up when you start a new document. Here’s how:

Create a new document – the size you create it as being will be the default for all documents created based on this profile as will the other settings in the New dialog.

Now choose Window > Swatches and select all the swatches you don’t want and drag them onto the Trashcan icon to delete them.

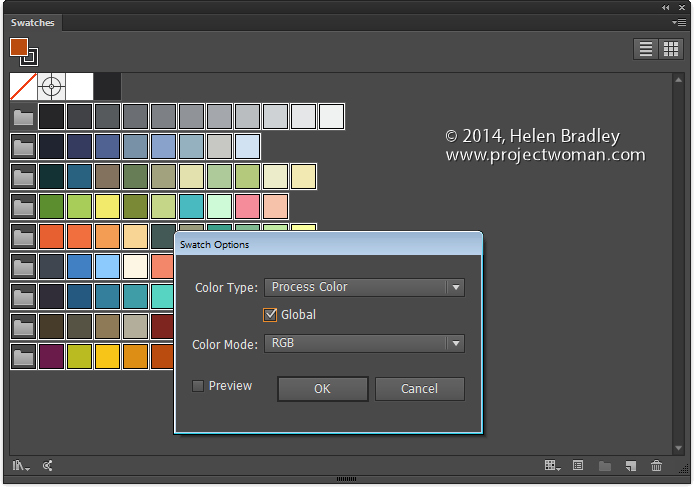
Add all the swatches you do want to have available to the Swatches palette. If you want some colors to be global colors, select them, click the Swatch Options button and click Global.

You can add any type of swatch at this point including pattern, gradients and solid colors.

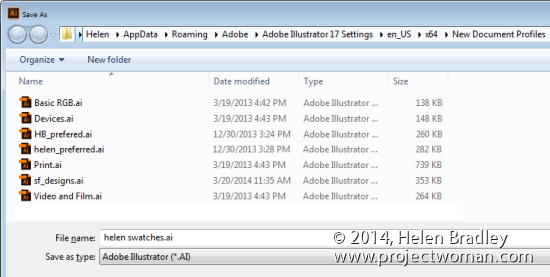
Then when you are done, choose File > Save As and save the file to one of these locations depending on your version of Illustrator and  your operating system:

On the Mac save the file to:


~/Library/Application Support/Adobe/Adobe Illustrator 17/en_US/New Document Profiles.

The tilde (~ ) indicates your hidden user library.
You can open it this way:
1 Launch Finder
2 Choose Go > Go to Folder
3 Type ~/Library and click Go
4 This opens the ~/Library folder and you can now navigate to the appropriate folder listed above.

In Windows 7:

First make sure you can see hidden folders and locate this folder (the exact folder structure may vary slightly but it should be pretty easy to find):

C:\Users\AppData\Roaming\Adobe\Illustrator 17 Settings\en_US\x64\New Document Profiles

To locate your c:\users\\AppData folder, launch Windows Explorer and type this in the address bar :
%USERPROFILE%\AppData
This automatically opens the AppData folder for you so you can now navigate to the desired folder as detailed above.

The name you give to your file is the name that the document profile will appear as in future so make it descriptive of the purpose of the document.

Once this is done, you can close the document.

In future you can open a new document based on this profile by choosing File > New and choose the document profile from the Profiles list.

When you do so, your swatches will appear automatically. You can have multiple custom profiles so create them for the tasks you do most often.

Helen Bradley

Helen Bradley

Saturday, March 15th, 2014

Scroll though Blend Modes in Photoshop – Mac and PC

scroll through blend modes on the mac

by Helen Bradley

Learn the keystrokes that help you quickly scroll through blend modes in Photoshop on the PC and Mac

On the PC, being able to scroll through the blend modes in the Layers palette is a simple as selecting one blend mode in the list then use the Up Arrow and Down Arrow key to go from one to the next.

On the Mac, it isn’t as easy but it (thankfully), can be done.

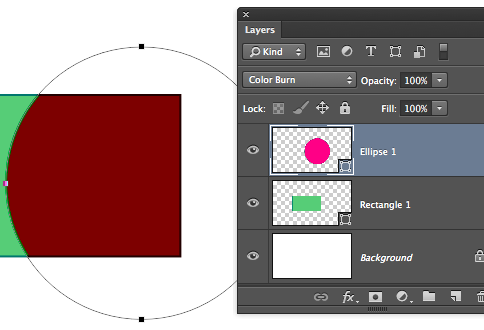
On the Mac, click in the Blend Modes list and select a blend mode. Then use the Shift + + or Shift + – keys to scroll up and down the list. Unlike on the PC, the Mac keys roll you around the list so, when you reach the bottom and press Shift + + once more you go right back to the top. Neat huh?


Helen Bradley

Friday, January 31st, 2014

Mac lock and display dimming timing

Memo to my Mac – Don’t go to sleep on me!

Hmmm me and my MacBook Air are getting along pretty well but some things still bug me from time to time.

One is the display dim time. You see it seems like I just look away and all of a sudden the Mac has gone elsewhere – the screen turns off and I have to wake it back up and enter my password.

Right now I am trying to download some software so this is getting pretty annoying. I want to be able to see the progress without having to the Mac up all the time. This constant jiggling the touchpad and entering  a password is becoming frustrating.

Seems like there are a couple of settings needing changing. One is in Settings > Security & Privacy. If I set the Require Password value to something more than Immediately I will get some leeway in having to enter my password all the time. I set this to 1 hour. But, the screen is still dimmed after only a minute or so. That setting is in Settings > Energy Saver – there you can set the Display Sleep – mine was set to 1.5 minutes – I ramped that up to 1 hour.

So now my Mac doesn’t go to sleep when I am downloading stuff on it and working on another computer and I don’t have to enter my password like every few minutes. In short, life is a lot simpler.

Hope this helps you and your Mac to be friends again?

Helen Bradley

Saturday, January 11th, 2014

Hide everything and show the Mac desktop

How to display your desktop – hiding all open programs on the Mac

I am in ‘traveling with my Mac mode’ – I have a MacBook Air and it is so light and thin that it makes a great traveling companion – sort of like having an oversize iPad that runs Illustrator, Photoshop and Lightroom.

BUT, and there are some big buts! I use a desktop PC so little things on the Mac bite me because I simply don’t have the knowledge at my fingertips. In the last couple of days the issue has been the desktop – I need to get to some files saved there but there is all this stuff in the way. Turns out there is a shortcut key you can use – F11 – if you’re on a notebook you’ll need to use the Fn function key with this so it is Fn + F11 but that’s all you need to hide everything and show your desktop.

Now I can take my screenshots Command + Shift + 3 then hide the junk so I can see the image to drag and drop it into a Word document or into Photoshop.

Yeah! Me and my Mac are friends again.


Helen Bradley

Thursday, January 9th, 2014

Format Painter missing in Word on the Mac

It’s actually not missing but it’s not where you expect to find it either.

I use Word on the PC every day and on the Mac only when I am traveling – I love my MacBook Air with its solid state drive – it’s light and an easy traveling companion.

What I don’t like is having to work out all the curly questions you have when things work differently in one operating system to another. Cue today’s issue. I was copying and pasting content from my website into Word on the Mac and I needed to remove the formatting – well I found the Clear Formatting button sort of where I expected it to be on the ribbon.

But when it came to copying a format from one piece of text to another I got stumped. You see the Format Painter isn’t on the ribbon where you expect it to be if you’re used to using Word on the PC. In fact Word on the Mac is a totally different animal.

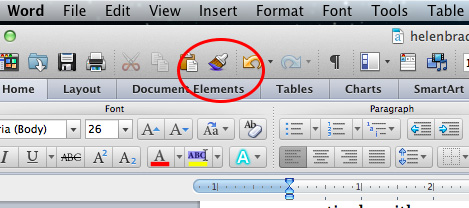
To find the Format Painter look upwards – up from the ribbon, up from the ribbon tabs and up to what we Windows folk would call the QAT or Quick Access Toolbar. On that toolbar of tools in Word on the Mac is the Format Painter. Click the text to copy the format from, click the Format Painter and then click the text to paint it onto. It’s a simple process BUT you have to find the Format Painter button first!

Hopefully this helps you!


Helen Bradley

Page 1 of 212