Saturday, October 10th, 2015


When the Mac keyboard shortcut doesn’t work – here’s how to fix it!
In Word on the PC you can click in a paragraph or select a paragraph or two (or even a row in a table) and move it up and down the document using Shift + Alt + Up Arrow of Shift + Alt + Down Arrow.
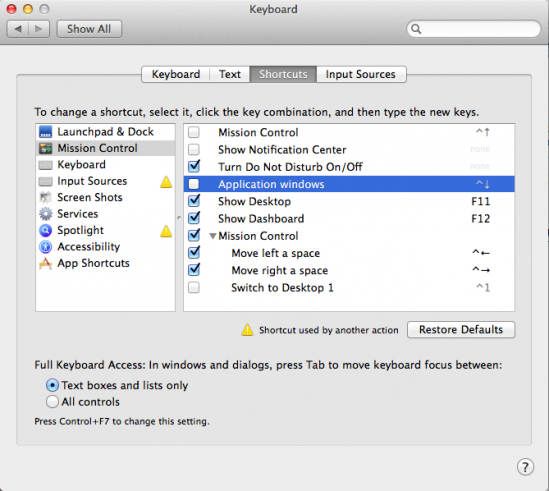
Sadly on the Mac this doesn’t work the same. The Mac keystroke is a little different – press Shift + Control + Up Arrow or Shift + Control + Down Arrow. So far so good – problem is that these are the exact same keystrokes that display Mission Control and Application Windows on the Mac so they don’t work. That is until you fix them to work.
Now I don’t use Mission Control at all so I have no need to go backwards and forwards between Mission Control and Application Windows and, worse still, I often hit those keys by mistake so I can easily live without this shortcut. Turns out, if you disable that Mac default shortcut then the Word one works.
To do this, launch System Preferences and select Keyboard > Shortcuts. You need to disable two options here – Mission Control and Application Windows so deselect the two checkboxes and close the window. That’s all there is to it. Now the keyboard shortcuts Shift + Control + Up Arrow and Shift + Control + Down Arrow work just fine in Word for the Mac.
It’s the small things that put the biggest smile on my face. This is a small change but I use it every day and I love it – hope it works for you too!
Labels: disable mission control, keyboard shortcut, mac keyboard shortcuts, Microsoft Word, move paragraph, preferences, shift control down arrow, shift control up arrow, shortcut, word mac
Categories:Mac, office
posted by Helen Bradley @ 8:56 am12 Comments links to this post
Sunday, July 27th, 2014
Learn the secrets of how to Rotate Text in all versions of Word – 2003, 2007, 2010 & 2013
One of my most popular blog posts deals with the problem of rotating text in Microsoft Word. The issue is that in prior versions putting text in a shape and then rotating it just rotated the shape – not the text – sucks huh?
While the newer versions of Word work more reliably – not all of them do! Here’s the video version of that blog post – you will see how to rotate text in any version of Word from 2003 onwards and also see what doesn’t work so you don’t waste time trying!
I’ll show you how to rotate text through 90 degrees, 180 degrees and any other rotation you need and we’ll use Text Boxes, Word Art, Tables and Shapes to do it.
Helen Bradley
Labels: Microsoft Word, rotated text, vedio
Categories:video
posted by Helen Bradley @ 7:14 amNo Comments links to this post
Thursday, January 9th, 2014
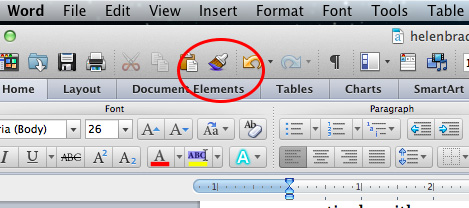
It’s actually not missing but it’s not where you expect to find it either.
I use Word on the PC every day and on the Mac only when I am traveling – I love my MacBook Air with its solid state drive – it’s light and an easy traveling companion.
What I don’t like is having to work out all the curly questions you have when things work differently in one operating system to another. Cue today’s issue. I was copying and pasting content from my website into Word on the Mac and I needed to remove the formatting – well I found the Clear Formatting button sort of where I expected it to be on the ribbon.
But when it came to copying a format from one piece of text to another I got stumped. You see the Format Painter isn’t on the ribbon where you expect it to be if you’re used to using Word on the PC. In fact Word on the Mac is a totally different animal.
To find the Format Painter look upwards – up from the ribbon, up from the ribbon tabs and up to what we Windows folk would call the QAT or Quick Access Toolbar. On that toolbar of tools in Word on the Mac is the Format Painter. Click the text to copy the format from, click the Format Painter and then click the text to paint it onto. It’s a simple process BUT you have to find the Format Painter button first!
Hopefully this helps you!
Helen Bradley
Labels: copy formats, format painter, mac, Microsoft Word, missing icon, ms word, osx, Ribbon, Word
Categories:Mac, office
posted by Helen Bradley @ 11:09 am1 Comment links to this post
Thursday, November 28th, 2013
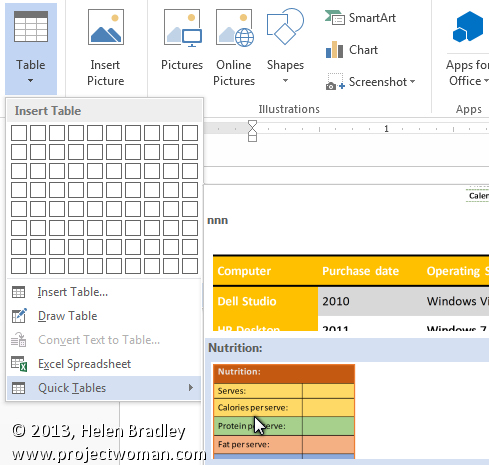
Learn to insert a table in a Word document with a single click
When you need to repeatedly create the same type of table in a Word document you can do so using the new Word Quick Part feature.
This technique works well when you use the same table layout repeatedly. Your inserted table will be the same size, have the same number of columns and rows and contain any preset formatting that it had when you created it as a Quick Part entry. Once created, you can insert it quickly whenever you need it.
To do this:
- Create a new table with the number of rows and columns you want all your tables to have.
- Include any text in the table that needs to always be in this type of table – if there is none, leave the cells blank.
- Format the cells in the way you wan them to be formatted every time – including text formats and cell background colors and borders.
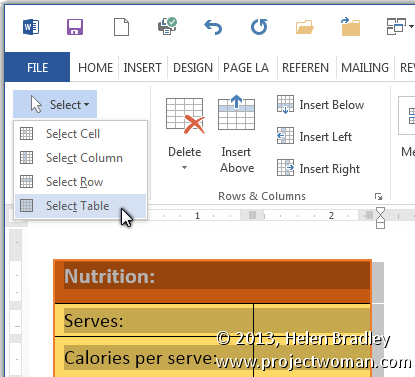
When you are done, select the table by clicking in it and choose Table Tools > Layout > Select > Select Table.
Choose Insert > Quick Parts > AutoText > Save Selection to AutoText Gallery.
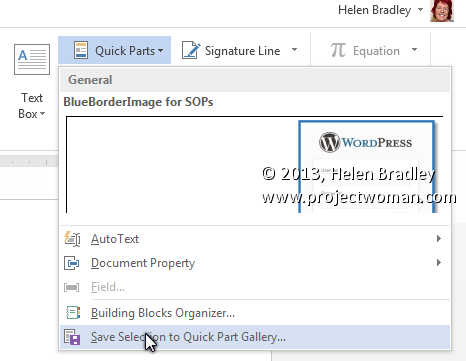
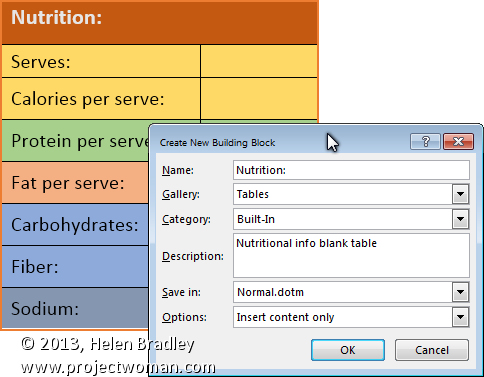
In the Create New Building block dialog set the Gallery to Tables and type a description of the table and click Ok.
In future, to create a table to these exact specifications choose Insert > Tables > Quick Tables, locate the table in the list and click it to insert it into the document.

This feature is the successor to the AutoText feature in earlier versions of Word. It looks a little more cumbersome but it is more easily discovered so you don’t have to remember where the table was saved as it appears automatically on the Insert Table menu.
Helen Bradley
Labels: Auto Text, AutoText., Building Blocks, gallery, insert table, Microsoft Word, table, Word 2007, Word 2010, Word 2013
Categories:office
posted by Helen Bradley @ 9:56 amNo Comments links to this post
Friday, August 23rd, 2013
Keep track of the changes made to your document
Word’s Reviewing tools make it easy to show someone the changes you’ve made to a document.
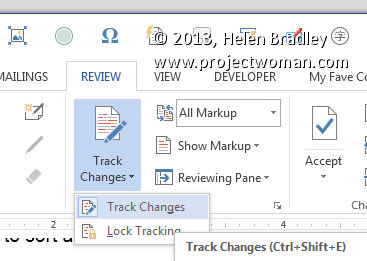
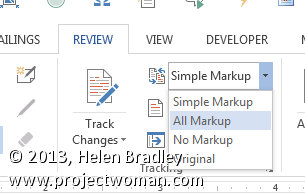
You can set Word to record the changes before you make them by selecting the Review tab on the ribbon and click Track Changes > Track Changes.
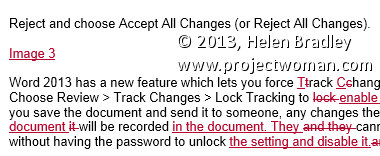
Now, in Word 2007 & 2010, every addition to your document will be underlined and every deletion will be marked with strikeout. Word 2013 defaults to Simple Markup so you will need to choose All Markup to see the changes marked up.
These changes are retained when you save the document.
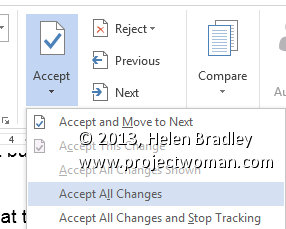
You can apply the changes permanently at any time by selecting Review > Accept or Reject and choose Accept All Changes (or Reject All Changes).
Word 2013 has a new feature which lets you force Track Changes to be enabled. Choose Review > Track Changes > Lock Tracking to enable this feature. Now if you save the document and send it to someone, any changes they make to the document will be recorded in the document. They cannot disable this feature without having the password to unlock the setting and disable it.
Helen Bradley
Labels: 2010, 2013, Accept All Changes, change, Highlight, Lock Tracking, mark, mark up, markup, Microsoft Office, Microsoft Word, review, tip, track changes, tracked changes, trick, Tutorial, up, Word, Word 2010, Word 2013
Categories:office
posted by Helen Bradley @ 6:23 amNo Comments links to this post
Thursday, August 15th, 2013
Sorting data in Word 2007, 2010 & 2013
In the pre-ribbon versions of Word you would use the Table commands to sort data in a Word document.
In Word 2007, 2010 & 2013 you can’t use the table sort options any longer for plain old text simply because you can’t select the table options if you don’t have a table – it’s a Catch 22 situation.
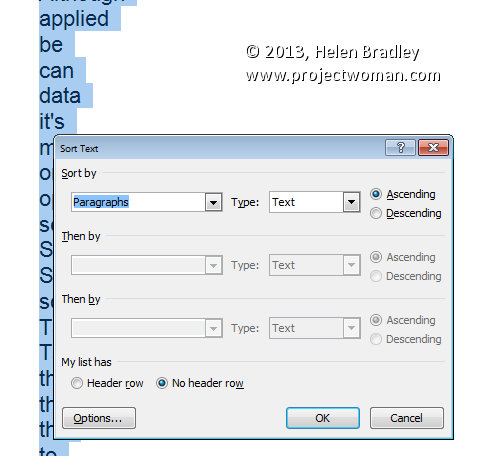
Luckily, Word now includes a proper sort option for any text – not just table text. To use it, first select the text to sort and then click the Sort button on the Home tab of the Ribbon.
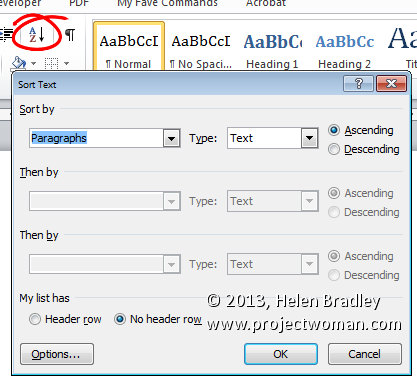
When the Sort Text dialog opens you can choose what to sort such as Paragraph or Field and the type of sort. If you want a case sensitive sort so A is treated differently to a then click Options and check the Case Sensitive checkbox.
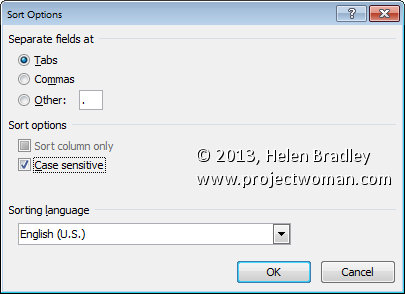
Once you are done select the sorting options, click Ok to perform the sort.
Helen Bradley
Labels: 07, 2007, 2010, 2013, Command, data, Microsoft Office, Microsoft Word, sort, Sort Options, Sort Text, table, Table Command, text, tip, trick, Tutorial, Word, Word 2010, Word 2013
Categories:office
posted by Helen Bradley @ 5:57 am1 Comment links to this post
Friday, August 9th, 2013
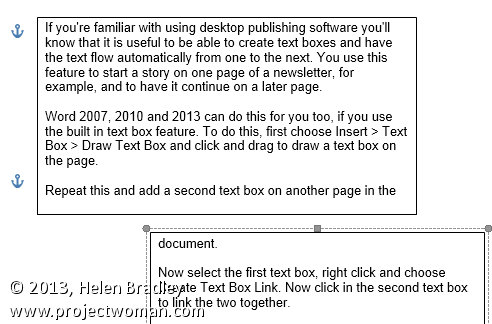
How to use linked text boxes to flow text throughout a document automatically
If you’re familiar with using desktop publishing software you’ll know that it is useful to be able to create text boxes and have the text flow automatically from one to the next. You use this feature to start a story on one page of a newsletter, for example, and to have it continue on a later page.
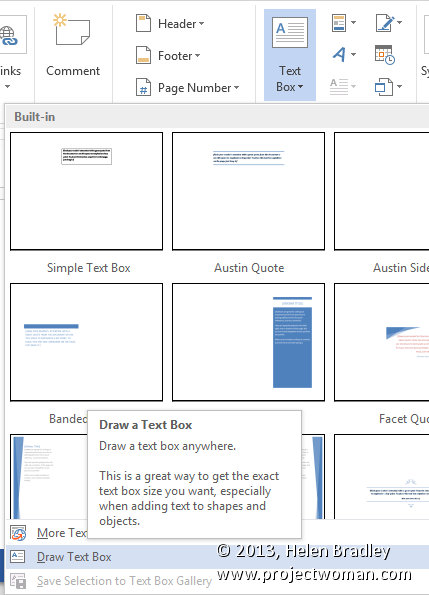
Word 2007, 2010 and 2013 can do this for you too, if you use the built in text box feature. To do this, first choose Insert > Text Box > Draw Text Box and click and drag to draw a text box on the page.
Repeat this and add a second text box on another page in the document.
Now select the first text box, right click and choose Create Text Box Link.
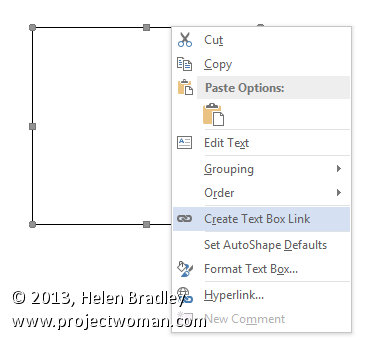
Now click in the second text box to link the two together.

In future, any text which you type into or paste into the first text box and which won’t fit because the box is not large enough to accommodate it, will flow automatically into the second text box.
Helen Bradley
Labels: 2010, 2013, automatic, Create Text Box Link, Draw Text Box, flow, insert, Microsoft Office, Microsoft Word, text, text box, tip, trick, Tutorial, Word, Word 2010, Word 2013
Categories:office
posted by Helen Bradley @ 6:09 am1 Comment links to this post
Thursday, August 1st, 2013

Know when your document was printed by adding a date and time stamp to each printed page
Add a date and time stamp all your printouts by placing the current date and time in the document footer so it prints when the page is printed.
To do this in Word 2007, 2010 and 2013 choose Insert > Footer > Edit Footer. Click the Date & Time button and enable the Update Automatically checkbox. From the list of dates and times choose a date or date and time – depending on what you want to see on the page. Click Ok.
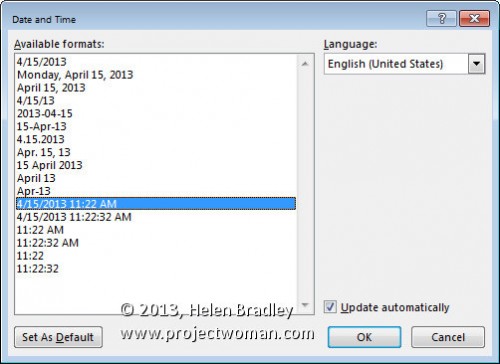
Select the text that Word has inserted in the footer and you can now format it to a small font – such as Italic 8 pt. You can also prefix the text with the words Printed On: or something similar, if desired.
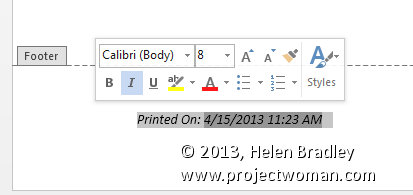
Click Close Header and Footer to return to your document. Now the current date and time will be printed in the footer each time the document is printed.
Helen Bradley
Labels: 2010, 2013, add, Close Header and Footer, date, footer, header, insert, Microsoft Office, Microsoft Word, Printed On, printout, stamp, time, timestamp, tip, trick, Tutorial, Update Automatically, Word, Word 2010, Word 2013
Categories:office
posted by Helen Bradley @ 5:18 am1 Comment links to this post
Thursday, July 25th, 2013

Crop your image to a shape in Word
It is easy to crop an image to a shape such as a star or a heart in Word by using the Crop to Shape feature.
First add the image to your document then click to select it. From the Picture Tools > Format tab click Crop > Crop to Shape.
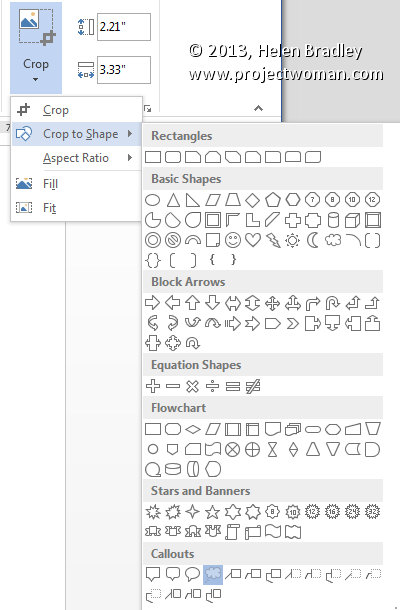
Select the shape to use to crop the image to. You can then add a shadow or reflection or other effect to the shape as desired.
Helen Bradley
Labels: 2010, 2013, AutoShape, crop, format, heart, image, Microsoft Office, Microsoft Word, Picture Tools, reflection, shadow, shape, star, thought bubble, tip, trick, Tutorial, Word, Word 2010, Word 2013
Categories:office
posted by Helen Bradley @ 5:27 am1 Comment links to this post
Thursday, July 11th, 2013
See your document as a web page and keep it looking that way
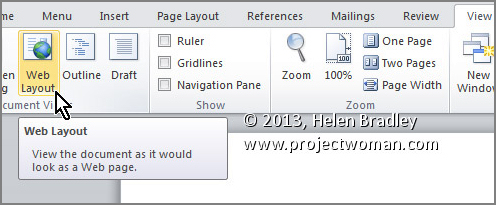
To see how any of your Word 2010 and 2013 documents will look when they are saved as web pages, select the View tab on the Ribbon, then click Web Layout.
Now, to save a document as a web page, select File > Save As. In the Save As dialog, under click the Save as type: dropdown list and choose Web Page (*.htm;*.html).
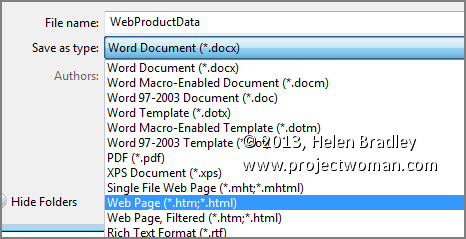
Make sure to choose a location to save the document in, give it a name (it should have the .htm extension), and click Save.
Helen Bradley
Labels: .htm, .html, 2010, 2013, file, File name, Microsoft Office, Microsoft Word, preview, save, Save As, save as type, tip, trick, Tutorial, view, Web, Web Layout, web page, Word, Word 2010, Word 2013
Categories:office
posted by Helen Bradley @ 6:13 amNo Comments links to this post


