Thursday, July 25th, 2013

Word 2010 and 2013 Tip – Making shapely images


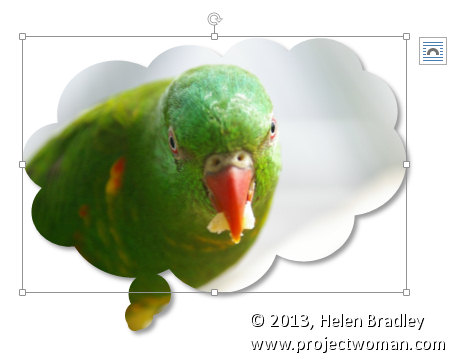
Crop your image to a shape in Word
It is easy to crop an image to a shape such as a star or a heart in Word by using the Crop to Shape feature.

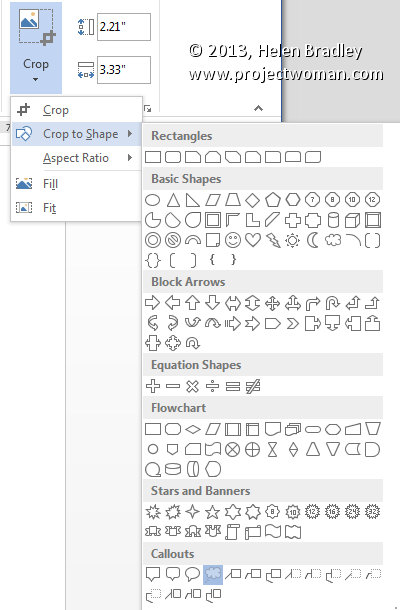
First add the image to your document then click to select it. From the Picture Tools > Format tab click Crop > Crop to Shape.


Select the shape to use to crop the image to. You can then add a shadow or reflection or other effect to the shape as desired.

Helen Bradley

Friday, April 12th, 2013

Illustrator – Using the Halftone Hearts

See how to create some effects such as rotations and a transparency heart effect in Illustrator. This is Part 2 of the videos on halftone hearts.

Transcript:
Hello, I’m Helen Bradley. Welcome to this video tutorial. In this tutorial we’re going to take a step further from our halftone hearts tutorial and have a look and see what we can do with the halftones that we create. In this video we’re going to go one step further than the last video.

Click Here for Part 1

In this video we’re going to create this sort of circular effect from the string of hearts that we created using the Blend tool in Illustrator. And then I’m going to show you how you can use a transparency mask to create this sort of effect in Illustrator as well.

We’re going to start with a brand new file. And I have some of the elements left over from the first video here that we’re going to use. And we’re going to bring in this heart shape. And I also have a spare set of this string of hearts that we created so I’m going to bring that in. That just saves us having to recreate those. Now I want two sets of this so I’m just going to drag a second set away from the first.

Let’s have a look first at how we would create that sort of spiral. I’m going to size the hearts down in proportion so I have a small set because I’m going to rotate these around to create the full rotation. To do that I’m going to choose Effect and then Distort and Transform and I’ll select Transform. I’m going to click Preview so I can see what’s happening, and I’m going to rotate these around at this bottom point. So this is the very bottom point of this chain of hearts and I’m going to rotate them 10 degrees. Now I haven’t got Copy set so this individual string is going to be rotated 10 degrees but I want enough rotations that I can go all the way around a circle. And if I rotate something 10 degrees in 10 degree increments I need 36 of those to go around the circle because a circle has 360 degrees. And that’s all I need to go to create this shape so I’ll click Ok.

And now that shape is created but of course it is still really just a string of heart. And to make it into the individual shapes we’ll choose Object and then Expand Appearance. And now it is those little heart shapes individually. The other thing I want to do is to create a set of halftone hearts that we can use as a transparency mask for this particular heart.

First of all I’m going to switch the foreground and background colors here so that we have a pink heart. And I need to create a box, a sort of rectangle of these hearts. So again I’m going to shrink these down so they’re about the same size or height as this heart is because they’re going to be used for a transparency mask for that. I’m going to select these and again I’m going to do is the transform so I’m going to choose Effect, Distort and Transform and then Transform. This time I’m going to create about 20 copies. And I want to move these so I’m going move these in a horizontal direction about 7 or 8 pixels, let’s say 8 pixels here, and just click Ok.

I just want a block of hearts big enough for me to put my heart on top of that. So they just need to be that size. I’m going to expand the appearance of this halftone effect so I’ll choose Object and then Expand Appearance. And then I want to copy it to the Windows clipboard so I’ll select it all and choose Edit and then Copy. So it’s now in the Windows clipboard and I can just tuck it outside out of the way because we don’t need it anymore.

With the heart shape selected I’m going to use the Transparency palette which we can get to by choosing Window and then Transparency. And I’m going to click to make a mask. And because I want this mask to be clipped to the heart shape I’ll click Clip. I’m going to select on the mask here and I’ll just choose Edit and then Paste. And here is the halftone heart shape. And I’m just going to position it into position here. And I want the little hearts to be pretty much up around the top curve of the heart so it’s really quite well defined. So I’m thinking that’s probably going to be about the right position. And then to go back to working with my heart I’ll click on the heart in the Transparency palette. And that’s how the final effect looks.

What I did when I showed it to you earlier was I created a filled, a red filled square that was over the top of the heart. I’m just going to create my square. And this needs to be sent behind so I’m going to send it to the back. And the heart itself instead of being filled with pink was filled with black so I’ll just click the fill color and we’ll fill it with black. Now if the mask is not in exactly the right place we can also just select back on the heart, reselect the mask and perhaps adjust the positioning of the mask by a pixel or two, reselect the heart and we’re back working with the heart itself.

So there are some effects that you can create using this sort of halftone effect which we created this time using halftone hearts rather than halftone dots in Adobe Illustrator.

I’m Helen Bradley. Thank you for joining me for this video tutorial. Look out on this YouTube channel for more of my video tutorials and go to my website at projectwoman.com for more tutorials, tips and tricks on Illustrator, Photoshop, Photoshop Elements, Lightroom and more.

Helen Bradley

Tuesday, April 9th, 2013

Illustrator – Creating Halftones with Hearts

Learn how to make half tone effects with hearts (instead of dots), in Illustrator. Uses the Blend and the Transform tools for this effect. This is part 1 of a two part series on halftone hearts.

Transcript:
Hello, I’m Helen Bradley. Welcome to this video tutorial. In this tutorial I’m going to show you how you can make halftone hearts in Illustrator.

Before we get started creating our halftone heart effect let’s see what it is that we’re aiming for. And this is the effect that we’re going to create by the end of this video tutorial. And if you look at the link below for the next video tutorial in this series I’m going to show you have to create this effect and this one too.

Click Here to View Part 2

But for now let’s get started on this effect. I’m going to create a new file by choosing File and then New and click Ok. I’m going to view my rulers so that I can drag a guide in that I will use as a guide for drawing my shape. I’m going to grab the Pen tool. I’ll click and drag on the guide. I’m going to add a curve over here, another one here, and one finally back here down on the guide. And I’m just going to Ctrl click outside to disable that Pen tool. And here is my shape. And obviously I need to do something with it before we go any further.

I’m just going to adjust these points so that we get something looking a little bit more like a heart shape. I’m going to get rid of my guides so I’m just going to clear my guide. And let’s go back over, select this shape and let’s give it a stroke. So with the shape selected I’m going to give it a pink stroke, and I’m just going to make that a bit of a larger stroke so we can see it clearly. To flip this shape to make the rest of my heart I’m going to first select the shape and then I’m going to click the Reflect tool which shares a toolbar position with the Rotate tool.

The first thing to do with this tool is to click on the anchor point across which you want to flip it. So that’s going to be either this top point here or this one here. It doesn’t matter which. I’m going to Alt click on it. Now I’m getting that reflected shape sort of across the vertical access and all I want to do is to click Copy to make that a heart shape. And now I’m going to join it together by selecting it and choose Object Path Join. And here is now my heart shape.

Now I want to size this down a bit. Actually I’m going to scale it in proportion. And I’m going to make a duplicate of it so I’m going to hold it as I drag a duplicate away. And I just want to tuck this duplicate out of the way for the minute. I don’t want it around but I’m but I’m going to need it a bit later on. So let’s go and select this one and let’s size it down to be the starting point for our halftone heart. So I’m just going to fill this with pink. And I want another duplicate of this so I’m just going to Alt drag a duplicate away. And this is going to be the top one of my hearts. And I want these to line up, although right now is not the time to line them up. I’m going to size it down first of all. So this is going to be my little heart. This is going to be my big heart. And now I’m going to place it in position.

So I want these to align perfectly to their mid lines. They’re not doing that right now. There we are. This is the line that I want. I want to make sure that they’re perfectly aligned so that the point of this heart lines up with the point of this one. And I’m going to change the color so this one I’m going to make quite a sort of dark crimson color. Only I wanted that for its fill and not its stroke. So we’ve got a dark large heart and a very pale pink small one. What we’re going to do now is to blend these two shapes together so we’re going to blend the little and the big heart together. So we’re going to use the Blend tool here on the toolbar. So I’m going to select it and then I’m going to click on the first of the shapes and click on the second. And that blends these two shapes together.

Well it does such a good job that it looks nothing like what it is that we really want. So I’m going to double click the Blend tool to open the Blend options dialog. First of all I’m going to enable Preview and I don’t really want Smooth Color. I want Specified Steps. At the moment there are 127 steps to blend these two shapes and colors together. And I don’t want that. I want to actually see the shapes. So I’m thinking I’m going to start with something like 25 steps and see how that looks. That’s pretty good. Probably let’s just try down to 20 on this one. The other thing that you can do is you can also use Specify Distance as well as Smooth Color. So we don’t want Smooth Color. We definitely want to see these shapes. And we can either go with steps or distance. But I think that’s pretty good so I’m going to click Ok to accept that.

So now we’ve got the first of our lines of hearts and we just want the rest. And we get the rest with a Transform effect. So I’m going to click Effects and then choose Distort and Transform and we’re going to choose Transform. And here’s the Transform dialog. Again I always want to click on Preview so I can see what’s happening here. And let’s do 15 copies. And what I want to do is to make each copy a little bit to the side of this one. So I’m just going to choose Horizontal Move here. And I’m going to move these apart until they are looking like what I want them to look like. Now I quite like that but I think I don’t have enough copies. So I’m going for 25. What I want here is I want these hearts to run into each other. I made it so that the ones would run into each other in the vertical direction. And I want these in the horizontal direction also to run into each other so that I get this final effect. So I’m just going to click Ok.

And there is my effect that we came here looking for. This is a halftone set of hearts. And they vary from light at the top, very small too dark at the bottom. And if we want to create these so that we can work with them we’ll expand them. So with this line selected I’m going to choose Object and then just Expand Appearance. And these are now grouped but their appearance is expanded so we can work on them a little more time. Here is the Link on working

Click Here to View Part 2

Helen Bradley

Wednesday, February 20th, 2013

OmniSketch Mirror Drawing Video Tutorial

In this video I demonstrate having a little fun in the iPad app OmniSketch, which lets you create tons of funky and interesting brushes.

Transcript: 

I’m Helen Bradley. Welcome to this video tutorial on creating a mirror drawing in OmniSketch on the iPad. If you followed my previous tutorial you know how to create this sort of Seurat background. Now we’re going to create some hearts.

So the first thing I’m going to do is select here and click this box here that has lines through it. This means that we’re going to start drawing four things at once and then I’m going to select a brush to use. So I’m going to start with probably this second brush in the top row and we’ll just see how we go. I’m going to choose a sort of red pink because I think I’m going to make some red pink hearts here, okay. And now I’m going to start drawing and you can see that I’m actually drawing all four at the one time.

Now everything is a bit light here so let’s go and see. Let’s increase the width and fiddle with the adjustments. So you can see now that I can get a heavier rendition of these hearts. So I’m going to change brushes and see if we can’t find some brushes that will go down a bit more quickly. Okay, the opacity is really low on that. The width is really low. Let’s go and get some change of color. You can see how these brushes all paint very, very differently. OmniSketch would be probably one of my favorite applications simply because it’s just totally funky. You can get some really, really interesting effects with it. And it’s the kind of application that you can play with for hours.

So I’m just trying to give you a look at – ohhh. Okay, probably not the bubbles. I’m trying to give you a look at some of these different brushes. But let’s just undo that one and let’s go and get a different brush. Okay, this one is pretty good. And for all these brushes you can adjust their opacity and width. And of course you want to keep changing your colors as you work so that you get some interesting designs happening. And I want to fill this one in pretty fast so this is usually a pretty good filler tool. And let’s make it pretty wide and let’s start filling it in. Of course we can always go back to our Seurat dots which are the dots that we used to create the background. I don’t want them to be very wide but you can slowly just draw in this area. And of course I can draw in any one of these and right now I’m working in the top left corner. But I can change and draw on any one of these that I like because wherever you’re drawing you’re just repeating all the way around the image.

So I just kind of work and build up, that was not a happy brush. If you make a mistake just tap Undo and wait as it undoes. It’s probably a little bit delayed here because I’m screen recording at the same time. I’m just going to change the color and yes, let’s just dial down the width on this brush. This is a really nice little brush. And I tend to use it a bit but sparingly because it does really, really funky things so I’m going to see. Sometimes it’s really not clear what adjustment does but varying it just has an interesting effect. I think I need this to be wider and certainly adjustment is going to help me here with this brush. This is really a nice little brush. I think I’m going to darken it up and use it quite a bit for my heart here.

So I’m just looking at building up an overall heart shape. And let’s go back to this brush and I think it’s a small width. I’m just testing this one here. We’ll just undo it. This is a brush I like to use at the very end because it has this really nice little spiky effect. So sometimes I’ll use it for sort of like the star effect because if you just tap you can get this like star happening on your heart shape. So let’s call that good for now. You can obviously work on something similar yourself.

Let’s have a look at what I’ve done in the past. I’m just going to save this and we’ll go back and have a look at some of the hearts that I’ve created previously. This is one of the hearts and it has that same effect down the side. Let’s just open this up. I’m not quite sure why it’s upside down but let’s just go with it. It’s got those little edges around it.

Here’s another set of hearts. This has been drawn on a white background but again it’s had these black hairs around it. Now I’m thinking with the black hairs I might have erased in the middle here as I was working after I did the black hairs. But this mirror drawing is really interesting. You can get some really, really nice effects with it. So there’s a little bit of an introduction to the wonders of OmniSketch on the iPad. And as I’ve said it’s probably one of my favorite applications for drawing because you get these wonderful, wonderful brushes to play around with. I’m Helen Bradley.

Thank you for joining me for this video tutorial. Look out for more iPad tutorials as well as Photoshop, Illustrator, Lightroom, Photoshop Elements on my YouTube channel. And visit projectwoman.com for more tips, tricks and tutorials. And please subscribe to my YouTube channel and Like the video if you liked it. Thank you.

Helen Bradley

Wednesday, August 22nd, 2012

Illustrator-half drop repeat pattern part2

Learn how to make a half drop repeat pattern in Illustrator. In this video I show you  how to use the  Object Transform Move tool to create the pattern.

See all of our video tutorials on our YouTube channel.

Here’s the text from the video:

Hello, I’m Helen Bradley. Welcome to this video tutorial. Today I’m going to show you how to create a half drop repeat pattern in Illustrator. Before we start creating half drop repeating pattern it’s worthwhile having a look at exactly what a half-drop repeat is. On the left here I have a very simple pattern. It’s just a series of stars side by side. And it’s created by just creating a pattern swatch from a single star in the middle of a document. It’s a plain sort of pattern that works well for some uses but it’s not as sophisticated as this one over here. You can see here that the stars take up each other’s space. So if we were to draw a line through the edge of each of the stars you’ll see that we run through the stars themselves. I’m just going to get the line tool. I’m going to concentrate on this star here. And if I draw a line along where that star is you can see that other stars come into its space. And across here horizontally as well other stars work into the space that’s consumed by this star. There’s not a whole box of white around it. These stars are offset from each other. This is a half drop repeat and it’s a sophisticated style of pattern. And we’re going to look at how to create this now. I like to start with a new file that is a known size. So I’m just going to make mine 100 x 100 points. Just a regular square file is fine but you will need to know exactly how big it is because you’re going to need to work out what half of that is soon. So I’ll just click Ok. I’m just going to zoom out a little bit here and move my image into position where I can see it and the tools around it. We’re going to draw a heart with the pen tool just a filled pink heart. It’s not going to have a border on it and it’s going to be a bright pink so that we can see it. So with the pen tool selected I’m going to click and drag, click and drag, create my point down the bottom, click and drag up here and then click to finish. And this is my heart shape. Now I can neaten it up if I like. I’m just going to make this a little bit smaller so that we can create the repeating pattern from it. So I’m pretty happy with that heart shape. I’m just going to move it roughly into the middle of this square. And now we’re going to break it up into the corners. And we do that using the Object Transform Move feature. What we’re going to do here is we’re going to start with minus a half of the dimensions of the original image. Now the original image was 100 points x 100 points. So we’re going to make this 50 x 50, and we’re going in a negative direction. What we’re going to do is effectively put this heart up here, but we want to make a copy of it, not move it. So I’m going to click Copy. I’m going back to select my heart. I’m going to do that again, Object Transform Move. This time I’m going to put it down here. So I’m going to go minus 50 in a horizontal direction but plus 50 in a vertical direction. I’m just going to remove that minus. Let’s click Preview. You can see it’s going to go in exactly the right position, and I’ll click Copy. Do that again, Object Transform Move. This time we’re headed over here which is plus in a horizontal direction and plus in a vertical direction. Everything is measured from this top corner. So when we’re thinking of our heart moving down here we’re headed in a horizontal plus direction, vertical plus direction. I’ll preview it just to make sure it’s going in exactly the right spot and click Copy. We’ve one last transformation, Object Transform Move and we’re going to send it up in this top corner which is positive in a horizontal direction but it’s going negative in a vertical directions. So I’m just going to type a negative sign in here, preview it, make sure it looks all right, which it does, and click Copy. So this is our repeating pattern. And it’s a really nice tight repeat. This is going to look really good. So the next step is to grab the rectangle tool and just click here on the Art Board. And I want a rectangle the exact same size as my art board. So I’m typing in 100 x 100 and then I’m going to tap V for move and move it so it’s over the top of the art board. If I want to check I can read off my transform settings here. And what I’m looking for is that the X and Y values are one-half of the art board size and one-half of the rectangle size. So everything is in position, now I’m just going to take the fill off this rectangle or square shape. So it now has no fill and no stroke. It’s still selected which is what it should be, so I’m going to click Object Arrange Send to Back. So this shape needs to be at the very back. If we go into our layers we’ll see that it is just there. You can see its path is at the very back of everything. And it needs to be there. Now I’m going to press Ctrl or Command A, and that selects everything. I could also choose Select All but the key stroke is a little bit easier. I’m going to click on this. Let’s just go and Ctrl or Command A again just to make sure that I didn’t do the wrong thing there. And I’m going to drag and drop it into the swatches panel. And what I have now is a sophisticated half drop repeating pattern. To use it I’m going to need to save this swatch because otherwise I’m going to lose it. So I’m going to click the fly out menu for the Swatches pallet, choose Save Swatch Library as AI so it’s saved as an AI file, and I’m going to call this heart. We better call it heart three because it looks like there’s some other hearts before, and click Save. Now we can get rid of this particular pattern if we want to. I’m going to create a new art board, a new file, File New, and I’m just going to create a regular letter size landscape document. Let’s just get this in position so we can see it. I’m going to put a rectangle over the top of this document. And the rectangle can be filled with things such as orange color. It can also be filled with our pattern. But you can see that the pattern is not in the swatch. So we have to go and get the pattern before we can use it. Luckily it’s saved to disk as a file. Click the fly out menu, open swatch library, user-defined and then we’ll go and get heart three which is up here. And here is our heart swatch. You can see it here. And now if I click on this my shape my rectangle is now filled with my repeating pattern. This is a tighter repeat than we had in the other image but it’s a half drop repeating pattern. Now if we look at this and say well whatever we wanted to use this for whether it be fabric design or the background of some sort of project if we thought that we didn’t have enough hearts, we want the heart smaller we can do so, Object Transform Scale. And what we’re going to do here is scale the pattern but not the rectangle. We want the rectangle the same size as the art board. So we’re not going to transform objects but we are going to Transform Patterns. And I’m going to take this down to 50 percent, and let’s preview that. So that would give us more hearts, and if we went down even smaller we’d get more hearts. If we thought that our hearts weren’t big enough then we could go up to say 150 percent and then they would be bigger. And we could go up from here. So if you want more or less hearts inside your rectangle you’ll come into Object Transform Scale, you’ll turn off Transform Objects because you don’t want to make the rectangle any difference in size but you do want to transform the pattern inside the rectangle. So there you have creating a half-drop repeating pattern in Illustrator. Now this is going to work in a lot of versions of Illustrator. These tools have been around for a long time. There is a new feature in Illustrator CS6 which is what I’m using here. It makes it even easier to create repeating patterns And I’ll have a look at that in another video.

Helen Bradley

Tuesday, January 11th, 2011

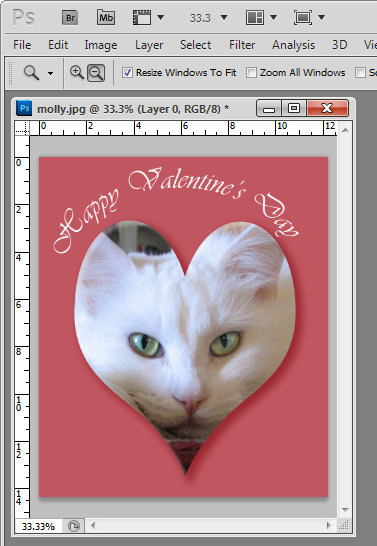
Crop to a Valentine heart shape in Photoshop

With Valentine’s Day coming up shortly you might be wondering how you create heart shape images in Photoshop. Well, here’s how:

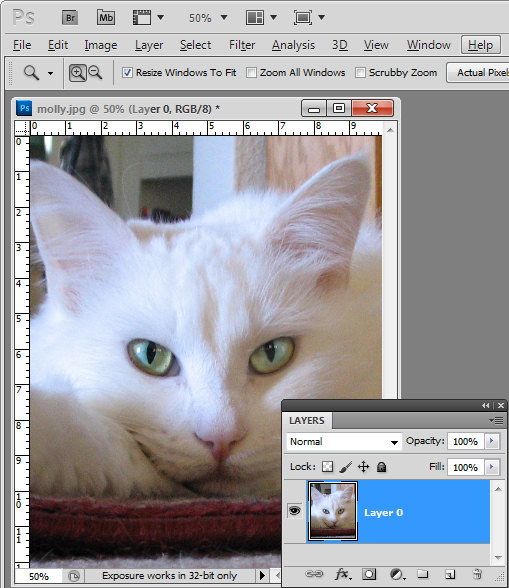
Start by opening an image that you want to use and convert the background layer to a regular layer by double clicking the background layer in the layers palette and click Enter.
Crop image to Valentine's heart shape in Photoshop

From the tool palette, select the Custom Shape tool, which sits below the Rectangle tool.

From the Shapes dropdown list on the Tool Options bar, select a heart shape.

If you don’t have a heart shape in your list, click the flyout menu and select All. Click Append to append all the shapes available which will give you access to at least one heart shape. In fact you probably have a Heart Card shape, a Heart shape and a Heart Frame shape.

To cut a heart shape out of your image you’ll want the Heart shape or the Heart Card shape.
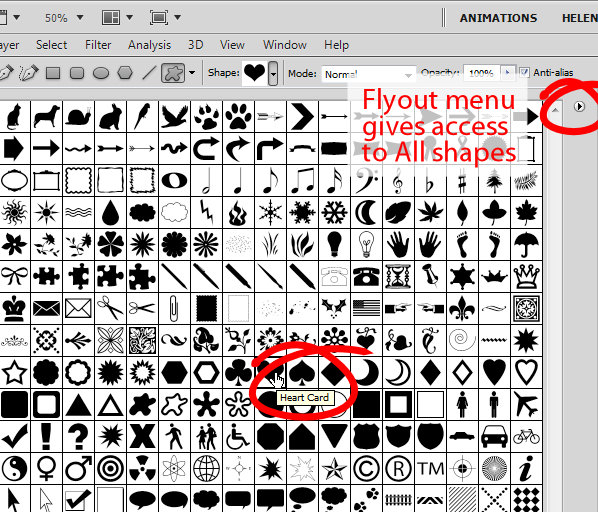
Crop an image to a heart shape in Photoshop

Click the New Layer icon at the foot of the layers palette or choose Layer > New > Layer.

From the toolbar, select the option that says Fill pixels. Drag a heart shape over your image. Don’t worry that there is a fill color associated with the heart and that it is covering up your image. Size the shape using the move tool until it’s positioned pretty much where you want it to be.
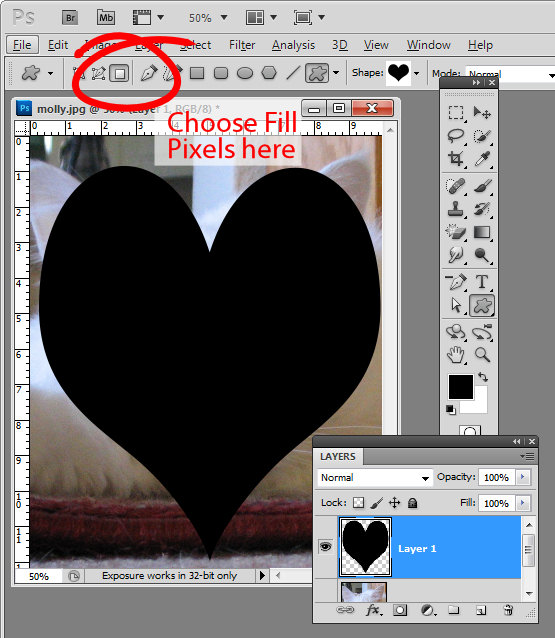
Crop image to valentine heart shape

Now with the heart layer selected, drag it below the image layer and select the image layer again.

Choose Layer > Create Clipping Mask and your image will be clipped to the heart shape.
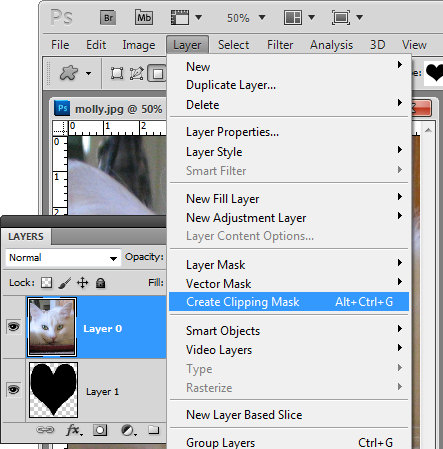
crop image to valentine heart shape

This method of creating a heart shape is ideal as the heart can be moved into a different positioned and resized by selecting the heart layer and resizing the heart appropriately.

In addition, you can click to select the image layer and drag with the Move Tool (V) on the image to place the image inside the heart in an appropriate position.
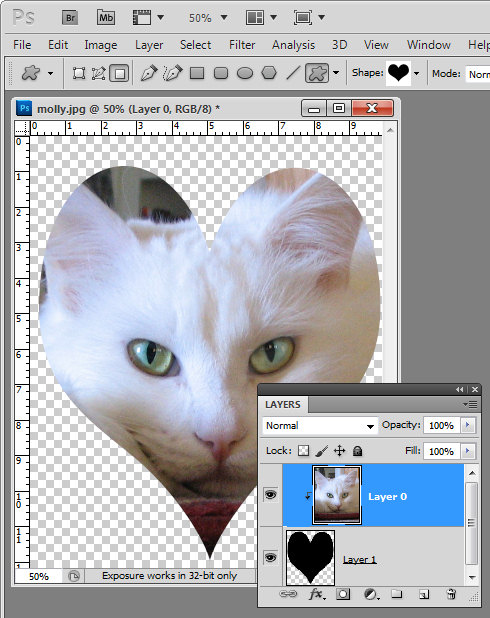
Crop an image to a Valentine heart shape

If you want a background for your image, click the bottommost layer and then Ctrl + Click (Command + click on the Mac) on the new layer icon at the foot of the layers palette.

This adds a new layer below all the other layers.

Select a foreground color to use, target your new layer and press Alt + Backspace (Option + Delete on the Mac) to fill  this layer with the foreground color.

Finish your Valentine heart effect by selecting the heart layer and apply a drop shadow to it by clicking the Add a Layer Style fx button at the foot of the layer palette and choose Drop Shadow.
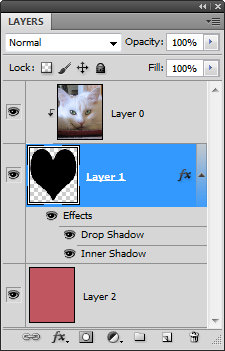
Add some text and you’re ready to save and print the file.

There is a YouTube video of this process using Photoshop CS6 here – it is the same in any version of Photoshop.

Helen Bradley