Thursday, October 23rd, 2014
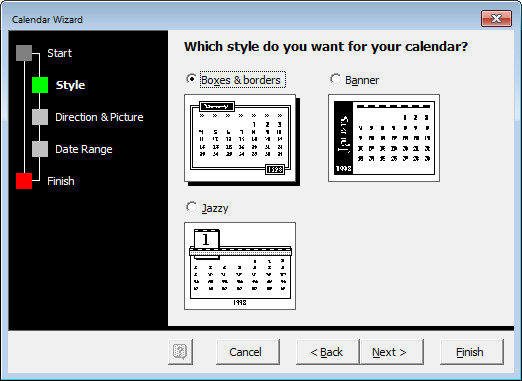
Missing the Calendar Wizard in Word 2013? – no problem, here’s how to get it
Many years ago, Word had a wonderful Calendar Wizard that you could use to make calendar pages in Word. One really neat aspect of this Wizard was (and still is) that you can make calendar pages for any period of time – so you don’t have to wait till someone makes 2017 calendars for you to download – instead you can make your own and you can do it now! Hell you can make calendars for 2020 now if you want to really plan ahead!
In Word 2013 it might at first appear that the Calendar Wizard isn’t available – and it isn’t – that is, until you know how to make it accessible.
To start, download the WIZ file for the wizard from here: Microsoft Word Calendar Wizard Download for Word 2013 and Word 2016.
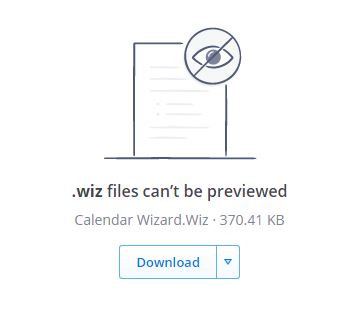
Alternately, if you have an older version of Word on your computer, search for Calendar Wizard.wiz as you may have it on your computer somewhere already.
If you find a .cab file for the Calendar Wizard and if it is a zipped archive format file then you will need to open it. If double clicking it doesn’t launch an unzip program that can handle it, then download Express Zip File Compression as it can handle .cab files easily.
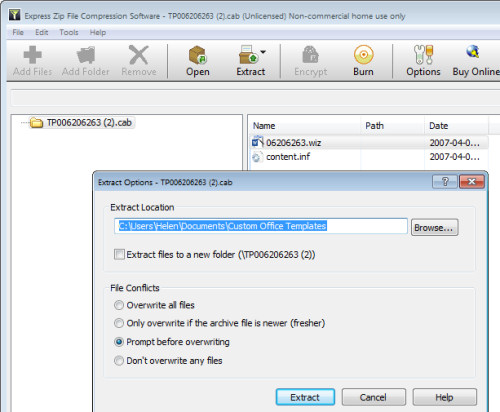
Extract the .wiz file (or copy it) to a folder of your choice or, better still, put it into your custom templates folder C:\Users\‹Username›\Documents\Custom Templates. If you’re downloading from the Dropbox link above then you have the .wiz file and you just need to move it into position.
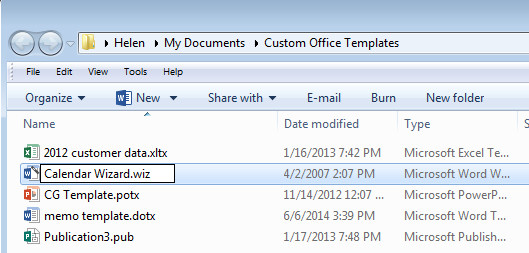
If you are doing this, then change its name when you do so – calendar wizard.wiz is (and was) a good name for it. If you found the wiz file on your own drive, make a copy to this folder.
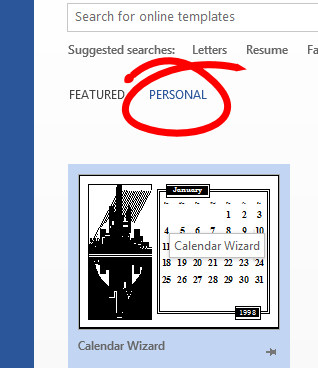
T’hen double click the .wiz file to launch it in Word. If you put it in your Custom Office Templates folder then you can launch it from inside Word 2013 by choosing File > New, click Personal to view your personal templates and click to run it from there.
You can view my YouTube video on downloading and running and using the Calendar Wizard here: https://youtu.be/0HlnXxYIr7k
Note: Post updated November 2016 to include a new download location which was valid at this time.
Note: Post updated September 2017 – it still works! And to add video link.
Labels: Calendar Wizard, find the calendar wizard, make a calendar, Microsoft Word 2013, Word 2010, Word 2013 calendar wizard
Categories:office
posted by Helen Bradley @ 4:35 pm10 Comments links to this post
Thursday, November 28th, 2013
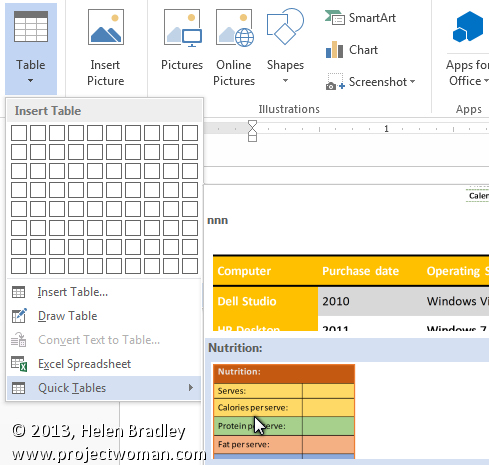
Learn to insert a table in a Word document with a single click
When you need to repeatedly create the same type of table in a Word document you can do so using the new Word Quick Part feature.
This technique works well when you use the same table layout repeatedly. Your inserted table will be the same size, have the same number of columns and rows and contain any preset formatting that it had when you created it as a Quick Part entry. Once created, you can insert it quickly whenever you need it.
To do this:
- Create a new table with the number of rows and columns you want all your tables to have.
- Include any text in the table that needs to always be in this type of table – if there is none, leave the cells blank.
- Format the cells in the way you wan them to be formatted every time – including text formats and cell background colors and borders.
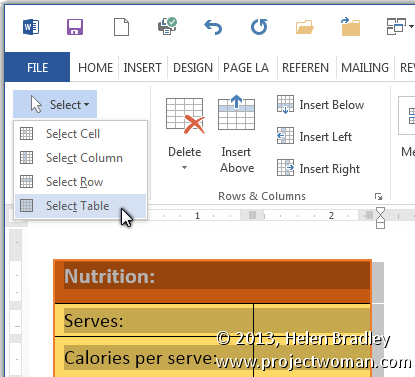
When you are done, select the table by clicking in it and choose Table Tools > Layout > Select > Select Table.
Choose Insert > Quick Parts > AutoText > Save Selection to AutoText Gallery.
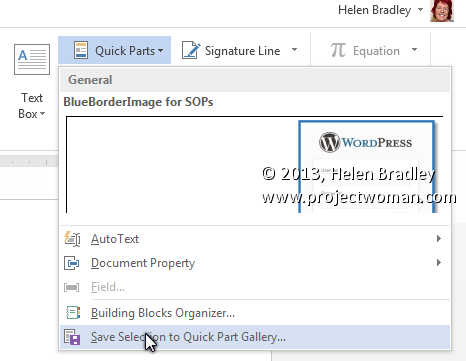
In the Create New Building block dialog set the Gallery to Tables and type a description of the table and click Ok.
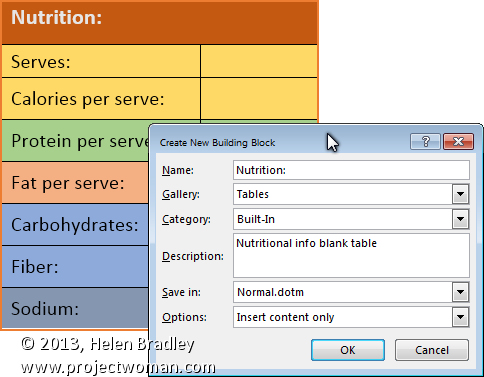
In future, to create a table to these exact specifications choose Insert > Tables > Quick Tables, locate the table in the list and click it to insert it into the document.

This feature is the successor to the AutoText feature in earlier versions of Word. It looks a little more cumbersome but it is more easily discovered so you don’t have to remember where the table was saved as it appears automatically on the Insert Table menu.
Helen Bradley
Labels: Auto Text, AutoText., Building Blocks, gallery, insert table, Microsoft Word, table, Word 2007, Word 2010, Word 2013
Categories:office
posted by Helen Bradley @ 9:56 amNo Comments links to this post
Wednesday, November 13th, 2013
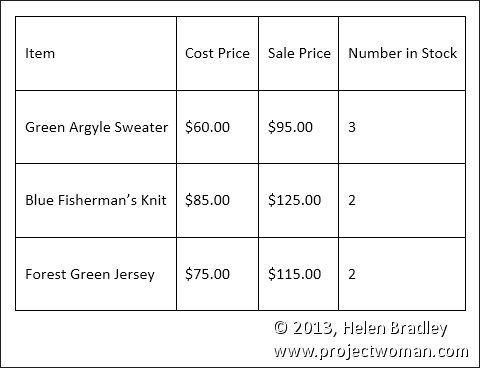
Learn to quickly add extra spacing above and below the contents of a Word table cell
When you enter text in a Word 2013 table you may want more space above and below your text than appears by default.
While you can make the table cells larger and vertically centre the text in the cells this is a cumbersome solution and there is better and faster way.
To add extra spacing you can change the table’s cell spacing values.
To do this, first select the table, right click choose Table Properties.
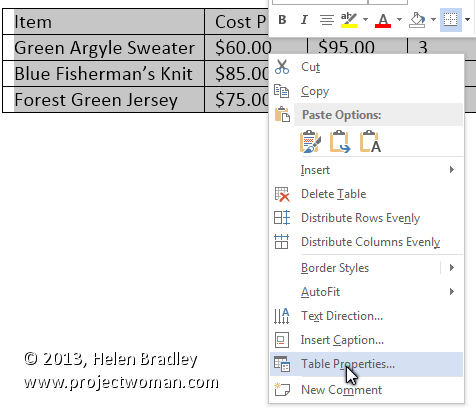
Click the Table tab and click Options.
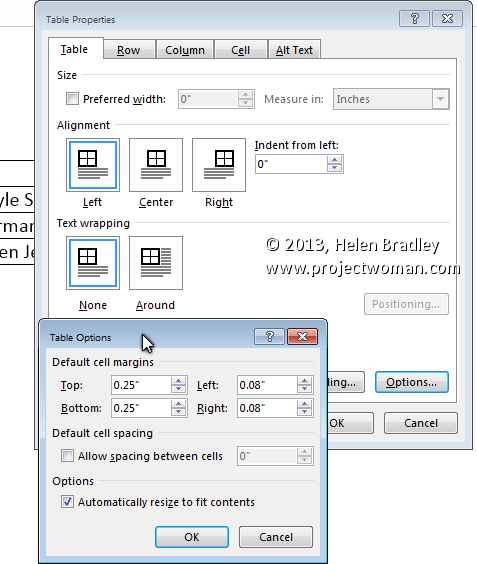
Here you can set the Top, Bottom, Left and Right cell margins for all cells in the table. Set the Top and Bottom values to 0.25″ to add a little extra space above and below the text in the cells.
Helen Bradley
Labels: cell spacing, space, table, vertical and horizontal space, Word 2007, Word 2010, Word 2013
Categories:Uncategorized
posted by Helen Bradley @ 12:11 pm1 Comment links to this post
Thursday, November 7th, 2013
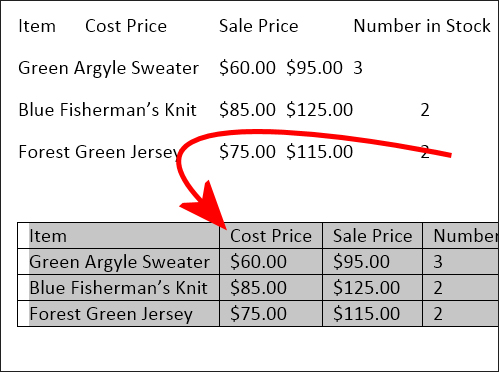
Quickly turn text into a Microsoft Word table
It is possible to convert text from a Word document into a table.
However, to do so requires the text to be correctly laid out – if it is not, it is worth a few minutes work to reformat the text so it can be easily converted to a table.
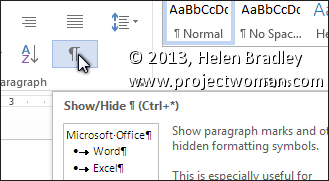
To convert the text each column’s content needs to be separated by a single tab and you need to have a paragraph marker at the end of each line. To check your text is correctly formatted, click the Home tab and click the Show/Hide¶ button to see the tab marks in the document (they are small right pointing arrows).
Make sure there is only one tab marker between each item in the list. If you don’t have data for a particular column add two tab marks to indicate that one column is empty.
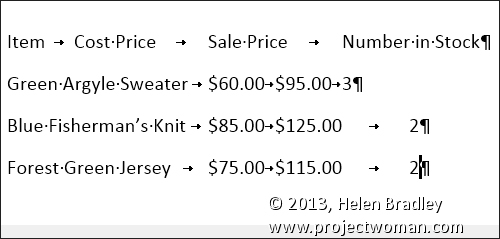
Click the Show/Hide¶ button again when you are done.
Select the list and choose Insert > Table > Convert Text To Table.
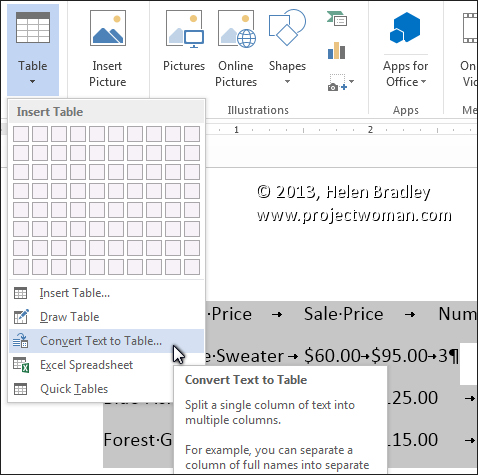
Word should automatically suggest the correct number of columns. From the Separate text at options select Tabs, set the AutoFit behavior to AutoFit to contents if the items are short like ours are and click Ok.
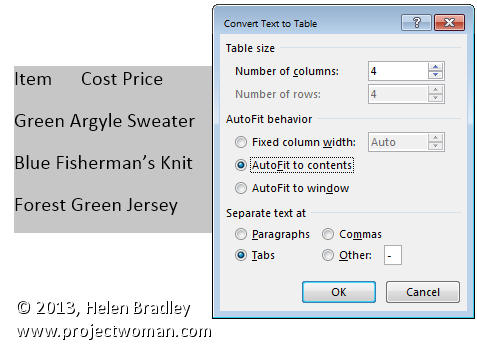
The text will be automatically placed in a new table ready for you to continue to work on it.

Helen Bradley
Labels: Autofit, convert text to table, Microsoft Word 2013, tabs, Word 2007, Word 2010
Categories:Uncategorized
posted by Helen Bradley @ 11:42 amNo Comments links to this post
Friday, August 23rd, 2013
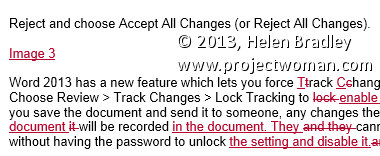
Keep track of the changes made to your document
Word’s Reviewing tools make it easy to show someone the changes you’ve made to a document.
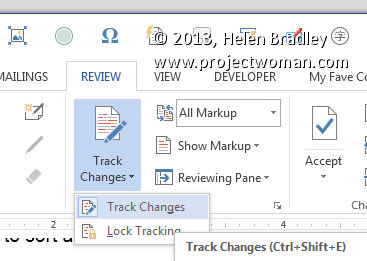
You can set Word to record the changes before you make them by selecting the Review tab on the ribbon and click Track Changes > Track Changes.
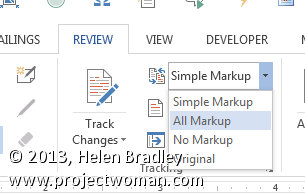
Now, in Word 2007 & 2010, every addition to your document will be underlined and every deletion will be marked with strikeout. Word 2013 defaults to Simple Markup so you will need to choose All Markup to see the changes marked up.
These changes are retained when you save the document.
You can apply the changes permanently at any time by selecting Review > Accept or Reject and choose Accept All Changes (or Reject All Changes).
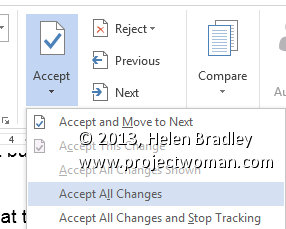
Word 2013 has a new feature which lets you force Track Changes to be enabled. Choose Review > Track Changes > Lock Tracking to enable this feature. Now if you save the document and send it to someone, any changes they make to the document will be recorded in the document. They cannot disable this feature without having the password to unlock the setting and disable it.
Helen Bradley
Labels: 2010, 2013, Accept All Changes, change, Highlight, Lock Tracking, mark, mark up, markup, Microsoft Office, Microsoft Word, review, tip, track changes, tracked changes, trick, Tutorial, up, Word, Word 2010, Word 2013
Categories:office
posted by Helen Bradley @ 6:23 amNo Comments links to this post
Thursday, August 15th, 2013
Sorting data in Word 2007, 2010 & 2013
In the pre-ribbon versions of Word you would use the Table commands to sort data in a Word document.
In Word 2007, 2010 & 2013 you can’t use the table sort options any longer for plain old text simply because you can’t select the table options if you don’t have a table – it’s a Catch 22 situation.
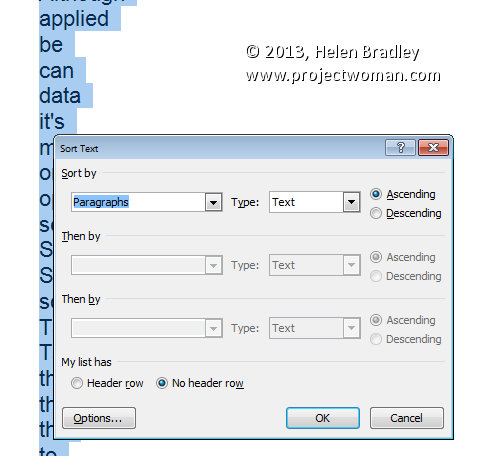
Luckily, Word now includes a proper sort option for any text – not just table text. To use it, first select the text to sort and then click the Sort button on the Home tab of the Ribbon.
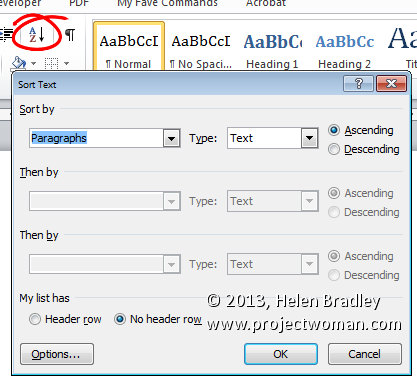
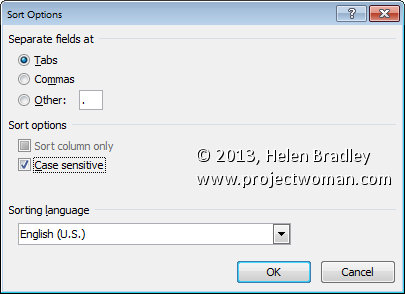
When the Sort Text dialog opens you can choose what to sort such as Paragraph or Field and the type of sort. If you want a case sensitive sort so A is treated differently to a then click Options and check the Case Sensitive checkbox.
Once you are done select the sorting options, click Ok to perform the sort.
Helen Bradley
Labels: 07, 2007, 2010, 2013, Command, data, Microsoft Office, Microsoft Word, sort, Sort Options, Sort Text, table, Table Command, text, tip, trick, Tutorial, Word, Word 2010, Word 2013
Categories:office
posted by Helen Bradley @ 5:57 am1 Comment links to this post
Friday, August 9th, 2013
How to use linked text boxes to flow text throughout a document automatically
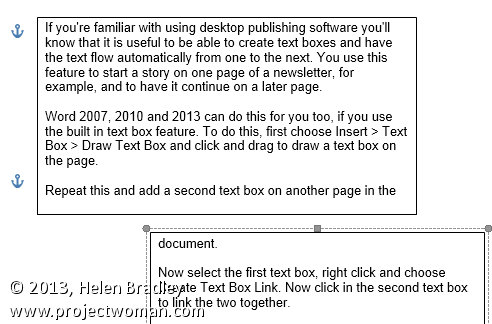
If you’re familiar with using desktop publishing software you’ll know that it is useful to be able to create text boxes and have the text flow automatically from one to the next. You use this feature to start a story on one page of a newsletter, for example, and to have it continue on a later page.
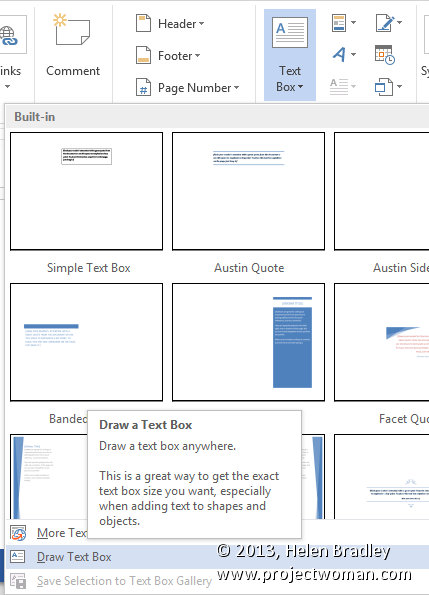
Word 2007, 2010 and 2013 can do this for you too, if you use the built in text box feature. To do this, first choose Insert > Text Box > Draw Text Box and click and drag to draw a text box on the page.
Repeat this and add a second text box on another page in the document.
Now select the first text box, right click and choose Create Text Box Link.
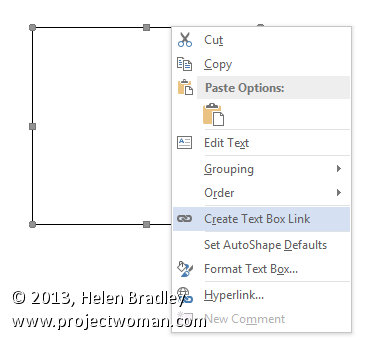
Now click in the second text box to link the two together.

In future, any text which you type into or paste into the first text box and which won’t fit because the box is not large enough to accommodate it, will flow automatically into the second text box.
Helen Bradley
Labels: 2010, 2013, automatic, Create Text Box Link, Draw Text Box, flow, insert, Microsoft Office, Microsoft Word, text, text box, tip, trick, Tutorial, Word, Word 2010, Word 2013
Categories:office
posted by Helen Bradley @ 6:09 am1 Comment links to this post
Thursday, August 1st, 2013

Know when your document was printed by adding a date and time stamp to each printed page
Add a date and time stamp all your printouts by placing the current date and time in the document footer so it prints when the page is printed.
To do this in Word 2007, 2010 and 2013 choose Insert > Footer > Edit Footer. Click the Date & Time button and enable the Update Automatically checkbox. From the list of dates and times choose a date or date and time – depending on what you want to see on the page. Click Ok.
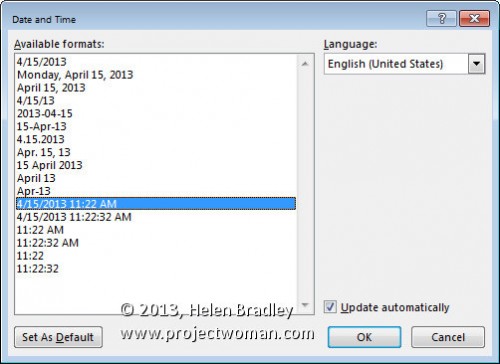
Select the text that Word has inserted in the footer and you can now format it to a small font – such as Italic 8 pt. You can also prefix the text with the words Printed On: or something similar, if desired.
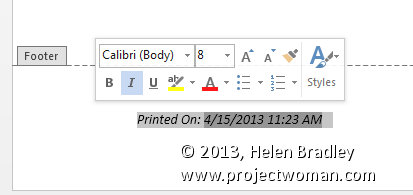
Click Close Header and Footer to return to your document. Now the current date and time will be printed in the footer each time the document is printed.
Helen Bradley
Labels: 2010, 2013, add, Close Header and Footer, date, footer, header, insert, Microsoft Office, Microsoft Word, Printed On, printout, stamp, time, timestamp, tip, trick, Tutorial, Update Automatically, Word, Word 2010, Word 2013
Categories:office
posted by Helen Bradley @ 5:18 am1 Comment links to this post
Thursday, July 25th, 2013

Crop your image to a shape in Word
It is easy to crop an image to a shape such as a star or a heart in Word by using the Crop to Shape feature.
First add the image to your document then click to select it. From the Picture Tools > Format tab click Crop > Crop to Shape.
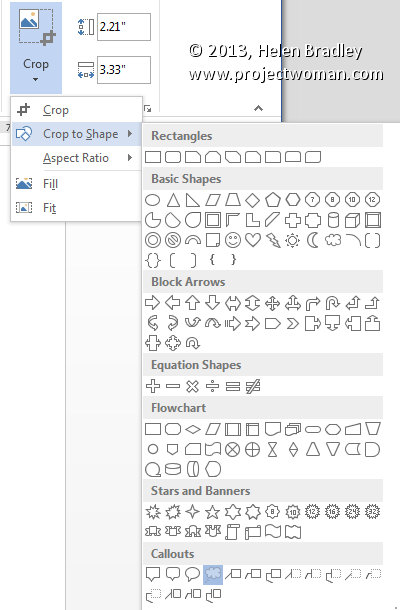
Select the shape to use to crop the image to. You can then add a shadow or reflection or other effect to the shape as desired.
Helen Bradley
Labels: 2010, 2013, AutoShape, crop, format, heart, image, Microsoft Office, Microsoft Word, Picture Tools, reflection, shadow, shape, star, thought bubble, tip, trick, Tutorial, Word, Word 2010, Word 2013
Categories:office
posted by Helen Bradley @ 5:27 am1 Comment links to this post
Thursday, July 11th, 2013
See your document as a web page and keep it looking that way
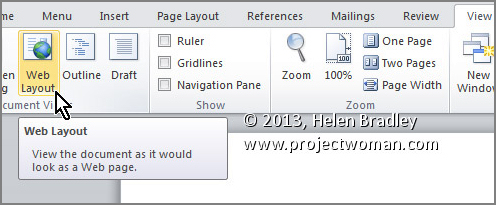
To see how any of your Word 2010 and 2013 documents will look when they are saved as web pages, select the View tab on the Ribbon, then click Web Layout.
Now, to save a document as a web page, select File > Save As. In the Save As dialog, under click the Save as type: dropdown list and choose Web Page (*.htm;*.html).
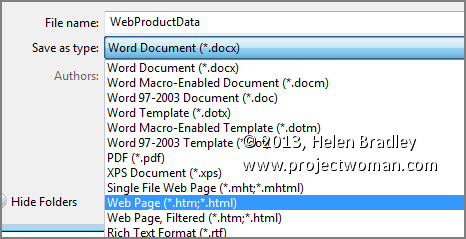
Make sure to choose a location to save the document in, give it a name (it should have the .htm extension), and click Save.
Helen Bradley
Labels: .htm, .html, 2010, 2013, file, File name, Microsoft Office, Microsoft Word, preview, save, Save As, save as type, tip, trick, Tutorial, view, Web, Web Layout, web page, Word, Word 2010, Word 2013
Categories:office
posted by Helen Bradley @ 6:13 amNo Comments links to this post


