Wednesday, July 3rd, 2013
Use a text box in Word to control text wrap around a table
In a previous tip I showed you how to place a table inside a text box so you could put two tables side by side. You can use the same process to make the text on your page wrap around a table.
Click here to learn how to place a table inside a text box
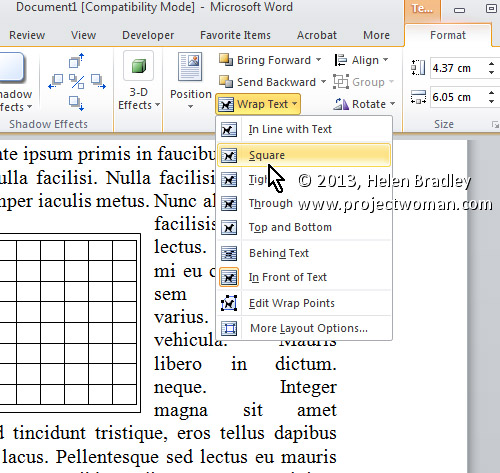
To control the way text wraps around a table, first create a text box and place a table inside it.
Then click to select the text box and, from the Ribbon, select the Format tab > Text Box Tools. Click the Wrap Text dropdown menu and choose the desired wrapping option from those in the list – typically you will use Square to wrap text round the text box with its inserted table.
Helen Bradley
Labels: 2010, 2013, format, insert, Microsoft Office, Microsoft Word, option, part 2, table, text, Text Box Tools, tip, trick, Tutorial, Word, Word 2010, Word 2013, wrap, Wrap text, wraparound
Categories:office
posted by Helen Bradley @ 6:05 am1 Comment links to this post
Wednesday, June 26th, 2013
Place tables side by side in a document using text boxes to keep them in place
If you add a table to a text box in Microsoft Word, you can position the text box wherever you want it to be on the screen.
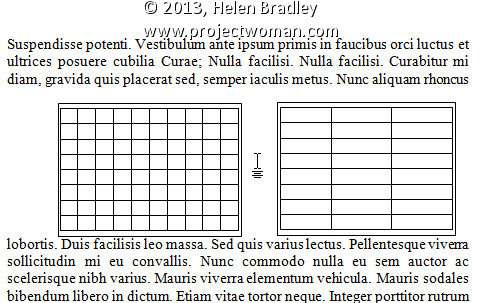
If you need two tables to be placed side by side in your document you can do so by placing each of them inside a text box and then arranging the text boxes side by side.
To do this, create a text box by selecting the Insert tab on the Ribbon, click Text Box and click Draw Text Box. Click and drag to create a text box and then click inside it and create a table by choosing Insert > Table. Repeat the process to create the second table in its text box then drag to position the text boxes side by side.
Helen Bradley
Labels: 1, 2010, 2013, insert, Microsoft Office, Microsoft Word, Page, Part 1, Ribbon, side, side by side, Simple Text Box, table, text box, tip, trick, Tutorial, Word, Word 2010, Word 2013
Categories:office
posted by Helen Bradley @ 6:00 am11 Comments links to this post
Tuesday, June 18th, 2013
Modify a Style’s Font Color to help find missed formatting
Quickly determine which paragraphs in a document have been formatted using one style, rather than another, by changing the colour of the formatted text.
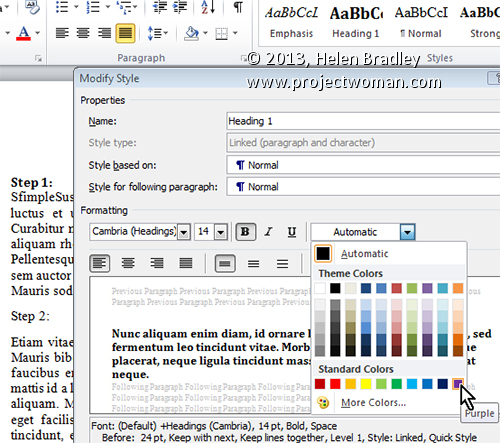
To do this, click the Home tab on the Ribbon, hover over the style’s name you want to edit in the Styles gallery. Now, right click it and select Modify. In the Modify Style dialog, change the Font Color to something that will stand out on the page (such as purple) and click OK.
Now scroll through your document to see if the style has been applied everywhere you wanted it applied. Remember, if you don’t make any changes at this point, you can quickly undo the colour change by selecting Undo.
Otherwise, when you are done formatting the document, set the colour back to the original Font Color by repeating the above steps.
Helen Bradley
Labels: 2010, 2013, color, colour, font, Font Color, format, Home, Microsoft Office, Microsoft Word, miss, mistakes, modify, Modify Style, style, Styles Gallery, tip, trick, Tutorial, Word, Word 2010, Word 2013
Categories:office
posted by Helen Bradley @ 5:44 amNo Comments links to this post
Tuesday, June 11th, 2013
Learn to use ‘Save as type’ to format your document so users of older versions of Word can access them
You can easily exchange files with users of older versions of Word. This is because Word 2007, 2010, and 2013 essentially share the same file format. So it is pretty easy to open any Word document created using version 2007, 2010 or 2013 in any other of these three versions of Word. In addition, Word 2007, 2010, and 2013 will open files from any previous version of Word.
However, when you need to share a Word 2007, 2010, or 2013 file with someone using a much earlier version such as Word 2003 or a Mac version of Word, you must save the file using their particular Word file format. This is because the file formats are not the same and the older versions of Word cannot read the newer file formats.
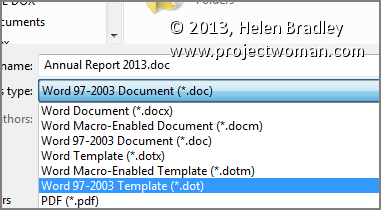
To save using the appropriate format, select the File tab on the Ribbon, and click Save As. In the Save As dialog, click the Save as type: dropdown list and select the word processing format that matches the software that your other user is using such as Word 97-2003 Document (*.doc). Then click Save to save it in that format.
Helen Bradley
Labels: 2003, 2007, 2010, 2013, convert, file, format, mac, Microsoft Office, Microsoft Word, old, open, Save As, save as type, share, software, tip, trick, Tutorial, Word, Word 2010, Word 2013
Categories:office
posted by Helen Bradley @ 6:28 amNo Comments links to this post
Tuesday, September 25th, 2012
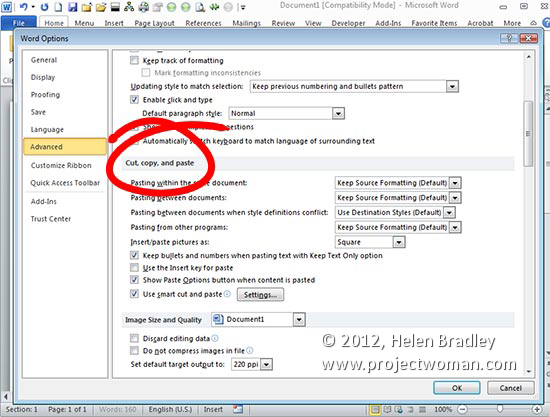
Setting up your pasting preferences in Microsoft Word can speed up your workflow when you’re working from another resource. You can do this by clicking File > Options (Office button > Word Options in Word 2007) and then click Advanced. You’ll find what you’re looking for under the Cut, Copy and Paste section. Set your default paste preferences to those that best fit your needs and click OK.
Helen Bradley
Labels: copy and paste, Microsoft, Paste preference, preferences, tip, trevor office, trevor payne, Word, Word 2010
Categories:office, trevor tip
posted by Trevor Payne @ 8:00 amNo Comments links to this post
Wednesday, May 2nd, 2012
Each of the Office applications allows you to configure a look for a document, spreadsheet, publication or presentation and then save it as a template so that you can reuse it anytime.
Templates in PowerPoint 2010
In PowerPoint you’ll create your presentation and then save it using File > Save As and select from the Save As Type list choose PowerPoint Template (*.potx). Give your presentation template a name and click Save.
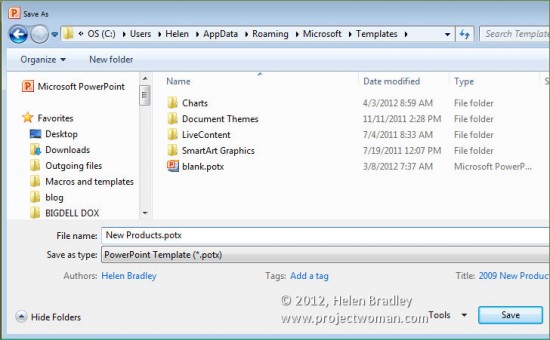
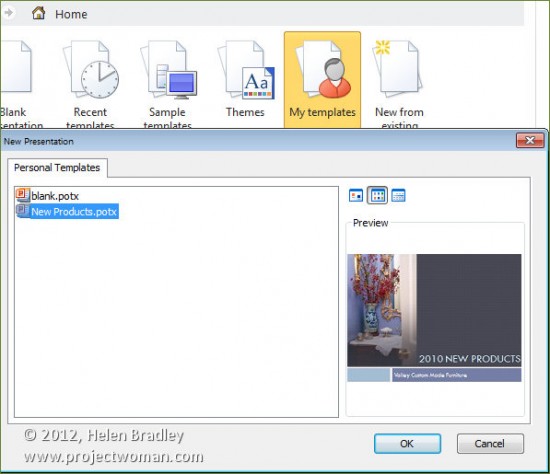
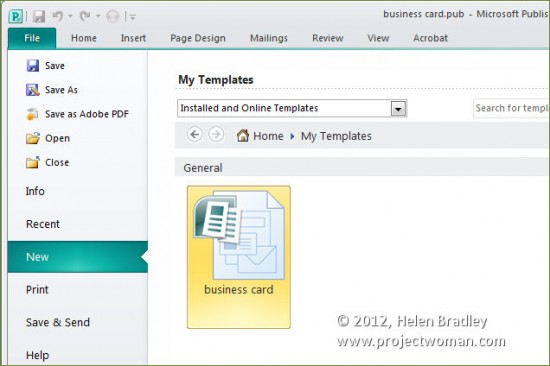
In future you can locate this presentation by choosing File > New > My Templates and click on the template to use it as the basis of a new document.
Templates in Word 2010
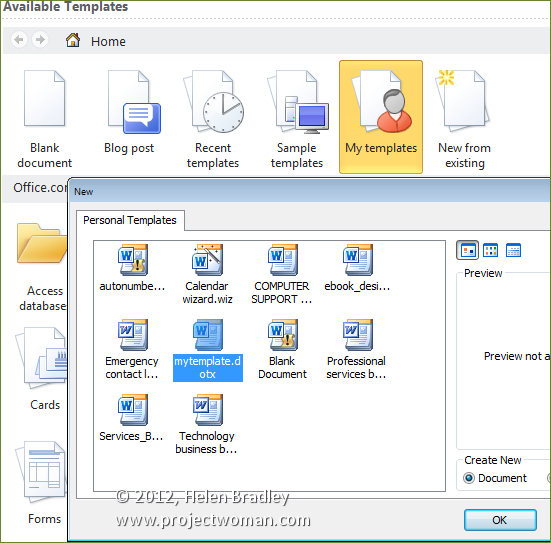
In Microsoft Word choose File > Save As and from the Save As Type dropdown list choose Word Template (*.dotx). In the top left of the dialog click the Templates option to make sure that the template will be stored in the correct location and give the template a name.
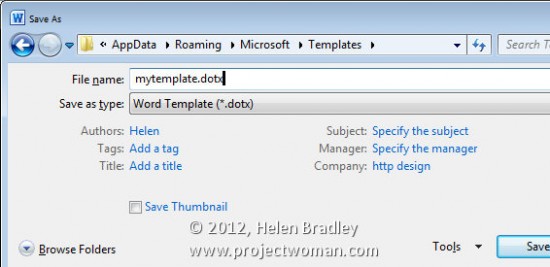
In future choose File > New > My Templates and select the template to use.
Templates in Excel 2010
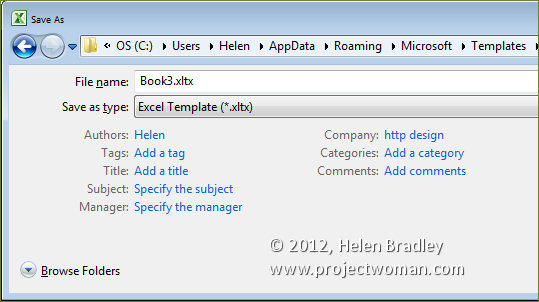
In Microsoft Excel, you can save the look of your document so that it can be used as the basis of a new document by choosing File > Save as and choose Excel Template (*.xltx ) as the file type. Type a name and save the template file.
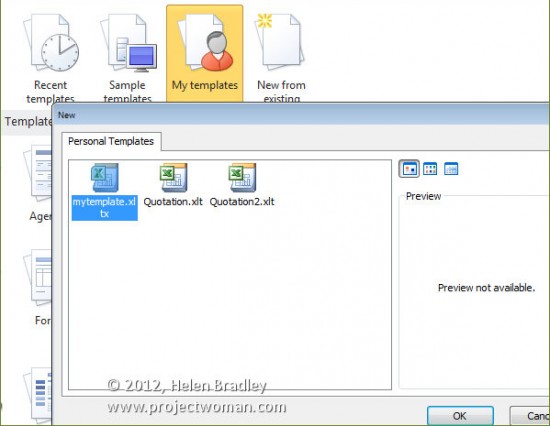
In future you can base a new worksheet on this template by choosing File > New > My Templates and select it from the Personal Templates list.
Templates in Publisher 2010
In Publisher you’ll choose File > Save As and then select Publisher Template (*.pub). Type a name for the template and click Save.
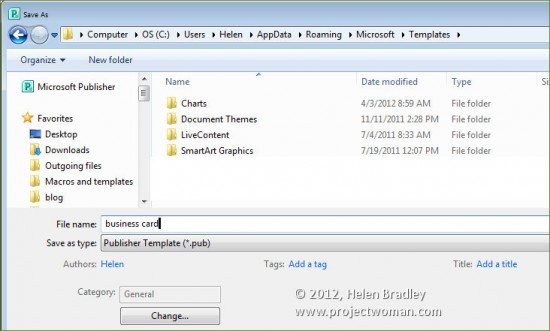
In future you can access this template by choosing File > New > My Templates, select the template and click Create. You may need to close and reopen your software before the new templates are available.
Helen Bradley
Labels: Excel, Excel 2010, Helen Bradley, how to, PowerPoint, PowerPoint 2010, publisher, Publisher 2010, save as a template, templates, tips, Word, Word 2010
Categories:Uncategorized
posted by Helen Bradley @ 8:00 am1 Comment links to this post
Tuesday, April 24th, 2012
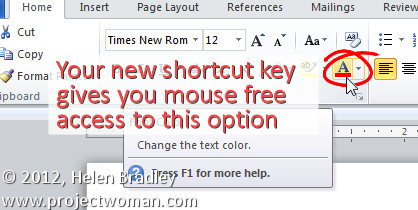
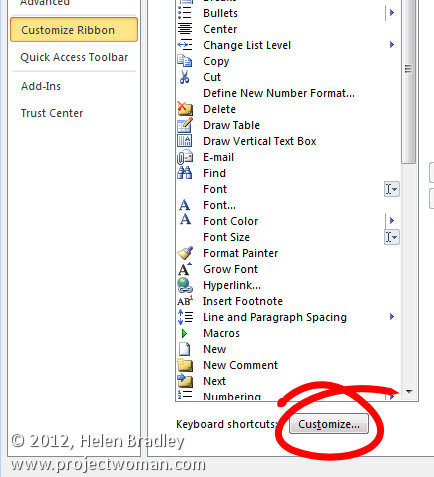
In Word 2010 you can set keyboard shortcuts for ribbon buttons using the program options. Choose File > Options and click Customize Ribbon. Click the Customize button at the foot of the dialog – this is available in Word 2010 but not in Excel 2010 curiously.
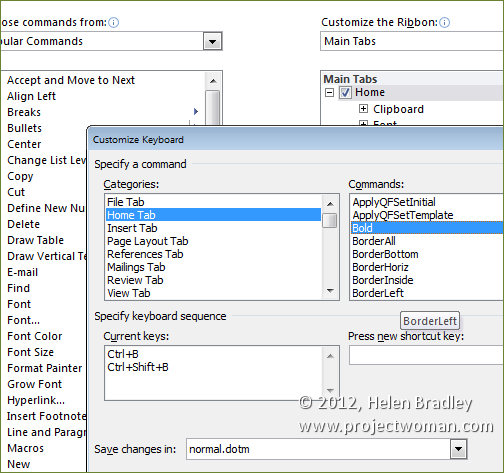
Click the tab that you’re interested in and locate the button on the tab that you want to customize. For example, if you choose the Home tab and click Bold as the command you’ll see that there are already keyboard shortcuts associated with that command.
Many other commands do not have keyboard shortcuts associated with them and if you want to add them you can do so.
For example, there is no keyboard shortcut for the Font Color Picker. Select Home tab and then Font Color Picker and press a new shortcut key. For example the shortcut Alt + Ctrl + Shift + C is not currently assigned.
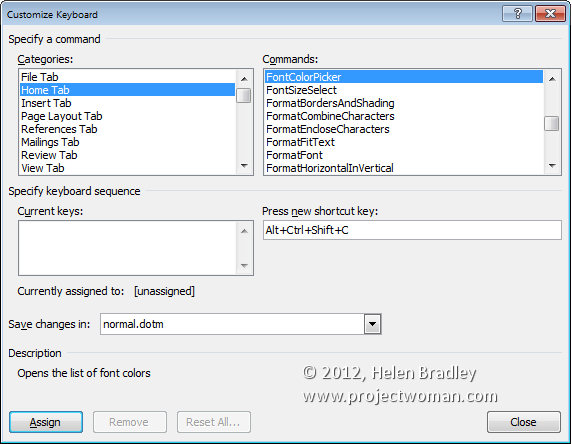
Click in the box and press that keyboard combination. If you want to use that for the Font Color Picker, you can do so by clicking Assign. This assigns this keystroke to the Font Color Picker tool.
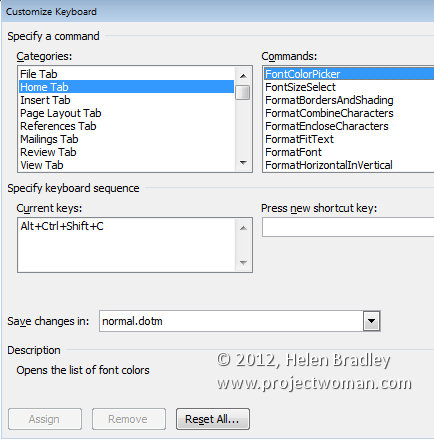
To test this, click Close and then Ok. Now when you select a piece of text you can apply the currently selected font color to it by pressing Ctrl + Alt + Shift + C.

Helen Bradley
Labels: customise, customize, Excel 2010, Helen Bradley, key shortcuts, keyboard assignments, Keyboard Shortcuts, keystroke short cuts, short cut key, Word 2010
Categories:Uncategorized
posted by Helen Bradley @ 8:00 am1 Comment links to this post
Thursday, April 12th, 2012
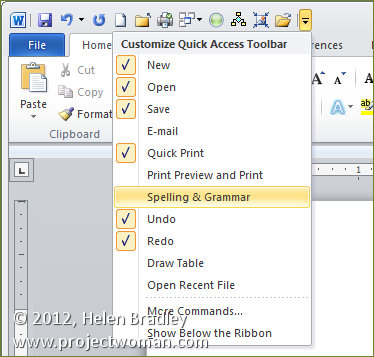
The Quick Access Toolbar or QAT runs across the top left edge of the Word 2007 and 2010 window. It also appears in other ribbon compatible programs like Excel 2007 & 2010, PowerPoint 2007 & 2010.
The QAT is a handy place to put icons that you use all the time. It can be customized through this Quick Access Toolbar option.
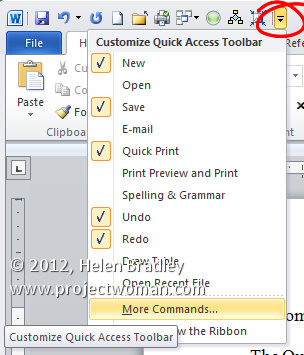
Click this icon to show the QAT editing options. Click Show Below the Ribbon to place the Quick Access Toolbar below the ribbon – I think most people will find its current position acceptable but if you want to move it that’s how to place it elsewhere.
Choose More Commands to add more commands to the Ribbon. From the Choose Commands From list you can select commands to view. These include Popular Commands, Commands Not In The Ribbon, in other words commands that are available in Microsoft Word but for which you have no other easy way of accessing, All Commands or Macros. The remainder of the dialog gives you access to the individual tabs in Word so that you can get access to icons listed there.
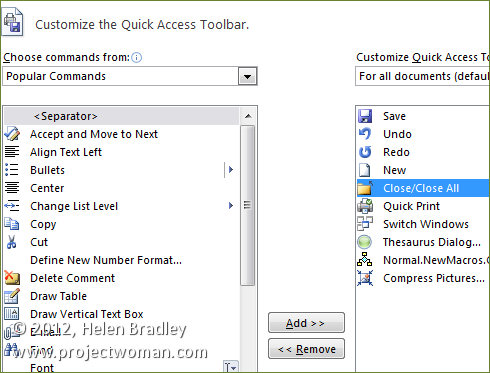
Some options you may want to add to the Quick Access Toolbar include the Close/Close All Button, Quick Print and I like to add Switch Windows which is available from the All Commands list. Other tools that you use frequently can be added to the Quick Access Toolbar making them instantly accessible.
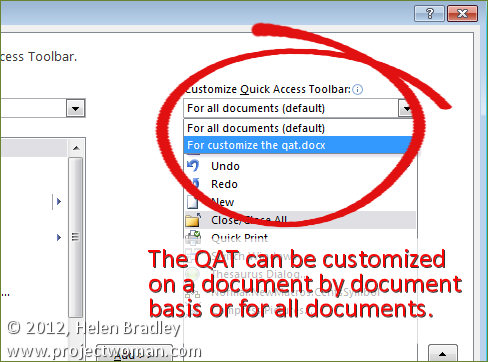
You should note that you can set the features for all documents or for just an individual document so that you can, for example, set a different toolbar for a specific document. When you choose this option the specific document will get all the tools on the standard quick access toolbar plus those that you’ve added to just its toolbar.
Helen Bradley
Labels: Excel 2007, Excel 2010, Helen Bradley, mini toolbar, OneNote 2010, Outlook 2010, PowerPoint 2007, PowerPoint 2010, Qat, quick access toolbar, Ribbon, Word 2007, Word 2010
Categories:Uncategorized
posted by Helen Bradley @ 8:00 am1 Comment links to this post
Thursday, November 17th, 2011
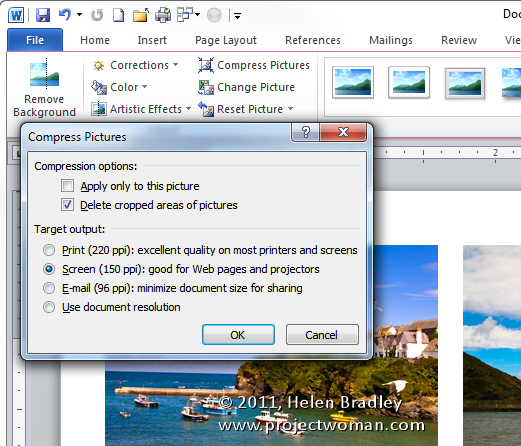
A reader just asked if they added 50 images to a Word file would that blow out the file size when they send it to their colleagues. Answer: Yep! big time.
Most specially if you use your your beaut iPhone to capture the images, or a good compact camera or if you just insert big pictures. You see, unless you do something those big pictures will be inserted in the file and included in it when you save it – you can end up with a monster Word file (think 5Mb x 50!)
The solution to the problem is to compress the images. To compress all the images in your Word 2010/2007 file so that they take less room, click on any image and choose Picture Tools > Format tab. Locate the Compress Pictures button and deselect Apply only to this Picture so all images will be compressed.
If there is an Options button click it to see the sizing options (this appears in Word 2007 but not in Word 2010). Then choose the Target output – typically Screen or Print are good options as they will view well and print just fine. Check the Delete Cropped Areas of Pictures checkbox so cropped data won’t be saved. Click Ok. Then save the document.
This compression feature will reduce your file to a better size for sharing without compromising the quality of the document. And the changes affect only the images in the document not the originals on your disk.
Helen Bradley
Labels: compress images, Picture, reduce file size, reduce size of files, shrink, squash, Word 2003, Word 2007, Word 2010
Categories:Uncategorized
posted by Helen Bradley @ 9:59 amNo Comments links to this post
Monday, October 17th, 2011
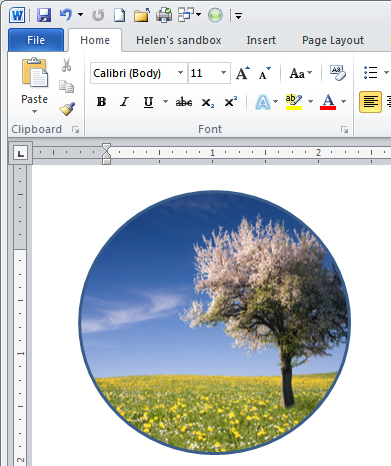
There is a healthy range of free clip art available from Microsoft and it includes some photos including content from iStockPhoto.com. However, the process of getting them into your document any other way than by choosing Insert > Clip Art is not always obvious.
Here’s how to add a clip art image to a circle shape:
Choose Insert > Shape and select the Oval. Hold Shift as you draw to create a circle on the screen. If you choose Drawing Tools > Format > Shape Fill you get the option of applying a picture to the shape but not clip art.
Instead, right click the shape and choose Format Shape to get access to the new to Word 2010 – Format Shape dialog. Choose Fill > Picture or Texture Fill and click the Clip Art button.
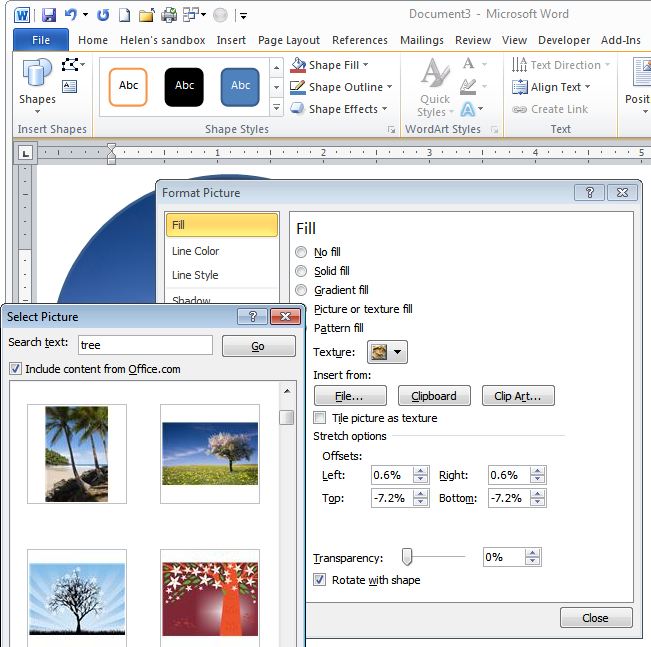
Browse or search for an image. You could also have placed a Clip Art image into your document using Insert > Clip Art and then selected it and cut it to the Clipboard. Here in this dialog you can choose Clipboard to add the image from the clipboard – in short you have more options here for using image than you have using the Shape Fill list.
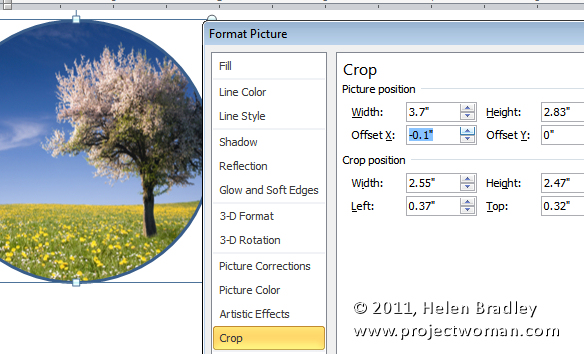
If the image is skewed out of shape – and it will be if it is a portrait or landscape image inside a circle which is pretty much a square with the corners cut off – you can adjust it.
Select Crop and, for a landscape orientation image inside a circle, increase the Picture Position Width value. For a portrait orientation image inside a circle, increase the Picture Position: Height value.
Then adjust the Offset X or Offset Y values, if desired, to control which portion of the image shows up inside the circle.
Helen Bradley
Labels: clip art, images, Microsoft Word 2010, photos, pictures in shapes, shapes, Word 2010
Categories:Uncategorized
posted by Helen Bradley @ 11:39 amNo Comments links to this post


