Wednesday, December 10th, 2014

Photoshop Quick tip: Change from Dodge to Burn Tool

Switch between the Dodge and Burn tools with one key press

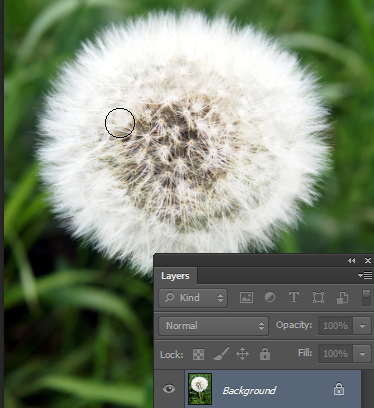
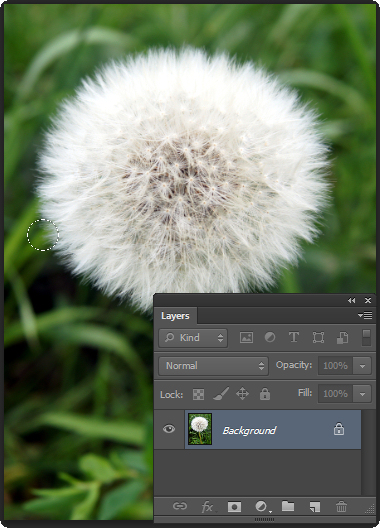
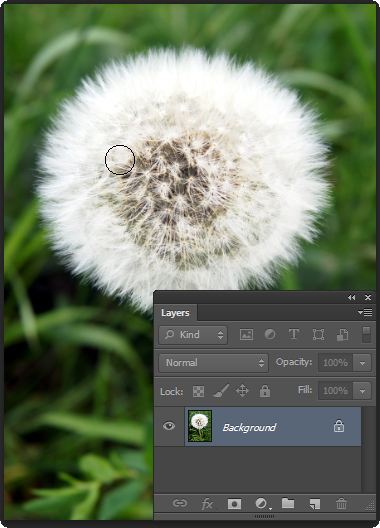
While you are making small photo edits one easy trick that could save you a lot of time is switching between pairs of editing tools like Dodge and Burn with one key press.

So to change from the Dodge to the Burn tool (or vice versa), hold down the Alt key (Option on the Mac).

While you have the Alt key (Option key) held you will be using the other tool. Let go the Alt (Option) key to return to the original tool you were using.

Now you can easily move back and forth between tools to speed up your edits.

Photo credit: © anitab0000 freeimages.com

Friday, March 22nd, 2013

Sync photos from iPad or iPhone to your Mac

Learn how to download photos from your iPad or iPhone to your Mac


I’ve been using iCloud on the PC for a while now to sync photos from my iPad to my PC and it works well. On my new Mac, however, I had a problem, you see the feature is built in so you don’t have to install it – but you do have to find it! Here’s how:

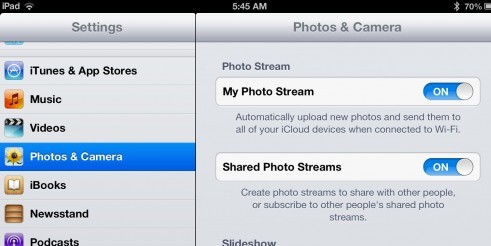
1. Assuming you already have an iPad or iPhone and you have been taking photos with it, then you want to get them to your Mac. Start on your iPad and make sure it is set to sync. Do this in Settings – scroll to find Photos & Camera and make sure that My Photo Stream is turned on. This means that when you are on a wifi connection your photo stream will be synced with iCloud.

Note:
The photo stream has some limits. One is that iCloud itself only stores images for 30 days so after that they disappear. However provided you are connected via wifi on a regular basis these will be synced frequently so that won’t be a big issue.

On a device like the iPad and iPhone the photo stream will only contain those most recent 1,000 images – older ones are removed. This is because you have less space on your iPad and iPhone than on a Mac or PC. Remember too that the photo stream contains images from the iPad/iPhone and from your Mac or PC so this 1,000 image limitation is for images from all devices in total, so it’s not as big as it might seem.

On the PC that is less of a problem because you have a special Photo stream folder that you put images into to sync them, so you know how many you are putting there. It is more of an issue on the Mac because the process is more automated so you have to be mindful of what is happening. On your Mac or PC all the images from your Photo stream are stored – because there is more storage available on them.

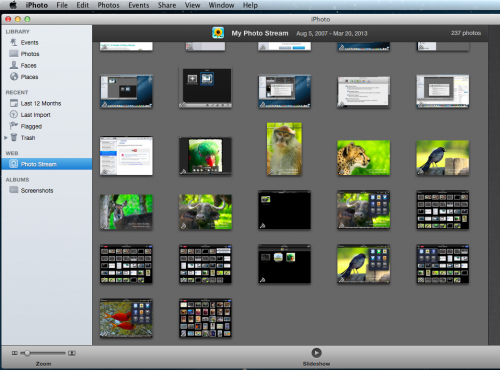
2. To set up the Mac. You need to click iPhoto to launch it and then click Web: Photo Stream and turn this on.

3. Now, if you are connected via wifi you can wait as your photo stream downloads automatically for you otherwise this will happen automatically next time you are connected.

Once images are downloaded to iPhoto they will be added to the Photos folder so even if you turn off Photo Stream at some time the images that are already downloaded will have be stored there permanently.

Helen Bradley

Sunday, March 17th, 2013

Add images to your iPad & iPhone photo stream from your Mac

See how to upload images from your Mac to your iPad or iPhone

Sometimes you will get images on your Mac that you want to share with your devices such as your iPad or iPhone. To do this you can add them to your photo stream and they will be synced automatically next time you are connected using a wifi connection.

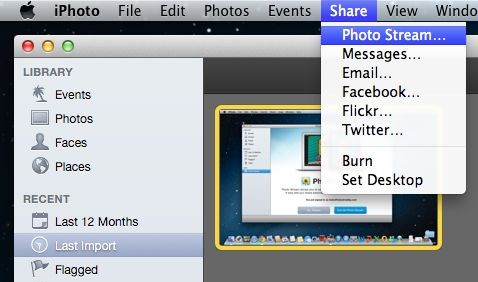
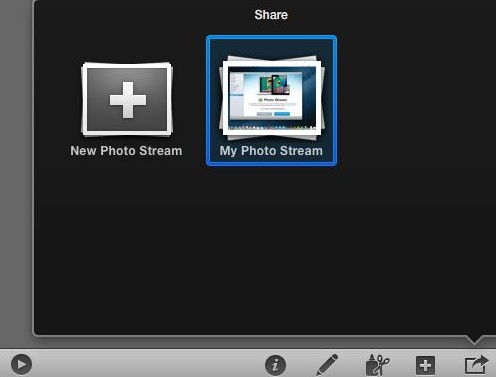
To do this, from inside iPhoto, click the image(s) to add to the photo stream then click the Share option on the toolbar, click Photo Stream > My Photo Stream. The images will be uploaded to your photo stream and then downloaded to other devices when they next update via a wifi connection.

Of course, for this to work the images have to be in iPhoto. If an image is not, for example, it is on the desktop – you can add it to iPhoto by dragging and dropping it into iPhoto and then add it to your photo stream.

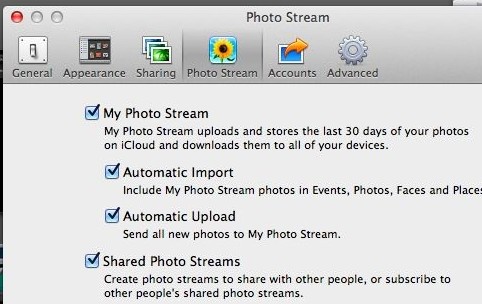
Of course if you have your iPhoto set up to automatically send all new images to your photo stream the very process of adding images to iPhoto will add them to your Photo Stream. To do this in iPhoto, choose iPhoto > Edit Preferences > Photo Stream and, under My Photo Stream (which should already be enabled), check Automatic Import.

Helen Bradley

Sunday, November 25th, 2012

Help! Lightroom Lost My Files

If there’s one thing that confuses new Lightroom users it is that quite often files that should be in Lightroom appear to have gone missing. Here are some things to look out for when this happens to you.

Is a Filter Hiding Things?

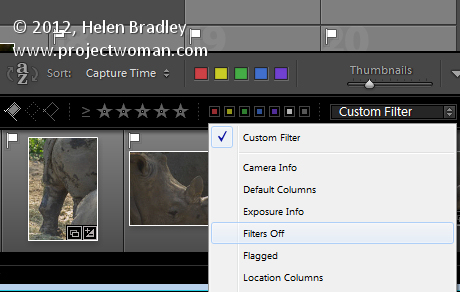
If you think a folder should be displaying more images than it does, check that there is not a Custom Filter in place. In the Library module, make sure the Filmstrip is visible and if there is a filter listed in the Filter box then that’s affecting what you’re seeing. To return to showing all your images in the currently selected folder, select Filters Off from the Filters list.

Are you looking in the right place?

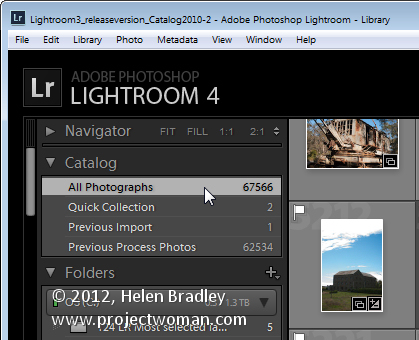
While Lightroom’s folders mimic the folder structure on your computer and external drives sometimes you really want to look through all the files in Lightroom. To do this, open the Catalog panel in the Library and select All Photographs. This selects all the photographs in the Lightroom catalog as the basis of your search.

Images in Subfolders

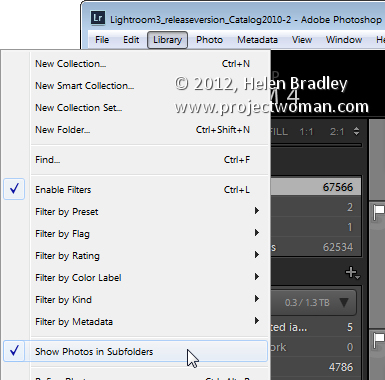
If you click on a folder that has subfolders but you see nothing or none of the images in the subfolder that is typically caused by a Lightroom setting. This setting lets you control whether or not you see photos in subfolders when you click that folder in the Library module. To view the current setting choose the Library menu > Show Photos in Subfolder. The setting can be enabled or disabled depending on your preferences but it’s often the cause of photos in subfolders not showing when you think they should be there.

Look in Folders and not Collections (or vice versa)

Lightroom has folders and collections and they can have the same name. You’ll find Collections in the Collections panel and folders in the Folders panel. A collection can include files from a number of folders but a folder can only contain images which are stored in that folder on your disk, so make sure you’re looking for the right folder or collection.

Contents of Smart collections Change

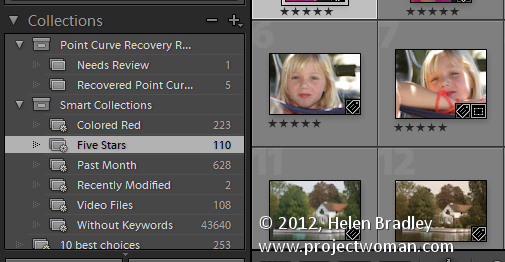
Regular collections are fixed so that the images, once placed in the collection, remain in that collection until you remove them. Smart Collections are dynamic so the images in them change depending on the criteria you have set for them. For example, the 5 Star Smart Collection shows all images that are 5 Star images. If you make an image a 5 star image it automatically gets added to that collection. If you change a 5 star image to a 4 star one then it no longer appears in that Smart Collection and that might be the cause of images going ‘missing’.

Search for Lost Images

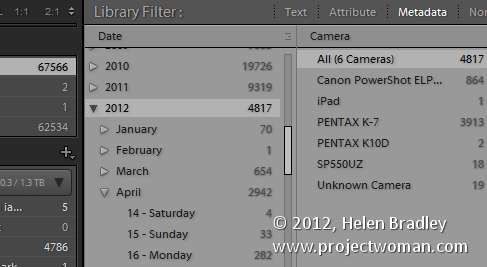
If you’ve lost photos and you know roughly when they were captured or which camera you captured them with it is possible to search your Lightroom collection for them. Start in the Library and click the Catalog panel and click All Photographs. Then choose View > Show Filter Bar. Click Metadata and you can then locate images by their metadata. For example if you know the approximate capture date was January 2012 then make sure that the first filter is set to Date and click 2012 and then January. This will show only those images that you shot during that time.

It’s also possible to filter by camera, lens and other metadata. You’ll just need to make sure that the primary field that you are filtering on is the one on the left of the Filter Bar. Images are filtered from left to right so, if the leftmost panel is Date and the one to its right is Camera type – you’ll see the camera types for only those photos shot on the specified date. If Camera type is the leftmost column and Date the rightmost one, then you’ll filter out all the images captured with a certain camera and see only those dates you actually captured images with it.

Lightroom Can’t Find the Image

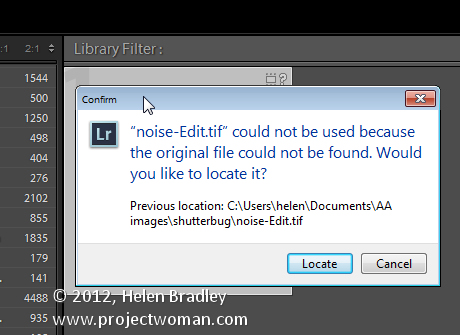
Sometimes Lightroom will display an image with a question mark in its corner indicating that the photo is missing. This means that the image was imported into Lightroom but Lightroom can’t find it any longer. To return it to Lightroom, click its question mark icon and you’ll be prompted to locate the image on disk. Click Locate, find the image on disk, select it and it will appear again and it will be editable inside Lightroom.

Lightroom Lost the Entire Folder

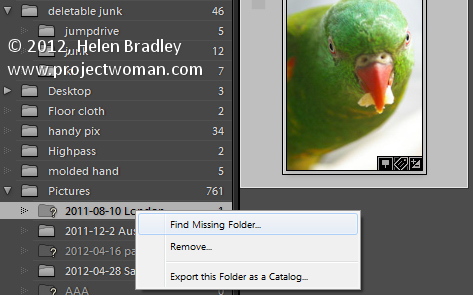
If you move or rename a folder on your disk outside Lightroom then Lightroom won’t know what you’ve done. If there are photos in the Lightroom catalog in that folder it will report the entire folder as missing when you launch it next. Missing folders will have a question mark beside their name. If you know where you moved the folder or that you renamed it, you need to tell Lightroom where it is. To do this, right click the folder in Lightroom and choose Find Missing Folder then locate the folder on disk and Lightroom will update accordingly.

A Folder is Missing Some Files

If you have a folder which you think should have more images in it than are currently showing in Lightroom this could well be the case. The Lightroom folder structure mimics the disk folder structure but only those images you import into Lightroom will actually be in Lightroom. It is also possible to remove images from Lightroom but in such a way as they remain on disk.

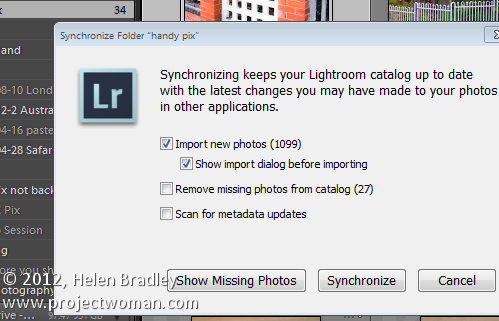
To check to see if there are additional images in a folder that aren’t showing in Lightroom, right click the folder in Lightroom and choose Synchronize Folder. Make sure that the Show Import Dialog before Importing option is enabled and select Synchronize. This shows the import dialog and those images that are in the folder but not in Lightroom so you can synchronize the contents of the folder with Lightroom.

Now it’s over to you. Have you ever experienced missing files in Lightroom and, if you did, what was the cause and how did you resolve the issue?

Helen Bradley

Friday, October 12th, 2012

Create an HTML web gallery in Lightroom

With the increasing popularity of the iPad and iPhone it’s no longer appropriate for most of us to create Flash based web galleries – they just can’t be easily viewed on these devices. If you want almost everyone to be able to see your galleries then you need to create them as HTML galleries and not Flash.

Lightroom has a range of HTML Templates you can use to create a reasonable looking gallery in a very short time.

To make your web gallery in Lightroom start by placing your images in a Collection. This makes it easier for you to work with the images and you can save the gallery so you can edit it in future if needed.

Select your Collection and switch to the Web module. From the Layout Style options, you can select Lightroom HTML gallery or, easier still, from the Template Browser panel on the left of the screen, select a gallery that is HTML based. If you look in the preview area the HTML gallery templates all have the letters HTML in their bottom left corner. Select a template to use.
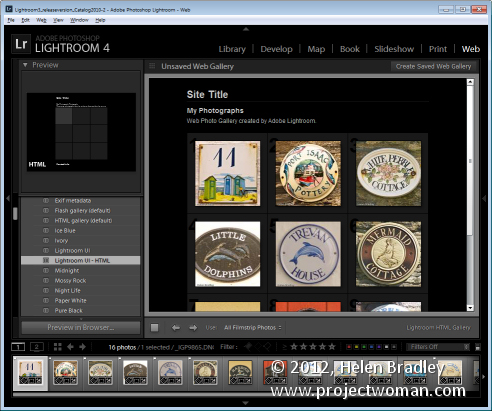
From the toolbar (press T if it isn’t visible), choose All Filmstrip Photos if you have a Collection selected and this will add all the images to your gallery. What you see on the screen in the editing area is a live version of your web gallery. You can click on any image to view it as it will look on the web.
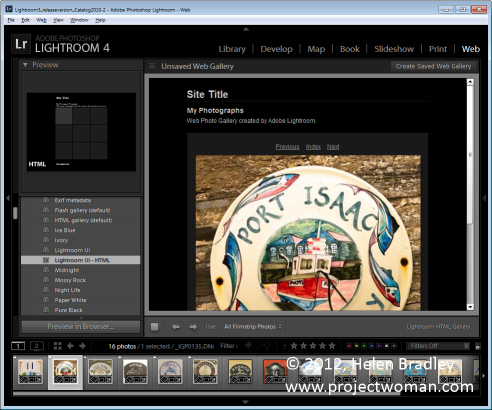
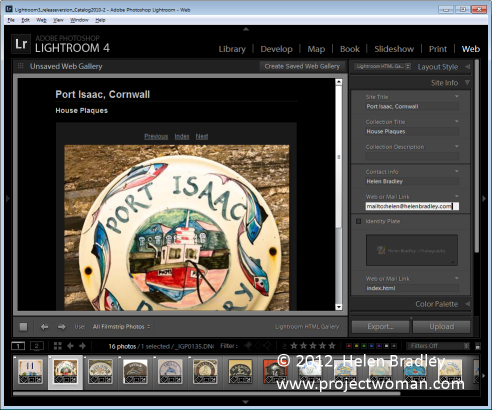
Open the Site Info panel and type a Site Title, a Collection Title and a Collection Description. If you don’t want to use all of these simply delete the placeholder text for those items you don’t want to use and the space they take up in the template will be freed for use for your images.

For the Contact Info, type your contact name if desired and then complete the Web Or Mail Link and this will be linked automatically to the contact name in the web gallery.
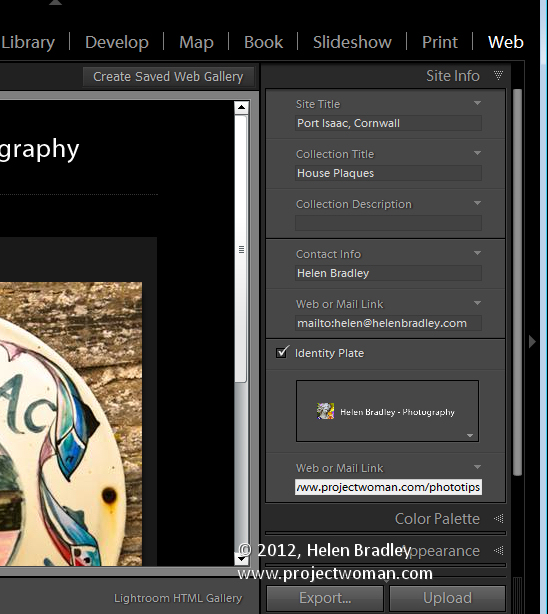
You can add an identity plate to the gallery, if desired, it will sit above the Site Title. You can link it back to your site if desired by completing the Web or Mail Link box.
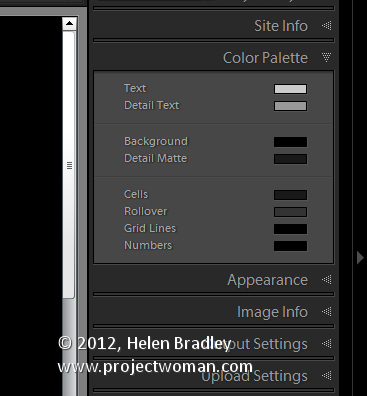
The Color Palette options let you change the colors for the various elements in the website template.

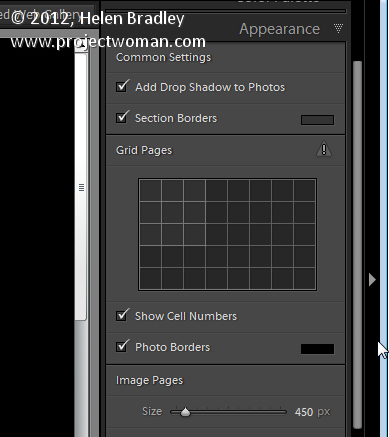
In the Appearance panel you can set the thumbnail image grid size – it defaults to 3 x 3 and cannot be any smaller but it can be considerably larger. If you want to show cell numbers over the images you can do so – this is useful when you need to give viewers an easy way to identify images they like. Images are numbered sequentially and if you have multiple pages the images on the second page continue sequentially from the numbering from the first page.
You can control the size of the full size image on the Image Page by adjusting the Size slider. You can also add Photo Borders to the images in the Image Pages. Note that the Appearance panel is divided into Common Settings, Grid Pages and Image Pages allowing you to make change that effect the entire gallery, only the grid pages or only the image pages.
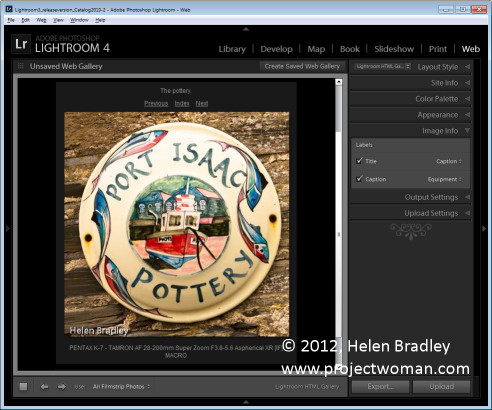
In the Image Info panel you can select to add labels to your images. These appear on the Image Page only. You can select a Title which appears above the image and a Caption which appears below the image. For each you can source the text from the image metadata and there is no reason why you can’t set the Title to be the Caption metadata and the Caption to be your Equipment metadata, for example.
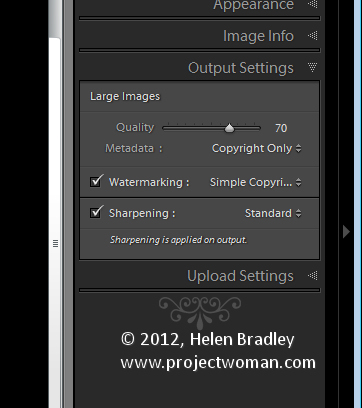
In Output Settings select the quality of the larger size JPG images – 0 is low quality and 100 is high quality. If you want to include Metadata with the image select what to include – your choices are Copyright Only or All.

Also add a Watermark if desired. If you select to add a watermark, you’ll see it on the image page and the index pages so you can check to see that it’s what you want.

Select whether or not to sharpen the images – this sharpening is only applied as the images are output so you won’t see it on the screen. If you’re unsure what to use, enable Sharpening and set it to Standard.
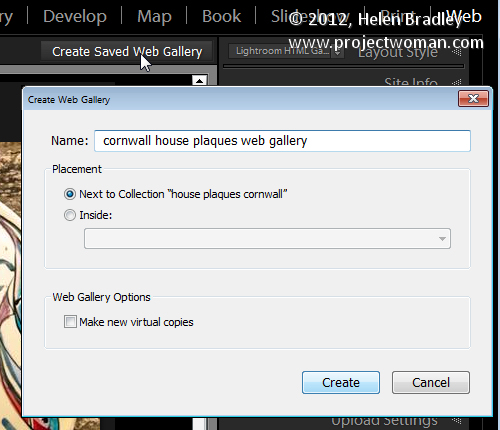
When you’re done, click Create Saved Web Gallery – this is a new option in Lightroom 4 and it appears to the top right of the main editing area. Type a name for your web gallery and click Create. Doing this ensures that the gallery is saved and once you have done this, Lightroom will track your changes from now on.

In future you can come back to the web gallery by clicking the special collection that Lightroom creates for you.
If you want to upload your gallery to the web later on, click Export to export it to disk. Otherwise you can upload it direct to your website by selecting the Upload Settings panel and configure your FTP server. For this, you’ll need your server details, user name and password. You’ll also need the server path although you can click Browse to browse your server to find it if desired. Type a subfolder in which to place the gallery – you’ll need to do this if you plan to have multiple galleries in the server folder you are using. Each gallery needs to be placed in a different subfolder or it will overwrite the previously uploaded gallery.
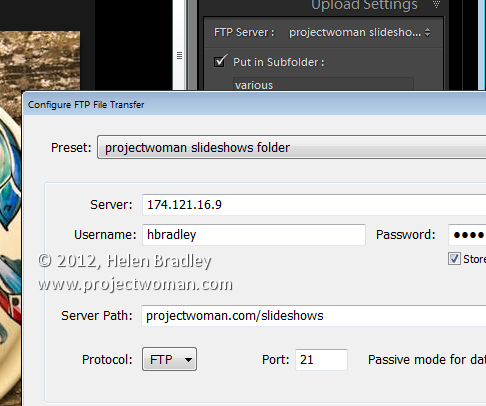
When you have everything configured click Upload to render the gallery images, create the necessary html code and upload it all automatically to your server.

The HTML galleries in Lightroom aren’t the best looking galleries in town but having a gallery accessible to almost any device is definitely and incentive to use them in place of Flash galleries.

Helen Bradley

Thursday, June 28th, 2012

Bulk delete photos from the iPad


I’ve been taking a lot of screenshots lately and I have over 1,200 photos on my iPad – a lot more than I really want to store there.

When I went to delete the photos in bulk, I banged my head pretty quickly up against a problem with the iPad. It’s not immediately apparent how you delete a lot of images at one time and deleting them one at a time will get very cumbersome very quickly.

Here’s how to do it:

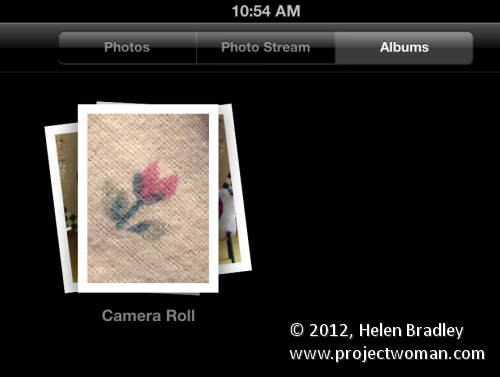
To begin, launch the Photos app, tap the Albums link and then make sure you’re viewing the Camera Roll or the place where your image are stored. I wanted to remove them from the Camera Roll so I tapped that.


Now press the bent arrow icon in the top right corner of the screen and you’ll see options on the left for Share, Copy and Delete.


Tap an image to select it and then go ahead and select each of the images to delete – they’ll get checkmarks on them to show they are to be deleted. To undo the setting, tap the image again.


Then when I you have those you want to delete selected, tap the Delete button and choose Delete Selected Photos to remove them.


It is, as you might have expected this is ridiculously simple once you know how to do it but difficult until you do.

The good news is that the images aren’t removed from your iCloud download folder on your PC. So, for example, if you’ve previously had the images synched so they appear on your PC in a folder of iPad downloads, the images will still be on your PC at the end of the process – they’re just removed from your iPad.

Helen Bradley

Thursday, June 21st, 2012

Resize Images in Dreamweaver


If you don’t pre-prepare your images before adding them to a page in Dreamweaver, you’ll need to resize them in the program.

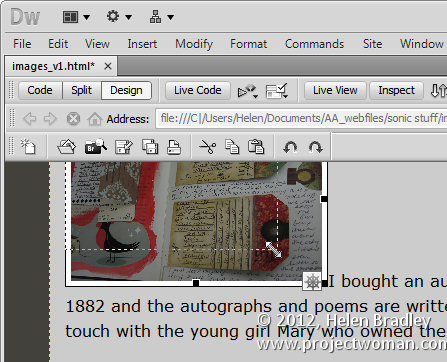
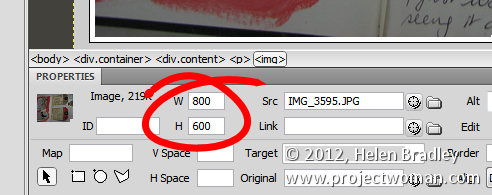
If you click an image and check the Properties panel, you’ll encounter your first problem. The selectors that let you adjust the Width and Height of the image do not do so proportionally so it’s perilously easy to skew your images out of alignment.


One alternative for resizing an image is to click the image and use the sizing handles to resize it. Hold the Shift key as you do this to scale the image in proportion.


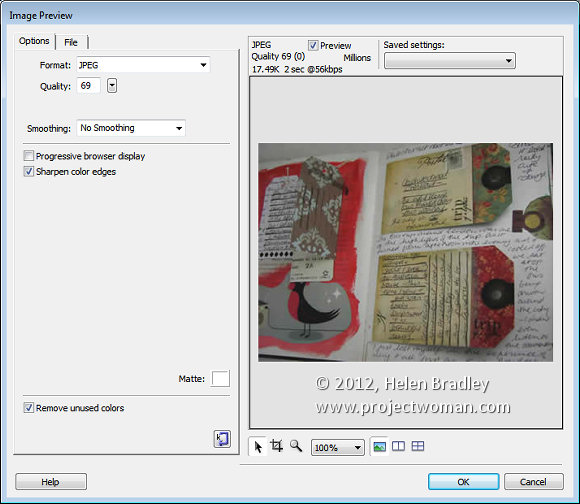
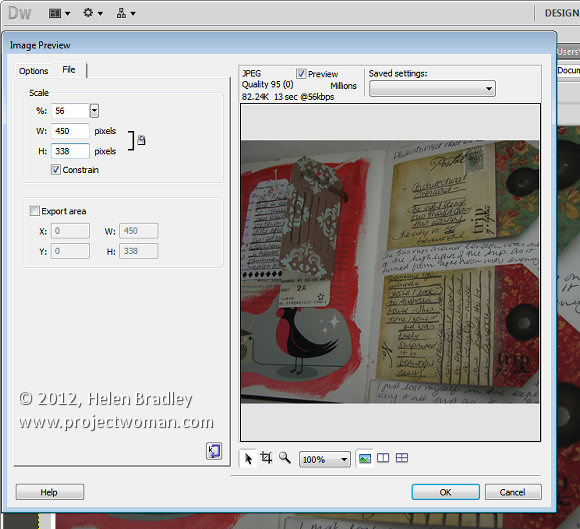
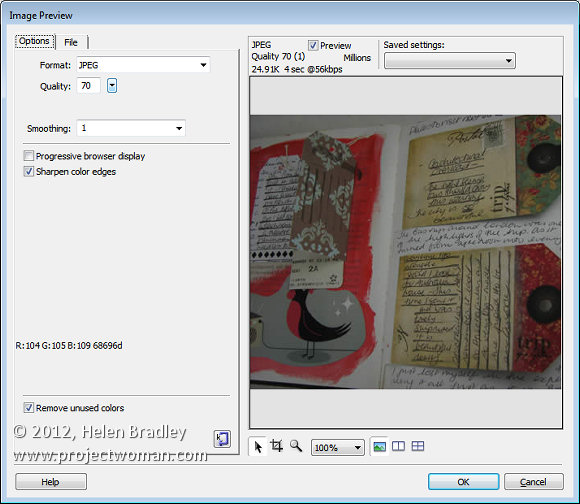
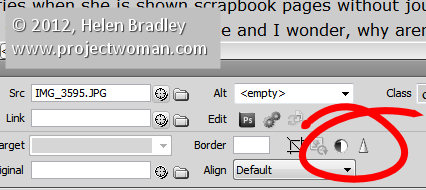
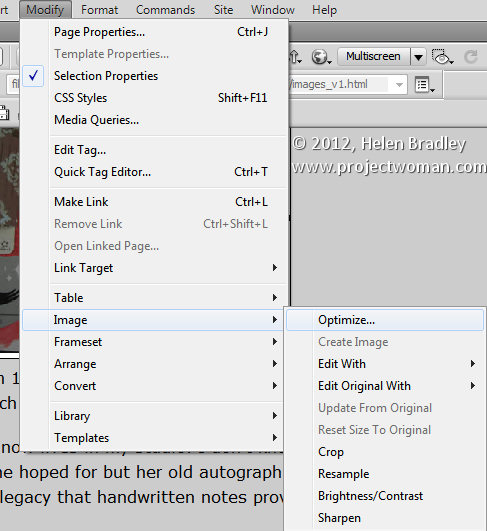
There is also another way and that is to click the image and choose Commands > Optimize Image. This is the same dialog as you get if you click the image and click the Edit Image settings button in the Properties tab (it’s just difficult to work out what button this is because it is so tiny). This opens the Image Preview window.


Click the File tab and you can scale the image to a fixed percentage or check the Constrain checkbox and adjust either the width or the height and both will be adjusted automatically in proportion.

Under the image are tools for moving around the image in the dialog, cropping it, zooming in and out of it and setting a magnification for viewing it in the dialog.

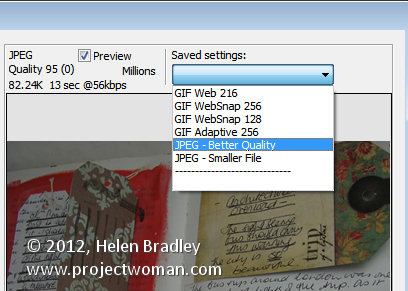
From the Saved Settings dropdown list you can select an optimization setting for your file, if you select JPEG – Smaller File the image will be saved as a low quality JPG. JPEG – Better Quality will result in a better quality but overall larger size file. For photos always select a JPG option and never GIF.


With the Preview enabled you can read off how long it will take to download the image at the currently selected quality at a 56kbps download rate.

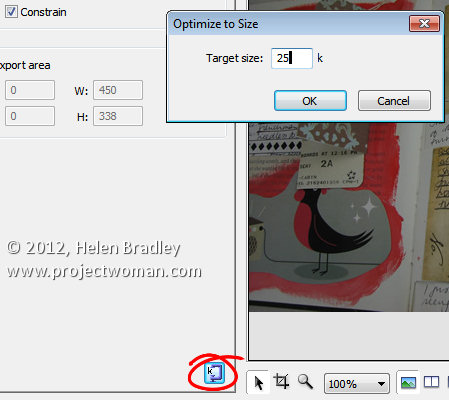
There is also a button in the bottom right of the left hand panel that allows you to optimize to a fixed size. Click it and you can set a target size for your image such as 20kb, click Ok and the image quality will be adjusted to give you file that is no larger than the size requested.


In the Options tab you can select to sharpen the color edges if desired. When you’re done, click Ok to configure the changes for your image.


Other image options include Brightness and Contrast and Sharpening both of which you can select by clicking the respective Brightness and Contrast, and Sharpen buttons in the Properties panel.


These options can also all be found by clicking Modify > Image. Here are options for optimizing the image, editing with an external editor, editing the original with an external editor, cropping, brightening, adjusting contrast, resampling and sharpening the image.


Helen Bradley

Monday, October 17th, 2011

Shape images and Clip Art in Word 2010

There is a healthy range of free clip art available from Microsoft and it includes some photos including content from iStockPhoto.com. However, the process of getting them into your document any other way than by choosing Insert > Clip Art is not always obvious.
Here’s how to add a clip art image to a circle shape:

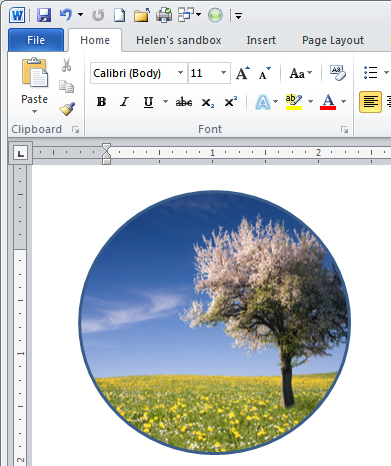
Choose Insert > Shape and select the Oval. Hold Shift as you draw to create a circle on the screen. If you choose Drawing Tools > Format > Shape Fill you get the option of applying a picture to the shape but not clip art.

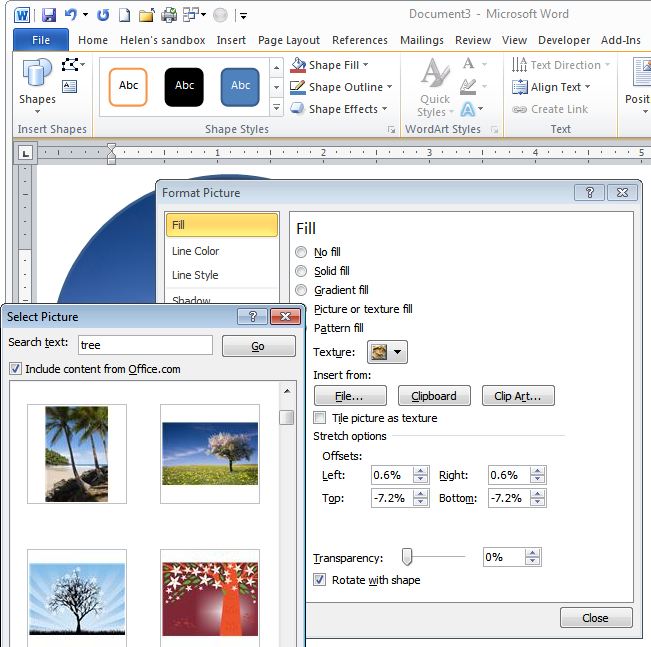
Instead, right click the shape and choose Format Shape to get access to the new to Word 2010 – Format Shape dialog. Choose Fill > Picture or Texture Fill and click the Clip Art button.

Browse or search for an image. You could also have placed a Clip Art image into your document using Insert > Clip Art and then selected it and cut it to the Clipboard. Here in this dialog you can choose Clipboard to add the image from the clipboard – in short you have more options here for using image than you have using the Shape Fill list.

If the image is skewed out of shape – and it will be if it is a portrait or landscape image inside a circle which is pretty much a square with the corners cut off – you can adjust it.

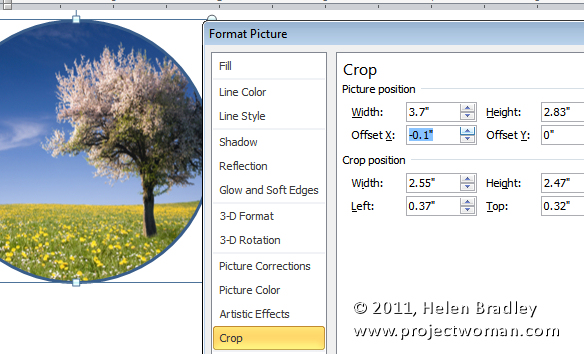
Select Crop and, for a landscape orientation image inside a circle, increase the Picture Position Width value. For a portrait orientation image inside a circle, increase the Picture Position: Height value.

Then adjust the Offset X or Offset Y values, if desired, to control which portion of the image shows up inside the circle.

Helen Bradley