Monday, July 29th, 2013

Lightroom Tip – Introduction to Lightroom Smart Collections

Get Up to Speed with Lightroom Smart Collections

Lightroom has two types of collections: regular Collections and Smart Collections. Smart Collections are live and they are created as a result of filtering your photos according to rules that you write. You cannot add an image to a Smart Collection by dragging and dropping it into the collection. You can’t remove an image from a Smart Collection just because you don’t want it in there – it can only be removed if it fails to meet the criteria you set up for the collection.

Smart collections are a handy way to create collections and to manage your photos and here I’ll show you how to make use of them.

Shipped Smart Collections
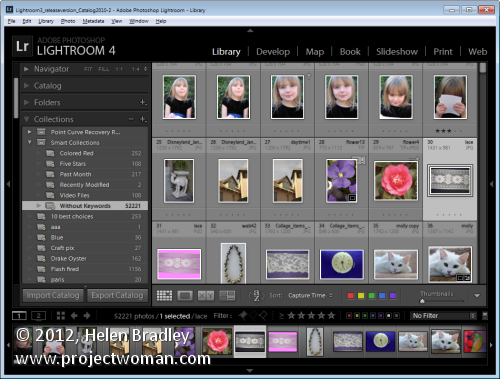
There are a few Smart Collections which ship with Lightroom. To find these, click the Collections panel in Lightroom and click on the Smart Collection Set. Click the Smart collection called Without Keywords. As its name suggests, this collection shows you all the images in your Lightroom catalog that do not have keywords associated with them.

If you’re like me you’ll want to close this one pretty quickly – it can be scary to see just how many images aren’t keyworded!

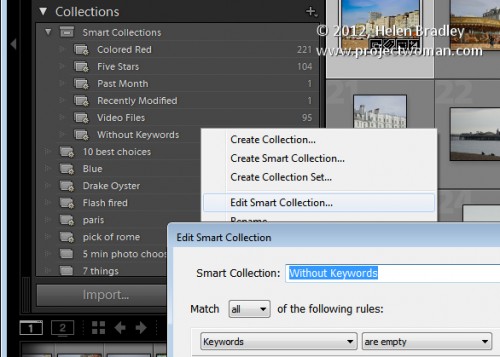
You can learn more about this collection by right clicking its name and choose Edit Smart Collection. You’ll see that the Smart Collection is configured to contain all those images for which the Keywords property is empty.

There are other collections which are shipped with Lightroom including Recently Modified which is a collection of images that have been edited recently.

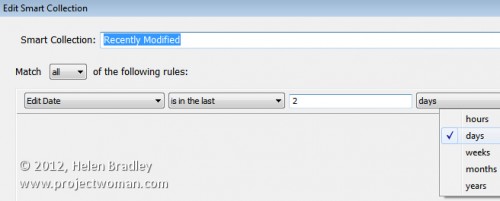
You can, if desired, change the Recently Modified Smart Collection to span a different number of days. Click this collection , right click and choose Edit Smart Collection. You can see that the collection criteria is set to be Edit Date > Is in the last

When you do so, Lightroom checks the images in your catalog to determine which images meet this criteria and it displays these in this Smart Collection.

Make your own Smart Collections
In addition to those shipped with Lightroom you can create your own Smart Collections. For example, if you color your images red meaning a certain thing you can create a Smart Collection that contains all the images which are colored red.

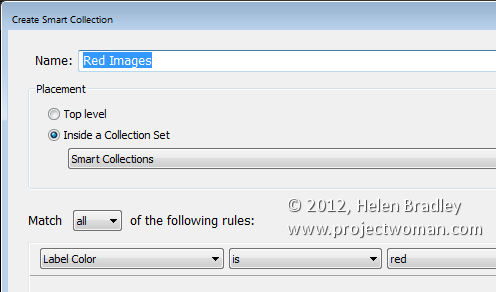
To do this, click to open the Collections panel, click the plus symbol and choose Create Smart Collection. Type a name for it such as Red Images, click Inside a Collection Set and choose to add it to the Smart Collections set. From the options below select Label color is red.

Click Create to create the collection – it will contain all images in your collection which have the red label color associated with them.

Remove an Image from a Smart Collection
The only way you can remove an image from a Smart Collection is to configure it so it no longer meets the criteria for the Smart Collection. For example an image will no longer appear in the Without Keywords collection if you add a keyword to it.

You can remove an image from the Red Images collection if you remove or change its color label. When it no longer has the red color label associated with it, it will no longer appear in the collection.

Similarly, if you apply the red color label to an image in Lightroom it will be automatically added to the Red Images Smart Collection.

One of the benefits of Smart Collections is that they’re continually updated by Lightroom. So Lightroom ensures that all the images which match the criteria you use to define the Smart Collection are in that collection.

How Smart Collections differ from Regular Collections
Smart Collections behave differently to Regular Collections in a few key ways. One difference is that you cannot arrange images in a Smart Collection into your own custom order.

The collection order can only be set to one of the Lightroom default Sort Order options; Capture Time, Edit Order, Edit Time, Edit Count, Rating, Pick, Label Text, Label Color, File Name, File Extension, File Type and Aspect Ratio. Regular collections, on the other hand, can be sorted into User Order which is useful for slideshows and web pages for example.

You also cannot set a Smart Collection as the Target Collection because you cannot add images to a Smart Collection manually. It can only be added if it matches the criteria which describes that collection.

Over to you .. Do you use Smart Collections in Lightroom and, if so, how do you use them? Do you use the shipped collections or make your own?

Helen Bradley

Wednesday, May 29th, 2013

Stop Lync and Windows Messenger in Windows 8


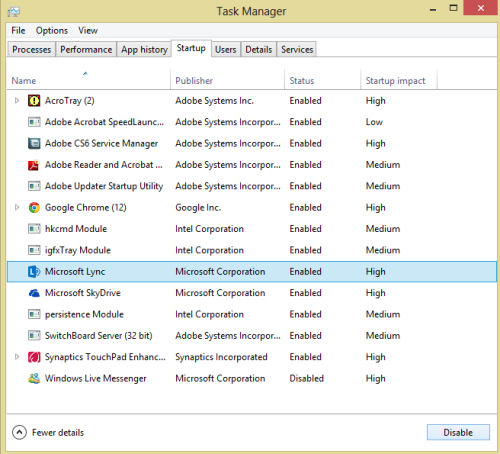
Ok. so I have Office 2013 installed but I don’t use Lync – but the damn program launches each time I start my Windows 8 machine and that doesn’t suit me. I shut down my computer every time I use it to save battery life when I travel and for airplane safety. For this reason, the fact that Lync starts up with Windows 8 is a major inconvenience. Not so much so Windows Live Messenger but I don’t want that either – Microsoft is phasing it out and I never use it to communicate – haven’t done so for years. So, the question is – how to remove these annoying startups in Windows 8. Turns out the solution is simple – much simpler in fact than in earlier Windows versions.

Press Ctrl + Alt + Del once and click Task Manager. This is now not only the way you stop a program from running once but also how you axe it permanently. Click the Startup tab in the list and locate the application to stop – in my case, it is Lync. Then click the Disable button in the bottom right of the dialog. Repeat for any other program you want to stop running – of course never stop anything from running that you don’t understand the purpose of – you never know just how vital that program might be – but Windows Live Messenger and Lync are not needed.

When you’re done, click the close button and next time you start up your machine these programs won’t run. Yeah! No more annoyance – well, there are plenty of annoyances but these no longer count!

Helen Bradley

Friday, March 8th, 2013

Word 2013 Disable the Start Screen

Learn how to remove the Start Screen in Word 2013

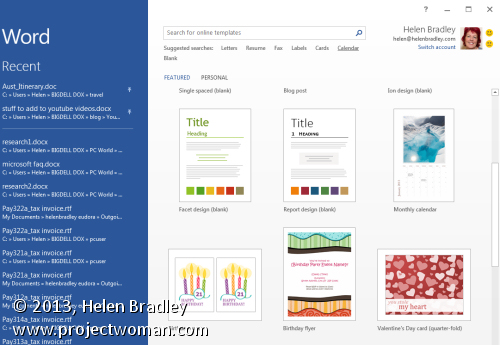
Do you hate the Start Screen in Word 2013? Many users find it cumbersome because it forces you to make a choice before continuing that many of us don’t want to have to make. Luckily it is easy to get rid of it.

If you just want to by pass it once, press Esc or Enter to open a new blank document.

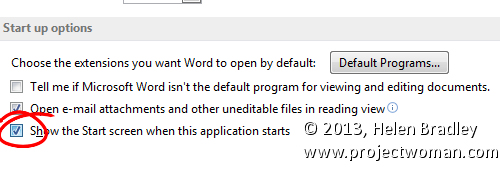
However you might want to go further and axe it permanently. To do this, launch Word and choose File > Options. In the screen there, the last option is to Show the start screen – disable the checkbox and click Ok. The start screen will be gone and, if you miss it, you can always reinstate it!

Helen Bradley

Monday, November 5th, 2012

Photoshop Elements – color fix images

Learn to fix images that have iPhone filters applied to them using Photoshop Elements. Remove unwanted color casts from the images using two different methods.

Transcript:

I was sent this image by a gentleman who wanted me to fix the color in the image because this was shot with an iPhone and the young lady had applied a filter to it. I sent him a few copies back each one of them altered a little differently. And this is the one that he came back and said this is the truest to what her hair color looks like. So now I’m going to show you how you go ahead and fix an image like this.

Now I’ll always work on a copy of the original image, so I’ve made a copy. I’m just going to size this down so we can see both images side by side. Now there are a couple of tools that I would typically use. One of them is Enhance, Adjust Color, Adjust Color for Skin Tones. In this case what we do is we just click on some skin tone in the image and try and fix it that way.

Now it’s not giving me great results here so I want to show you another tool that we could use. And that is just the colorcast tool, Enhance, Adjust Color and then Remove Colorcast. And here we would click on somewhere in the image that was supposed to be a sort of neutral gray, black sort of white area. So we could sample some of her clothes here to see if we get a good fix. We could sample around her teeth as well. And I think that this is a pretty good result as a match for this image over here, so I’m just going to click Ok.

Let’s just zoom out here and see. So these two images have pretty much the same look in them. The hair color is pretty much the same. If anything I might just reduce the saturation a little bit on this image which I could do by choosing Enhance and then Adjust Color. And we could do hue/saturation and then we could just decrease the saturation a little bit across the entire image. And that would get rid of some of the yellow. In fact I think I’ve actually got a better fix on this image probably than I had on the original.

So there’s one way of fixing a colorcast in an image. I have another pair of images of the same young girl. Let’s have a look at them here. And I have one here that was said to be a reasonably good fix for that image. Now I’m going to show you some means of getting this result from this sort of an image. The first thing I’m going to do with this image is because it’s got a sort of reddy orange colorcast on it I think that if I apply a filter to this image we might be able to kill some of that color. So I’m going to choose Layer, New Adjustment Layer, Photo Filter. And here’s my photo filter dialog, click Ok. And what I want is a cooling filter. That’s a blue filter. So I’m going to go for one of these cooling filter effects. I’m going to wind it up quite high. So let’s see which is the better of them. And I think the 82 is a better cooling filter. You can see that now we’ve got some sort of reasonably good skin tones here. So I’m thinking about 65 is pretty good there. So let’s call that done.

Now one of the things that I would like to do with this image is to get rid of the sort of grain that there is on her skin. So I’m going to take this cooling filter and click on it and just press Ctrl Alt Shift E which will give me a duplicate of that image as it was. So I haven’t got rid of these two layers, but what I’ve got is a layer that contains everything that was in those two layers. And I’m going to duplicate this as well. So I’m going to drag it onto the New Layer icon so we have two versions of her face. This one I’m going to blur. So I’m going to use a blur. I’m going to choose Filter, Blur and then we’ll use a surface blur. Now surface blur is a blur that will blur the surface but not around the edges. It tends to keep edges very crisp. We don’t actually want crisp edges but we do want the edges around her face not to be blurred. So I’m going to reduce the threshold and the radius to small values. What I want to see on this image is a lessening of this grain so it’s sort of blurring out. I don’t want it too blurred, but I do want it blurred. And since I’m only going to use the lightened values here, I’m not really too concerned about the fact that it looks a little unreal at this point, I’m just going to click Ok.

And now I’m going to blend this back in using lighten. So with the lightening we’re actually lightening the pixels underneath so that’s a pretty good result there. But let’s have a look at what we’re sort of targeting. I don’t think this is great, but I don’t think this is quite there either. So let’s have a look and see what we could do.

Well we could apply another photo filter. So let’s go to Layer, New Adjustment Layer. Let’s go and get another photo filter and again, a cooling filter. So I’m thinking one of these others might be appropriate. Let’s just wind the value down and let’s check those again. This one’s pretty good. It’s a little bit red but it’s not a bad sort of cooling filter for this image if we could get the density of it correct. Let’s have a look at this other one. Again, that’s having quite a nice effect on her skin tone. So I might choose one or other of these cooling filters to apply to the image.

So now if I was continuing to work on the image I might want to for example apply a curves adjustment to it. So let’s just go and get our layers. We’re working on an adjustment layer right now so I’ll need to give us a full image layer to work on. So I’ve pressed Ctrl + Alt + Shift + E so we’ve got a new layer to work on. And now we could use a curves adjustment, Enhance, Adjust Color, Adjust Color Curves. And here what I’d be looking for is to sort of just generally lighten the image. So, I think the backlight will give us a reasonably good start here. And I’m just going to adjust this curve so that everything is just a little bit lighter. So I’m just looking at pulling all of these curve marks up a little bit. Here’s our before and after. And you can see that we’ve got a little bit better skin tones here so I’ll click Ok.

And I think in actual fact this time round I’ve probably got a better fix than I had the first time. Perhaps if I have a look at that smart blur again I might to do something else or what I could do is just blur a duplicate of the image using for example a Gaussian blur and then just bring back these areas into the image. Let’s see what we would do there.

I’m just going to duplicate this layer. I’m going to apply a blur for example, a Gaussian blur to this layer looking to get the smoothest skin tones. That’s really all I’m interested in here is the slight smoothening of the skin so that we get rid of the grain that we got in from the iPhone, click Ok.

I’m going to add a layer mask to this layer. And what I’m going to do now is to just paint out the areas where we’ve got some softening of the image. The softening areas are going to be around the eye and perhaps over the lips. So I’m going to bring these areas of detail back a little bit in these areas. So there’s how I would fix these images to remove the impact of using an iPhone to take the images in the first place. Let’s just go back to the Undo history on this image and let’s see how far we’ve come. This is the original image and this is what we’ve got now, a much more pleasing result for the family of this young woman.

I’m Helen Bradley. Thank you for joining me for this video tutorial. I encourage you to subscribe to my YouTube channel so you’ll be advised when new videos are released. And look out at projectwoman.com for more Lightroom, Photoshop, Photoshop Elements and Illustrator tutorials.

Helen Bradley

Thursday, June 28th, 2012

Bulk delete photos from the iPad


I’ve been taking a lot of screenshots lately and I have over 1,200 photos on my iPad – a lot more than I really want to store there.

When I went to delete the photos in bulk, I banged my head pretty quickly up against a problem with the iPad. It’s not immediately apparent how you delete a lot of images at one time and deleting them one at a time will get very cumbersome very quickly.

Here’s how to do it:

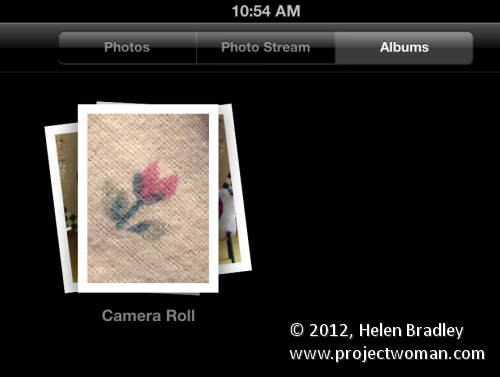
To begin, launch the Photos app, tap the Albums link and then make sure you’re viewing the Camera Roll or the place where your image are stored. I wanted to remove them from the Camera Roll so I tapped that.


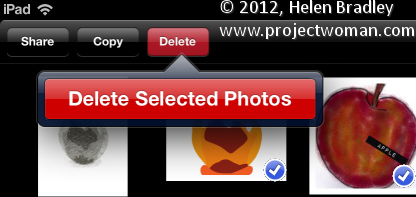
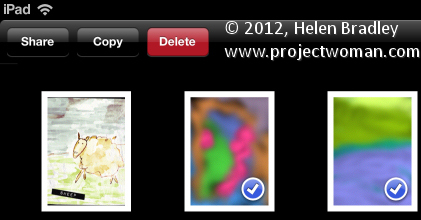
Now press the bent arrow icon in the top right corner of the screen and you’ll see options on the left for Share, Copy and Delete.


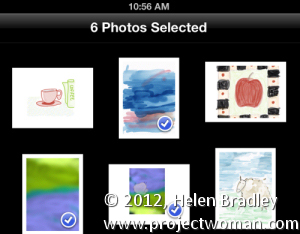
Tap an image to select it and then go ahead and select each of the images to delete – they’ll get checkmarks on them to show they are to be deleted. To undo the setting, tap the image again.


Then when I you have those you want to delete selected, tap the Delete button and choose Delete Selected Photos to remove them.


It is, as you might have expected this is ridiculously simple once you know how to do it but difficult until you do.

The good news is that the images aren’t removed from your iCloud download folder on your PC. So, for example, if you’ve previously had the images synched so they appear on your PC in a folder of iPad downloads, the images will still be on your PC at the end of the process – they’re just removed from your iPad.

Helen Bradley

Tuesday, January 18th, 2011

Use Lightroom to Remove Sensor Dust

One of the annoyances most photographers encounter from time to time is sensor dust. This is dust that you get on the camera’s sensor and which shows up in your images as dark marks or flaws on your photos. Most often you’ll see this in the sky but it can appear anywhere in an image and it will appear in the same place in all your images – the tell tale sign that you have problems.

Of course, the only way to get rid of the dust is to clean your camera either using its dust removal option or by physically cleaning it. However, chances are that the reason you know you have a dust problem is that you see it on your photos. For these images, at least, cleaning the camera won’t help. Instead, digital removal is required.

If you’re faced with a series of photos that have dust problems, Lightroom can simplify the process of fixing them. Its Spot Removal tool can be used to fix sensor dust and, the benefit of doing the work in Lightroom rather than Photoshop, for example, is that once you have one image fixed, you can automatically fix most of the others.

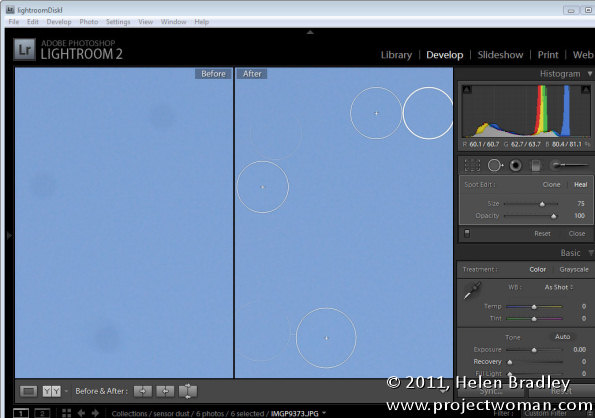
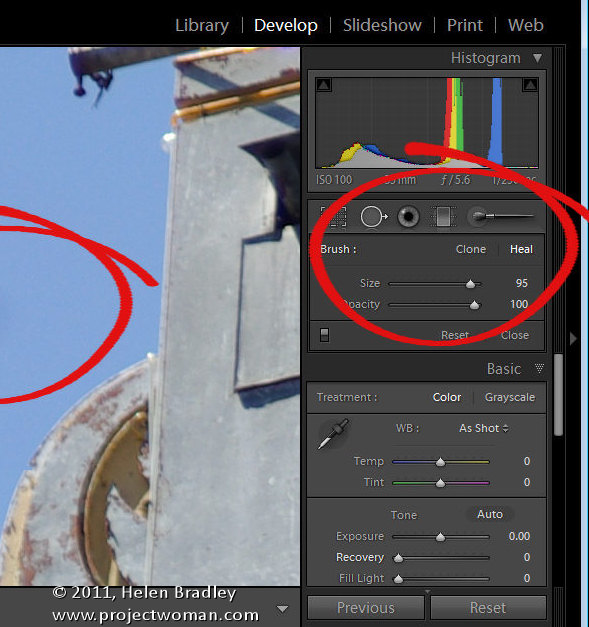
To get started, locate one image in the sequence that has sensor dust issues. Switch to Develop move and select the Spot Removal tool. Set it to Heal (the other option is Clone). Set the brush size to something large enough to cover the problem area and set its Opacity to 100 percent.

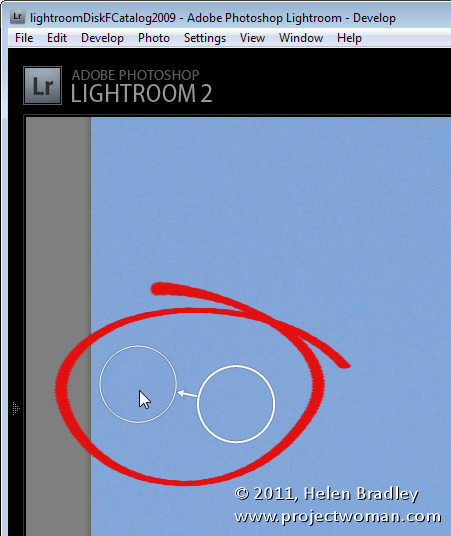
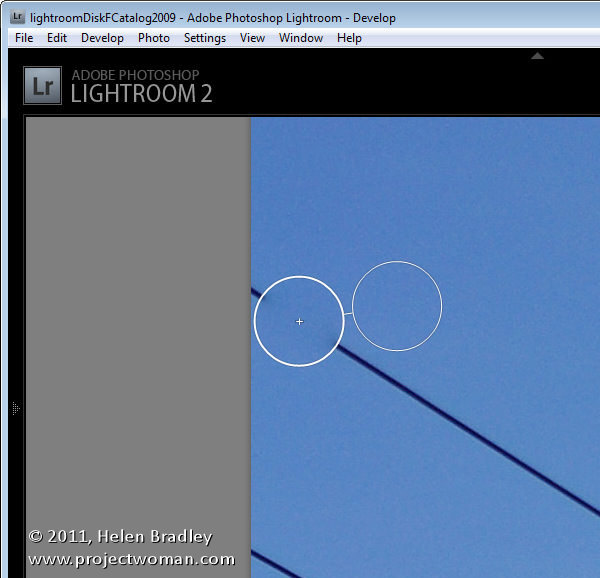
Click on the dust to set the location for the fix. You’ll see two circles appear on the image; one over the problem area (the spot circle) and the second over the area used to fix it (the sample circle). You can tell which circle is which as the arrow between them points from the sample circle towards the spot circle.

You can drag to reposition either circle and you can drag on one circle when the mouse pointer shows as a double headed arrow to resize the pair.

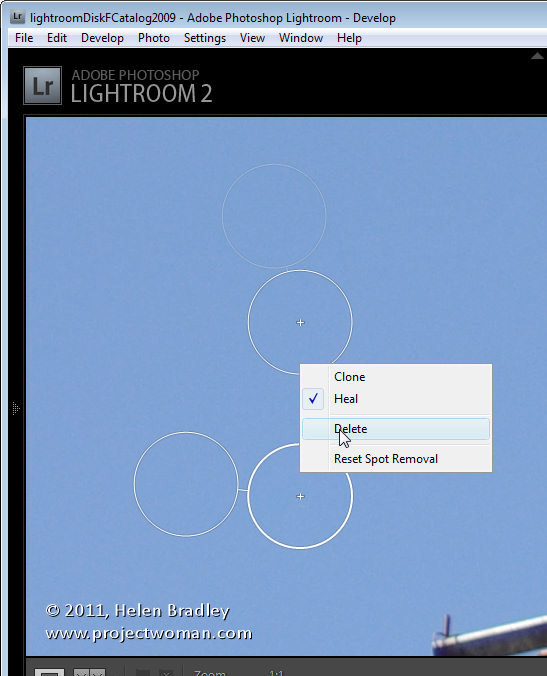
You can add multiple fixes to one image and, if you make too many, right click on the one to delete and choose Delete from the menu.

You can also use the right click menu to change from Heal to Clone to see if you get a better fix with this setting.

Once you have fixed the spots on the current image, you can copy these to other images. To do this, click the Close button to close the Spot Removal Tool drawer.

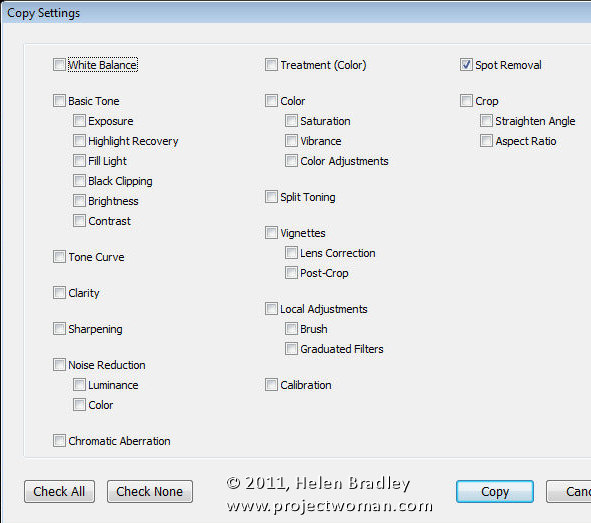
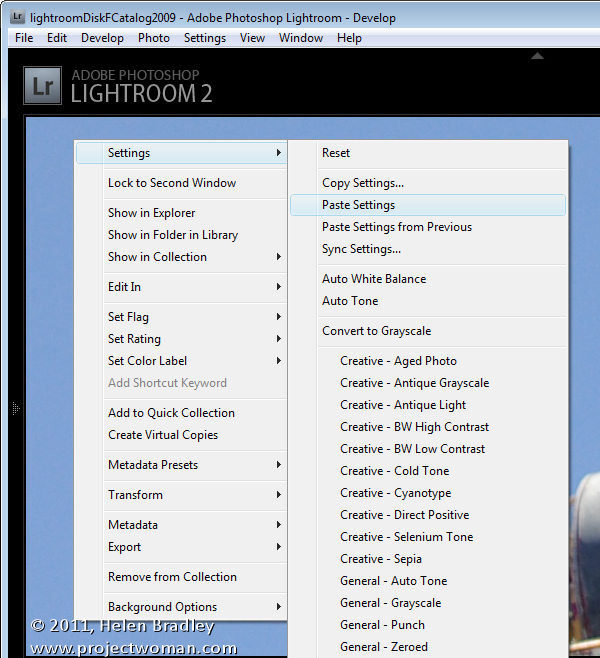
Right click the image and choose Settings > Copy Settings and when the dialog appears, select Spot Removal, disable all other options and click Copy.

Select one or more images in the sequence that you shot and that need the fix applied to them. These do not have to share the same aspect ratio as Lightroom can fix portrait and landscape images at the one time.

Right click and choose Settings > Paste Settings. This will paste the fix onto the other images. Alternately you can select the fixed image and one or more other images, click Sync and select Spot Removal.

Check each fixed image in turn. Some images may have image content under the sample circle that doesn’t provide a suitable match for the problem area so you will need to move the sample circle to adjust the fix.

However, the entire process should be quicker than performing the fix to each image individually in Photoshop, for example.

Helen Bradley