Learn to insert a table in a Word document with a single click
When you need to repeatedly create the same type of table in a Word document you can do so using the new Word Quick Part feature.
This technique works well when you use the same table layout repeatedly. Your inserted table will be the same size, have the same number of columns and rows and contain any preset formatting that it had when you created it as a Quick Part entry. Once created, you can insert it quickly whenever you need it.
To do this:
Create a new table with the number of rows and columns you want all your tables to have.
Include any text in the table that needs to always be in this type of table – if there is none, leave the cells blank.
Format the cells in the way you wan them to be formatted every time – including text formats and cell background colors and borders.
When you are done, select the table by clicking in it and choose Table Tools > Layout > Select > Select Table.
Choose Insert > Quick Parts > AutoText > Save Selection to AutoText Gallery.
In the Create New Building block dialog set the Gallery to Tables and type a description of the table and click Ok.
In future, to create a table to these exact specifications choose Insert > Tables > Quick Tables, locate the table in the list and click it to insert it into the document.
This feature is the successor to the AutoText feature in earlier versions of Word. It looks a little more cumbersome but it is more easily discovered so you don’t have to remember where the table was saved as it appears automatically on the Insert Table menu.
Learn to quickly add extra spacing above and below the contents of a Word table cell
When you enter text in a Word 2013 table you may want more space above and below your text than appears by default.
While you can make the table cells larger and vertically centre the text in the cells this is a cumbersome solution and there is better and faster way.
To add extra spacing you can change the table’s cell spacing values.
To do this, first select the table, right click choose Table Properties.
Click the Table tab and click Options.
Here you can set the Top, Bottom, Left and Right cell margins for all cells in the table. Set the Top and Bottom values to 0.25″ to add a little extra space above and below the text in the cells.
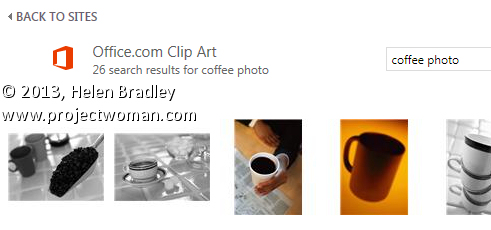
Learn how to find only photos or only illustrations when searching Office 2013 online images
In Office 2013 the old Clip Art feature was removed and now you can insert an image by searching for it online at a number of places. One of these is the Microsoft clip art collection which is now stored totally online and not partly on your computer.
So far, so good.
The problem is that the old task pane feature which let you determine the types of images you want to search for is now gone. So, on the face of it, when you search for something like coffee you get illustrations and photos. In many cases much more than you want or need.
Often, I know ahead of time I want a photo or an illustration so I want my search to return only one type of image. There’s no information at all as to how to do this but you can! Instead of searching for coffee, type coffee photo to find photos relating to coffee or coffee wmf to find just illustrations as these are generally wmf format images.
It isn’t a perfect solution and you will miss out on some images as well as get the occasional illustration with your photos or vice versa.
However, if you’re not too fussy about missing out on some imagery then using this search format will weed out a lot of the stuff you don’t want and serve up mostly the type of content that you do want.
This tip works in any of the Office 2013 applications – PowerPoint 2013, Excel 2013, Publisher 2013. Word 2013 and more.
Word’s Reviewing tools make it easy to show someone the changes you’ve made to a document.
You can set Word to record the changes before you make them by selecting the Review tab on the ribbon and click Track Changes > Track Changes.
Now, in Word 2007 & 2010, every addition to your document will be underlined and every deletion will be marked with strikeout. Word 2013 defaults to Simple Markup so you will need to choose All Markup to see the changes marked up.
These changes are retained when you save the document.
You can apply the changes permanently at any time by selecting Review > Accept or Reject and choose Accept All Changes (or Reject All Changes).
Word 2013 has a new feature which lets you force Track Changes to be enabled. Choose Review > Track Changes > Lock Tracking to enable this feature. Now if you save the document and send it to someone, any changes they make to the document will be recorded in the document. They cannot disable this feature without having the password to unlock the setting and disable it.
In the pre-ribbon versions of Word you would use the Table commands to sort data in a Word document.
In Word 2007, 2010 & 2013 you can’t use the table sort options any longer for plain old text simply because you can’t select the table options if you don’t have a table – it’s a Catch 22 situation.
Luckily, Word now includes a proper sort option for any text – not just table text. To use it, first select the text to sort and then click the Sort button on the Home tab of the Ribbon.
When the Sort Text dialog opens you can choose what to sort such as Paragraph or Field and the type of sort. If you want a case sensitive sort so A is treated differently to a then click Options and check the Case Sensitive checkbox.
Once you are done select the sorting options, click Ok to perform the sort.
How to use linked text boxes to flow text throughout a document automatically
If you’re familiar with using desktop publishing software you’ll know that it is useful to be able to create text boxes and have the text flow automatically from one to the next. You use this feature to start a story on one page of a newsletter, for example, and to have it continue on a later page.
Word 2007, 2010 and 2013 can do this for you too, if you use the built in text box feature. To do this, first choose Insert > Text Box > Draw Text Box and click and drag to draw a text box on the page.
Repeat this and add a second text box on another page in the document.
Now select the first text box, right click and choose Create Text Box Link.
Now click in the second text box to link the two together.
In future, any text which you type into or paste into the first text box and which won’t fit because the box is not large enough to accommodate it, will flow automatically into the second text box.
See your document as a web page and keep it looking that way
To see how any of your Word 2010 and 2013 documents will look when they are saved as web pages, select the View tab on the Ribbon, then click Web Layout.
Now, to save a document as a web page, select File > Save As. In the Save As dialog, under click the Save as type: dropdown list and choose Web Page (*.htm;*.html).
Make sure to choose a location to save the document in, give it a name (it should have the .htm extension), and click Save.
Learn to recolor clip art using theme colors so it is not only the color that you want it to be but it also matches the theme and it changes color when the theme changes.
This works with pretty much all versions of Office and all apps including Word 2013, PowerPoint 2013, Excel 2013, Publisher 2013 and older versions of Office including 2010, 2007, 2003 and earlier.
Transcript:
Hello, I’m Helen Bradley.
Welcome to this video tutorial. In this tutorial I’m going to show you how you can easily recolor clipart in Microsoft Office and how you can use theme colors so that your clipart changes when your theme changes.
Before we get started with this tutorial let’s have a look and see what it is that we are trying to achieve. This is the same piece of clipart and I just made a duplicate of that clipart image and I recolored it in the way that I’m going to show you how you can recolor your clipart. But let’s have a look and see the impact of the recoloring.
I’m going to choose the Colors tool here and watch as I arrow over all of these colors in turn. And you’ll see that the clipart image that I have recolored I have recolored this time with theme colors. And the beauty of this is that the clipart image is going to change colors in accordance with the theme that is in use.
The only thing that hasn’t been recolored is the black and the little yellow light in the candle. Everything else is a theme color and it’s going to change color using the new theme colors whenever the theme or the design of this PowerPoint presentation changes. So this is the concept that we’re going for here.
Now I have a slightly simpler image here. All I did to find these images was I chose Insert and then Online Pictures and I went looking for cake. And I particularly wanted wmf files as that’s Windows metafile and that is an illustrative file most of which can be recolored inside of PowerPoint or Word or Excel or any of the Microsoft applications.
And you don’t have to be using Microsoft Office 2013. You can choose any version of Microsoft Office. I’ve been doing this for years in Microsoft Office. It’s just that the way that you add images is a little bit different in this new version. Now before I start let’s just take a copy of this image and let’s paste it so that we’re working on a duplicate.
We can see then how far we’ve come later on. I’m just going to get rid of these images. Now with the image that I’m working on selected I’m going to choose Picture Tools, Format tab and I’m going to choose Group and then Ungroup.
Now you’ll see that the group option sometimes is not available from this dropdown menu but it will always be available from the Picture Tools, Format tab if the image is able to be ungrouped. You’ll get a message showing that this is an imported picture and not a group and asking you if you want to convert it to a Microsoft Office drawing object.
The answer to that is yes. And then you’ll go and repeat the process. You’ll right click and choose Group, Ungroup or from the Drawing Tools, Format tab you’ll choose the Group button here and choose Ungroup.
That ungroups the object so it’s now a whole lot of smaller objects. I’m just going to click outside it and then we’re going to start selecting individual pieces of this object. And I suggest that you start with a nice color scheme. So I’m just going to go to the color schemes and let’s choose something relatively colorful.
I found slip stream was a good option to use but any of these such as red violet that is fairly colorful is a good choice. Drawing Tools, Format tab and now from the shape filled dropdown list we’re going to make sure that we recolor all of the shapes using the fill colors that are theme colors.
So, again, I’m going to select here, this is on this sort of turquoise bit, and I’m going to color it a darker version of that same blue. I’m going to click on the candle light and see if I’ve got something I can use for candle light. I think I’m going to choose one of these colors because I would really like my candle light this time to be a theme color.
To select multiple colors or multiple shapes at a time I’m just selecting the first and then Ctrl clicking on the last. And again, I want these to be colored the same color as the candle light. Now I’m going to click here. There’s a shape here.
If you ever want to see what the shape is that you’re working on just press the Delete key and it will disappear and then you can undo it to be able to work on it. Or of course you can just fill it and see what it is that you are actually filling.
So I’m going to select that color. And now we’re going for this shape over here and I want a slightly darker or lighter version here. I think I’m going for a darker version. And here we have the shadows. Again, I’ll want a darker color for the shadow. I think I’ll go back for these blues. I’m going to stick to the turquoises and this sort of purple color.
So I’m going to now select these smaller items here and when I’ve got them selected I’m going to fill them as well. And when I’m pretty happy with my shape that has been recolored I’m going to select over the entire shape because now what I want to do is to stick it all back together again because I don’t want lots of little pieces.
Drawing Tools, Format tab, Group and this time I want to Regroup. And I’ll just test this by moving the object and it should all move as one. And now let’s look and see that this object is going to recolor unlike the original object if we change the color of this particular design that we’re using in PowerPoint.
So I’m going to choose the colors dropdown list here and as I choose a different color scheme you can see that my clipart shape is changing color. And as I said this works exactly the same way in any of the Office applications and in pretty near any version of these. You can do this in Word 2003.
You can do it in PowerPoint, Excel, Publisher, any of the applications and you can create clipart so that it not only matches the current theme but also looks the colors that you want it to look but which will change colors as the theme colors change.
I’m Helen Bradley.
Thank you for joining me for this video tutorial. Look out for more of my PowerPoint and Microsoft Office tutorials on this YouTube channel.
And visit my website at projectwoman.com for more tips, tricks and tutorials on a range of Microsoft Office applications as well as Photoshop, Lightroom, Illustrator and a whole lot more.


