Saturday, October 5th, 2013

Lightroom Tip – Batch Crop & Resize

Save Time in Lightroom when Resizing and Cropping Large Amounts of Output Images

If you’re working on a large shoot and need to output a lot of images at a fixed size then Lightroom can do the work for you. It isn’t obvious how you can crop all your images to a fixed size and output them at a certain set of pixel dimensions but it is easy to do when you know how. Here’s how to do it:

Step 1

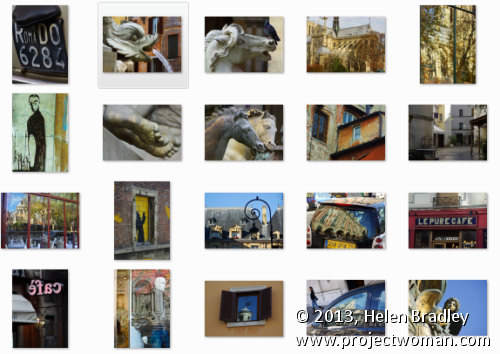
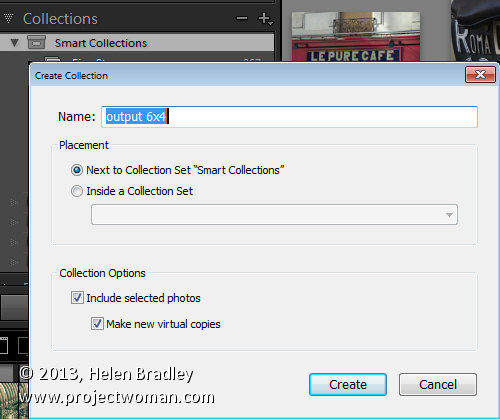
First locate the folder with your images in it. I prefer to make virtual copies of my images and put them in a new collection but you can do whatever makes sense to you.

Step 2

Select all the images in Grid view in the Library module in Lightroom.

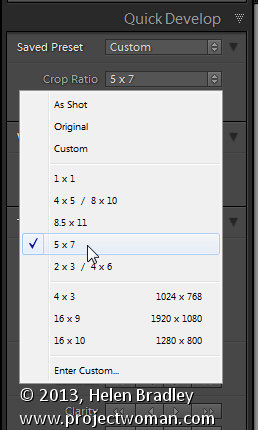
Open the Quick Develop panel on the right and, from the Crop Ratio dropdown list, select the crop ratio that you want to crop to. For example you can crop to fixed ratios such as 1 by 1 or printing sizes such as 5×7, 4×6 and so on.

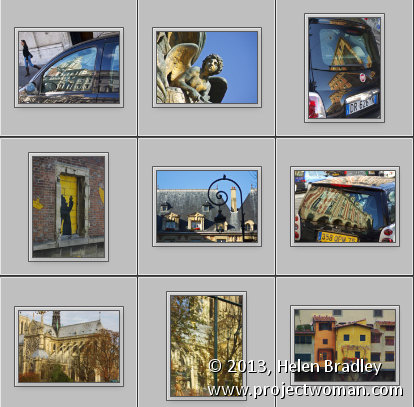
Here I’ve selected 5×7 and when I do so all the selected images are automatically cropped to this 5 x 7 ratio.

Lightroom is smart enough to understand that some images are portrait orientation and others are landscape. Portrait images are cropped to 5 x 7 and landscape orientation images to 7 x 5.

Step 3 (optional)

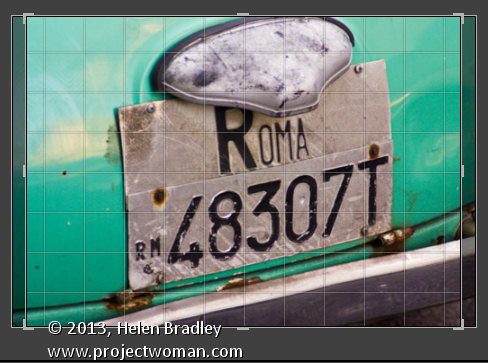
If desired, you can now move to the Develop module and check the crop for all the images. By default, Lightroom will center the crop rectangle on the image and this may not be exactly what you want for some images. However, it is easy to go to the Develop module, click the first image and click on the Crop Overlay Tool so you see the crop marquee in position on the on the image.

Now from the filmstrip you can click on each image in succession to preview it in the crop window and you can easily identify if any of them need an adjustment to the crop rectangle. If they do simply drag on the crop rectangle to reposition it. When you’re done return to the Library view.

Step 4


As the images are now all cropped to size, press Ctrl + A to select them and then click Export. Choose a folder to export the images into or click New Folder to create a new folder.

You can now set your desired preferences in the Export dialog.

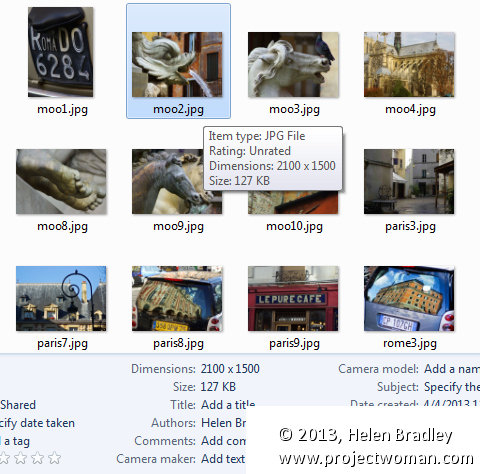
To control the output size – in pixels wide and tall – of the images easily because you already know the crop ratio. To do this, select the Resize to fit checkbox and choose Long Edge from the dropdown list. Then type a pixel dimension for the long edge. So, for example, to prepare 5 by 7 ratio images for printing at 300 dpi the longest edge will need to be 2,100 pixels (7 x 300) so type 2100 and set the resolution to 300.

Step 5

Click Export to export your images and they will be exported to a folder at the chosen size and resolution.

This process allows you to quickly and effectively prepare a batch of images for printing. It manages portrait and landscape images so that you don’t have to separately handle each type. It’s a simple workflow and a fast way to prepare images from a large shoot.

Helen Bradley

Thursday, July 25th, 2013

Word 2010 and 2013 Tip – Making shapely images


Crop your image to a shape in Word
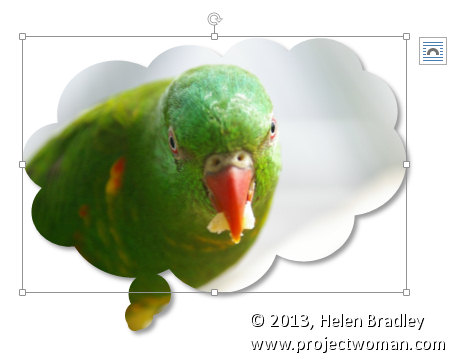
It is easy to crop an image to a shape such as a star or a heart in Word by using the Crop to Shape feature.

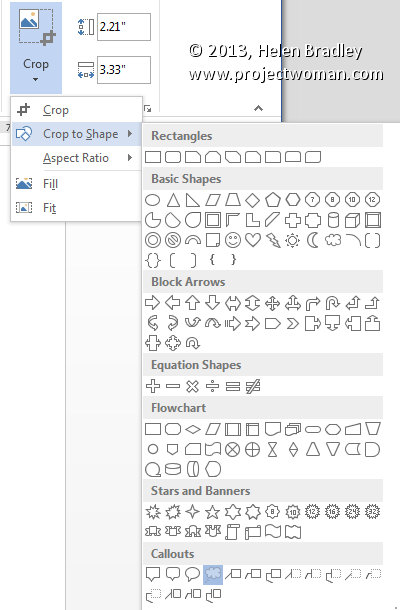
First add the image to your document then click to select it. From the Picture Tools > Format tab click Crop > Crop to Shape.


Select the shape to use to crop the image to. You can then add a shadow or reflection or other effect to the shape as desired.

Helen Bradley

Wednesday, May 1st, 2013

Lightroom Tip – Bulk Crop and Resize Image

Learn how to crop and resize in bulk in Lightroom. If you have a lot of images you need to, for example, crop to 5 x 7 and then save at a particular pixel size and resolution, you can learn how to do this quickly and effectively in Lightroom. This makes use of the tools in the Quick Develop panel in the Library module.

Transcript:
Hello, I’m Helen Bradley. Welcome to this video tutorial. In this tutorial I’m going to show you how you can bulk crop and resize images and export them from Lightroom.

A reader recently posed a question to me and that was what do I do if I need to crop all my images to 5 by 7 in size and get them out as 500 by 700 pixel images. In Lightroom that’s not that difficult to do. What I suggest you do is you do it from the Library in Quick Develop mode. So I’m going to select the images here and then I’m going to select Crop Ratio and I’m going to choose 5 by 7. And that will crop all of these images to 5 by 7 images. But look what it’s done with the verticals. It’s cropped them to 5 by 7 but it’s kept that same vertical alignment.

So now let’s go to the Develop module and just see what we’re seeing here. This is the crop marquee. And you can see that this image, each one of these images in fact has been cropped to 5 by 7. And let’s go and find a vertical crop and see how it’s been cropped. Again, it’s been cropped to 5 by 7 but in a vertical direction. So this means that all of these images have automatically been cropped.

All we would do is have a quick look and make sure that important parts of the image have not been cropped off. If these were people we’d have a quick check to make sure that somebody’s head hasn’t been chopped off for example. And having done that now knowing that everything is cropped to 5 by 7, to export these images at 500 by 700 pixels in size or 700 by 500 we would select all of them by clicking on the first and Shift click on the last. I’m going to right click and choose Export and then Export again and we would just set up the Export option. So here I’m going to put this in a folder called 5 by 7.

I don’t want to rename these files. All we want to do is to resize them. But what I do want to do is I want to select Resize to Fit. And the longest edge since I know that these are all 5 by 7s is going to be 700 pixels and the resolution I can set to 100 pixels per inch. So these are then going to be 5 by 7 images at 100 pixels per inch resolution. And all I need to do is to click Export and Lightroom is going ahead and it is cropping and resizing all of those images so that they are all going to be the exact right size that we chose. And here they are including the ones that were verticals. You can see that these are 500 by 700 pixels in size. This one is 700 by 500 because it’s a landscape image.

So in Lightroom you could batch resize and export these images in just a matter of a few seconds by just choosing the right option. And that is here in the Quick Develop module setting a crop ratio for those images. This is not something you can do easily in the Develop module, but it’s something that you can do very, very simply here in the Quick Develop area of the Library in Lightroom.

My name is Helen Bradley. Thank you for joining me for this Lightroom video tutorial. If you liked the tutorial please comment, press the Like button, consider subscribing to my YouTube channel. You’ll also find more of my tutorials, tips and tricks on my website at projectwoman.com.

Helen Bradley

Monday, October 22nd, 2012

Photoshop Heart Shape Crop

Crop an image to a heart shape or any other shape in Photoshop. Uses a filled shape and a clipping mask.

Check out all our tutorials on our YouTube channel.

Complete transcript of this video:

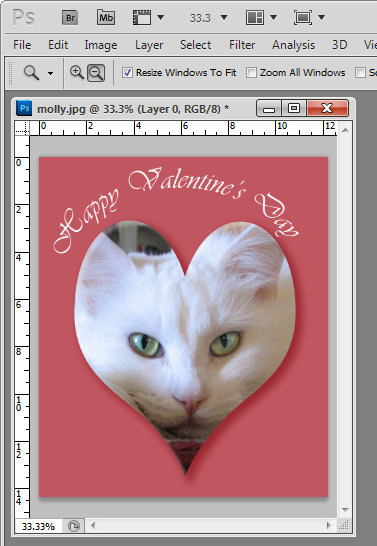
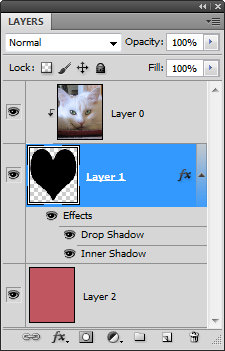
Hello, I’m Helen Bradley. Welcome to this video tutorial. In this tutorial I’m going to show you how to crop to a heart or any other shape in Photoshop. Before we get started on this technique let’s just have a look and see what the end product is going to be. You can see here that I have an image of my cat. And what I’m going to do is to cut her face out in a heart shape. Now in Photoshop Elements this is relatively easy to do because there’s a cookie cutter tool that you can use. In Photoshop it’s not that easy. So we’re going to go through this step by step so that you know exactly how to do it. So let’s get started. I’m going to open up a duplicate of this image. And the shape that we’re using is a heart but this could be any shape at all. So it doesn’t have to be a heart and this process is going to be the same for any shape. The first thing we’re going to do is convert the background into a regular layer. And do that your favorite way. I’m just going to double click the layer and click Ok. And now I’m going to go and get my heart shape. So I’m going to click on the custom shape tool here, and I’m going to select a shape. Now I’ve already selected the heart I want to use but let’s have a look and see. There’s a couple of hearts here. There’s one in the sort of card collection, but I don’t actually like that very much. It’s a really sort of weird shape that one. I prefer this one here so I’m just going to select it, and then let’s go and add a new layer. So I’ve just added a new layer. And let’s go and select a color. Now it can be any color at all, and I’m going to make it this sort of black. It doesn’t matter what color it is. And we’re going to use pixels so this is really important this bit, the pixels bit. In earlier versions of Photoshop there’s actually three icons here and you want to select the one that is pixels. And I’m just going to draw my heart shape. And if it’s not in the exact right position I’m just got a hold the Spacebar as I draw the shape so that I can move it around. And this is actually a nicer shape so once I’ve finished drawing and I’m just going to let go. And now I have a black heart shape right over the top of my cat. It doesn’t matter what this color is because it’s about to disappear. It does matter that the order of these two layers is the wrong way around. So I’m just going to drag the bottom layer up over the top layer. So the photos are on top and the heart is underneath it. And what we’re going to do is we’re going to cut the photo to the heart shape and we do that using a clipping group or clipping mask. So with this layer selected I’m going to choose Layer, Create Clipping Mask. You see here that there is a keystroke that’s Alt Ctrl G. That’s something we could use as well. But what this does is it cuts the photo into the shape of the shape below. So if this were a star than we’d have a star shape. So essentially that’s all you need to do. If you’re already to go, go now because you know how to create a heart shape from an image. If you want to finish it off nicely than hang around and we’re going to finish it off. The way we’re going to finish it off is by adding yet another new layer, and we’re to drag it to the very bottom. And what we’re going to do here is to fill this with a nice color. So I’m going to choose a color of pink because this is a sort of Valentine theme. My foreground color is pink. I have the bottom layer selected. I’m going to Alt Backspace on the PC, Option Delete on the Mac, to fill it with pink. Now we have our heart shape image over pink we can crop it. So I’m just going to crop it to size. And we’ll come in a bit on the edge here too. And now we want that nice finishing touch that we had on the original image. Let’s go and see the original image. You can see that this one’s got dimension and ours is very flat. If you want that dimensional look what we’re going to do is we’re going to add a drop shadow. And we’re going to do it to this heart layer because we want to the drop shadow to follow the heart shape. Here is the layer effects tool, the layer style tool. I’m going to click here and choose Drop Shadow Now my drop shadow at the moment is black. I would prefer a color that is similar to this pink but perhaps a bit darker than it. So let’s just go and get a darker version of our pink. We’re on multiply blend mode which is a good blend mode. I don’t like the angle of light. I prefer my light to be cast in this direction. And you can see that I can now drag my drop shadow around to place it where I want it to be. It’s a bit harsh so I’m going to soften it. Now this is where Photoshop is a little confusing. I think they’ve labeled these really wrongly because size actually adjusts the feathering and spread really adjusts the size. So we don’t want it to have a very big size or spread, but we do want it to have a nice feathering so I’m going to adjust the size to suit there. And on the other one I added an inner glow so I want to grab inner glow here. I again changed the color, this time sampling the pink from the image and going for a lighter pink for my inner glow. And then we’ve got it screen blend mode so that’s going to work nicely. But we do need to increase the size here and probably increase the choke a bit. And we just wanted to blend that around the edge and click Ok. So this is an effect that you can create with any shape in Photoshop. You can put any shape in here. You can put your photo on top. You’re going to add a clipping mask or create a clipping mask with Layer. And this will say Create Clipping Mask. At the moment it says Release because that’s what we would be doing at this point because we already have clipping mask created and we’re just dropping a filled layer below it. I’m Helen Bradley. Thank you for joining me for this Photoshop video. If you liked this video please would you give it a thumbs up so that others know that it’s a good video. Look out for more videos on my YouTube channel and look at projectwoman.com for more tutorials about Photoshop.

Helen Bradley

Helen Bradley

Monday, May 7th, 2012

Crop to fixed ratio in Photoshop

By Helen Bradley

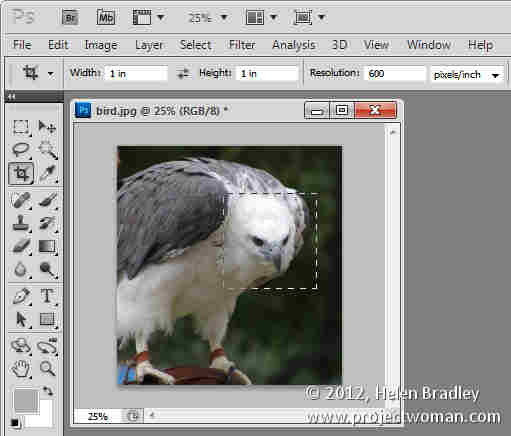
If you’ve ever tried to crop an image to a fixed ratio in Photoshop you may have run up against an issue. There is, it appears, no option for cropping to a fixed ratio such as 4 x 6, 5 x 7 or even 1 x 1. You can crop to fixed sizes like 4in x 6in and you can set a resolution for the image but you can’t on the face of it just crop to a simple 1 x 1 without specifying a unit of measure. Here I’ll show you how to do this, but first things first…

The risk you run if you don’t watch how your settings are configured and if you don’t watch what you enter in the dialogs, is that Photoshop will not only crop, but also determine the units of measure and resample the image for you.

Default Settings

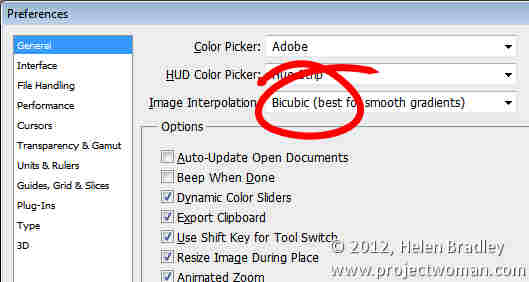
The default units of measure and the default resampling method are set in the program preferences which you can locate by choosing Edit > Preferences > General (Photoshop > Preferences > General) and then read the image interpolation method being used. In this set up it is set to Bicubic:

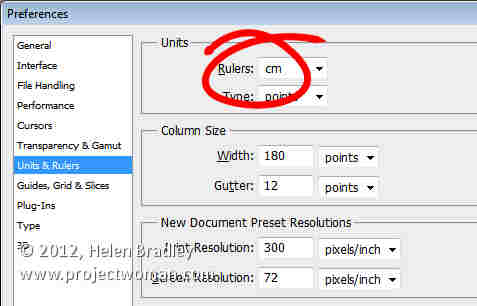
The default units of measure are set in the Units & Rulers options or the Panel options for the Info Palette as the ruler measurements:

If you type a number in the Width and Height boxes when you select the Crop tool in Photoshop then the default units of measure are used unless you also type the desired units of measure. This might not sound like it is a problem but if the default units of measure are pixels and you type 6 x 4 and have the Resolution set to 300 dpi you might end up with a very small size image indeed!

It is not possible to type a number in the Width or Height box for the Crop tool without a unit of measure being applied to it. So, what do you do if you want a 1 x 1 ratio crop not a 1 in x 1 in image?

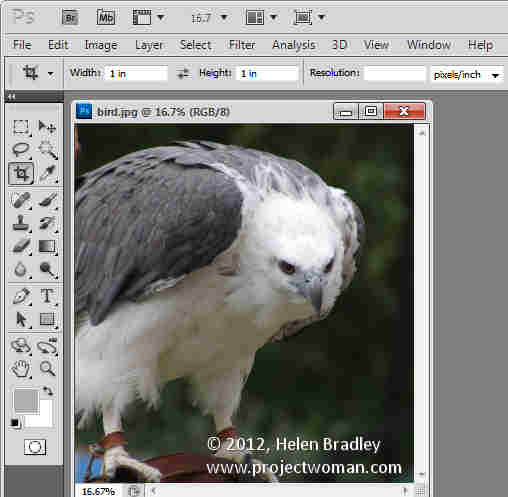
The solution is to type 1in or 1cm in each the Width and Height boxes and ignore the units of measure. Then, remove anything from the Resolution box. When Photoshop is told to crop to a fixed size/ratio and is not told the Resolution to use it crops to the size requested, it doesn’t resample the image, and it simply adjusts the Resolution of the final image to suit the image. It might sound weird but it works to let you crop to a fixed ratio. The problem is of course, that the resulting resolution can be very large indeed.

Here I cropped this image to 1 in x 1 in with no resolution set:

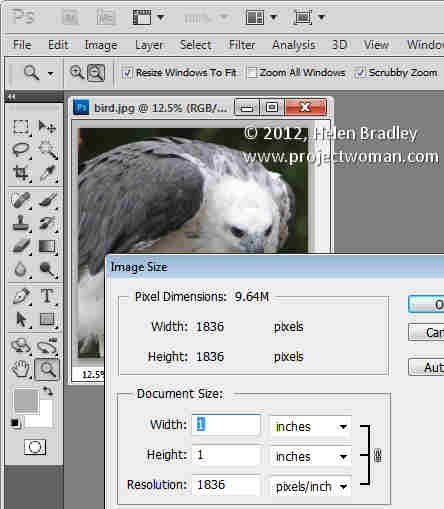
Here are the final image dimensions – the size is 1 x 1 but the resolution is very large:

Change Resolution but not Size

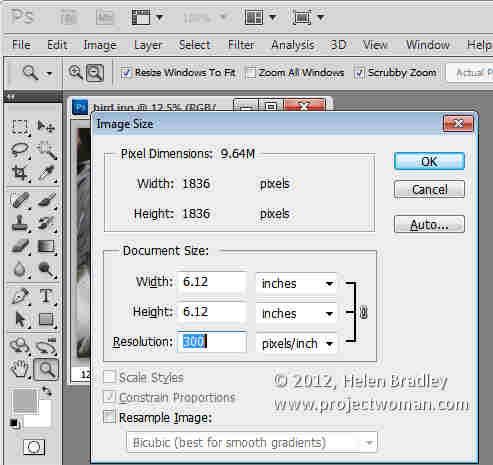
If the resolution of the image is important to you then you can change it by choosing Image > Image Size, disable the Resample checkbox and set the desired Resolution and click Ok to adjust this. This resizes the image to the chosen resolution but does not resample it in the process.

Crop and Resample

On the other hand, if you set a width and height for the image in the Crop tool options and if you set a resolution, Photoshop will crop the image to that size and resolution.

If the image is very large and the desired size is comparatively small then Photoshop will downsize the image and in the process resample the image. If there are insufficient pixels in the image to crop to the desired size and resolution, Photoshop will upsize the image resampling it as it does so.

An Alternate Method

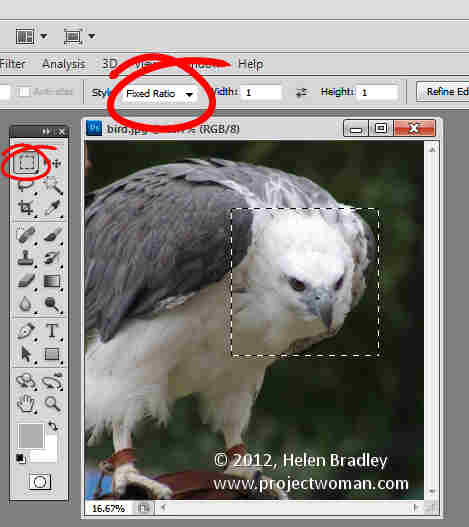
There is an alternative method that lets you crop to a fixed ratio without altering image resolution. It is a little longer but it works well and is bypasses the crop tool entirely. Instead, target the Rectangular Marquee tool and select Fixed Ratio from the Style list and then set the Width and Height as values without measurements. Select the area to keep – if necessary, hold the Space Bar as you are drawing the shape to move it to a new position.

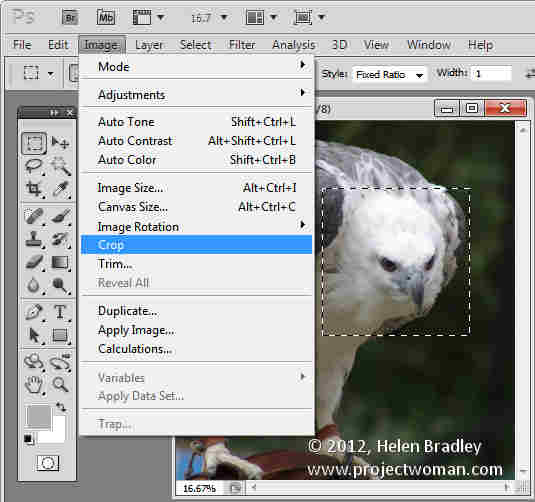
When you ‘re done choose Image > Crop to crop it.

Next time you need to crop to a fixed aspect ratio, one of these methods will ensure you get the result you expect.

Helen Bradley

Monday, December 5th, 2011

Work in the Lightroom Quick Develop panel


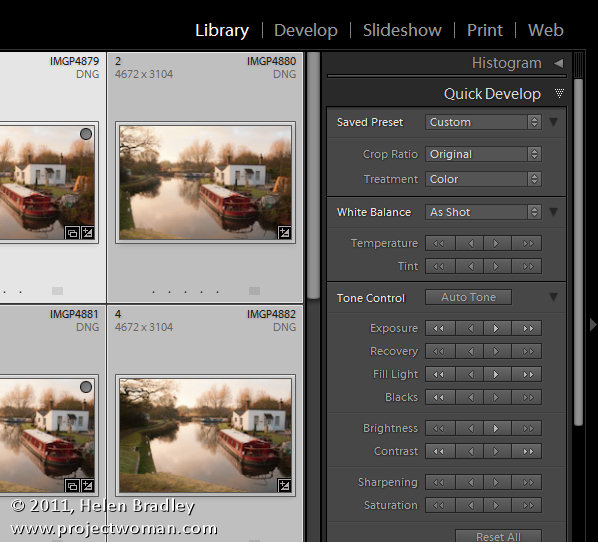
In Lightroom you can fix a series of images all at once using the Quick Develop Panel in the Library Module. While this tool lacks the precise adjustments you can make to an image in the Develop Module, it offers a quick solution for getting started fixing your images.

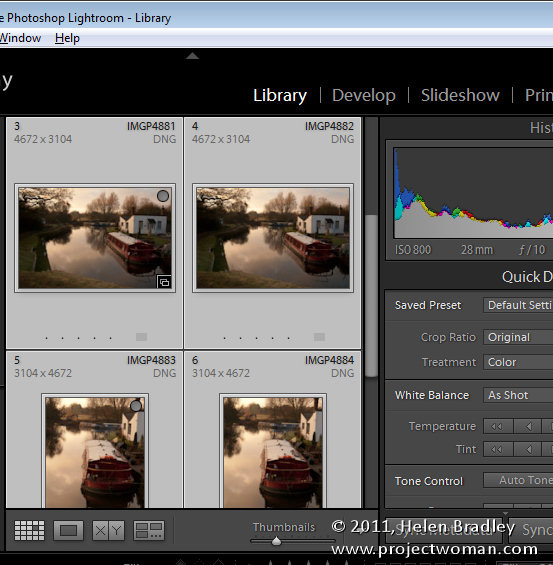
To make use of the Quick Develop panel you should be working in the Library Module, in Grid View. So open the Library module and click G to select Grid view. If you are in Loupe view the changes you make will be applied only to the most selected image regardless of how many images you have selected in the Filmstrip.

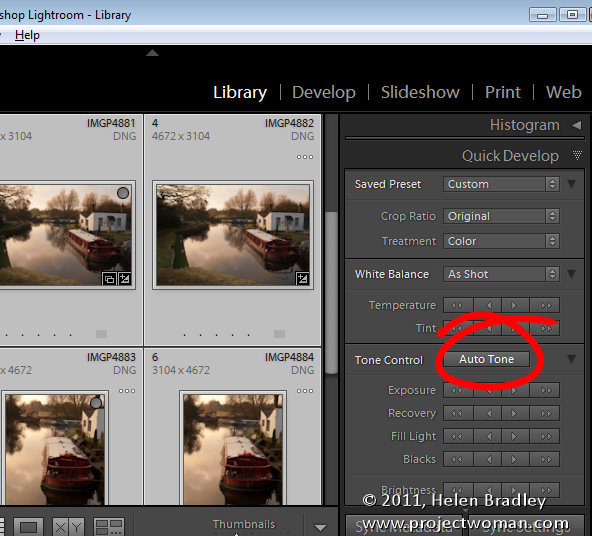
If you typically use the Auto Tone feature in the Develop module to quick start fixing your images, select all the images to fix in grid view and click the Auto Tone button. Every image will be assessed and then adjusted according to its particular needs.

How fixes are applied

In the Quick Develop module, when you choose to adjust, for example, the Exposure on a series of selected image, each image will be adjusted by the same relative amount. So, if you select a series of images and click the single right pointing arrow, you will add +0.33 to the current Exposure value for each image. So, if an image had a starting Exposure setting of 2.00 it will be increased to 2.33. The single left pointing arrow moves Exposure -0.33. If you click the double arrows you will increase or decrease exposure by 1.0 for every image. Each adjustment works in a similar way although the relative values will vary.

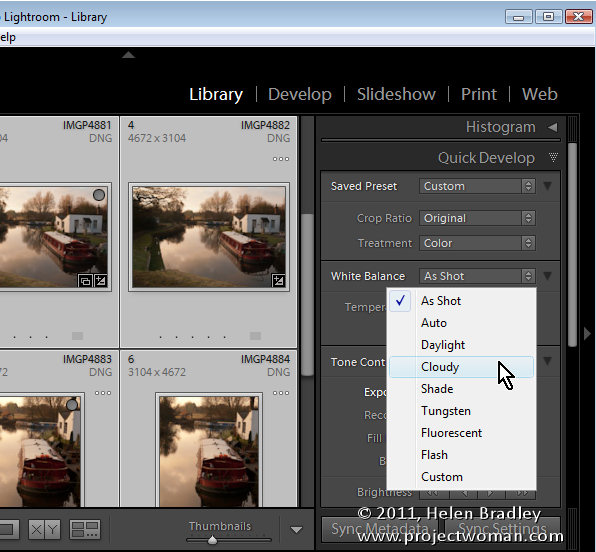
One feature of the Quick Develop module which is useful is the White Balance tool. If you have a series of images all shot in similar light you can select them and adjust the white balance for all of them by choosing a different White Balance setting from the dropdown list or by adjusting the Temperature (Blue/Yellow) and/or Tint (Green/Magenta) sliders.

Hidden Options

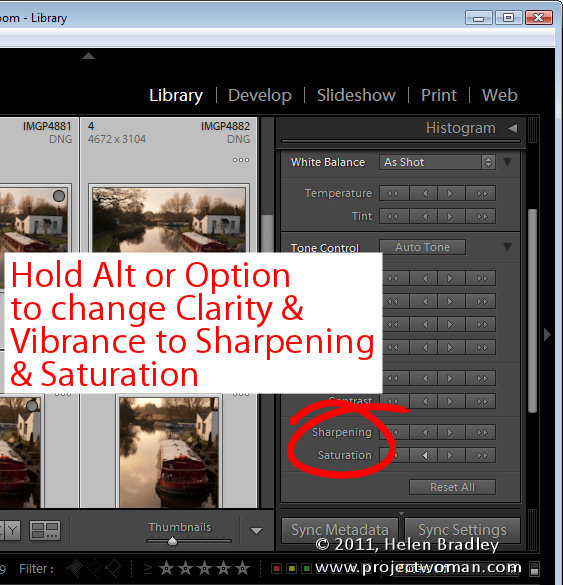
There are some options hidden in the Quick Develop panel. If you hold the Alt key (Option on a Mac) the Clarity and Vibrance adjusters change to allow you to adjust Sharpening and Saturation. Notice that Sharpening is an all in one setting and that it lacks the ability for you to alter the Radius, Detail and Masking which you can do with the Detail panel sliders in the Develop module.

How I use it

I use the Quick Develop panel to make quick edits to a series of images at one time. I’ll assess the images to see if they need a particular adjustment such as increasing the Exposure if they are all a little underexposed. I also like to increase Clarity and Vibrance.

So, I’ll select the images in the Grid, click to increase Exposure and then again increase Vibrance and Clarity.

Using the Quick Develop panel to make fixes to all images saves me a little time later on when I switch to the Develop module and apply additional fixes on an image by image basis.

One Gotcha to be aware of

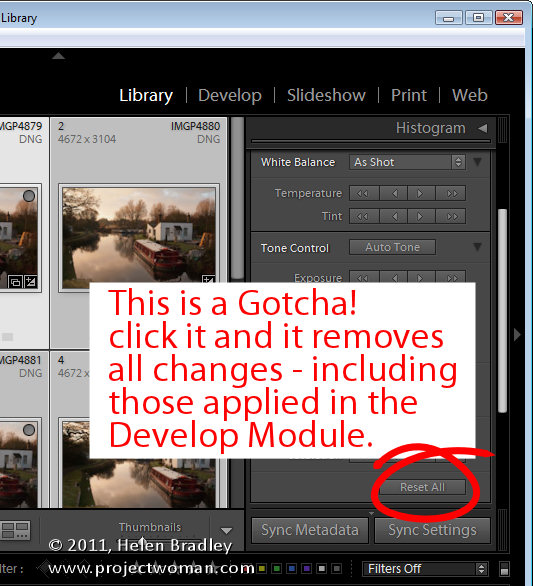
If you want to remove the settings applied to an image you can do so using the Quick Develop panel. Select the image and choose Reset All. However, be aware that when you do this, you will remove not only all settings applied to the image using the Quick Develop panel but also any changes made to it using the tools in the Develop module.


Helen Bradley

Tuesday, January 11th, 2011

Crop to a Valentine heart shape in Photoshop

With Valentine’s Day coming up shortly you might be wondering how you create heart shape images in Photoshop. Well, here’s how:

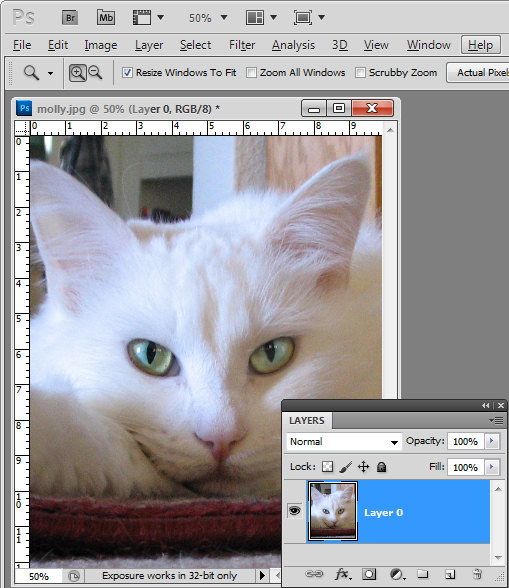
Start by opening an image that you want to use and convert the background layer to a regular layer by double clicking the background layer in the layers palette and click Enter.

Crop image to Valentine's heart shape in Photoshop

From the tool palette, select the Custom Shape tool, which sits below the Rectangle tool.

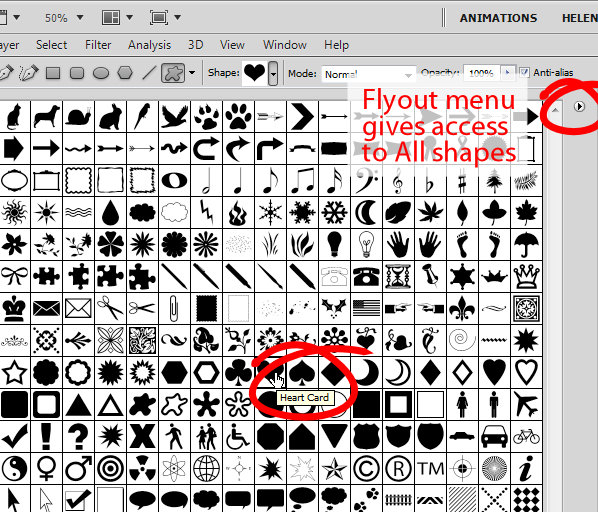
From the Shapes dropdown list on the Tool Options bar, select a heart shape.

If you don’t have a heart shape in your list, click the flyout menu and select All. Click Append to append all the shapes available which will give you access to at least one heart shape. In fact you probably have a Heart Card shape, a Heart shape and a Heart Frame shape.

To cut a heart shape out of your image you’ll want the Heart shape or the Heart Card shape.

Crop an image to a heart shape in Photoshop

Click the New Layer icon at the foot of the layers palette or choose Layer > New > Layer.

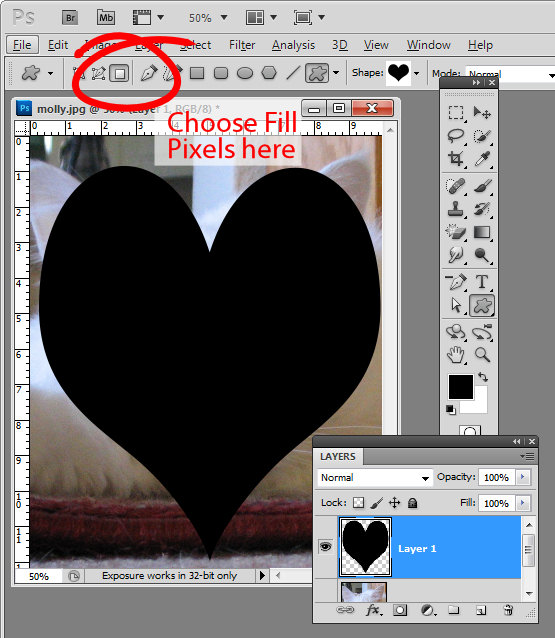
From the toolbar, select the option that says Fill pixels. Drag a heart shape over your image. Don’t worry that there is a fill color associated with the heart and that it is covering up your image. Size the shape using the move tool until it’s positioned pretty much where you want it to be.

Crop image to valentine heart shape

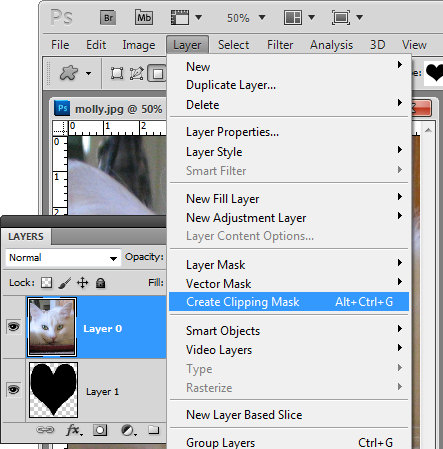
Now with the heart layer selected, drag it below the image layer and select the image layer again.

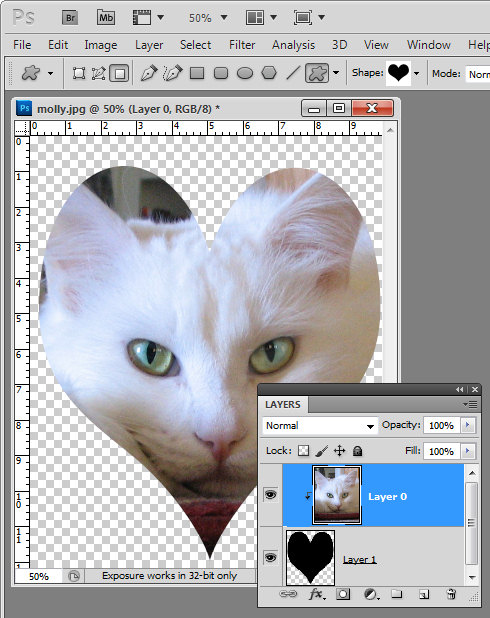
Choose Layer > Create Clipping Mask and your image will be clipped to the heart shape.

crop image to valentine heart shape

This method of creating a heart shape is ideal as the heart can be moved into a different positioned and resized by selecting the heart layer and resizing the heart appropriately.

In addition, you can click to select the image layer and drag with the Move Tool (V) on the image to place the image inside the heart in an appropriate position.

Crop an image to a Valentine heart shape

If you want a background for your image, click the bottommost layer and then Ctrl + Click (Command + click on the Mac) on the new layer icon at the foot of the layers palette.

This adds a new layer below all the other layers.

Select a foreground color to use, target your new layer and press Alt + Backspace (Option + Delete on the Mac) to fill  this layer with the foreground color.

Finish your Valentine heart effect by selecting the heart layer and apply a drop shadow to it by clicking the Add a Layer Style fx button at the foot of the layer palette and choose Drop Shadow.

Add some text and you’re ready to save and print the file.

There is a YouTube video of this process using Photoshop CS6 here – it is the same in any version of Photoshop.

Helen Bradley

Friday, November 26th, 2010

Crop an image to size in PowerPoint 2010

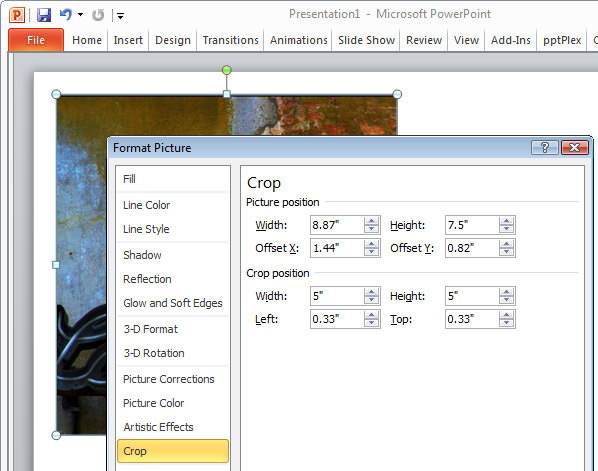
When you have an image in a PowerPoint presentation and you want to crop it to a specific size, click on the image, and from the Picture Tools > Format tab, select the Size and Position dialog by clicking in the dialog launcher in the bottom right corner of the Size group.

Click on the Crop group of options and then in the Crop Position area, type the dimensions that you want to crop the image to. Once you have done this, the image will be cropped to the desired size.

If there is not enough data in the image to crop it to that size, the image will be placed inside a placeholder the size you determined. Once you click Close to finish cropping the image you can increase the size of the image so it fills the placeholder by clicking on the Crop tool on the Picture Tools > Format tab and choose Fill. This increases the size of the image to fill the placeholder.

Helen Bradley

Tuesday, May 4th, 2010

Cropping in Lightroom

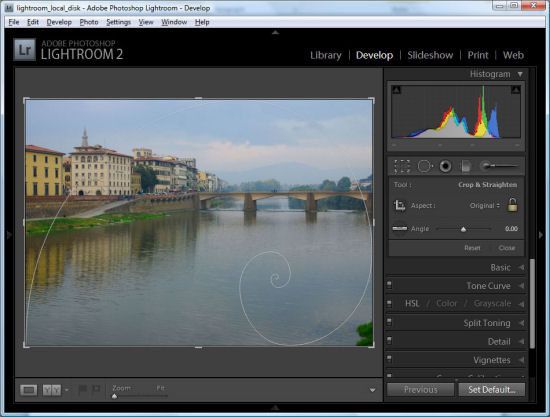
Ok, so it’s pretty easy to crop an image in Lightroom- just click the Develop module and click crop. But try to crop to 6 x 4 – there’s a 4 x 6 size but that’s not the same as 6 x 4 as you’ll soon find out.

Here is a link to a video tutorial that shows how to crop in Lightroom, including how to crop to that 6 x 4 and how to display handy crop overlays.

Watch the Video – how to crop in Lightroom.

Helen Bradley

Friday, March 26th, 2010

Faux panos in Lightroom


Lightroom finished panorama of Cam River Cambridge, Uk

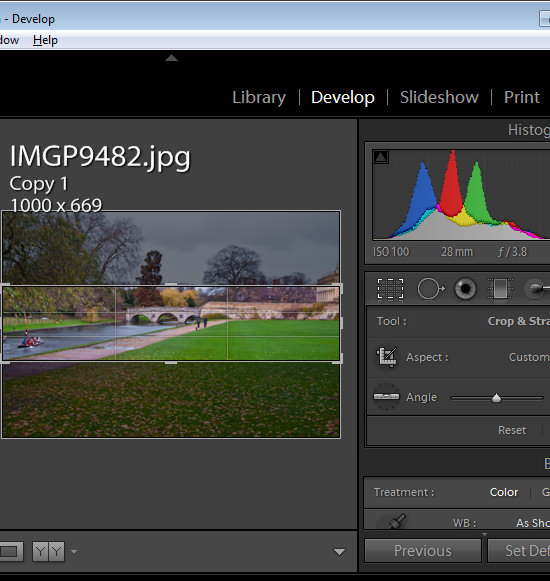
Ok, so I am using Lightroom for this but seriously you can do this in Photoshop or any application you like. It’s a faux panorama and you do it with one image by simply cropping the image to a long width and a small depth. You need the right image – it needs to have plenty of data across the middle of the image but it does have so much punch that it can turn a ho hum snapshot into something that looks so much more.

Lightroom crop to create a panorama

So, in Lightroom, select your image, move to the Develop module, crop the image to as wide as you can and a small height/depth and then Export it. This one I framed in the Lightroom Print module before printing to a file and posting it. All too simple really and everyone will think you’ve been snapping panos instead of infusing your images with a little creativity.

Oh, and for a tip in a tip, press Control + ‘  (Command + ‘ on the Mac) to make a virtual copy before cropping so you still have your original visible in Lightroom.

Helen Bradley

Page 1 of 212