Wednesday, July 25th, 2012
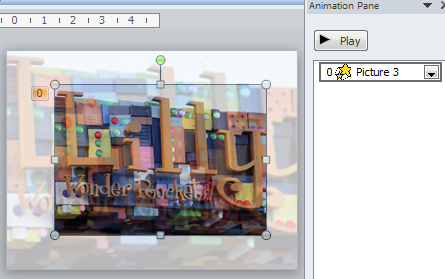
In earlier versions of PowerPoint you could select the size for a Grow/Shrink animation. In PowerPoint 2010 it seems these features are more limited – that’s not the case but to make them more useful you need to know how the animations can be configured.
On a slide with a full size image on it, click the Animations tab and select the Grow/Shrink animation – it is an Emphasis effect.
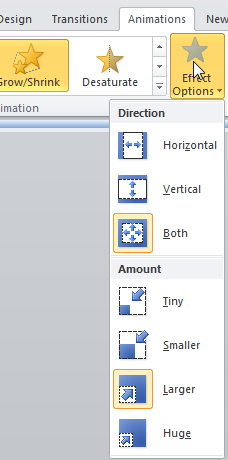
If you select Effect Options you will see that you can select Both so the animation grows in both directions. Now select Larger or Huge. In most cases, Larger will be sufficient but notice that it appears as if you can only choose Larger or Huge as bigger sizes and that there is nothing in between these two settings. This is where you can get misled.
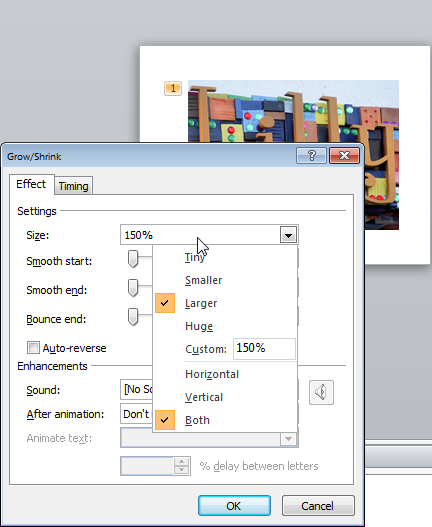
Click the Animation Pane icon to display the Animation pane. Right click the entry for your image in the Animation Pane and choose Effect options. See that the Size is set to 150 % but you can set it to any value of your choice using the Custom option.
For example, set it to 75%. Here too you can add Smooth Start and Smooth End to the effect and a Bounce to the end of it.
In most cases, you’ll want your animation to start immediately the slide appears so click the Timing tab, set the Start option to After Previous. Set the Duration value to your choice of speed and click Ok.
It’s best to test your animations using the slideshow preview rather than the animation pane.
Helen Bradley
Labels: animate, animation, animation pane, Duration, emphasis, entrance, exit, grow/shrink, Helen Bradley, PowerPoint 2010, Start, Timing
Categories:office
posted by Helen Bradley @ 8:14 amNo Comments links to this post
Wednesday, May 2nd, 2012
Each of the Office applications allows you to configure a look for a document, spreadsheet, publication or presentation and then save it as a template so that you can reuse it anytime.
Templates in PowerPoint 2010
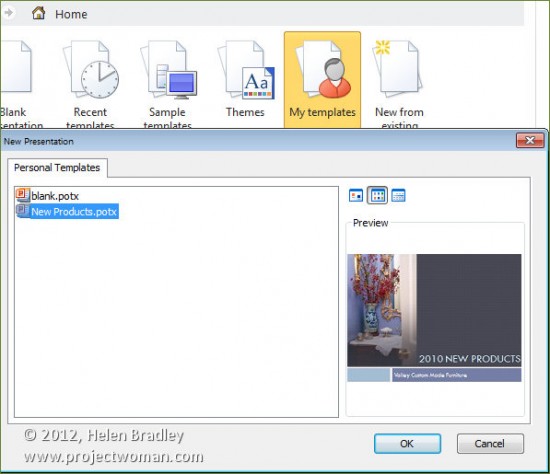
In PowerPoint you’ll create your presentation and then save it using File > Save As and select from the Save As Type list choose PowerPoint Template (*.potx). Give your presentation template a name and click Save.
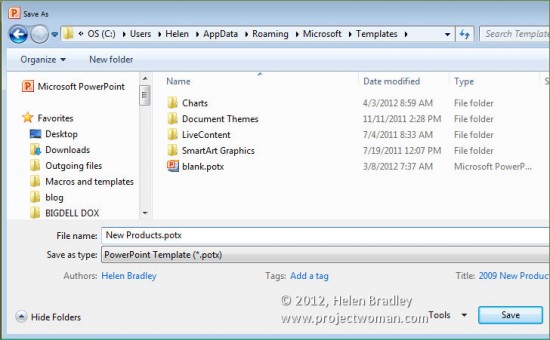
In future you can locate this presentation by choosing File > New > My Templates and click on the template to use it as the basis of a new document.
Templates in Word 2010
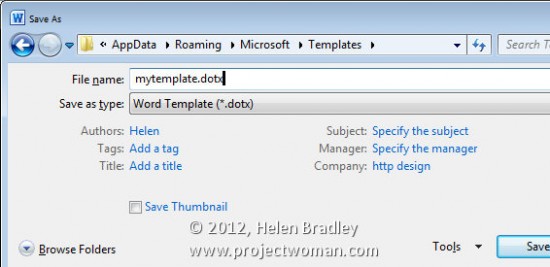
In Microsoft Word choose File > Save As and from the Save As Type dropdown list choose Word Template (*.dotx). In the top left of the dialog click the Templates option to make sure that the template will be stored in the correct location and give the template a name.
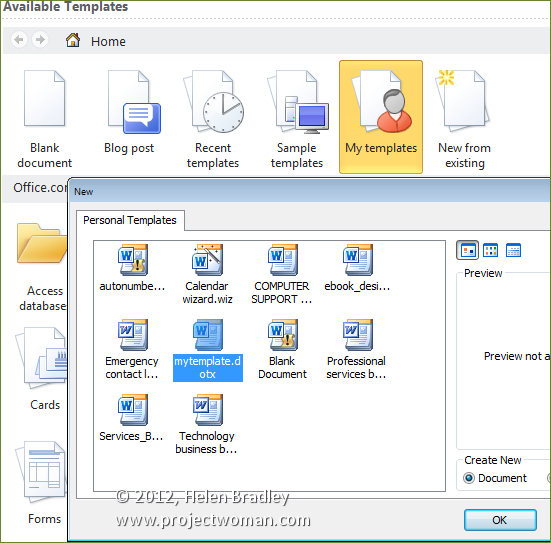
In future choose File > New > My Templates and select the template to use.
Templates in Excel 2010
In Microsoft Excel, you can save the look of your document so that it can be used as the basis of a new document by choosing File > Save as and choose Excel Template (*.xltx ) as the file type. Type a name and save the template file.
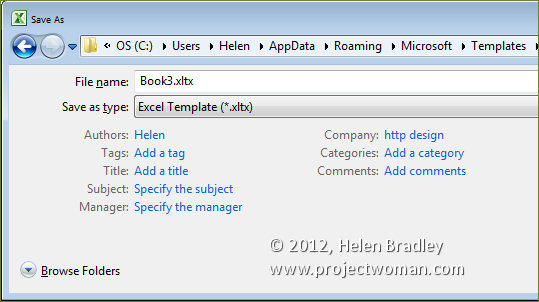
In future you can base a new worksheet on this template by choosing File > New > My Templates and select it from the Personal Templates list.
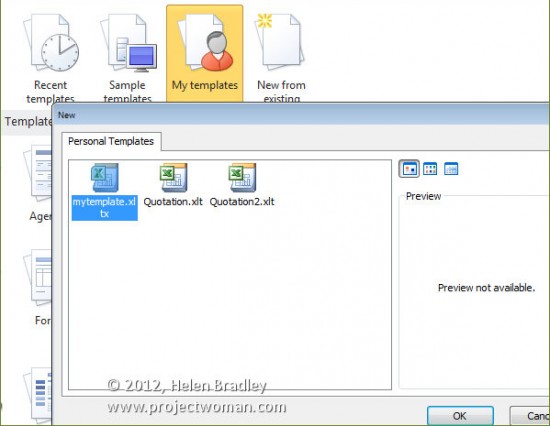
Templates in Publisher 2010
In Publisher you’ll choose File > Save As and then select Publisher Template (*.pub). Type a name for the template and click Save.
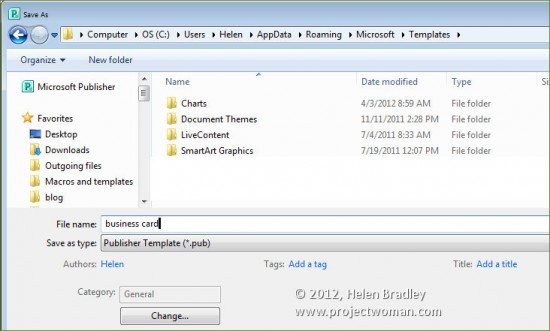
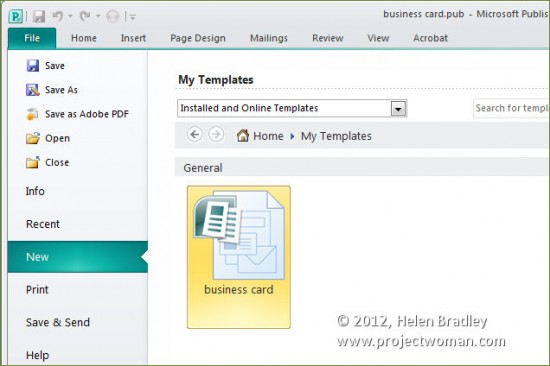
In future you can access this template by choosing File > New > My Templates, select the template and click Create. You may need to close and reopen your software before the new templates are available.
Helen Bradley
Labels: Excel, Excel 2010, Helen Bradley, how to, PowerPoint, PowerPoint 2010, publisher, Publisher 2010, save as a template, templates, tips, Word, Word 2010
Categories:Uncategorized
posted by Helen Bradley @ 8:00 am1 Comment links to this post
Wednesday, April 18th, 2012
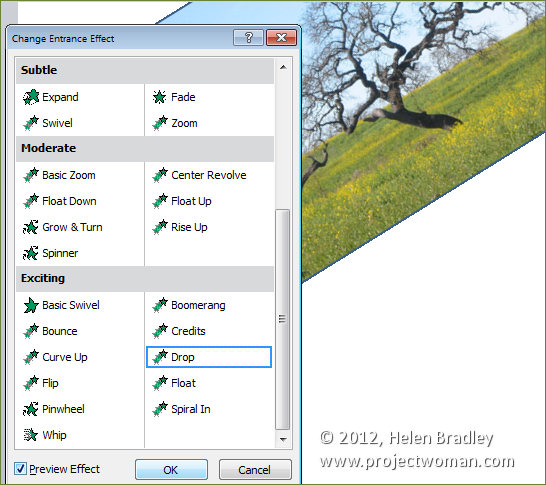
Sometimes when you’re working in PowerPoint you’ll notice that an animation is not available and it is greyed out.
For example add an image to a slide and then try to select the drop animation from the Entrance Effects. It’s not available because what you’re trying to select is a tool that is used to animate text and you are using an image.
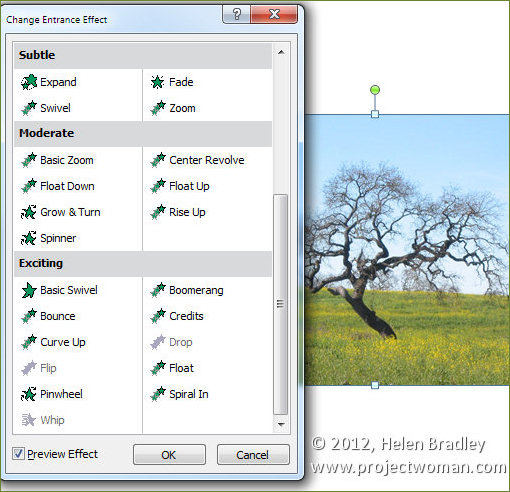
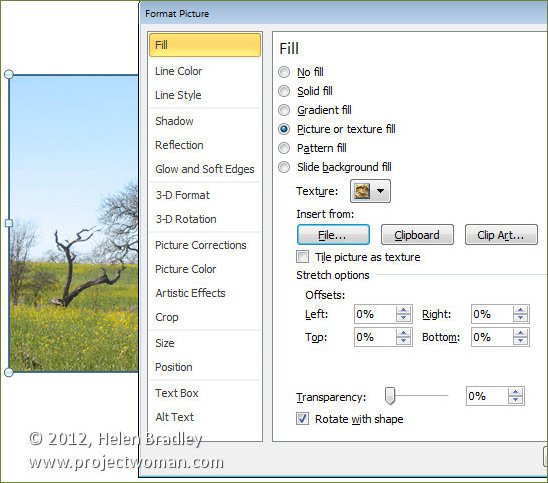
However you can use this animation on an image, you just need to know how to do so. To do this, place the image inside a shape. So, add a shape to the slide – a plain rectangle will do, and as the shape background add the picture by right-clicking the shape, choose Format Shape and then from the shape Fill options select Picture and fill it with a picture.
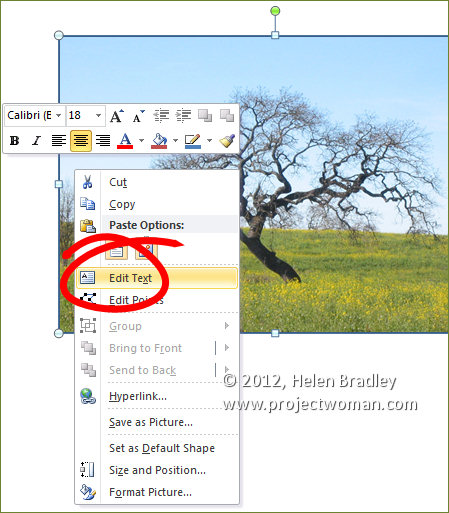
Right click the shape and choose Edit Text and press the spacebar a couple of times so that you add some text to the shape – spaces won’t show but they are text. It’s critical that you do this because without the text the shape will not be able to be animated using text animation tools.
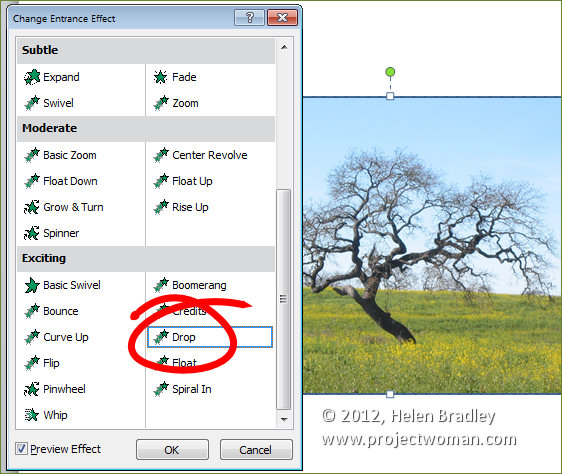
Now when you select the Animate options and the Entrance Effects you’ll find that the effects that you couldn’t use before like Drop, Flip and Whip are now available because you’re working with PowerPoint deems to be a text object.
Helen Bradley
Labels: amimation pane, animate, animations, drop, entrance effects, flip, grayed out, greyed out, Helen Bradley, hidden animations, PowerPoint, PowerPoint 2010, timeline, whip
Categories:Uncategorized
posted by Helen Bradley @ 8:00 amNo Comments links to this post
Thursday, April 12th, 2012
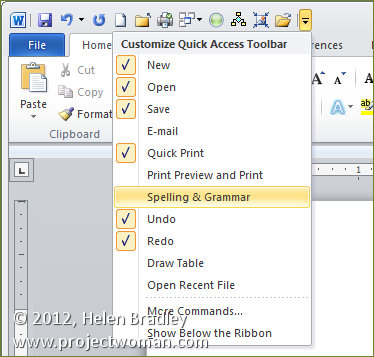
The Quick Access Toolbar or QAT runs across the top left edge of the Word 2007 and 2010 window. It also appears in other ribbon compatible programs like Excel 2007 & 2010, PowerPoint 2007 & 2010.
The QAT is a handy place to put icons that you use all the time. It can be customized through this Quick Access Toolbar option.
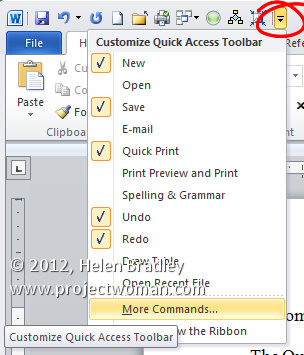
Click this icon to show the QAT editing options. Click Show Below the Ribbon to place the Quick Access Toolbar below the ribbon – I think most people will find its current position acceptable but if you want to move it that’s how to place it elsewhere.
Choose More Commands to add more commands to the Ribbon. From the Choose Commands From list you can select commands to view. These include Popular Commands, Commands Not In The Ribbon, in other words commands that are available in Microsoft Word but for which you have no other easy way of accessing, All Commands or Macros. The remainder of the dialog gives you access to the individual tabs in Word so that you can get access to icons listed there.
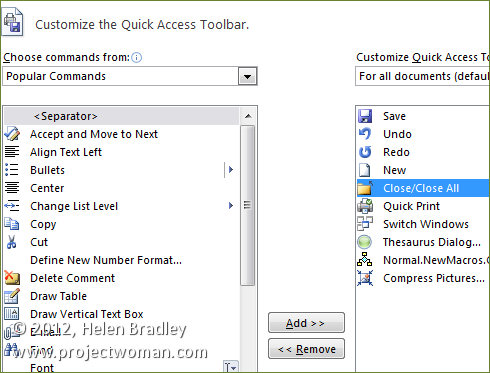
Some options you may want to add to the Quick Access Toolbar include the Close/Close All Button, Quick Print and I like to add Switch Windows which is available from the All Commands list. Other tools that you use frequently can be added to the Quick Access Toolbar making them instantly accessible.
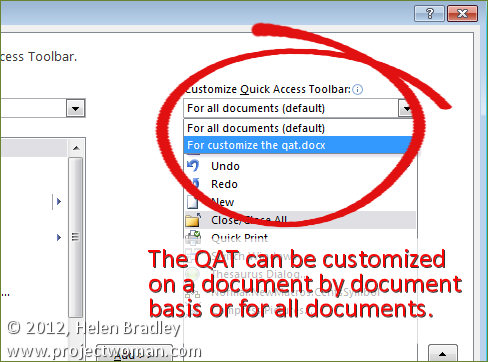
You should note that you can set the features for all documents or for just an individual document so that you can, for example, set a different toolbar for a specific document. When you choose this option the specific document will get all the tools on the standard quick access toolbar plus those that you’ve added to just its toolbar.
Helen Bradley
Labels: Excel 2007, Excel 2010, Helen Bradley, mini toolbar, OneNote 2010, Outlook 2010, PowerPoint 2007, PowerPoint 2010, Qat, quick access toolbar, Ribbon, Word 2007, Word 2010
Categories:Uncategorized
posted by Helen Bradley @ 8:00 am1 Comment links to this post
Friday, November 26th, 2010
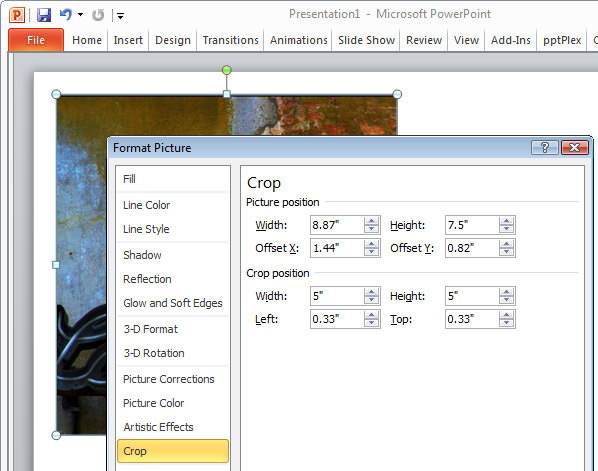
When you have an image in a PowerPoint presentation and you want to crop it to a specific size, click on the image, and from the Picture Tools > Format tab, select the Size and Position dialog by clicking in the dialog launcher in the bottom right corner of the Size group.
Click on the Crop group of options and then in the Crop Position area, type the dimensions that you want to crop the image to. Once you have done this, the image will be cropped to the desired size.
If there is not enough data in the image to crop it to that size, the image will be placed inside a placeholder the size you determined. Once you click Close to finish cropping the image you can increase the size of the image so it fills the placeholder by clicking on the Crop tool on the Picture Tools > Format tab and choose Fill. This increases the size of the image to fill the placeholder.
Helen Bradley
Labels: crop, image, Office 2010, PowerPoint 2010, resize
Categories:Uncategorized
posted by Helen Bradley @ 1:31 pm1 Comment links to this post
Monday, July 19th, 2010
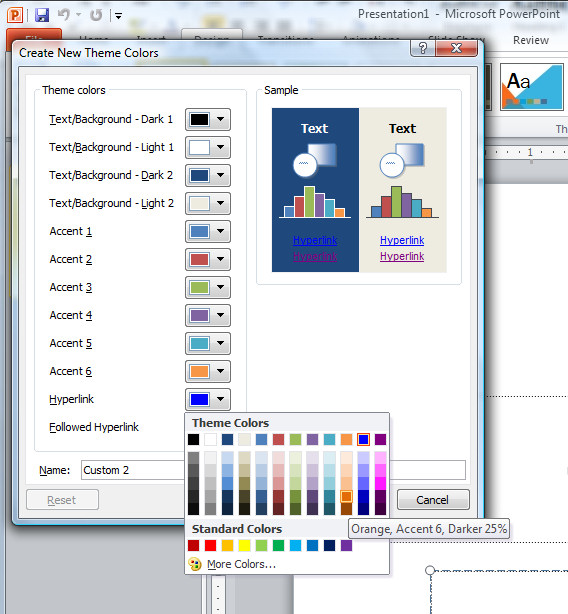 If you’ve added an email link or a website URL to a PowerPoint slide, you’ll know that PowerPoint 2007 and PowerPoint 2010 automatically format the hyperlinks for you.
Because PowerPoint doesn’t use styles, it’s not obvious exactly how the formatting gets applied and how you control it.
The first thing to know is that you simply can’t control the underlining, it’s there and it’s there to stay. You can, however, change the colors used.
Click the Design tab > Colors > Create New Theme Colors, locate the Hyperlink color and change it to something different if desired. To control the Followed Hyperlink color, select that option and change it.
You now need to save your changes as a custom color scheme, so type a name for your color scheme and click Save.
Now the chosen hyperlink color and followed hyperlink color will be used to format the hyperlinks in your PowerPoint presentation.
Helen Bradley
Labels: formatting, Hyperlinks, PowerPoint, PowerPoint 2007, PowerPoint 2010
Categories:Uncategorized
posted by Helen Bradley @ 1:30 pm13 Comments links to this post
Monday, July 5th, 2010
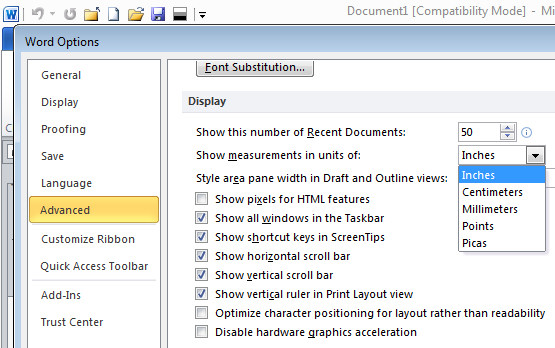
Ok, so its easy to change units of measure in Word by setting the Word Options to measure in inches or cm – depending on where you live. However, if you’re using PowerPoint don’t waste your time looking in PowerPoint for the setting – it ain’t there.
Instead, the measurements in PowerPoint are tied to your geography. If you live in the US you get inches, if you fess up to living else where you get your local units of measure. To change where you live, launch the Control Panel and look for a Regional settings option and set your location there.
For those of us who live in the US but who think imperial measurements suck big time and who yearn for the metrics of our childhood in the far off land of Aus, thanks to Microsoft we are s*** out of luck. You see, if I set my region as Australia or the Uk to get metrics, everything else goes pear shaped and Google starts serving up UK or Australian pages in preference to US ones, or I get £ by default in Excel. It’s all round not a good choice. So, I’ll have to suck it up and learn to embrace feet and inches – but provided you still call the land of your birth home chances are you’ll be just fine.
Helen Bradley
Labels: PowerPoint 2007, PowerPoint 2010, Units of measure, Word 2007, Word 2010
Categories:Uncategorized
posted by Helen Bradley @ 9:48 am3 Comments links to this post


