Saturday, October 5th, 2013

Lightroom Tip – Batch Crop & Resize

Save Time in Lightroom when Resizing and Cropping Large Amounts of Output Images

If you’re working on a large shoot and need to output a lot of images at a fixed size then Lightroom can do the work for you. It isn’t obvious how you can crop all your images to a fixed size and output them at a certain set of pixel dimensions but it is easy to do when you know how. Here’s how to do it:

Step 1

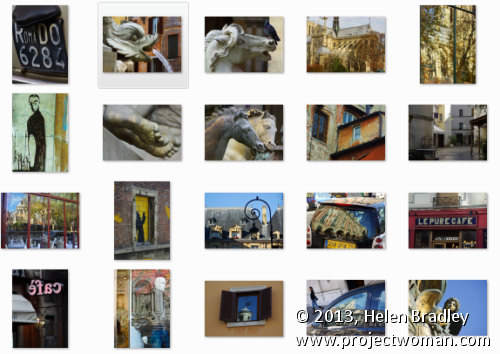
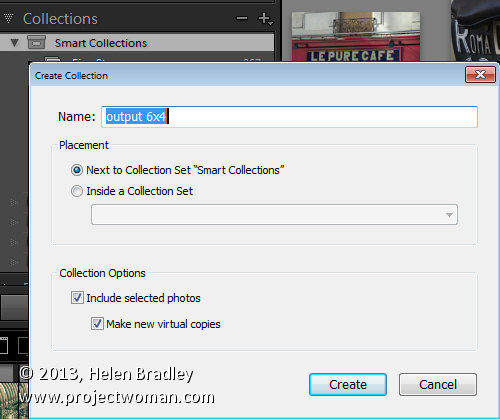
First locate the folder with your images in it. I prefer to make virtual copies of my images and put them in a new collection but you can do whatever makes sense to you.

Step 2

Select all the images in Grid view in the Library module in Lightroom.

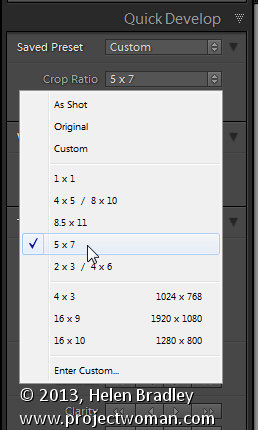
Open the Quick Develop panel on the right and, from the Crop Ratio dropdown list, select the crop ratio that you want to crop to. For example you can crop to fixed ratios such as 1 by 1 or printing sizes such as 5×7, 4×6 and so on.

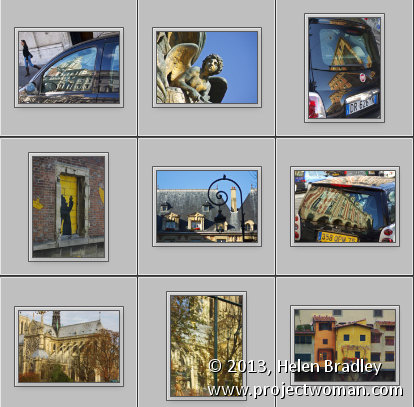
Here I’ve selected 5×7 and when I do so all the selected images are automatically cropped to this 5 x 7 ratio.

Lightroom is smart enough to understand that some images are portrait orientation and others are landscape. Portrait images are cropped to 5 x 7 and landscape orientation images to 7 x 5.

Step 3 (optional)

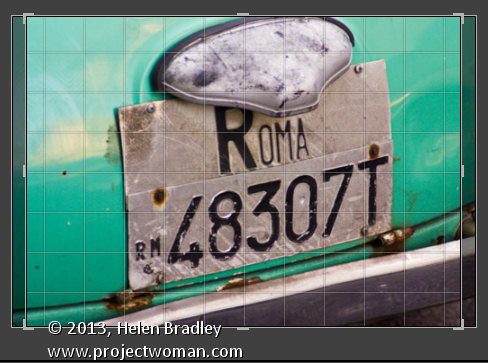
If desired, you can now move to the Develop module and check the crop for all the images. By default, Lightroom will center the crop rectangle on the image and this may not be exactly what you want for some images. However, it is easy to go to the Develop module, click the first image and click on the Crop Overlay Tool so you see the crop marquee in position on the on the image.

Now from the filmstrip you can click on each image in succession to preview it in the crop window and you can easily identify if any of them need an adjustment to the crop rectangle. If they do simply drag on the crop rectangle to reposition it. When you’re done return to the Library view.

Step 4


As the images are now all cropped to size, press Ctrl + A to select them and then click Export. Choose a folder to export the images into or click New Folder to create a new folder.

You can now set your desired preferences in the Export dialog.

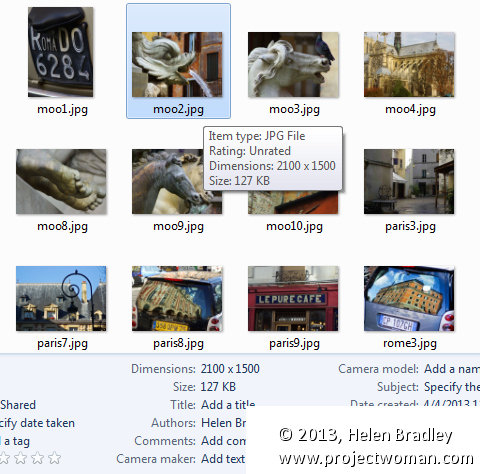
To control the output size – in pixels wide and tall – of the images easily because you already know the crop ratio. To do this, select the Resize to fit checkbox and choose Long Edge from the dropdown list. Then type a pixel dimension for the long edge. So, for example, to prepare 5 by 7 ratio images for printing at 300 dpi the longest edge will need to be 2,100 pixels (7 x 300) so type 2100 and set the resolution to 300.

Step 5

Click Export to export your images and they will be exported to a folder at the chosen size and resolution.

This process allows you to quickly and effectively prepare a batch of images for printing. It manages portrait and landscape images so that you don’t have to separately handle each type. It’s a simple workflow and a fast way to prepare images from a large shoot.

Helen Bradley

Wednesday, May 1st, 2013

Lightroom Tip – Bulk Crop and Resize Image

Learn how to crop and resize in bulk in Lightroom. If you have a lot of images you need to, for example, crop to 5 x 7 and then save at a particular pixel size and resolution, you can learn how to do this quickly and effectively in Lightroom. This makes use of the tools in the Quick Develop panel in the Library module.

Transcript:
Hello, I’m Helen Bradley. Welcome to this video tutorial. In this tutorial I’m going to show you how you can bulk crop and resize images and export them from Lightroom.

A reader recently posed a question to me and that was what do I do if I need to crop all my images to 5 by 7 in size and get them out as 500 by 700 pixel images. In Lightroom that’s not that difficult to do. What I suggest you do is you do it from the Library in Quick Develop mode. So I’m going to select the images here and then I’m going to select Crop Ratio and I’m going to choose 5 by 7. And that will crop all of these images to 5 by 7 images. But look what it’s done with the verticals. It’s cropped them to 5 by 7 but it’s kept that same vertical alignment.

So now let’s go to the Develop module and just see what we’re seeing here. This is the crop marquee. And you can see that this image, each one of these images in fact has been cropped to 5 by 7. And let’s go and find a vertical crop and see how it’s been cropped. Again, it’s been cropped to 5 by 7 but in a vertical direction. So this means that all of these images have automatically been cropped.

All we would do is have a quick look and make sure that important parts of the image have not been cropped off. If these were people we’d have a quick check to make sure that somebody’s head hasn’t been chopped off for example. And having done that now knowing that everything is cropped to 5 by 7, to export these images at 500 by 700 pixels in size or 700 by 500 we would select all of them by clicking on the first and Shift click on the last. I’m going to right click and choose Export and then Export again and we would just set up the Export option. So here I’m going to put this in a folder called 5 by 7.

I don’t want to rename these files. All we want to do is to resize them. But what I do want to do is I want to select Resize to Fit. And the longest edge since I know that these are all 5 by 7s is going to be 700 pixels and the resolution I can set to 100 pixels per inch. So these are then going to be 5 by 7 images at 100 pixels per inch resolution. And all I need to do is to click Export and Lightroom is going ahead and it is cropping and resizing all of those images so that they are all going to be the exact right size that we chose. And here they are including the ones that were verticals. You can see that these are 500 by 700 pixels in size. This one is 700 by 500 because it’s a landscape image.

So in Lightroom you could batch resize and export these images in just a matter of a few seconds by just choosing the right option. And that is here in the Quick Develop module setting a crop ratio for those images. This is not something you can do easily in the Develop module, but it’s something that you can do very, very simply here in the Quick Develop area of the Library in Lightroom.

My name is Helen Bradley. Thank you for joining me for this Lightroom video tutorial. If you liked the tutorial please comment, press the Like button, consider subscribing to my YouTube channel. You’ll also find more of my tutorials, tips and tricks on my website at projectwoman.com.

Helen Bradley

Monday, April 22nd, 2013

iPhoto won’t enlarge images

Learn how to enlarge images from iPhoto – because it won’t do it for you!

If you try to export an image from iPhoto on the Mac you’ll be invited to resize it on export. Funny thing is that even if you ask for the size to be larger than the original iPhoto won’t warn you it is about to ignore your request – seriously! It happily takes the size you ask for and, if it is bigger than the original, it exports the image at the original size but doesn’t tell you it did so. So you can think you’ve been successful but you have not.

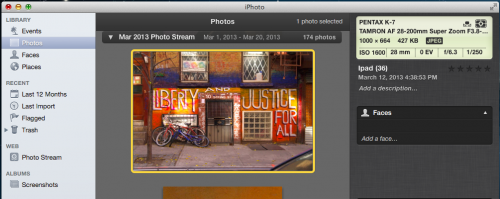
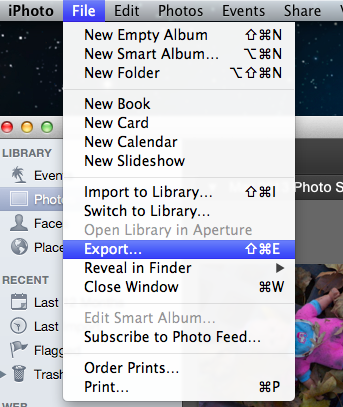
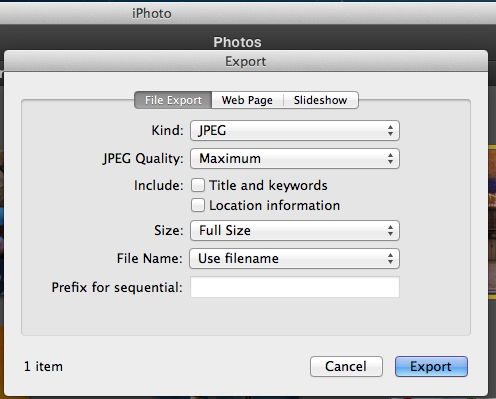
In short, you can’t enlarge or upsize an image from iPhoto. So here’s a simple solution – I use PIXizer.com. So, start from inside iPhoto, select an image and then select File > Export.

Then select to export the image as a JPEG maximum quality and leave the size set to Full Size – ie the original image size.

Then export the image to your desktop or somewhere else it will be easy to find.

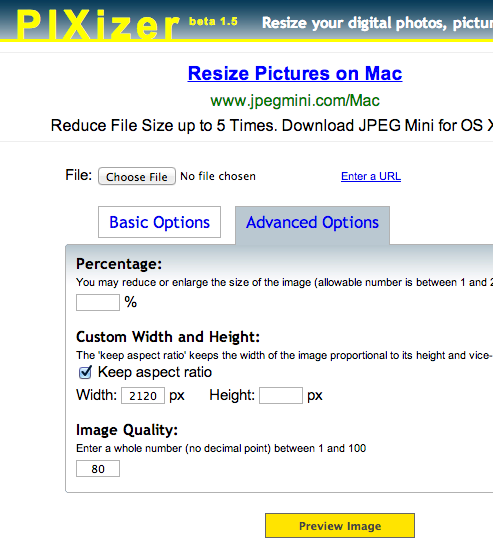
Launch a browser and head to PIXizer.com.

Click Choose File and choose a file to upload and use the tabbed panels to choose the quality and image size. When you click to Preview Image the image is uploaded and resized. You can then click to download it and it will download automatically to your download folder.

I like the efficiency of PIXizer – it would be nice if iPhoto actually enlarged images but since it won’t – I now have a free and quick and easy solution when I need a quick image enlargement.

Helen Bradley

Helen Bradley

Wednesday, November 28th, 2012

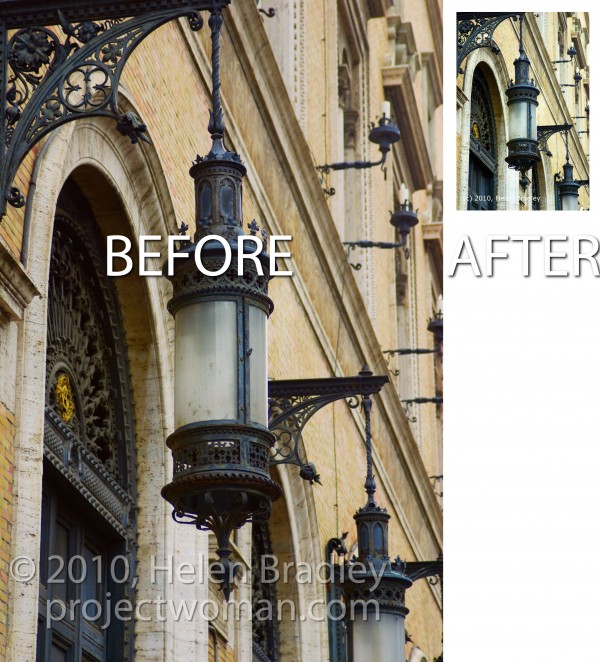
Trevor’s Quick Photoshop Tip – Resize an image

original Photo By: Gisela Royo
To resize the content on a layer or an object in Photoshop CS6 bring up the bounding box or transform controls by pressing Ctrl + T on a PC or Command + T on a Mac. When the controls appear you can drag on them to resize the object. To resize the background layer of an image you’ll first have to transform it to a regular layer by double clicking it in the layer palette and click Ok.

Helen Bradley

Thursday, June 21st, 2012

Resize Images in Dreamweaver


If you don’t pre-prepare your images before adding them to a page in Dreamweaver, you’ll need to resize them in the program.

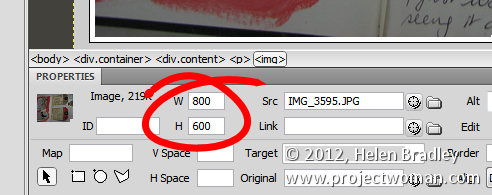
If you click an image and check the Properties panel, you’ll encounter your first problem. The selectors that let you adjust the Width and Height of the image do not do so proportionally so it’s perilously easy to skew your images out of alignment.


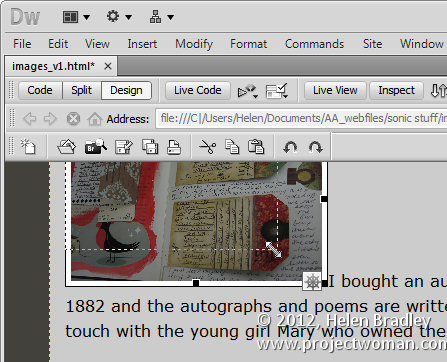
One alternative for resizing an image is to click the image and use the sizing handles to resize it. Hold the Shift key as you do this to scale the image in proportion.


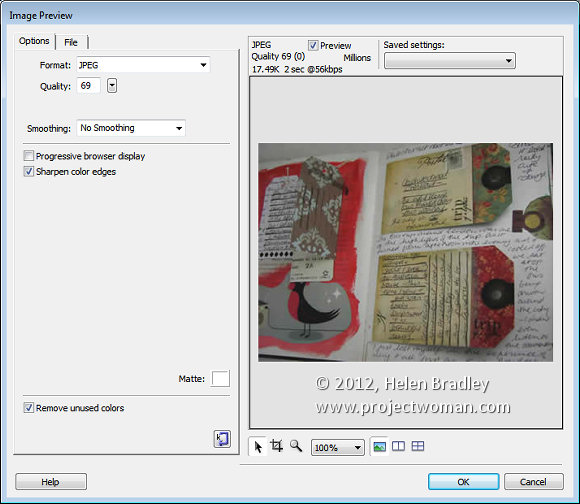
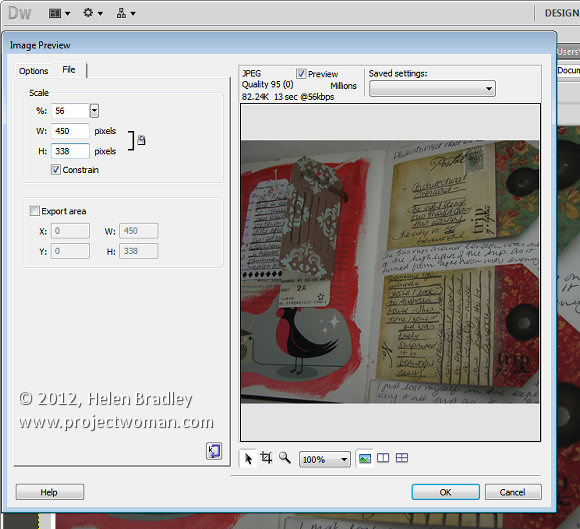
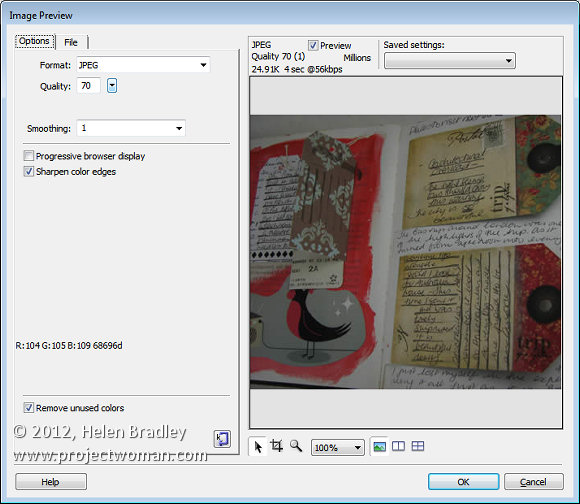
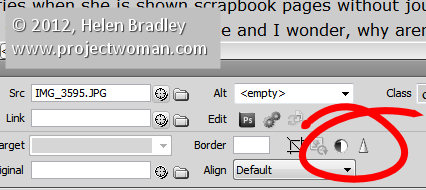
There is also another way and that is to click the image and choose Commands > Optimize Image. This is the same dialog as you get if you click the image and click the Edit Image settings button in the Properties tab (it’s just difficult to work out what button this is because it is so tiny). This opens the Image Preview window.


Click the File tab and you can scale the image to a fixed percentage or check the Constrain checkbox and adjust either the width or the height and both will be adjusted automatically in proportion.

Under the image are tools for moving around the image in the dialog, cropping it, zooming in and out of it and setting a magnification for viewing it in the dialog.

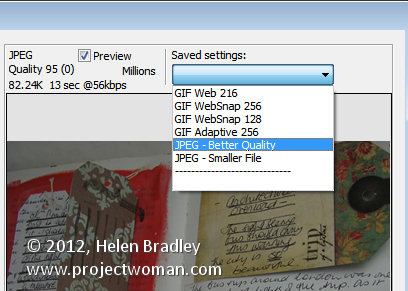
From the Saved Settings dropdown list you can select an optimization setting for your file, if you select JPEG – Smaller File the image will be saved as a low quality JPG. JPEG – Better Quality will result in a better quality but overall larger size file. For photos always select a JPG option and never GIF.


With the Preview enabled you can read off how long it will take to download the image at the currently selected quality at a 56kbps download rate.

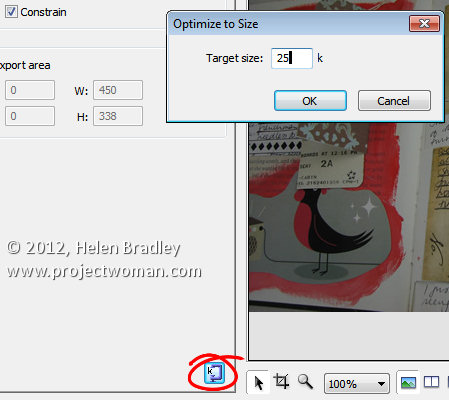
There is also a button in the bottom right of the left hand panel that allows you to optimize to a fixed size. Click it and you can set a target size for your image such as 20kb, click Ok and the image quality will be adjusted to give you file that is no larger than the size requested.


In the Options tab you can select to sharpen the color edges if desired. When you’re done, click Ok to configure the changes for your image.


Other image options include Brightness and Contrast and Sharpening both of which you can select by clicking the respective Brightness and Contrast, and Sharpen buttons in the Properties panel.


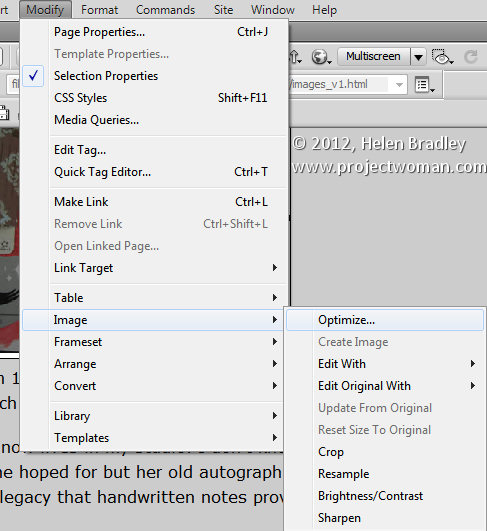
These options can also all be found by clicking Modify > Image. Here are options for optimizing the image, editing with an external editor, editing the original with an external editor, cropping, brightening, adjusting contrast, resampling and sharpening the image.


Helen Bradley

Friday, December 30th, 2011

Lightroom – help my import dialog just shrunk!


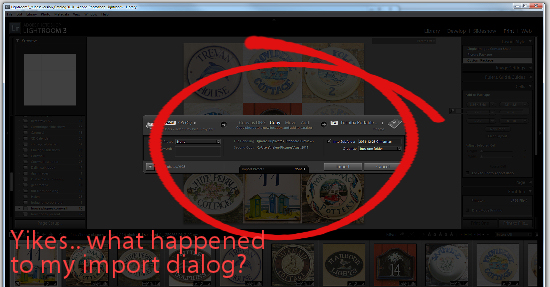
I just got a help! email from a reader who lost her import dialog. It had shrunk to a small size and none of her regular options were available. She is using Lightroom 3 and this shrinking dialog is actually a feature – it’s just she wasn’t seeing it that way – and who can blame her?

If something happens to change your screen and you don’t know how to undo it all of a sudden a feature becomes a disaster. Here is what her screen looked like:

There is a small button in the bottom left of the Import dialog shown circled here and it switches you into this mode. All you need to do to get back to where you want to be is to click on it again and the import dialog goes back to its regular size.

When you know how, it really is a feature, until then… help! my Lightroom import dialog shrunk.

Helen Bradley

Friday, December 16th, 2011

Blow it Up with Alien Skin Blow Up 3

I’ve never used an upsizing or enlarging program before. Instead, when I need to enlarge an image, I perform the age old trick of increasing an image’s size by 110 percent multiple times in Photoshop to enlarge it. It seems to do a reasonable job of the enlarging process.

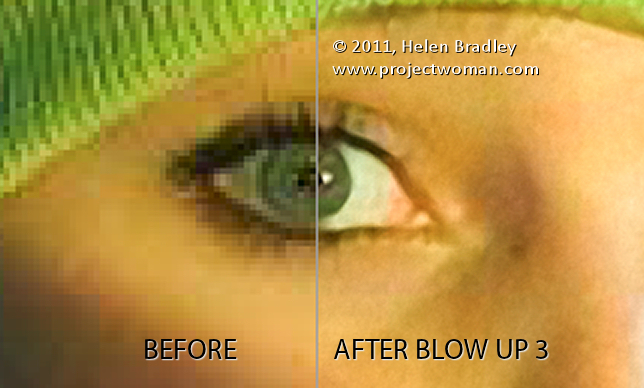
However, recently I was offered Alien Skin’s Blow Up 3 to test – since the folks at Alien Skin make some really cool applications I thought I’d give Blow Up 3 a try. I actually had an image that needed of blowing up for a magazine article. The image I had was a totally cool image but from a very old camera phone so it was a tiny 479 x 640 pixels in size. Not only was it very small but it had some very obvious jpg artifacts so when I enlarged it 300 percent it showed not only those artifacts at an enlarged size (the result was horrible) but the image also showed some distinct pixelization.

This was a perfect image to try out with Blow Up 3 – if I succeeded with the task the image would be acceptable quality for the magazine, if not, I needed to find something else.

Alien Skin Blow Up 3 with Lightroom

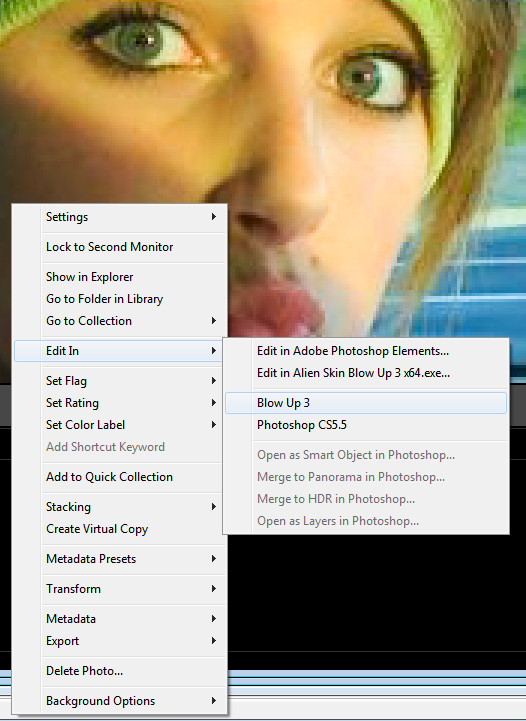
I had already installed Alien Skin Blow Up 3 for Lightroom, so running it is as simple as right clicking the image in Lightroom and choosing and choose Edit In > Blow Up 3. You get a choice of opening the image from Lightroom either as a copy with Lightroom adjustments, you can edit a copy or edit the original. You just select the option to use and click Edit and it opens automatically in Blow Up 3.

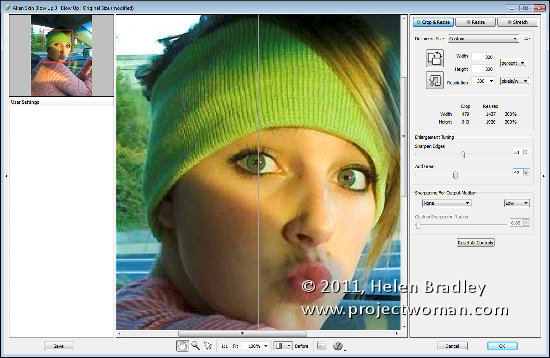
Blow Up 3 really couldn’t be easier to use. In fact I was a little confused at first because I kept looking for more options where there really weren’t any. I selected the Before/After option at the foot of the main screen so I could see the before version on the left and the after version on the right. I wanted to see as I worked just how effective the program would be. I then selected the Crop & Resize option and set it to Percent. I selected 300 percent for width and height and a resolution of 300 pixels per inch.

With the Before/After view on the screen, it was clear that the result would be a significant improvement for this image. The settings you can choose from include grain and sharpening. I checked out the grain slider. For this image, if I didn’t add grain, the jpg artifacts were still very apparent and they really detracted from the image because they were so visible. I opted to add a lot of grain to the image so I set the value to around 30 to soften and blend the artifacts.

I also checked out the Sharpen Edges setting to see how that would affect the image. For this image, I really didn’t want a lot of sharpening so I opted to set it to 40. This gave me some sharpening around the edges such as in her eyes but not really obvious haloing which the higher values produce.

Then, it is as simple as clicking Ok to blow up the image and be taken back to Lightroom where the blownup version appears in the same folder as the original so I found it alongside the original in the filmstrip.

From its original size the image is now nearly 1500 x 1900 pixels in size well suited to being used in a magazine and way more pleasing to look at than it was originally – sans artifacts. If you need to enlarge images significantly this application has the goods.

Helen Bradley

Tuesday, October 4th, 2011

Batch resize images in Photoshop Elements

Some time ago I wrote a post on batch resizing images in Photoshop. You can find the link here: http://projectwoman.com/2009/09/batch-resize.html. I also wrote an article on resizing in Lightroom which you can find here: http://projectwoman.com/2009/10/resizing-images-in-lightroom-2.html.

Someone then wrote to me explaining that they are using Photoshop Elements and that the resize feature in Photoshop does not work in Photoshop Elements. They are correct, but there is a way of batch resizing in Photoshop Elements and here’s how to do it.

Step 1
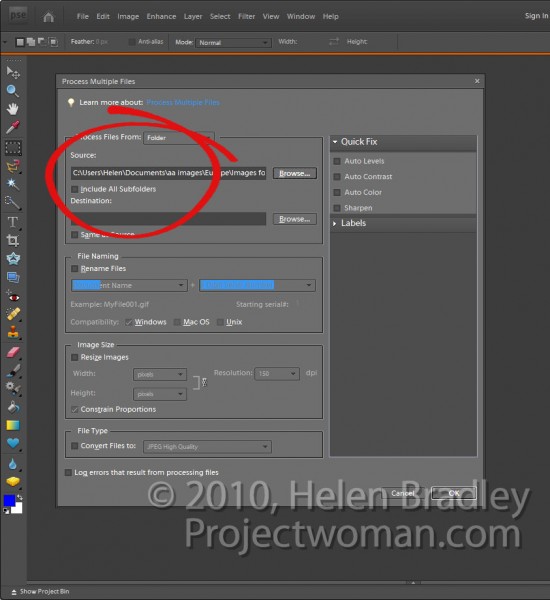
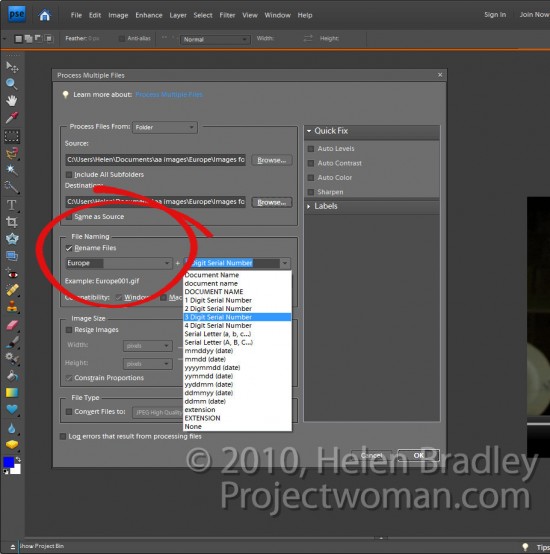
In Photoshop Elements, choose File > Process Multiple Files. This opens the Process Multiple Files dialog.

Here you can select which images to process. You can select either a folder of images, all opened files or you can click import and import images from an external device such as a camera card.

Typically, the best option will be to place all the images in a folder and process the files from that folder. To do this, click the Browse button opposite the Source box and choose the folder to process. Enable the Include All Subfolders checkbox if desired.

Step 2
Select the destination folder for the resized images (you can create one from this dialog), or, if desired, select Same as Source.

In the file naming area, select Rename Files if this is desired. You can then choose the naming convention such as typing a document name and the sequential numbering system to be used.

Step 3
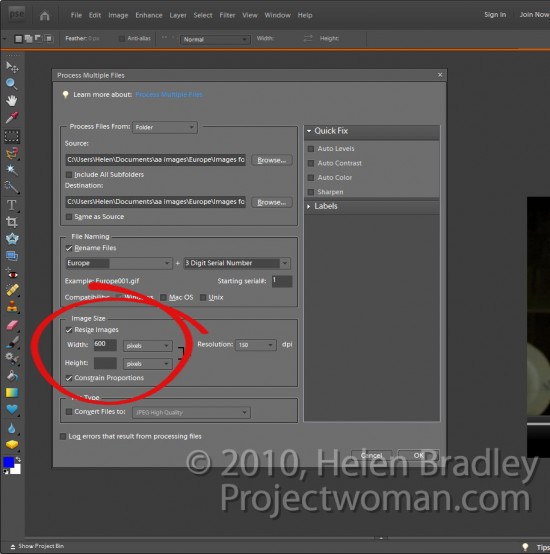
In the image size area, select Resize Images as that’s what we came here to do.

Select Constrain Proportions as you will want your images to be resized in proportion and not skewed or distorted out of shape.

Now type the largest Width or Height to use for your resized images. If you enter 600 for the Width you will be unable to enter a value for the Height and vice versa. This is because you can only set one value – width or height (in this situation this resizing tool works differently to the corresponding tools in Photoshop and Lightroom).

So if you enter, for example, 600 as the Width all images will be sized so their width is 600 and their respective heights will be adjusted in proportion. Portrait images will be taller than 600 pixels and Landscape ones will be shorter.

Here too you should set the resolution for the images. If you plan to send your photos to an online sites for printing, you may want to match the resolution to what that site requires. For the web select 72 dpi.

Step 4
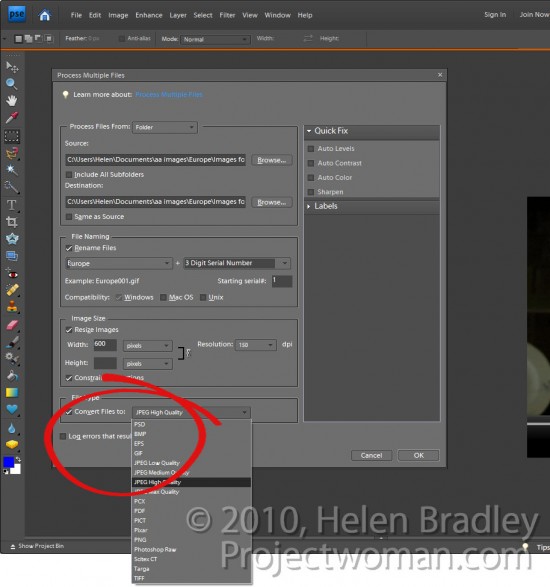
To convert the files to a different format or to compress them, from the File Type dropdown list, select the file format to use. For JPEG format images, you can choose Max, High, Medium or Low quality.

Step 5
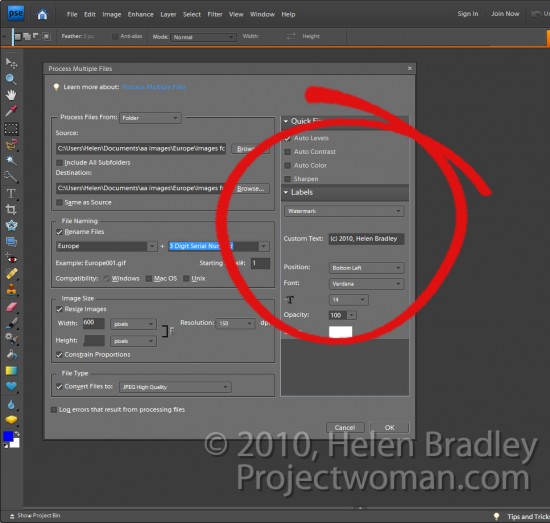
You can also apply a Quick Fix to your images as you process them. These fixes include Auto Levels, Auto Contrast, Auto Color or Sharpen.

You can also apply Labels to your image such as adding a watermark or caption by configuring the options in the Labels area.

When you are done, click Ok to process the folder of files or the group of files that you had selected for processing.

Tip
If you want to resize images so their longest edge is a set value such as 600 then you will need to presort Landscape and Portrait images into separate folders and process them separately.

Helen Bradley

Tuesday, January 25th, 2011

Simple Photoediting workflow – Step 14 – Optimize your image

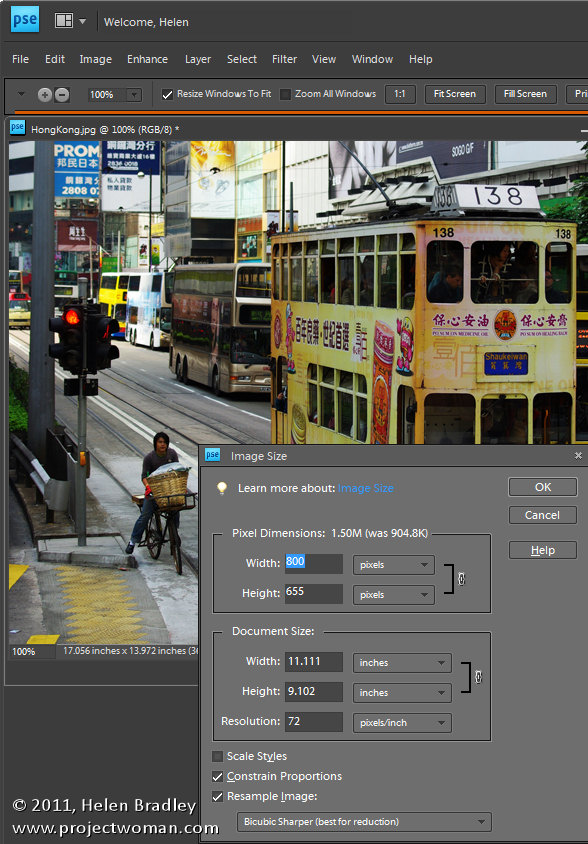
When you’re ready to prepare your photo for printing or sharing on the web. Use the Image > Resize > Image size option to adjust the image size.

Make sure the Constrain Proportions and Resample Image checkboxes are selected so you can set the desired size correctly.

For web display, set the resolution to 72 pixels per inch and then set the Width and Height dimensions to the desired value. Remember as you do this that even a very large monitor is only 1920 x 1080 pixels in resolution so you don’t generally want an image to be more than that size if you’re just putting it up on your website, for example.

For printing, set the resolution to anything from 150 – 300 pixels per inch and set the size to your desired print size such as 5 x 7in. Because you are resizing the image (not cropping it), it probably won’t resize to the exact proportions but you can get it close to this.

To save the image, choose File > Save As and, if you are planning to display it on the web save it in the JPEG format.

For printing and storing locally on your computer, the TIFF format, Photoshop .PSD format or a high quality JPEG are acceptable.

If you plan to both print a copy of the photo and share one on your web site, for example, size it for printing first, and save that copy and then resize for the web and save this version with a different name.

Other stories in this Simple Photo- Editing Workflow series:

Step 13 – Sharpen

Step 12 – Major Surgery

Step 11 – Getting to black and white

Step 10 – Fixing Redeye

Step 9 – Fixing Imperfections

Step 8 – Fix Skin tones

Step 7 – Fix Color problems

Step 6 – Fix muddy images

Step 5 – Fixing under and overexposed images

Step 4 – Straighten

Step 3 – Crop an image

Step 2 – Make a duplicate

Step 1 – Assess the image

Helen Bradley

Friday, November 26th, 2010

Crop an image to size in PowerPoint 2010

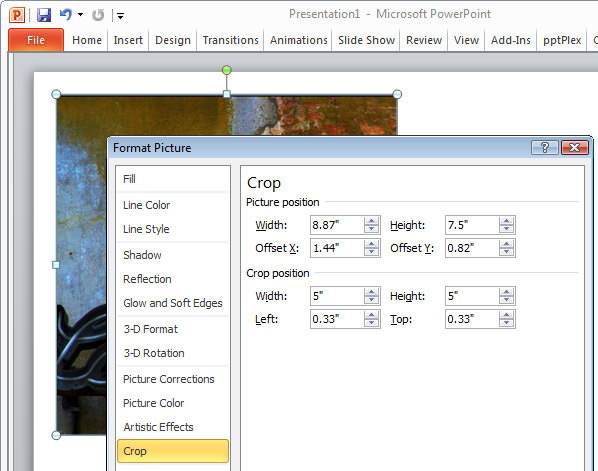
When you have an image in a PowerPoint presentation and you want to crop it to a specific size, click on the image, and from the Picture Tools > Format tab, select the Size and Position dialog by clicking in the dialog launcher in the bottom right corner of the Size group.

Click on the Crop group of options and then in the Crop Position area, type the dimensions that you want to crop the image to. Once you have done this, the image will be cropped to the desired size.

If there is not enough data in the image to crop it to that size, the image will be placed inside a placeholder the size you determined. Once you click Close to finish cropping the image you can increase the size of the image so it fills the placeholder by clicking on the Crop tool on the Picture Tools > Format tab and choose Fill. This increases the size of the image to fill the placeholder.

Helen Bradley

Page 1 of 212