Thursday, August 29th, 2019

Rename bulk files on the Mac

Quickly rename a selection of files on a Mac

Rename-multiple-files-in-finder
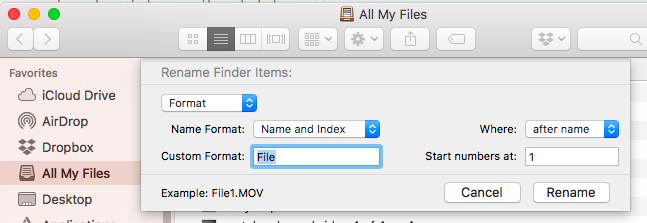
I download a lot of stuff to use in Photoshop and Illustrator. But I really need to label these files with where they came from so I can work out who to credit and to work out which ones are mine and which belong to others. So, it’s fairly easy to rename files on the Mac (can we say File > Rename) but that doesn’t work for multiple files.

Here’s how to do that, and bulk rename your files.

1. Open Finder and select the files to rename

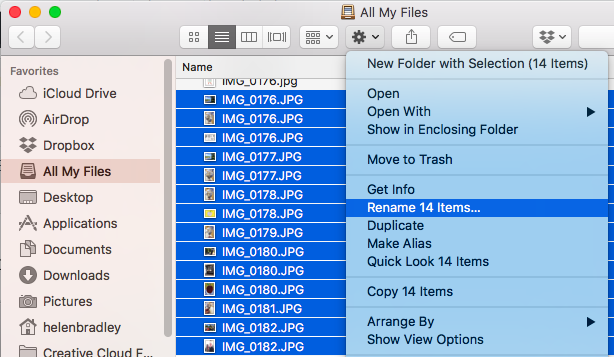
2. Click the Gear icon (it’s the Action button) at the top of the Finder window

3. Click Rename [n] Items

4. When the dialog opens, choose to Replace a piece of text with something else, to Add some text before or after the current filename, or choose Format to create a new filename format for these files.

5. Select your preference, complete the details and click Rename

Bulk-File-Rename-Finder-MAC

In all it kind of makes Windows users want to weep! If we had that granular dialog to rename files life would be so much better.

Monday, August 13th, 2018

Get Photos off an iPhone and onto a Mac

Download your photos and videos from your iPhone onto your Mac – quickly and easily and bypassing the Photos app

If you are like me, you hate the Mac Photos app like the plague but you like to periodically download your photos from your iPhone to your Mac. Well, turns out it’s easy to do when you know how.

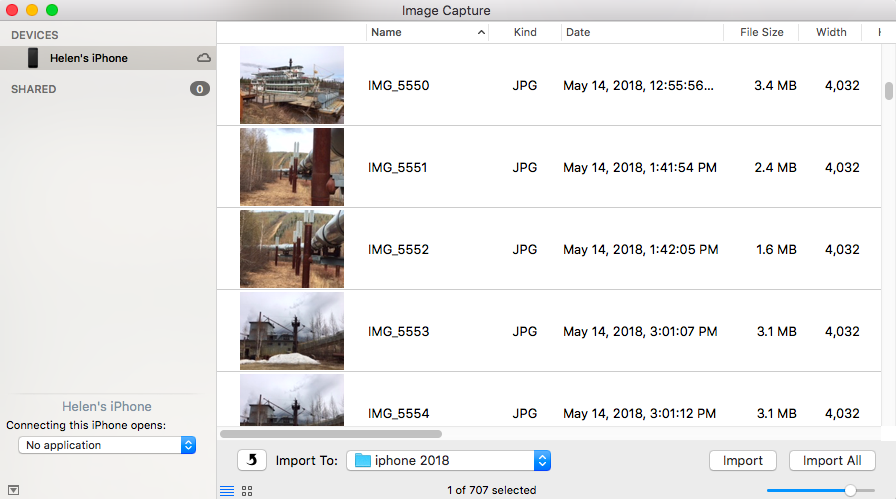
Start by launching ImageCapture from the Mac’s Applications folder. Then plug your iPhone into your Mac using a USB port.

Inside ImageCapture, your iPhone will appear automatically in the list on the left. Select it and select a download location from the box at the bottom of the screen. Select the photos to import and click Import or click Import All to download all of them. It’s as simple as that.

import photos to a mac bypassing Photos application

Sunday, July 22nd, 2018

USB Drive that works on Mac and PC

Format a drive for PC and Mac – Quick & Foolproof

In the last couple of years Apple broke the system that let you take a USB from a Mac to a PC and visa versa seamlessly. Now, it’s perilously easy to have a regular drive or a Flash drive that works fine on a PC but which isn’t recognized by a Mac. It’s also possible to happen the other way. So, if you’re faced with the issue of needing a drive that works on both, here’s what to do.

Firstly backup everything that was on the drive (you’re about to lose it all!).

Did you get that last step? Yup. Seriously. BACK IT UP!

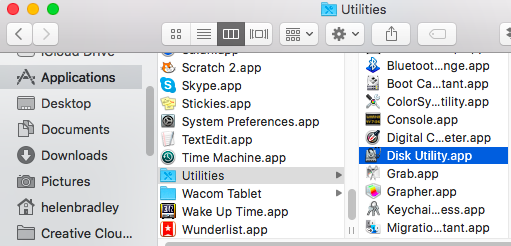
Now, put the drive in your Mac. The Mac is fussier than the PC so get it to do the work. It doesn’t matter if your drive is recognized by the Mac or not. Choose Applications > Utilities > Disk Utility.

Format USB drive for Mac and PC

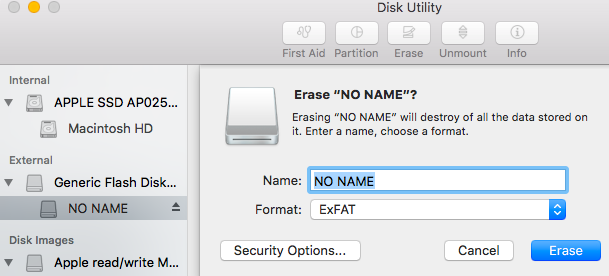
Wait until your drive appears in the External list (don’t touch the Internal drives).

Select your drive and click Erase.

Type a name for your Disk, from the Format dropdown list choose ExFAT and set the Scheme to Master Boot Record (if that is an option), and click Erase.

Make USB drive compatible with PC and OSX Mac

This erases and then formats the drive in a format that the PC can read.

Once it’s finished. Eject the drive and test it in your PC. I typically place a file on the drive using both the PC and the Mac (to check it writes ok) and then I open it on the other machine (to check it reads ok). If it works, you’re good to go!

NOTE: This is also the way you can erase everything from a USB drive on the Mac – often I find I have a drive that shows there is ‘nothing’ on it but which has part of the available space used up. Erase/format the drive fixes this quickly.

Saturday, October 10th, 2015

Move a Paragraph Up or Down in Microsoft Word (Mac)

When the Mac keyboard shortcut doesn’t work – here’s how to fix it!

In Word on the PC you can click in a paragraph or select a paragraph or two (or even a row in a table) and move it up and down the document using Shift + Alt + Up Arrow of Shift + Alt + Down Arrow.

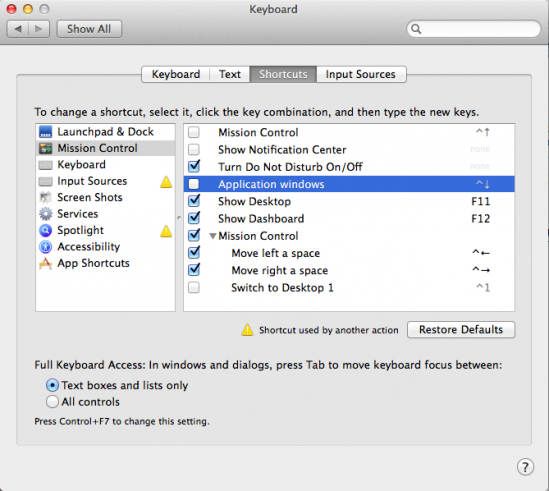
Sadly on the Mac this doesn’t work the same. The Mac keystroke is a little different – press Shift + Control + Up Arrow or Shift + Control + Down Arrow. So far so good – problem is that these are the exact same keystrokes that display Mission Control and Application Windows on the Mac so they don’t work. That is until you fix them to work.

Now I don’t use Mission Control at all so I have no need to go backwards and forwards between Mission Control and Application Windows and, worse still, I often hit those keys by mistake so I can easily live without this shortcut. Turns out, if you disable that Mac default shortcut then the Word one works.

To do this, launch System Preferences and select Keyboard > Shortcuts. You need to disable two options here – Mission Control and Application Windows so deselect the two checkboxes and close the window. That’s all there is to it. Now the keyboard shortcuts Shift + Control + Up Arrow and Shift + Control + Down Arrow work just fine in Word for the Mac.


how to make the shortcut for moving a paragraph in Word for Mac work properly

It’s the small things that put the biggest smile on my face. This is a small change but I use it every day and I love it – hope it works for you too!

Friday, July 31st, 2015

Left Arrow to Get to the Bottom of a Word Document – Mac Only Stupidity

Move to the top or bottom of a Word Document on a Mac

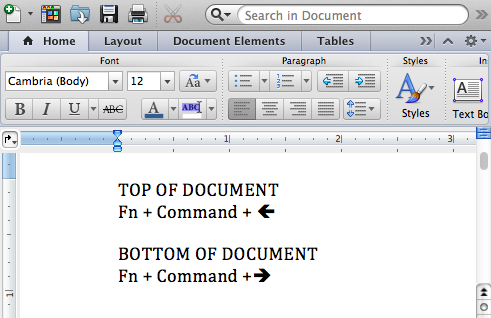
From a file labelled stupid commands comes this one for getting to the top or bottom of a Word document on the Mac. You see simple commands like Page Up and Page Down which work on a PC fail spectacularly on a Mac so most hapless users just use the arrow key (a lot) or scroll bars to get around a Word document.

Smart users know there is a key combination that will do it, but it uses the Left Arrow and Right Arrow keys – I kid you not! How stupid is that? However, since it is useful (albeit stupid), I’ll tell you how. To get to the top of the document use Fn + Command + Left Arrow and to get to the bottom of the document use Fn + Command + Right Arrow.

So, now you know and you can move faster around your documents. Just try explaining that key combination to a friend and hold your tongue as they look at you like you’re nuts.

Friday, May 29th, 2015

Stop iPhoto from Importing your Photos

How to stop iPhoto from launching when a camera card is inserted into your Mac

Disclosure: I hate iPhoto like the plague.  It isn’t that I just have no need for it but it tends to grab your photos and hide them where you can’t find them and, every time I put a camera card into my Mac it used to insist on grabbing the photos from it.

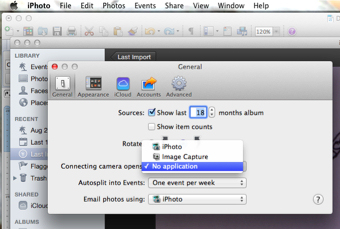
Now I use Lightroom so I have reason to want iPhoto to do anything at all with my photos. So to save having to close it down each time I put a camera card into the Mac, I stopped it from launching at all. If you’d like to do the same thing, here’s how to put iPhoto in its place:

1.    Launch iPhoto

2.    Choose iPhoto > Preferences > General

3.    From the Connecting Camera Opens dropdown list choose No Application

4.    Click the dialog’s Close button

5.    Exit iPhoto


Wednesday, April 15th, 2015

Add Mac Keyboard Icons to Word documents (and other things)

Find the Mac keyboard icons for the Control & Command keys

I had a problem today in that I was writing about the Mac but using a PC. I needed to type the character for the Command key on the Mac keyboard which, as you might know, is this cute twirly shape. But since I was working on a PC I didn’t have fonts which contained the character. After an hour or so of research, I found the character.

As luck would have it, it was where I should have looked to begin with, in my Wingdings font. To get it, in any document or any application that supports fonts, click to use the Wingdings font and type the lowercase z – voila – the Command key character.

So far, so good. But what about the other keys, like the Apple key and the Alt key on older keyboards? In the interests of helping you get everything you need in one post, if not in one font, here’s how to get hold of the characters for the Apple key and the Alt key:

Turns out the Alt key symbol isn’t as easy to find as it might be. Probably the quickest way to locate it is to download the free font Virtue from the ScooterGraphics site.

Once installed the font contains a range of characters including the Mac Alt key symbol and the Apple icon. To get the Alt key select the Virtue font and type Alt + 0221 on the keyboard. The Apple symbol is a little more difficult as it is a hex value so, switch to Virtue font, type F000 into a Word document and immediately (don’t press space) press Alt + X. This little bit of keyboard magic creates the little Apple logo for you. If you need it elsewhere, make it in Word and copy and paste it to the application you need to use it in.

Saturday, January 17th, 2015

Open Recent Files Missing from Word (Mac)

If your Recent files list disappears from your Mac, here’s how to put it back

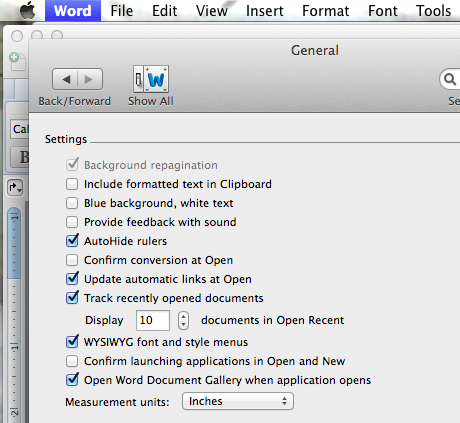
Word on my Mac doesn’t have a recently opened files list but Excel does. Turns out the feature was disabled (or perhaps it was never enabled). Whatever the reason, it wasn’t there and I wanted it to be accessible.

Lucky for me it is just a preference setting. Click the Word button, click Preferences and then General. Look for the Track Recently Opened Documents option and enable it. Set the number of documents to track and click Ok. Yeah! Now you can open a recently opened file like you expect to be able to do.

Tuesday, September 9th, 2014

Find Your templates in Microsoft Office – Mac

Need to manage your Microsoft Office templates but can’t find them?

It’s not easy to find the templates folder on your Mac. You might know it is My Templates but a typical search in Finder won’t turn it up.

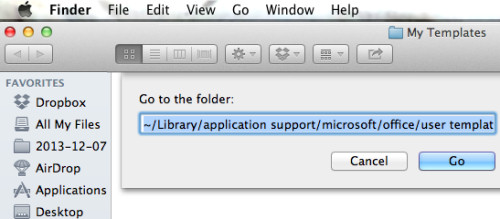
Luckily help is at hand. Launch Finder and choose Go > Go to Folder. Now paste this folder name into the search box to go to your My Templates folder where you can now see and manage your templates!

~/Library/Application Support/Microsoft/Office/User Templates/My Templates


Sunday, April 20th, 2014

Create a new Default Custom Swatch in Illustrator CC

Learn how to quick start a new document with your preferred swatches in place automatically

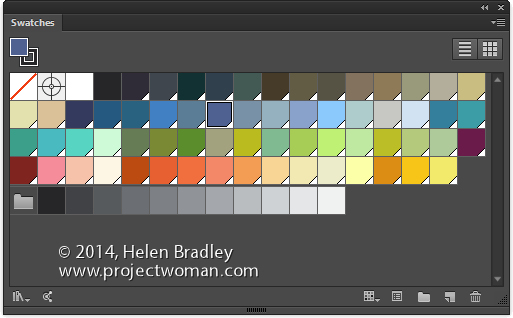
By default Illustrator starts all new documents with a preset set of swatches in the Swatches palette. If you prefer, you can create your own custom set of default swatches, save them and have them show up when you start a new document. Here’s how:

Create a new document – the size you create it as being will be the default for all documents created based on this profile as will the other settings in the New dialog.

Now choose Window > Swatches and select all the swatches you don’t want and drag them onto the Trashcan icon to delete them.

Add all the swatches you do want to have available to the Swatches palette. If you want some colors to be global colors, select them, click the Swatch Options button and click Global.
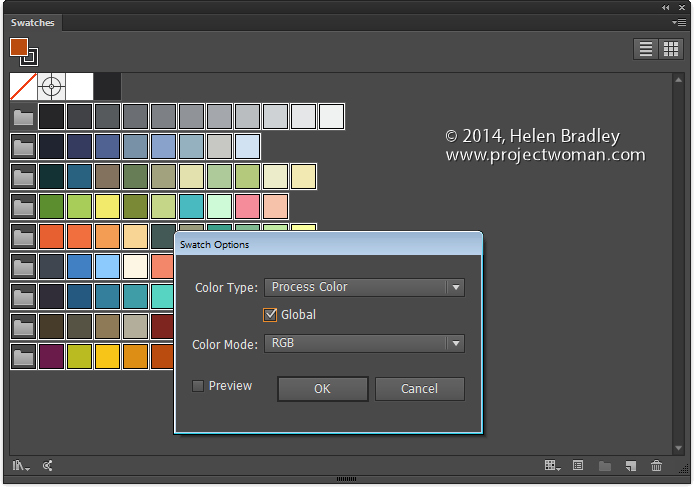
You can add any type of swatch at this point including pattern, gradients and solid colors.

Then when you are done, choose File > Save As and save the file to one of these locations depending on your version of Illustrator and  your operating system:

On the Mac save the file to:


~/Library/Application Support/Adobe/Adobe Illustrator 17/en_US/New Document Profiles.

The tilde (~ ) indicates your hidden user library.
You can open it this way:
1 Launch Finder
2 Choose Go > Go to Folder
3 Type ~/Library and click Go
4 This opens the ~/Library folder and you can now navigate to the appropriate folder listed above.

In Windows 7:

First make sure you can see hidden folders and locate this folder (the exact folder structure may vary slightly but it should be pretty easy to find):

C:\Users\AppData\Roaming\Adobe\Illustrator 17 Settings\en_US\x64\New Document Profiles
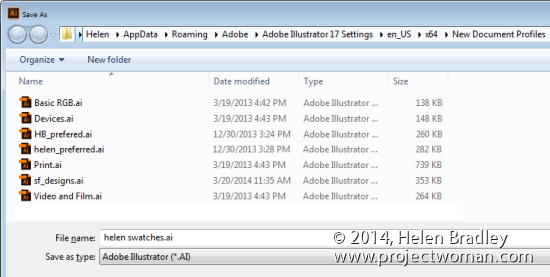
To locate your c:\users\\AppData folder, launch Windows Explorer and type this in the address bar :
%USERPROFILE%\AppData
This automatically opens the AppData folder for you so you can now navigate to the desired folder as detailed above.

The name you give to your file is the name that the document profile will appear as in future so make it descriptive of the purpose of the document.

Once this is done, you can close the document.

In future you can open a new document based on this profile by choosing File > New and choose the document profile from the Profiles list.
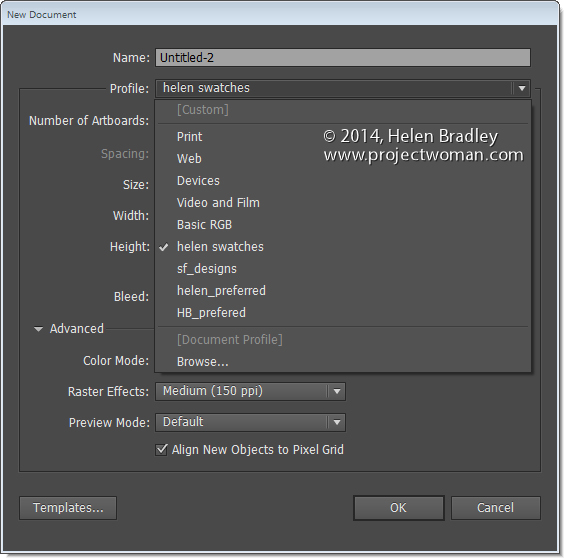
When you do so, your swatches will appear automatically. You can have multiple custom profiles so create them for the tasks you do most often.

Helen Bradley

Helen Bradley
Page 1 of 212